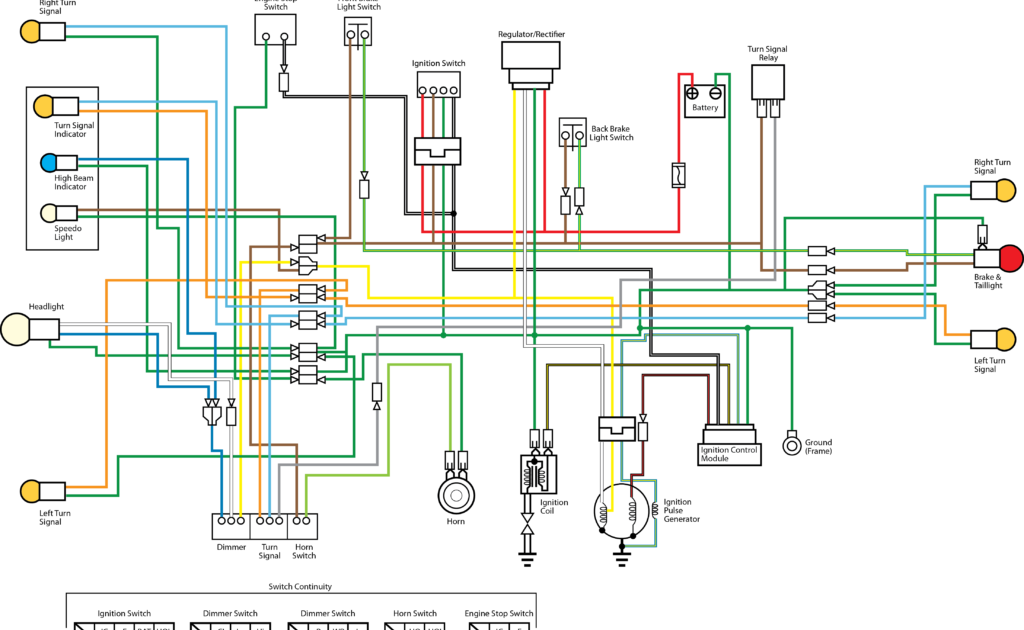
A Yamaha Warrior 350 Wiring Diagram is a detailed schematic representing the electrical connections and components within the Yamaha Warrior 350 motorcycle.
Its essential function is to provide a comprehensive visual guide for troubleshooting, repairing, and modifying the motorcycle’s electrical system. It enables users to trace and identify electrical circuits, locate components, and understand the interconnectedness of the system.
Yamaha Warrior 350 Wiring Diagrams are crucial for both professional technicians and DIY enthusiasts. They simplify electrical diagnostics, ensure accurate repairs, and prevent potential electrical issues that could affect the motorcycle’s performance and safety. One key historical development is the advent of computerized wiring diagrams, which offer interactive functionality and ease of use.
This article will delve deeper into the details of Yamaha Warrior 350 Wiring Diagrams, including their comprehensive components, interpretation techniques, and practical applications.
Yamaha Warrior 350 Wiring Diagrams are indispensable tools for comprehending and maintaining the electrical system of the popular ATV. Understanding the essential aspects of these diagrams is crucial for effective troubleshooting, repairs, and modifications.
- Schematic Representation: Wiring diagrams provide a visual representation of the electrical connections and components, enabling users to trace circuits and identify components.
- Troubleshooting Guide: Diagrams assist in diagnosing electrical issues, pinpointing faulty components or connections.
- Repair Manual: They serve as a guide for repairing and replacing electrical components, ensuring accurate and safe repairs.
- Modification Reference: Diagrams facilitate the addition or modification of electrical accessories, such as lighting or performance upgrades.
- Electrical System Understanding: Studying wiring diagrams enhances the overall understanding of the motorcycle’s electrical system and its interconnectedness.
- Safety Precaution: Referencing wiring diagrams before performing electrical work ensures proper handling and minimizes the risk of electrical hazards.
- Technical Communication: Diagrams serve as a common language for electrical professionals and enthusiasts, enabling effective communication about the electrical system.
- Historical Documentation: Wiring diagrams provide a valuable record of the motorcycle’s original electrical configuration, assisting in restoration or maintenance of vintage models.
In summary, Yamaha Warrior 350 Wiring Diagrams are essential for navigating the electrical system of the ATV. They provide a comprehensive understanding of the system, enabling effective troubleshooting, repairs, modifications, and overall electrical system management.
Schematic Representation
In the context of Yamaha Warrior 350 Wiring Diagrams, schematic representation is a fundamental aspect that underpins their functionality and significance.
Yamaha Warrior 350 Wiring Diagrams leverage schematic representation to provide a visual map of the motorcycle’s electrical system. This visual representation is critical because it enables users to trace electrical circuits, identify individual components, and understand their interconnections. This capability is essential for diagnosing electrical issues, performing repairs, and modifying the electrical system.
For example, if a user encounters an electrical problem with their Yamaha Warrior 350, they can refer to the wiring diagram to trace the affected circuit and identify the faulty component. This visual representation simplifies the troubleshooting process, reducing the time and effort required to pinpoint the source of the issue.
Moreover, schematic representation is crucial for accurate repairs. By referencing the wiring diagram, users can ensure that electrical components are replaced or repaired correctly, maintaining the integrity and safety of the electrical system.
In summary, the schematic representation in Yamaha Warrior 350 Wiring Diagrams is a vital component that empowers users to navigate the electrical system effectively. It facilitates troubleshooting, repairs, and modifications, contributing to the overall maintenance and performance of the ATV.
Troubleshooting Guide
Troubleshooting electrical issues on a Yamaha Warrior 350 ATV requires a systematic approach to identify and resolve faults accurately. Yamaha Warrior 350 Wiring Diagrams serve as invaluable troubleshooting guides, empowering users to diagnose electrical problems efficiently.
-
Electrical Circuit Analysis:
Wiring diagrams enable users to trace electrical circuits, analyze voltage and current flow, and pinpoint potential points of failure. By understanding the circuit’s behavior, users can identify faulty components or loose connections. -
Component Identification:
Wiring diagrams provide a visual representation of all electrical components within the system. This allows users to locate specific components, such as relays, fuses, or sensors, and check their functionality or replace them if necessary. -
Real-Time Monitoring:
With the help of a multimeter and wiring diagrams, users can perform real-time monitoring of voltage, current, and continuity. This helps in identifying intermittent faults or issues that may not be apparent during a static inspection. -
Problem Isolation:
Wiring diagrams aid in isolating electrical problems to specific circuits or components. This systematic approach minimizes the time and effort spent on troubleshooting, as users can focus on the affected area rather than the entire electrical system.
In summary, Yamaha Warrior 350 Wiring Diagrams are indispensable troubleshooting guides that empower users to diagnose electrical issues accurately and efficiently. By providing a comprehensive visual representation of the electrical system, they enable users to trace circuits, identify components, perform real-time monitoring, and isolate problems, ultimately ensuring the optimal performance and reliability of the ATV.
Repair Manual
Yamaha Warrior 350 Wiring Diagrams are intricately linked to repair manuals, forming a cohesive resource for electrical system maintenance and repair. Repair manuals provide step-by-step instructions, technical specifications, and troubleshooting tips, while wiring diagrams offer a visual representation of the electrical system’s components and connections.
The significance of repair manuals within Yamaha Warrior 350 Wiring Diagrams lies in their ability to guide users through the repair process accurately and safely. The detailed instructions and technical specifications ensure that electrical components are repaired or replaced correctly, maintaining the integrity and functionality of the electrical system.
For instance, if the starter motor on a Yamaha Warrior 350 ATV fails, the wiring diagram will help identify the relevant electrical circuits and components. The repair manual will then provide step-by-step instructions on how to troubleshoot the issue, test the starter motor, and replace it if necessary.
Furthermore, repair manuals emphasize safety precautions and proper handling of electrical components. By following the instructions carefully, users can minimize the risk of electrical hazards, such as short circuits or electrical shocks.
Modification Reference
Yamaha Warrior 350 Wiring Diagrams serve as indispensable references for modifying electrical systems to enhance the performance and functionality of the ATV. These modifications can range from installing additional lighting systems to upgrading ignition systems or adding performance-oriented accessories.
The critical role of wiring diagrams in electrical modifications lies in providing a comprehensive visual representation of the existing electrical system. This allows users to understand the system’s layout, identify potential connection points, and plan the integration of new components.
For example, if a user wants to install an aftermarket lighting system on their Yamaha Warrior 350, the wiring diagram will help them identify the appropriate power source, determine the correct wiring gauge, and locate suitable mounting points for the lights.
Furthermore, wiring diagrams are essential for ensuring the compatibility and safe operation of modified electrical systems. By following the diagrams carefully, users can avoid potential electrical hazards, such as short circuits or overloading, which could damage the electrical system or even pose a safety risk.
Overall, the modification reference aspect of Yamaha Warrior 350 Wiring Diagrams empowers users to customize and enhance their ATVs’ electrical systems safely and effectively, unlocking a wide range of performance and functionality improvements.
Electrical System Understanding
Within the context of Yamaha Warrior 350 Wiring Diagrams, the notion of electrical system understanding through the study of wiring diagrams holds immense significance. Wiring diagrams offer a comprehensive visual representation of the motorcycle’s electrical system, enabling users to trace circuits, identify components, and grasp the intricate connections between them.
Electrical system understanding is a critical component of Yamaha Warrior 350 Wiring Diagrams because it empowers users to not only troubleshoot and repair electrical issues but also modify and enhance the system to suit their specific needs. By understanding the system’s architecture, users can make informed decisions about component upgrades, accessory installations, and performance optimizations.
For instance, if a user wants to install an aftermarket ignition system on their Yamaha Warrior 350, a thorough understanding of the electrical system is essential. The wiring diagram provides insights into the compatibility of the new system, the required modifications, and the integration points within the existing electrical architecture.
Furthermore, electrical system understanding enables users to anticipate potential issues and take proactive measures to prevent them. By recognizing the interconnectedness of the system’s components, users can identify potential failure points and implement preventative maintenance strategies.
In summary, the connection between electrical system understanding and Yamaha Warrior 350 Wiring Diagrams is fundamental. Wiring diagrams serve as invaluable tools for gaining a comprehensive understanding of the electrical system, thereby empowering users to maintain, modify, and optimize their ATVs effectively.
Safety Precaution
When working on the electrical system of a Yamaha Warrior 350 ATV, adhering to safety precautions is paramount. Yamaha Warrior 350 Wiring Diagrams play a critical role in ensuring proper handling and minimizing the risk of electrical hazards. By referencing these diagrams before performing any electrical work, users can gain a comprehensive understanding of the system’s layout, component interconnections, and potential hazards.
- Identifying Potential Hazards: Wiring diagrams provide a visual representation of the electrical system, allowing users to identify potential hazards such as high-voltage components, short circuit risks, and grounding points. By recognizing these hazards, users can take appropriate precautions to minimize the risk of electrical shock or damage to the system.
- Correct Component Identification: Wiring diagrams enable users to accurately identify electrical components, ensuring that repairs or modifications are performed correctly. Misidentification of components can lead to incorrect connections, circuit malfunctions, or even electrical fires.
- Safe Wiring Practices: Wiring diagrams guide users in following proper wiring practices, such as using the correct wire gauge, connectors, and insulation. By adhering to these practices, users can prevent electrical shorts, overheating, and other hazards that could compromise the safety and performance of the electrical system.
- Grounding and Circuit Protection: Wiring diagrams indicate proper grounding points and circuit protection devices, such as fuses and circuit breakers. Referencing these diagrams ensures that electrical components are properly grounded and protected against overcurrent conditions, minimizing the risk of electrical fires or damage to the system.
In conclusion, referencing Yamaha Warrior 350 Wiring Diagrams before performing electrical work is a crucial safety precaution that helps users identify hazards, correctly identify components, follow safe wiring practices, and ensure proper grounding and circuit protection. By adhering to these safety precautions, users can minimize the risk of electrical accidents, menjaga system’s integrity, and ensure the safe and reliable operation of their ATV.
Technical Communication
Yamaha Warrior 350 Wiring Diagrams transcend the realm of mere schematics; they embody a universal language that facilitates effective communication among electrical professionals and enthusiasts. These diagrams provide a standardized visual representation of the electrical system, fostering a shared understanding and enabling seamless collaboration.
- Component Identification: Wiring diagrams assign unique symbols and labels to each electrical component, creating a common reference point for professionals and enthusiasts alike. This standardized identification eliminates confusion and ensures that all parties involved are referring to the same components.
- Circuit Analysis: Wiring diagrams depict the flow of electrical current through the system, allowing professionals and enthusiasts to analyze circuits, identify potential issues, and propose solutions. The visual representation simplifies complex electrical concepts and enables effective troubleshooting.
- Modification Planning: When modifying the electrical system, wiring diagrams serve as a roadmap for planning and executing changes. Professionals and enthusiasts can use them to identify compatible components, determine appropriate wire gauges, and ensure that modifications adhere to safety standards.
- Documentation and Knowledge Transfer: Wiring diagrams provide a permanent record of the electrical system’s configuration. This documentation facilitates knowledge transfer between professionals and enthusiasts, ensuring that system modifications and repairs are accurately communicated and understood by all parties involved.
Yamaha Warrior 350 Wiring Diagrams serve as an indispensable tool for effective communication about the electrical system. Their standardized representation, ease of understanding, and versatility make them a cornerstone of successful collaboration, troubleshooting, and system modifications.
Historical Documentation
Within the realm of Yamaha Warrior 350 Wiring Diagrams, historical documentation holds immense significance. These diagrams serve as invaluable records of the motorcycle’s original electrical configuration, playing a crucial role in the restoration and maintenance of vintage models.
- Original Electrical Configuration: Wiring diagrams provide a detailed snapshot of the motorcycle’s electrical system as it was originally designed and manufactured. This information is critical for ensuring authenticity during restoration projects, ensuring that the electrical system conforms to the original specifications.
- Restoration Reference: When restoring vintage Yamaha Warrior 350 ATVs, wiring diagrams serve as a comprehensive guide. They enable enthusiasts to accurately replace or repair electrical components, ensuring that the restored system operates as intended.
- Maintenance and Troubleshooting: For vintage models, obtaining replacement parts can be challenging. Wiring diagrams empower owners to identify and source compatible components, facilitating effective maintenance and troubleshooting.
- Preservation of Historical Legacy: Wiring diagrams contribute to the preservation of the Yamaha Warrior 350’s historical legacy. They document the evolution of the electrical system over time, providing valuable insights into the design and engineering decisions that shaped this iconic ATV.
In conclusion, the historical documentation aspect of Yamaha Warrior 350 Wiring Diagrams is of paramount importance for enthusiasts seeking to restore, maintain, and preserve vintage models. These diagrams provide a wealth of information that guides restoration efforts, ensures authenticity, and contributes to the preservation of the motorcycle’s historical legacy.


Related Posts


