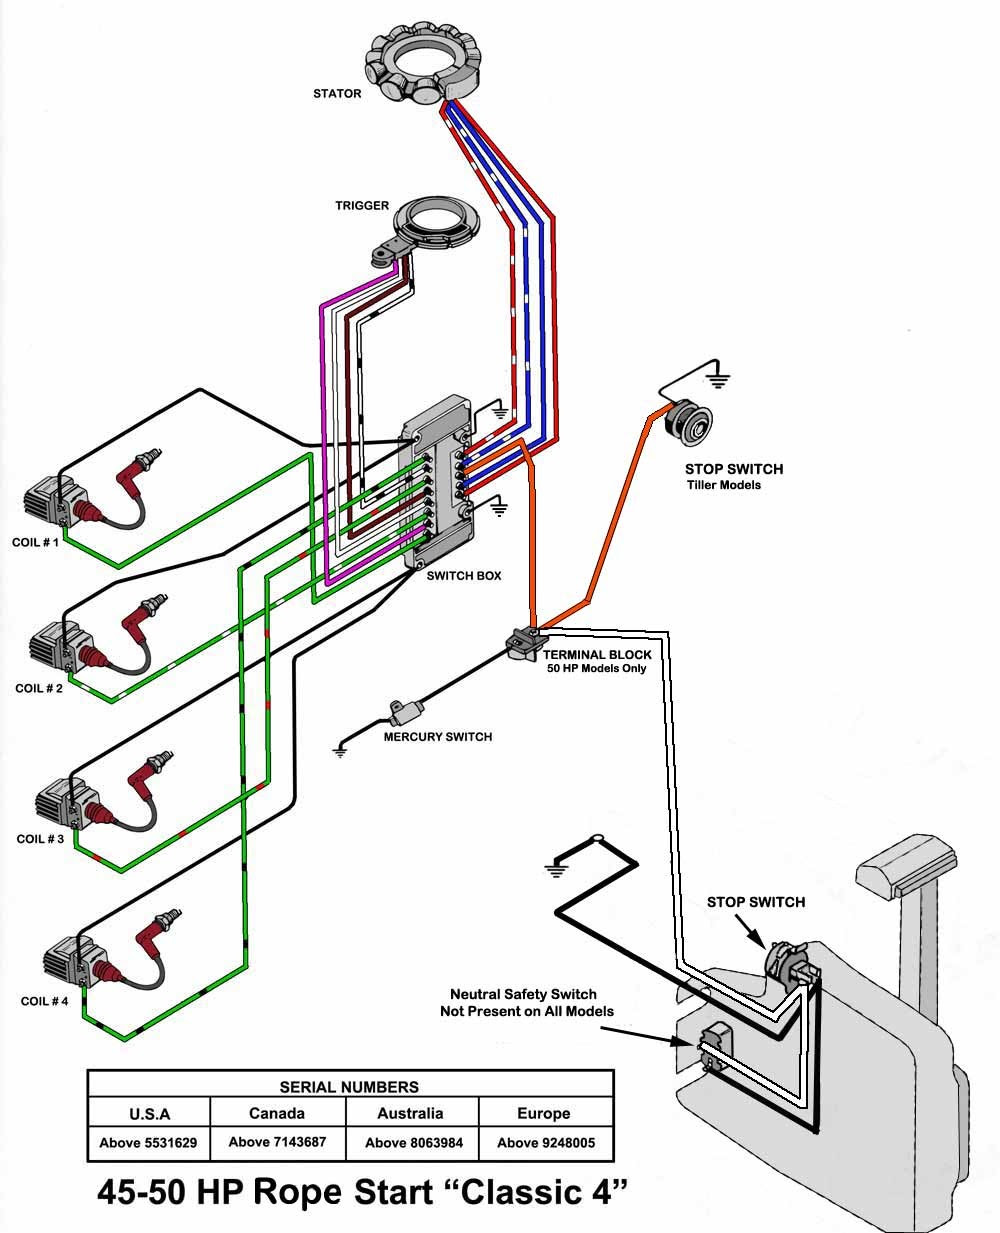
A Yamaha Outboard Tachometer Wiring Diagram presents a comprehensive visual representation of the electrical connections required for the installation and operation of a Yamaha outboard engine’s tachometer. It outlines the specific wiring sequence, color coding, and pin assignments, enabling proper integration with the engine’s electrical system.
The significance of this diagram lies in its role as a crucial guide for technicians, boat owners, and anyone involved in the installation or maintenance of Yamaha outboard engines. By adhering to the diagram’s instructions, they can ensure accurate and safe tachometer operation, which is essential for monitoring the engine’s revolutions per minute (RPM), an important indicator of engine performance and operating condition.
Historically, Yamaha Outboard Tachometer Wiring Diagrams have undergone continuous refinement to keep pace with the advancements in engine technology and the introduction of new tachometer models. As a result, the diagrams have become increasingly detailed and comprehensive, providing precise guidance for even the most complex installations.
Understanding the essential aspects of a Yamaha Outboard Tachometer Wiring Diagram is paramount for proper installation, maintenance, and operation of Yamaha outboard engines. These diagrams provide invaluable guidance on the electrical connections required for the tachometer to function accurately and reliably, allowing users to monitor critical engine parameters such as revolutions per minute (RPM).
- Accuracy: Wiring diagrams ensure precise connections, leading to accurate RPM readings.
- Compatibility: Diagrams specify compatible tachometer models for specific Yamaha outboard engines.
- Electrical Safety: Proper wiring minimizes electrical hazards and protects the engine and tachometer from damage.
- Engine Performance: Accurate RPM monitoring enables optimal engine performance and fuel efficiency.
- Maintenance: Diagrams facilitate troubleshooting and maintenance procedures related to the tachometer.
- Installation: Diagrams provide clear instructions for installing the tachometer and connecting it to the engine’s electrical system.
- Troubleshooting: Diagrams assist in identifying and resolving electrical issues affecting the tachometer.
- Upgradability: Diagrams may indicate compatibility with future tachometer upgrades or accessories.
- Warranty: Correct wiring according to the diagram ensures compliance with warranty requirements.
- Industry Standards: Diagrams adhere to industry standards for marine electrical systems, ensuring compatibility and safety.
In summary, Yamaha Outboard Tachometer Wiring Diagrams are essential for ensuring the proper functioning of the tachometer, which is crucial for monitoring engine performance and maintaining optimal operating conditions. By understanding and adhering to the various aspects outlined above, users can harness the full benefits of these diagrams, ensuring a safe and reliable boating experience.
Accuracy
In the context of Yamaha Outboard Tachometer Wiring Diagrams, accuracy is paramount to ensure precise RPM readings. This aspect is critical for monitoring engine performance and maintaining optimal operating conditions.
- Proper Sensor Connection: The wiring diagram guides the connection of the tachometer to the engine’s RPM sensor. Precise connections ensure that the sensor receives a clean and stable signal, resulting in accurate RPM readings.
- Electrical Noise Minimization: The diagram specifies proper grounding and shielding techniques to minimize electrical noise and interference. This ensures that the tachometer receives a clear signal, free from distortions that could affect RPM accuracy.
- Compatibility Verification: The diagram ensures compatibility between the tachometer and the specific Yamaha outboard engine. This includes matching the tachometer’s RPM range and signal type to the engine’s output. Accurate RPM readings are achieved through proper calibration and configuration.
- Maintenance and Troubleshooting: The wiring diagram serves as a reference for maintenance and troubleshooting purposes. It enables technicians to identify potential sources of inaccuracies, such as loose connections, damaged wires, or faulty components, ensuring timely repairs and maintaining RPM reading accuracy.
By considering these factors, Yamaha Outboard Tachometer Wiring Diagrams play a crucial role in ensuring accurate RPM readings, allowing boat owners and operators to monitor engine performance with confidence and make informed decisions for optimal operation and maintenance.
Compatibility
Compatibility is a critical aspect of Yamaha Outboard Tachometer Wiring Diagrams, ensuring that the tachometer selected is compatible with the specific Yamaha outboard engine. This compatibility ensures accurate RPM readings, reliable operation, and seamless integration with the engine’s electrical system.
The wiring diagram serves as a guide for selecting the correct tachometer model based on the engine’s specifications. It outlines the electrical characteristics, such as signal type, voltage range, and RPM range, that must match between the tachometer and the engine. By following the compatibility guidelines in the diagram, users can avoid potential issues like incorrect readings, electrical damage, or malfunctioning tachometers.
For instance, a Yamaha 60-hp outboard engine may require a tachometer compatible with a 2-stroke engine and an RPM range of 0-6000 RPM. The wiring diagram will specify the compatible tachometer models that meet these requirements, ensuring accurate RPM readings and proper engine monitoring.
Understanding the connection between compatibility and Yamaha Outboard Tachometer Wiring Diagrams is crucial for selecting the appropriate tachometer and ensuring its proper functionality. By adhering to the compatibility guidelines provided in the diagram, boat owners and technicians can ensure reliable and accurate monitoring of engine performance, enabling optimal operation and maintenance.
Electrical Safety
Electrical safety is paramount in the context of Yamaha Outboard Tachometer Wiring Diagrams. Improper wiring can lead to electrical hazards, such as short circuits, overloads, or ground faults, which can damage the engine, tachometer, or both. The wiring diagram serves as a guide for safe and proper electrical connections, ensuring the protection of these critical components.
The diagram specifies the correct wire gauges, connectors, and fusing requirements to handle the electrical load of the tachometer. It also outlines the proper grounding techniques to prevent electrical noise and interference. By adhering to the guidelines in the diagram, technicians and boat owners can minimize the risk of electrical hazards and ensure the safe operation of the tachometer and engine.
For example, the wiring diagram may specify that a particular tachometer model requires a 16-gauge wire for the power connection and a 10-amp fuse for protection. Using a thinner wire or a fuse with a higher amperage rating could lead to overheating and potential damage to the tachometer or engine.
Understanding the importance of electrical safety and the role of Yamaha Outboard Tachometer Wiring Diagrams is crucial for preventing electrical hazards and ensuring the longevity of the engine and tachometer. By following the guidelines provided in the diagram, boat owners and technicians can ensure safe and reliable operation of their Yamaha outboard engine and monitoring systems.
Engine Performance
Yamaha Outboard Tachometer Wiring Diagrams play a critical role in ensuring accurate RPM monitoring, which is essential for optimal engine performance and fuel efficiency.
By providing precise instructions on the electrical connections between the tachometer and the engine’s RPM sensor, the wiring diagram enables accurate RPM readings. These accurate readings allow boat owners and operators to monitor engine performance in real-time, identify potential issues, and make informed decisions to maintain optimal engine operation.
For instance, if the tachometer indicates unusually high RPMs at a given throttle setting, it could indicate a problem with the engine’s fuel mixture or ignition timing. By detecting these issues early on, boat owners can take prompt action to resolve them, preventing more severe engine damage and costly repairs.
Furthermore, accurate RPM monitoring enables boaters to optimize fuel efficiency. By operating the engine within the recommended RPM range, boaters can achieve the best balance between speed and fuel consumption. The wiring diagram ensures that the tachometer provides accurate RPM readings, allowing boaters to adjust their throttle accordingly and maximize fuel efficiency.
In summary, Yamaha Outboard Tachometer Wiring Diagrams are essential for ensuring accurate RPM monitoring, which is critical for optimal engine performance and fuel efficiency. By following the guidelines provided in the wiring diagram, boat owners and technicians can ensure that the tachometer provides accurate and reliable information, enabling them to make informed decisions for engine maintenance and operation.
Maintenance
Within the context of “Yamaha Outboard Tachometer Wiring Diagram,” the aspect of “Maintenance: Diagrams facilitate troubleshooting and maintenance procedures related to the tachometer” holds significant importance as it provides valuable guidance for maintaining and servicing the tachometer, ensuring its accurate and reliable operation.
- Fault Diagnosis: Wiring diagrams assist in identifying and diagnosing potential faults within the tachometer system. By providing a visual representation of the electrical connections, technicians and boat owners can systematically check for loose connections, damaged wires, or faulty components, enabling prompt troubleshooting and repairs.
- Component Replacement: The diagram serves as a guide for replacing faulty components within the tachometer, such as sensors, wiring harnesses, or the display unit. It outlines the proper steps for disconnecting and reconnecting components, ensuring that the tachometer is reassembled correctly and functions optimally.
- Regular Maintenance: Wiring diagrams provide instructions for regular maintenance procedures, such as cleaning electrical contacts, checking wire integrity, and lubricating moving parts. By following these guidelines, boat owners can proactively maintain their tachometer, prolonging its lifespan and ensuring its continued accuracy.
- Compatibility Verification: When upgrading or replacing the tachometer, the wiring diagram helps determine the compatibility between the new component and the existing engine’s electrical system. It ensures that the tachometer receives the correct signals and power, preventing potential damage or malfunction.
In summary, Yamaha Outboard Tachometer Wiring Diagrams play a crucial role in maintaining and servicing the tachometer, enabling boat owners and technicians to effectively troubleshoot faults, replace components, perform regular maintenance, and ensure compatibility during upgrades. By adhering to the guidelines provided in these diagrams, users can keep their tachometers operating accurately and reliably, contributing to the overall performance and safety of their Yamaha outboard engines.
Installation
In the context of Yamaha Outboard Tachometer Wiring Diagrams, the aspect of “Installation: Diagrams provide clear instructions for installing the tachometer and connecting it to the engine’s electrical system” holds utmost importance as it lays the foundation for a successful and functional installation. These diagrams serve as step-by-step guides, ensuring that the tachometer is integrated seamlessly into the engine’s electrical system, enabling accurate RPM readings and reliable operation.
The installation instructions provided in these diagrams are meticulously designed to cater to varying levels of technical expertise. They typically include detailed illustrations, color-coded wiring schematics, and precise instructions on connecting the tachometer to the engine’s RPM sensor, power source, and ground. By following these instructions carefully, boat owners and technicians can avoid potential errors and ensure a secure and proper installation.
For instance, the wiring diagram may specify the use of a specific type of electrical connector for the RPM sensor connection. Adhering to this instruction ensures a robust and reliable connection, preventing signal loss or interference that could affect the accuracy of the tachometer readings.
Furthermore, these diagrams provide guidance on mounting the tachometer in an optimal location, considering factors such as visibility, accessibility, and protection from the elements. Proper mounting ensures that the tachometer is easily visible to the operator, allowing for quick and accurate RPM monitoring.
In summary, the installation instructions provided in Yamaha Outboard Tachometer Wiring Diagrams are critical for ensuring a successful and reliable installation of the tachometer. By following these instructions meticulously, users can ensure that the tachometer is properly integrated into the engine’s electrical system, providing accurate RPM readings and contributing to the overall performance and safety of the outboard engine.
Troubleshooting
Introduction: Within the realm of Yamaha Outboard Tachometer Wiring Diagrams, troubleshooting plays a crucial role in ensuring the accurate and reliable operation of the tachometer, a vital instrument for monitoring engine performance. Wiring diagrams serve as invaluable tools that guide users through the process of identifying and resolving electrical issues affecting the tachometer, ensuring a seamless boating experience.
- Electrical Connection Verification: Wiring diagrams provide a comprehensive overview of the electrical connections between the tachometer and the engine’s electrical system. By following the diagram’s instructions, users can systematically check for loose connections, damaged wires, or faulty components, enabling prompt troubleshooting and repairs.
- Component Testing: Diagrams assist in testing individual components within the tachometer system, such as sensors, wiring harnesses, or the display unit. The diagrams outline the proper procedures for isolating and testing each component, allowing users to pinpoint the source of electrical issues and replace faulty parts as necessary.
- Signal Tracing: Wiring diagrams facilitate the tracing of electrical signals throughout the tachometer system. This is particularly useful when intermittent issues or complex electrical faults occur. By following the signal paths outlined in the diagram, users can identify points of signal loss or interference, enabling targeted troubleshooting and repairs.
Conclusion: Yamaha Outboard Tachometer Wiring Diagrams are indispensable tools for troubleshooting electrical issues affecting the tachometer. By providing clear instructions for electrical connection verification, component testing, and signal tracing, these diagrams empower users to diagnose and resolve problems efficiently, ensuring accurate RPM readings and reliable engine monitoring. Through meticulous troubleshooting, boat owners and technicians can maintain optimal engine performance, enhance safety, and enjoy a hassle-free boating experience.
Upgradability
As the technology landscape evolves at a rapid pace, the aspect of “Upgradability” holds significant relevance within the realm of “Yamaha Outboard Tachometer Wiring Diagrams.” These diagrams serve as valuable resources not only for initial installation and maintenance but also for potential future upgrades or the addition of accessories. By providing insights into the compatibility of the tachometer system with future advancements, the diagrams empower users to plan for seamless integration and expansion of their engine monitoring capabilities.
-
Modular Design
Yamaha Outboard Tachometer Wiring Diagrams may indicate the use of a modular design for the tachometer system. This modularity allows for the easy addition or replacement of specific components, such as sensors, display units, or communication modules. By adhering to the wiring guidelines provided in the diagram, users can seamlessly integrate future upgrades, ensuring compatibility with the existing electrical system.
-
Accessory Compatibility
The diagrams may also provide information on the compatibility of the tachometer system with various accessories, such as GPS receivers, fuel flow sensors, or engine data loggers. By following the instructions in the diagram, users can connect these accessories to the tachometer, expanding its functionality and enabling the monitoring of additional engine parameters.
-
Software Updates
In the case of digital tachometers, the wiring diagrams may indicate the availability of software updates. These updates can introduce new features, improve accuracy, or address potential bugs. By following the instructions in the diagrams, users can seamlessly update their tachometer’s software, ensuring that it remains up-to-date with the latest advancements.
-
Future-Proofing
Yamaha Outboard Tachometer Wiring Diagrams can serve as a valuable tool for future-proofing the engine monitoring system. By providing insights into the tachometer’s upgradeability, users can make informed decisions when selecting a tachometer model. Choosing a tachometer with a modular design and compatibility with future accessories ensures that the system can adapt to changing needs and advancements in marine technology.
In summary, the “Upgradability: Diagrams may indicate compatibility with future tachometer upgrades or accessories.” aspect of Yamaha Outboard Tachometer Wiring Diagrams underscores the importance of planning for future expansion and enhancements. By utilizing the information provided in these diagrams, boat owners and technicians can ensure that their tachometer systems remain adaptable and capable of meeting the evolving demands of engine monitoring and data acquisition.
Warranty
Within the context of Yamaha Outboard Tachometer Wiring Diagrams, the aspect of “Warranty: Correct wiring according to the diagram ensures compliance with warranty requirements.” holds paramount importance. Adhering to the guidelines outlined in the diagram is crucial for maintaining warranty coverage and safeguarding the investment made in the tachometer and outboard engine.
-
Preservation of Warranty Coverage
Correct wiring according to the diagram ensures that the tachometer is installed and operated in accordance with Yamaha’s specifications. This adherence to manufacturer guidelines is essential for preserving the validity of the warranty provided for the tachometer. By following the instructions precisely, users can avoid potential issues or damage caused by improper installation or wiring, which could jeopardize their warranty coverage.
-
Voiding Warranty Due to Incorrect Wiring
Conversely, if the tachometer is not wired according to the diagram, it may void the warranty. Incorrect wiring can lead to electrical faults, damage to the tachometer or engine components, or malfunctioning of the tachometer. In such cases, the manufacturer may deem the warranty void due to improper installation or misuse of the product.
-
Importance of Qualified Technicians
Yamaha often recommends that the installation and wiring of the tachometer be performed by qualified technicians or authorized dealers. These professionals possess the necessary expertise and experience to ensure that the tachometer is wired correctly and in compliance with the warranty requirements. Their involvement can provide peace of mind and protect the user’s investment.
-
Documentation of Correct Wiring
In some cases, Yamaha may require documentation or proof of correct wiring to validate a warranty claim. Maintaining a record of the installation process, including photographs or videos, can serve as valuable evidence of compliance with the wiring diagram. This documentation can strengthen the user’s position in the event of a warranty dispute.
In summary, adhering to the Yamaha Outboard Tachometer Wiring Diagram’s instructions for correct wiring is paramount for maintaining warranty coverage. Incorrect wiring can void the warranty, jeopardize the investment, and potentially lead to safety concerns. By entrusting the installation to qualified technicians, documenting the process, and following the diagram’s guidelines meticulously, users can ensure that their tachometer operates optimally and within the manufacturer’s specifications, preserving the warranty and providing peace of mind.
Industry Standards
Within the context of “Yamaha Outboard Tachometer Wiring Diagram”, understanding the aspect of “Industry Standards: Diagrams adhere to industry standards for marine electrical systems, ensuring compatibility and safety” is crucial for appreciating the overall reliability and effectiveness of the tachometer system.
-
Standardized Components and Wiring Practices:
Yamaha Outboard Tachometer Wiring Diagrams align with established industry standards for marine electrical systems, utilizing universally accepted components and wiring practices. This standardization ensures compatibility with a wide range of marine electrical equipment and accessories, allowing for seamless integration and operation.
-
Safety and Reliability:
Adherence to industry standards prioritizes safety and reliability. The diagrams incorporate safeguards and recommendations that comply with best practices for marine electrical installations. By following these standards, users can minimize the risk of electrical hazards, such as short circuits, overloads, or ground faults, ensuring the longevity and safe operation of the tachometer system.
-
Simplified Troubleshooting and Maintenance:
Standardized wiring practices make troubleshooting and maintenance tasks more straightforward. Technicians familiar with industry standards can easily interpret the wiring diagram and identify potential issues, reducing downtime and simplifying repairs. This standardization also facilitates the integration of future upgrades or modifications, ensuring compatibility with existing systems.
-
Warranty Compliance:
Wiring the tachometer according to industry standards is essential for maintaining warranty coverage. Following the guidelines outlined in the diagram demonstrates that the installation meets or exceeds industry best practices, which is often a requirement for honoring warranty claims. This compliance provides peace of mind and protects the investment made in the tachometer system.
In summary, the adherence to industry standards in Yamaha Outboard Tachometer Wiring Diagrams ensures compatibility, safety, simplified maintenance, and warranty compliance. These standards provide a solid foundation for the reliable and effective operation of the tachometer system, contributing to the overall performance and safety of the outboard engine.


Related Posts


