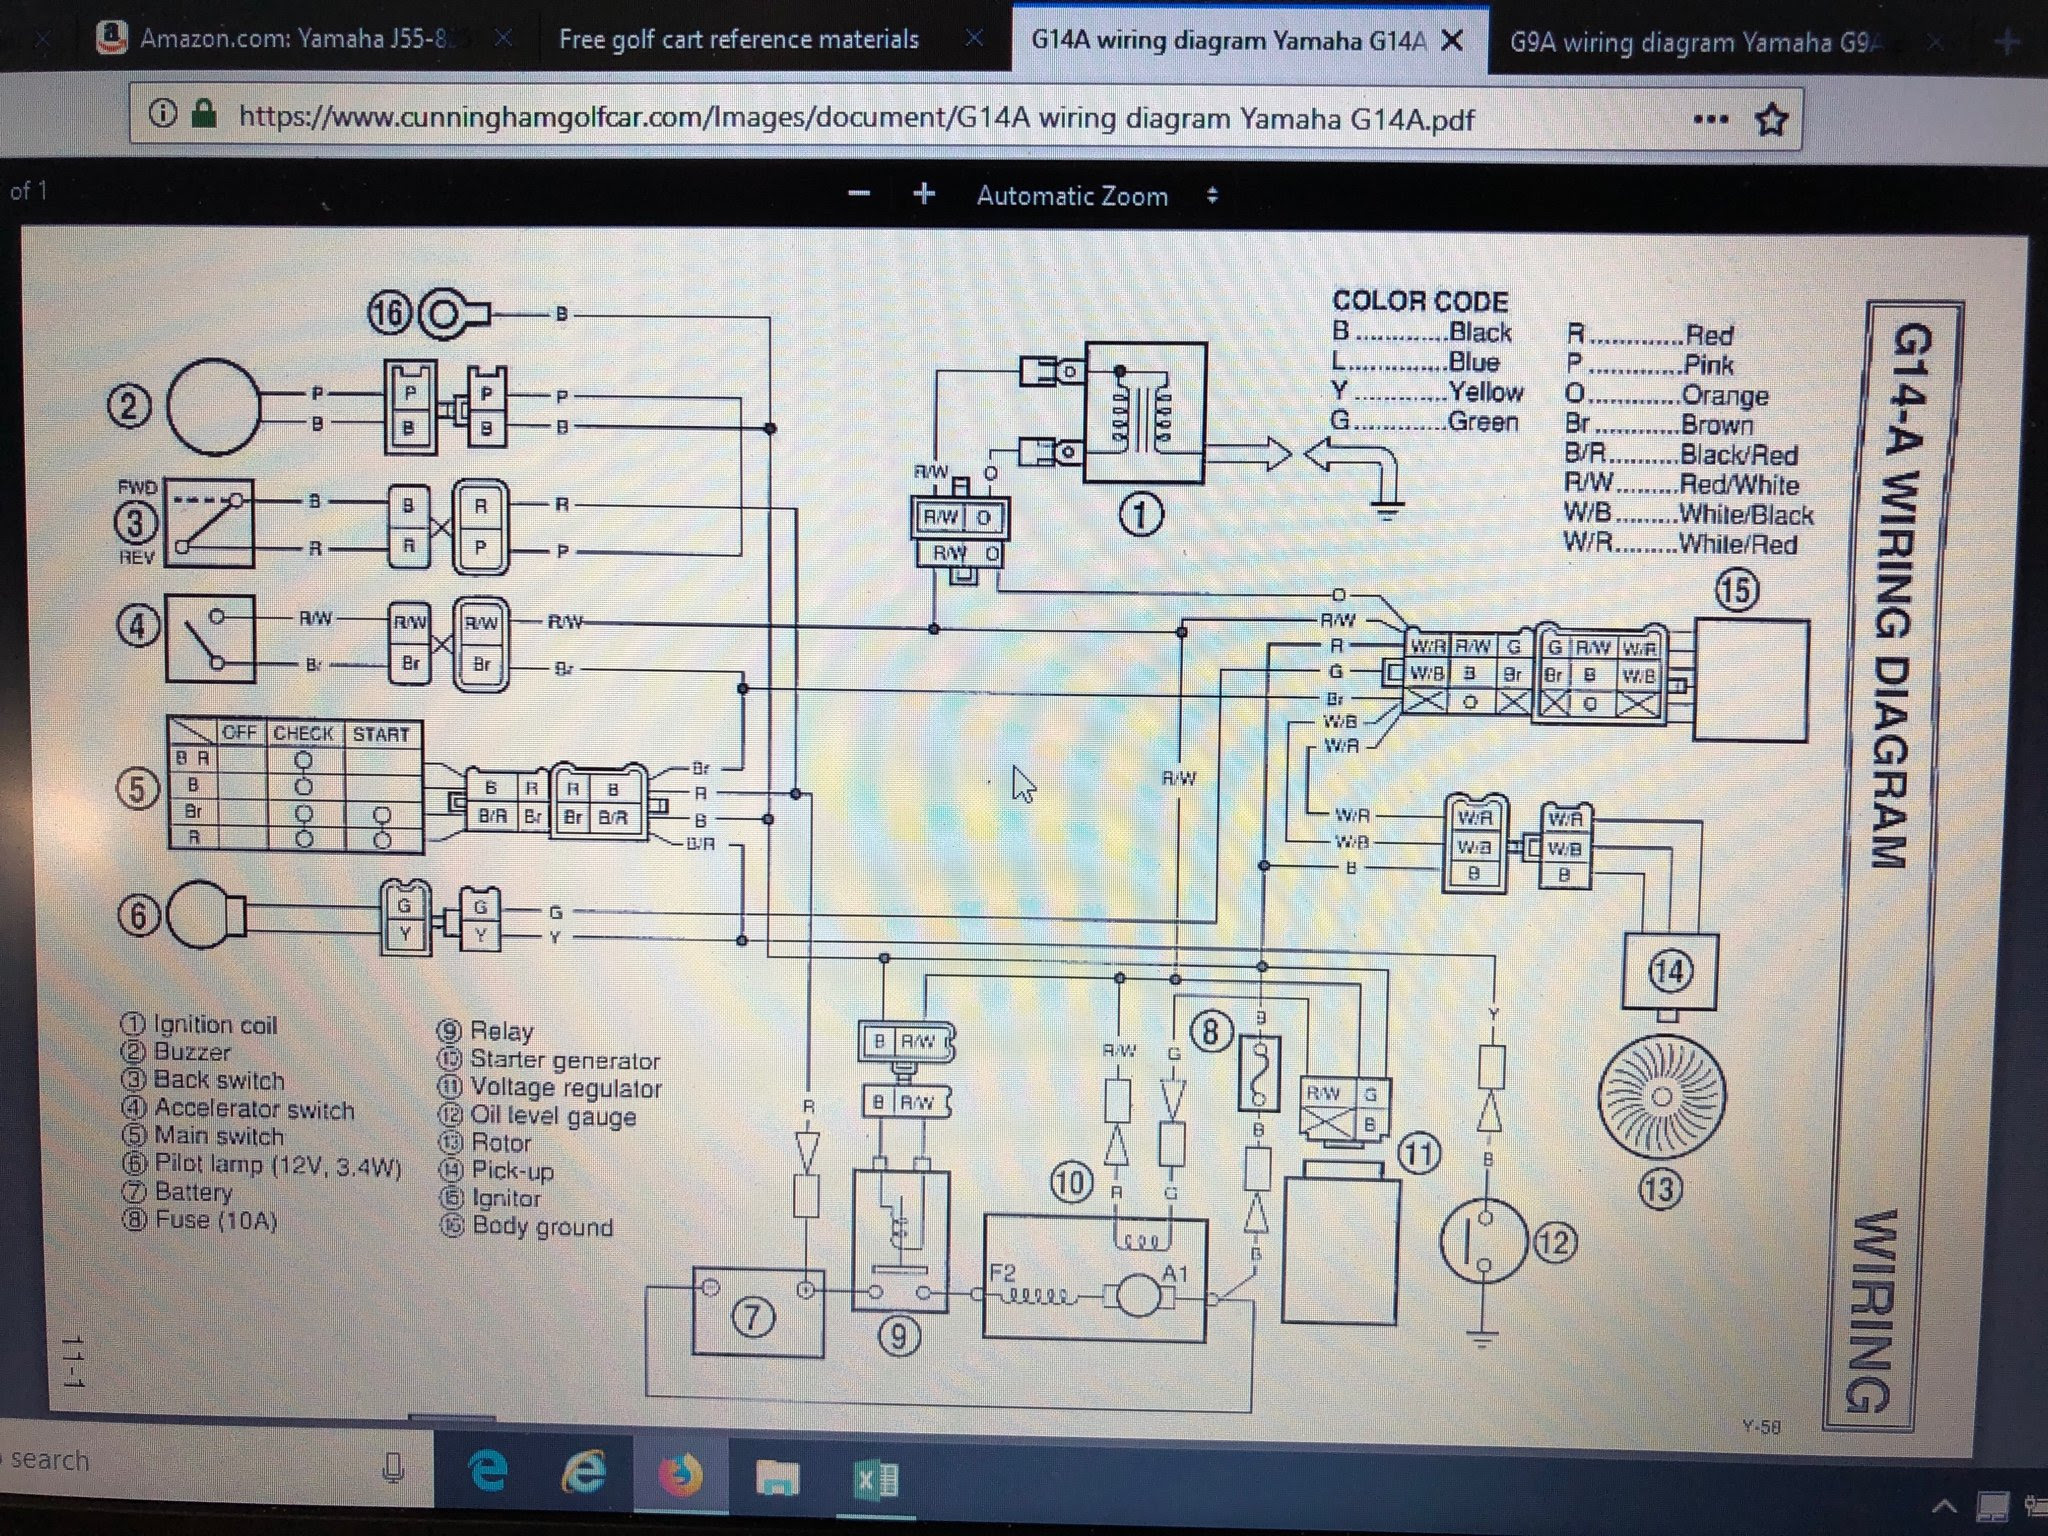
A Yamaha Golf Cart Wiring Diagram is a visual representation of the electrical system in a Yamaha golf cart. It shows the location of all the electrical components, as well as the wires that connect them. This information is essential for troubleshooting electrical problems, as it allows you to quickly identify the source of the issue.
For example, if your golf cart’s lights are not working, you can use the wiring diagram to trace the wires from the lights to the battery. This will help you to identify any broken wires or loose connections that may be causing the problem.
Yamaha Golf Cart Wiring Diagrams are also helpful for installing new electrical components. By following the diagram, you can ensure that the new components are wired correctly and will not cause any electrical problems.
Yamaha Golf Cart Wiring Diagrams are essential for understanding the electrical system of a Yamaha golf cart. They provide a visual representation of the location of all the electrical components, as well as the wires that connect them. This information is crucial for troubleshooting electrical problems, as it allows you to quickly identify the source of the issue.
- Components
- Connections
- Troubleshooting
- Installation
- Maintenance
- Safety
- Modifications
- Accessories
- Performance
- Customization
These aspects are all important for understanding how to properly maintain and repair a Yamaha golf cart. By understanding the wiring diagram, you can ensure that your golf cart is safe to operate and is performing at its best.
Components
The components of a Yamaha Golf Cart Wiring Diagram are the individual electrical components that make up the golf cart’s electrical system. These components include the battery, motor, controller, solenoid, and various switches and sensors. Each component plays a specific role in the operation of the golf cart, and they must all be wired together correctly in order for the golf cart to function properly.
The Yamaha Golf Cart Wiring Diagram is a critical component of the golf cart’s electrical system. It provides a visual representation of the location of all the electrical components, as well as the wires that connect them. This information is essential for troubleshooting electrical problems, as it allows you to quickly identify the source of the issue. For example, if your golf cart’s lights are not working, you can use the wiring diagram to trace the wires from the lights to the battery. This will help you to identify any broken wires or loose connections that may be causing the problem.
The components of a Yamaha Golf Cart Wiring Diagram are all interconnected, and they must all work together in order for the golf cart to operate properly. If one component fails, it can affect the operation of other components. For example, if the battery is not properly connected, the motor will not be able to receive power and the golf cart will not be able to move. Similarly, if the controller is not working properly, the solenoid will not be able to engage and the motor will not be able to turn on.
By understanding the components of a Yamaha Golf Cart Wiring Diagram, you can better understand how the golf cart’s electrical system works. This knowledge can be helpful for troubleshooting electrical problems, as well as for installing new electrical components. By following the wiring diagram, you can ensure that the new components are wired correctly and will not cause any electrical problems.
Connections
Connections are a crucial aspect of Yamaha Golf Cart Wiring Diagrams. They represent the electrical pathways that allow current to flow between the different components of the golf cart’s electrical system. Without proper connections, the golf cart would not be able to function properly.
-
Battery Connections
The battery connections are responsible for providing power to the golf cart’s electrical system. They must be properly connected to the battery terminals in order for the golf cart to operate. -
Motor Connections
The motor connections are responsible for sending power from the battery to the motor. They must be properly connected to the motor terminals in order for the golf cart to move. -
Controller Connections
The controller connections are responsible for controlling the speed and direction of the golf cart. They must be properly connected to the controller terminals in order for the golf cart to operate properly. -
Accessory Connections
The accessory connections are responsible for powering the golf cart’s accessories, such as the lights, horn, and turn signals. They must be properly connected to the accessory terminals in order for the accessories to function.
The connections in a Yamaha Golf Cart Wiring Diagram are all interconnected, and they must all be made correctly in order for the golf cart to operate properly. If one connection is loose or broken, it can cause the entire electrical system to malfunction. Therefore, it is important to inspect the connections regularly and to make sure that they are all tight and secure.
Troubleshooting
When it comes to Yamaha Golf Cart Wiring Diagrams, troubleshooting is an essential skill. By understanding the wiring diagram and the electrical system of your golf cart, you can quickly identify and fix any problems that may arise.
-
Components
The first step in troubleshooting is to identify the components of the electrical system that are causing the problem. This may require using a multimeter to test the voltage and continuity of the wires, connectors, and other components.
-
Connections
Once you have identified the components that are causing the problem, you need to check the connections between them. Loose or corroded connections can cause a variety of electrical problems, so it is important to make sure that all connections are tight and secure.
-
Power Supply
If the components and connections are all good, then the next step is to check the power supply. This involves testing the battery and the charging system to make sure that they are providing the correct voltage and amperage.
-
Ground
Finally, you need to check the ground connection. A bad ground connection can cause a variety of electrical problems, so it is important to make sure that the ground wire is properly connected to the frame of the golf cart.
By following these steps, you can quickly and easily troubleshoot any electrical problems that may arise with your Yamaha golf cart. With a little bit of knowledge and practice, you can keep your golf cart running smoothly for many years to come.
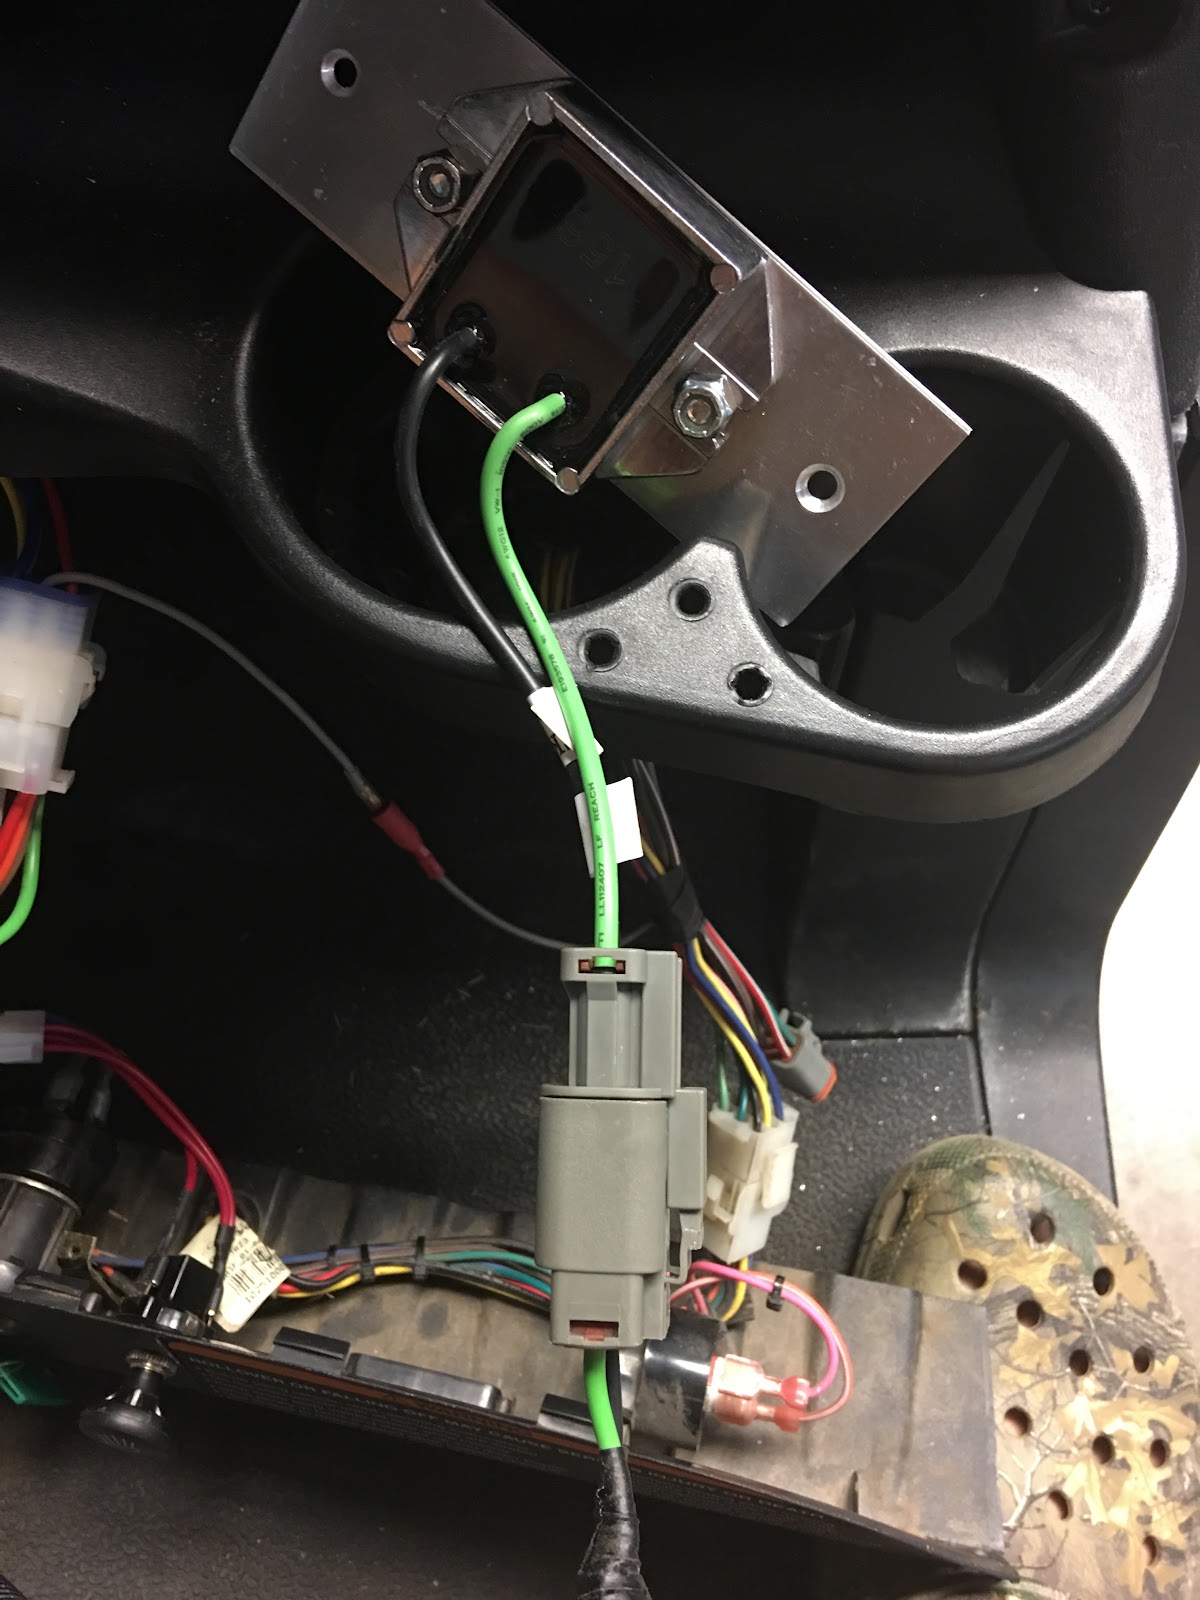
Installation
Installation is a critical aspect of Yamaha Golf Cart Wiring Diagrams. It involves the physical placement and connection of the various electrical components that make up the golf cart’s electrical system. Proper installation is essential for ensuring that the golf cart operates safely and efficiently.
-
Components
The first step in installing a Yamaha Golf Cart Wiring Diagram is to gather all of the necessary components. These components include the battery, motor, controller, solenoid, and various switches and sensors. It is important to make sure that all of the components are compatible with each other and with the golf cart.
-
Placement
Once you have all of the necessary components, you need to decide where to place them on the golf cart. The location of the components will depend on the specific golf cart model and the type of electrical system that you are installing. It is important to make sure that the components are placed in a way that allows for easy access and maintenance.
-
Wiring
Once the components have been placed, you need to wire them together according to the Yamaha Golf Cart Wiring Diagram. It is important to use the correct gauge wire and to make sure that all of the connections are tight and secure. Loose or frayed wires can cause electrical problems and even fires.
-
Testing
Once the wiring is complete, you need to test the electrical system to make sure that it is working properly. This involves checking the voltage and continuity of the wires, as well as the operation of the various components. If any problems are found, they need to be corrected before the golf cart can be operated.
By following these steps, you can ensure that the Yamaha Golf Cart Wiring Diagram is installed correctly and that the golf cart operates safely and efficiently.
Maintenance
Maintenance is an essential aspect of Yamaha Golf Cart Wiring Diagrams. By following a regular maintenance schedule, you can help to ensure that your golf cart’s electrical system is operating safely and efficiently. Here are four key maintenance tasks that you should perform on a regular basis:
-
Inspect the Wiring
Inspect the wiring throughout your golf cart for any signs of damage, such as fraying, cuts, or corrosion. Loose or damaged wires can cause electrical problems, so it is important to repair or replace any damaged wires as soon as possible.
-
Check the Connections
Check all of the electrical connections on your golf cart for tightness and corrosion. Loose or corroded connections can cause electrical problems, so it is important to tighten any loose connections and clean any corroded connections.
-
Test the Battery
Test the battery on your golf cart regularly to make sure that it is holding a charge and providing the correct voltage. A weak or dead battery can cause a variety of electrical problems, so it is important to replace the battery if it is not performing properly.
-
Lubricate the Moving Parts
Lubricate all of the moving parts on your golf cart’s electrical system, such as the motor, controller, and solenoid. Lubrication helps to reduce wear and tear and can help to prevent electrical problems.
By following these simple maintenance tasks, you can help to keep your Yamaha golf cart’s electrical system operating safely and efficiently for many years to come.
Safety
Safety is a critical component of Yamaha Golf Cart Wiring Diagrams. By understanding the wiring diagram and the electrical system of your golf cart, you can help to prevent electrical fires, shocks, and other accidents. For example, the wiring diagram will show you the location of the fuses and circuit breakers, which are designed to protect the electrical system from damage. By knowing the location of these components, you can quickly and easily replace them if they blow.
Another important safety feature of Yamaha Golf Cart Wiring Diagrams is that they help you to identify the correct gauge wire to use for each connection. Using the wrong gauge wire can cause the wire to overheat and start a fire. The wiring diagram will also show you the correct way to connect the wires, which is important for preventing electrical shorts and other problems. If you are not comfortable working on electrical systems, it is best to have a qualified technician install your Yamaha Golf Cart Wiring Diagram.
By following the safety guidelines in the Yamaha Golf Cart Wiring Diagram, you can help to ensure that your golf cart is safe to operate. Here are a few additional safety tips to keep in mind:
- Never operate your golf cart under the influence of alcohol or drugs.
- Always wear a seatbelt when operating your golf cart.
- Be aware of your surroundings and watch for pedestrians and other vehicles.
- Drive at a safe speed and never exceed the speed limit.
- Regularly inspect your golf cart’s electrical system for any signs of damage or wear.
By following these safety tips, you can help to ensure that you and your passengers have a safe and enjoyable time riding in your Yamaha golf cart.
Modifications
Modifications play a significant role in the realm of Yamaha Golf Cart Wiring Diagrams. By understanding the wiring diagram and the electrical system of your golf cart, you can customize and enhance its performance and functionality.
-
Performance Upgrades
Performance upgrades involve modifying the wiring diagram to improve the speed, torque, and acceleration of the golf cart. This can include installing a high-performance motor, controller, and battery. Performance upgrades can also involve modifying the wiring diagram to allow for the installation of additional accessories, such as lights, stereo systems, and GPS units.
-
Safety Enhancements
Safety enhancements involve modifying the wiring diagram to improve the safety of the golf cart. This can include installing additional lights, turn signals, and brake lights. Safety enhancements can also involve modifying the wiring diagram to allow for the installation of a seat belt interlock system.
-
Customizations
Customizations involve modifying the wiring diagram to change the look and feel of the golf cart. This can include installing custom wheels, tires, and body panels. Customizations can also involve modifying the wiring diagram to allow for the installation of a custom paint job or wrap.
-
Troubleshooting
Troubleshooting involves modifying the wiring diagram to diagnose and repair electrical problems. This can include adding test points to the wiring diagram to allow for easier troubleshooting. Troubleshooting can also involve modifying the wiring diagram to allow for the installation of a diagnostic tool.
Modifications to Yamaha Golf Cart Wiring Diagrams can be a great way to improve the performance, safety, and customization of your golf cart. However, it is important to note that modifications can also void your warranty. Therefore, it is important to weigh the benefits and risks of modifications before making any changes to your golf cart’s wiring diagram.
Accessories
Within the comprehensive layout of a Yamaha Golf Cart Wiring Diagram, accessories hold a significant position, influencing the vehicle’s functionality, aesthetics, and overall driving experience. These add-ons encompass a diverse range of components, each contributing unique features that enhance the golf cart’s capabilities and user enjoyment.
-
Lighting Enhancements
Upgrading the golf cart’s lighting system not only improves visibility in low-light conditions but also adds a touch of personalization. LED light bars, underbody lighting, and custom headlights are popular choices, enhancing safety and style.
-
Audio Systems
Music and entertainment become an integral part of the golf cart experience with the addition of audio systems. Bluetooth speakers, amplifiers, and subwoofers provide a rich sound experience, allowing riders to enjoy music or podcasts while cruising around.
-
Performance Upgrades
For those seeking enhanced speed or torque, performance upgrades like high-speed motors and controllers are available. These modifications improve the overall driving dynamics of the golf cart, making it more responsive and exciting to operate.
-
Aesthetic Enhancements
Custom wheels, tires, and body panels allow owners to personalize the look of their golf carts. From sleek alloy wheels to rugged off-road tires, these accessories transform the cart’s appearance, making it stand out on the course or in the neighborhood.
By understanding the intricate connections outlined in the Yamaha Golf Cart Wiring Diagram, installers can seamlessly integrate these accessories into the electrical system. The diagram guides the placement of wires, fuses, and switches, ensuring proper functionality and preventing electrical issues. Whether it’s for safety, entertainment, performance, or aesthetics, accessories play a vital role in customizing and enhancing the Yamaha golf cart experience.
Performance
In the realm of Yamaha Golf Cart Wiring Diagrams, performance plays a pivotal role in enhancing the overall driving experience and functionality of the vehicle. The wiring diagram serves as the blueprint for the electrical system, dictating the flow of power and the operation of various components that influence performance.
A well-designed Yamaha Golf Cart Wiring Diagram optimizes the electrical pathways, ensuring efficient energy transfer and minimizing resistance. This directly translates to improved motor performance, resulting in increased speed, torque, and acceleration. By understanding the relationship between the wiring diagram and performance, technicians and enthusiasts can fine-tune the electrical system to achieve the desired performance characteristics.
Real-life examples abound where modifications to the Yamaha Golf Cart Wiring Diagram have yielded significant performance gains. For instance, upgrading the controller to a higher amperage model allows for increased current flow to the motor, resulting in a noticeable boost in torque and acceleration. Similarly, installing a high-performance solenoid reduces voltage drop during startup, enhancing the motor’s responsiveness and overall efficiency.
The practical applications of this understanding extend beyond the race track or off-road trails. In commercial settings, such as golf courses or resorts, optimizing the wiring diagram can improve the efficiency and reliability of golf carts used for transportation or maintenance tasks. By ensuring proper power distribution and minimizing electrical losses, the wiring diagram contributes to extended battery life and reduced maintenance costs.
Customization
In the realm of Yamaha Golf Cart Wiring Diagrams, “Customization” emerges as a key aspect that grants owners the power to tailor their vehicles to their unique preferences, specific needs, and terrain requirements. By modifying the wiring diagram, enthusiasts can unlock a world of possibilities, enhancing not only the aesthetic appeal but also the performance and functionality of their golf carts.
-
Personalized Aesthetics
Custom wiring allows for the integration of unique lighting systems, custom dashboards, and audio setups, enabling owners to express their personal style and create a truly one-of-a-kind golf cart.
-
Performance Upgrades
Modifications to the wiring diagram can optimize power flow and enhance motor performance, resulting in increased speed, torque, and acceleration. Upgrading controllers, solenoids, and motors can transform a standard golf cart into a veritable speed machine.
-
Functional Enhancements
Custom wiring opens up the possibility of adding practical features such as GPS tracking systems, reverse cameras, and even onboard charging systems, extending the functionality and convenience of the golf cart.
-
Terrain Optimization
For those who venture off the beaten path, custom wiring allows for the integration of specialized equipment such as winches, lift kits, and all-terrain tires, enabling golf carts to conquer challenging terrain and explore new frontiers.
Customization, when approached with a thorough understanding of the Yamaha Golf Cart Wiring Diagram, empowers owners to create golf carts that perfectly align with their vision. From subtle aesthetic tweaks to comprehensive performance overhauls, the possibilities are as limitless as the imagination. By embracing customization, golf cart owners can elevate their vehicles from mere transportation devices into expressions of personal style and tailored functionality.


![[DIAGRAM] Wiring Diagram For Yamaha Golf Cart](https://i0.wp.com/chematron.org/image/yamaha-g16-golf-cart-parts-diagram.gif?w=665&ssl=1)

Related Posts


