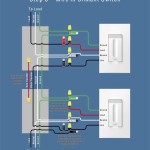
Wiring Single Pole Dimmer Switch refers to the process of connecting a dimmer switch to a single-pole electrical circuit, allowing for the precise control of light intensity. A single-pole dimmer switch is designed to regulate the flow of electricity to a single light fixture, providing smooth dimming capabilities to adjust the brightness of the light.
The relevance of single-pole dimmer switches lies in their wide range of applications, from residential to commercial settings. They enhance user comfort and energy efficiency by enabling the adjustment of lighting levels to suit different tasks or moods. Historically, dimmer switches have evolved from simple rheostats to sophisticated electronic devices, improving their efficiency, lifespan, and ease of use.
In the following sections, we will delve into the specifics of wiring single-pole dimmer switches, exploring the necessary materials, step-by-step instructions, and troubleshooting tips. We will also discuss the safety precautions to be considered during installation and the potential benefits of using dimmer switches in various applications.
Wiring a single-pole dimmer switch involves crucial aspects that impact its functionality, safety, and user experience. Understanding these aspects is essential for a successful installation and effective use of the dimmer switch.
- Circuit Compatibility: Ensuring the dimmer switch is compatible with the electrical circuit’s voltage, amperage, and load type.
- Wire Gauge Selection: Choosing the appropriate wire gauge based on the circuit’s amperage and distance to maintain proper current flow.
- Grounding: Establishing a proper ground connection for safety and to prevent electrical hazards.
- Switch Placement: Selecting a suitable location for the dimmer switch that is accessible, convenient, and meets building codes.
- Dimmer Type: Determining the type of dimmer switch (incandescent, LED, or smart) based on the connected light fixture’s compatibility.
- Load Capacity: Verifying that the dimmer switch can handle the total wattage of the connected light fixtures.
- Wiring Method: Following proper wiring techniques, including using the correct wire connectors and ensuring secure connections.
- Troubleshooting: Identifying and resolving common issues such as flickering lights, buzzing sounds, or dimmer switch failure.
- Safety Precautions: Adhering to electrical safety guidelines, including turning off power before installation and using appropriate tools and protective gear.
- Code Compliance: Meeting local building and electrical codes to ensure a safe and compliant installation.
These key aspects are interconnected and influence the overall performance and safety of the wiring process. Proper consideration of each aspect ensures a successful and trouble-free installation of the single-pole dimmer switch.
Circuit Compatibility
Circuit compatibility plays a crucial role in the successful and safe wiring of a single-pole dimmer switch. It involves matching the dimmer switch’s specifications with the electrical circuit’s characteristics to ensure proper functioning and prevent potential hazards.
The voltage compatibility ensures that the dimmer switch can withstand the electrical potential of the circuit without causing damage or overheating. Similarly, the amperage compatibility guarantees that the dimmer switch can handle the current flowing through the circuit without overloading or compromising its integrity.
Furthermore, load type compatibility is vital to prevent overloading or underloading of the dimmer switch. Different types of loads, such as incandescent, fluorescent, or LED lights, have varying power consumption and dimming requirements. Using a dimmer switch that is not compatible with the load type can lead to flickering, buzzing, premature failure, or even fire hazards.
Real-life examples of circuit compatibility issues include using a dimmer switch rated for incandescent lights to control LED lights. This mismatch can result in the dimmer switch not functioning correctly, causing the LED lights to flicker or dim inadequately. Another example is installing a dimmer switch with an insufficient amperage rating for the connected load, leading to overheating and potential fire hazards.
Understanding circuit compatibility allows electricians and homeowners to select the appropriate dimmer switch for their specific electrical circuit and load requirements. By ensuring compatibility, they can ensure the safe and effective operation of the dimmer switch, enhance the user experience, and prolong the lifespan of both the dimmer switch and the connected light fixtures.
Wire Gauge Selection
In the context of wiring a single-pole dimmer switch, selecting the appropriate wire gauge is crucial for ensuring the safe and efficient operation of the electrical circuit. The wire gauge, measured in American Wire Gauge (AWG), determines the thickness and current-carrying capacity of the wire. Choosing the correct wire gauge is essential to prevent overheating, voltage drop, and potential fire hazards.
- Current Capacity: The wire gauge must be able to handle the maximum amperage of the circuit without overheating. Oversized wires can lead to wasted energy, while undersized wires can pose safety risks.
- Voltage Drop: Over long distances, the resistance of the wire can cause a voltage drop, reducing the voltage available at the dimmer switch and connected light fixtures. Using a larger wire gauge minimizes voltage drop and ensures adequate voltage for proper operation.
- Real-Life Example: For a dimmer switch controlling a 10-amp circuit over a distance of 50 feet, a 14 AWG wire is recommended to prevent overheating and excessive voltage drop.
- Code Compliance: Local building codes often specify the minimum wire gauge requirements for different circuit types and distances, which must be followed to ensure safety and compliance.
Understanding wire gauge selection and its implications allows electricians and homeowners to make informed decisions when wiring single-pole dimmer switches. By choosing the appropriate wire gauge, they can prevent potential hazards, ensure optimal performance, and extend the lifespan of the electrical system.
Grounding
In the context of wiring a single-pole dimmer switch, grounding plays a critical role in ensuring the safety and proper functioning of the electrical system. Grounding provides a low-resistance path for electrical current to flow in the event of a fault, preventing dangerous voltage build-up and the risk of electrical shock or fire.Establishing a proper ground connection involves connecting the grounding wire (usually green or bare copper) of the electrical cable to a grounded electrical panel or grounding rod. This connection creates a conductive pathway for stray electrical currents to safely dissipate into the earth, protecting electrical equipment, users, and the building itself.Failure to properly ground a single-pole dimmer switch can have serious consequences. If a fault occurs and there is no proper ground path, dangerous voltage can accumulate on the switch, light fixture, or other components of the circuit. This can lead to electrical shock, arcing, or even a fire.In real-life scenarios, improper grounding has been a contributing factor in electrical accidents, including electrocutions and house fires. Ensuring proper grounding is a crucial safety measure that should never be overlooked.Understanding the connection between grounding and wiring single-pole dimmer switches allows electricians and homeowners to make informed decisions and take appropriate steps to prevent electrical hazards. By establishing a proper ground connection, they can ensure the safe and reliable operation of the electrical system and protect against potential risks.
Switch Placement
Switch placement is a crucial aspect of wiring single-pole dimmer switches, influencing both the functionality and safety of the electrical system. Selecting a suitable location for the dimmer switch ensures convenient control of lighting, enhances user experience, and complies with electrical codes, contributing to a well-designed and safe electrical installation.
- Accessibility: The dimmer switch should be placed within easy reach for users, avoiding awkward positioning or the need to stretch or bend to operate it. This is especially important for individuals with physical limitations or in high-traffic areas where accessibility is paramount.
- Convenience: The dimmer switch should be positioned where it can be easily located and operated without obstruction or hindrance. This includes considering the placement of furniture, dcor, or other objects that might block access to the switch.
- Building Codes: Local building codes often specify regulations regarding the placement of dimmer switches, including minimum heights, distances from doorways or windows, and accessibility requirements. Adhering to these codes ensures compliance with safety standards and avoids potential issues during electrical inspections.
- Aesthetic Considerations: While not directly related to functionality or safety, the placement of the dimmer switch should also consider aesthetic factors. Choosing a location that complements the dcor and overall design of the room can enhance the visual appeal of the space.
By carefully considering these facets of switch placement, electricians and homeowners can ensure that their dimmer switches are accessible, convenient, code-compliant, and aesthetically pleasing. This attention to detail contributes to a well-rounded electrical installation that meets both practical and aesthetic requirements.
Dimmer Type
When selecting a single-pole dimmer switch, understanding the type of dimmer and its compatibility with the connected light fixture is crucial. Different dimmer types are designed to control specific lighting technologies, and mismatches can lead to improper dimming, flickering, or even damage to the light fixture or dimmer switch.
The choice of dimmer type primarily depends on the connected light fixture’s compatibility. Incandescent and halogen lights, for example, are compatible with traditional incandescent dimmers, which use a simple rheostat to vary the resistance and control the light output. LED and CFL lights, on the other hand, require more sophisticated dimmers that are electronically designed to work with their unique dimming characteristics. Smart dimmers, which offer advanced features like remote control and scheduling, are compatible with both incandescent and LED lights, providing added flexibility and convenience.
Real-life examples of dimmer type compatibility issues include using an incandescent dimmer to control LED lights, resulting in flickering or premature LED failure. Conversely, using an LED dimmer with incandescent lights may not provide the desired dimming range or could cause the lights to flicker or buzz.
Understanding the connection between dimmer type and light fixture compatibility is essential for successful wiring and optimal lighting performance. By selecting the correct dimmer type, electricians and homeowners can ensure seamless dimming control, extend the lifespan of their light fixtures, and enhance the overall user experience.
Load Capacity
Load capacity is a crucial aspect of wiring a single-pole dimmer switch, as it ensures the switch can safely handle the electrical load of the connected light fixtures. Exceeding the load capacity can lead to overloading, overheating, and potential fire hazards. Understanding and verifying the load capacity involves considering various factors and implications.
- Wattage Calculation: Determine the total wattage of the light fixtures that will be connected to the dimmer switch. This involves adding up the wattage of each individual light bulb or fixture.
- Dimmer Switch Rating: Check the specifications of the dimmer switch to determine its maximum wattage rating. This rating indicates the maximum total wattage of light fixtures that the dimmer switch can safely control.
- Real-Life Example: If you want to connect three 60-watt light bulbs to a dimmer switch, the total load is 180 watts. Ensure that the dimmer switch you select has a wattage rating of at least 180 watts or higher to accommodate this load.
- Overloading Risks: Exceeding the dimmer switch’s load capacity can lead to overheating, damage to the dimmer switch, flickering lights, and in extreme cases, electrical fires.
Verifying the load capacity of a single-pole dimmer switch is essential for safe and reliable operation. By matching the dimmer switch’s wattage rating to the total load of the connected light fixtures, electricians and homeowners can prevent potential hazards and ensure optimal performance of the lighting system.
Wiring Method
In the context of wiring a single-pole dimmer switch, proper wiring techniques are paramount for ensuring the safety, reliability, and longevity of the electrical system. Following established wiring practices, including using the correct wire connectors and ensuring secure connections, plays a critical role in preventing potential hazards and maintaining optimal performance.
The choice of appropriate wire connectors is essential to establish secure and durable connections. Wire nuts, crimp connectors, and terminal blocks are commonly used, each suited for specific wire gauges and connection types. Proper selection and usage of these connectors ensure a strong mechanical bond between the wires, preventing loose connections and potential arcing or overheating.
Real-life examples of improper wiring methods include loose connections due to the use of undersized wire connectors or inadequate tightening, leading to overheating, flickering lights, or even electrical fires. Conversely, properly executed wiring techniques, including the use of the correct wire connectors and secure connections, ensure a safe and reliable electrical system, minimizing the risk of such issues.
Understanding the connection between proper wiring methods and wiring single-pole dimmer switches enables electricians and homeowners to make informed decisions and take appropriate steps to prevent electrical hazards, ensure code compliance, and extend the lifespan of their electrical systems. By adhering to proper wiring techniques, they can contribute to a well-designed and safe electrical environment for their homes or workplaces.
Troubleshooting
Troubleshooting is an essential aspect of wiring single-pole dimmer switches, enabling the identification and resolution of common issues that may arise during installation or operation. By understanding the connection between troubleshooting and wiring single-pole dimmer switches, electricians and homeowners can effectively diagnose and address these issues, ensuring a safe and reliable electrical system.
Common issues associated with dimmer switches include flickering lights, buzzing sounds, and dimmer switch failure. Flickering lights can be caused by loose connections, incompatible dimmer types, or overloading. Buzzing sounds may indicate an electrical fault, improper grounding, or a faulty dimmer switch. Dimmer switch failure can result from overheating, exceeding the load capacity, or using the wrong type of dimmer for the connected light fixtures.
Real-life examples of troubleshooting within the context of wiring single-pole dimmer switches include identifying and tightening loose wire connections to eliminate flickering lights, replacing a faulty dimmer switch to resolve persistent buzzing sounds, and verifying the load capacity of the dimmer switch to prevent overheating and premature failure.
The practical significance of understanding the connection between troubleshooting and wiring single-pole dimmer switches lies in its contribution to the overall safety and functionality of the electrical system. By effectively troubleshooting and resolving common issues, potential electrical hazards can be minimized, the lifespan of the dimmer switch and connected light fixtures can be extended, and optimal lighting performance can be maintained.
Safety Precautions
When wiring a single-pole dimmer switch, adhering to electrical safety precautions is paramount. These precautions minimize the risk of electrical shocks, fires, and other hazards. Understanding the connection between safety precautions and wiring a dimmer switch is essential for the safety of the installer and the occupants of the building.
- Turning Off Power: Before starting any electrical work, turn off the power to the circuit at the electrical panel. This prevents the risk of electrical shock and allows for safe handling of electrical components.
- Using Insulated Tools: Always use insulated tools when working with electrical components. Insulated tools have non-conductive handles that prevent the flow of electricity through the tool to the user’s hand.
- Wearing Protective Gear: Wear appropriate protective gear such as safety glasses and gloves when wiring a dimmer switch. This gear protects the installer from potential hazards such as flying debris or electrical sparks.
- Grounding: Ensure that the dimmer switch and all electrical components are properly grounded. Grounding provides a safe path for electrical current to flow in the event of a fault, preventing dangerous voltage from accumulating on the switch or other components.
Adhering to these safety precautions is crucial for the safe and successful wiring of a single-pole dimmer switch. By following these guidelines, electricians and homeowners can minimize the risk of accidents, protect themselves from harm, and ensure the proper functioning of the electrical system.
Code Compliance
When wiring a single-pole dimmer switch, adhering to local building and electrical codes is essential to ensure the safety and compliance of the installation. These codes establish minimum standards for electrical installations, including the proper selection, installation, and use of electrical components. By following these codes, electricians and homeowners can help prevent electrical fires, shocks, and other hazards.
- Permits and Inspections: Many localities require permits and inspections for electrical work, including the installation of dimmer switches. Obtaining a permit ensures that the work will be inspected by a qualified electrical inspector to verify compliance with code requirements.
- Wire and Cable Requirements: Electrical codes specify the minimum wire size and type that can be used for different applications. Using undersized or incorrect wire can lead to overheating and potential fire hazards.
- Grounding and Bonding: Proper grounding and bonding are essential for electrical safety. Codes require that all electrical components be properly grounded to prevent electrical shocks and ensure the safe operation of the electrical system.
- Switch and Dimmer Ratings: Electrical codes specify the maximum amperage and wattage ratings for dimmer switches. Using a dimmer switch that exceeds these ratings can lead to overheating and premature failure.
By understanding and following local building and electrical codes, electricians and homeowners can help ensure the safety and reliability of their electrical systems. Code compliance not only helps prevent accidents and hazards but also ensures that the electrical installation meets the minimum standards required by law.


Related Posts


