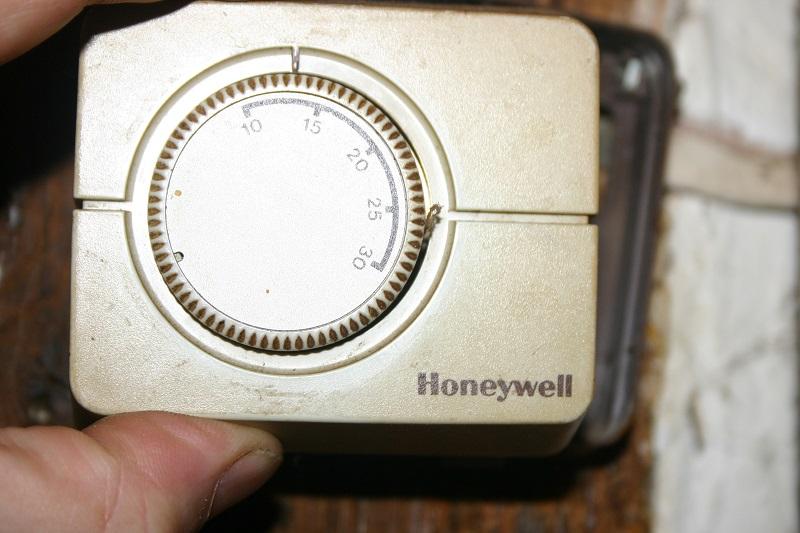
Wiring Old Honeywell Thermostat involves connecting wires to terminals on an obsolete Honeywell thermostat to establish a functional connection with a heating or cooling system. For instance, if an old Honeywell T87 thermostat needs replacement, proper wiring is crucial to ensure seamless temperature control.
Wiring Old Honeywell Thermostats is relevant in older buildings or during renovations where existing Honeywell thermostats need to be replaced or integrated with updated HVAC systems. Understanding this process offers benefits such as maintaining a comfortable indoor environment, avoiding costly service calls, and preserving the functionality of legacy HVAC systems.
A key historical development associated with wiring Honeywell thermostats is the introduction of color-coded wires in the 1950s. This standardization simplified the wiring process and made it easier for technicians to identify the purpose of each wire.
Moving forward, this article will delve into the intricacies of wiring Old Honeywell Thermostats, providing step-by-step instructions, safety considerations, and troubleshooting tips. It aims to empower homeowners and professionals with the knowledge and skills necessary to successfully navigate this process.
To grasp the intricacies of “Wiring Old Honeywell Thermostat,” understanding its key aspects is imperative. These aspects provide a comprehensive framework for exploring the topic’s essential dimensions, whether it be a noun, verb, adjective, or another part of speech.
- Wiring Diagram: Visual representation of wire connections
- Terminal Identification: Matching wires to correct thermostat terminals
- Color Coding: Standardizing wire colors for easy identification
- Safety Precautions: Ensuring electrical safety during the process
- Tools and Materials: Gathering necessary equipment for the job
- Troubleshooting Techniques: Diagnosing and resolving common issues
- Compatibility Considerations: Ensuring thermostat compatibility with HVAC system
- System Functionality: Understanding how wiring impacts thermostat operation
- Maintenance and Repair: Addressing ongoing thermostat upkeep
- Professional Assistance: When to seek expert guidance for complex tasks
These aspects are interconnected, forming a holistic understanding of wiring Old Honeywell Thermostats. For instance, comprehending wiring diagrams facilitates accurate terminal identification, while adhering to safety protocols ensures a risk-free installation. Moreover, troubleshooting techniques empower individuals to resolve minor issues, extending the thermostat’s lifespan. Ultimately, exploring these aspects provides a comprehensive roadmap for successful wiring and maintenance of Old Honeywell Thermostats.
Wiring Diagram: Visual representation of wire connections
Wiring diagrams are vital for understanding the intricacies of “Wiring Old Honeywell Thermostat“. They provide a visual representation of how wires connect to terminals on the thermostat, ensuring proper functionality and compatibility with the HVAC system.
-
Circuit Diagram
A circuit diagram displays the electrical connections between components, such as the thermostat, wires, and heating/cooling equipment. It provides a comprehensive view of the system’s electrical flow.
-
Terminal Layout
The diagram illustrates the arrangement of terminals on the thermostat. Each terminal has a specific purpose, such as connecting to power, heating, or cooling wires. Correctly identifying and connecting wires to the appropriate terminals is crucial.
-
Color Coding
Many wiring diagrams use color-coded wires to simplify identification and reduce installation errors. Standard color codes exist for different types of wires, such as red for power, white for neutral, and green for ground.
-
Compatibility Verification
Wiring diagrams help verify compatibility between the thermostat and the HVAC system. They ensure that the thermostat’s electrical specifications match the requirements of the heating and cooling equipment.
Wiring diagrams serve as essential tools for both homeowners and professionals tackling thermostat installation or replacement. They simplify the process, minimize errors, and promote system reliability. Understanding and interpreting wiring diagrams empowers individuals to confidently navigate the task of “Wiring Old Honeywell Thermostat”.
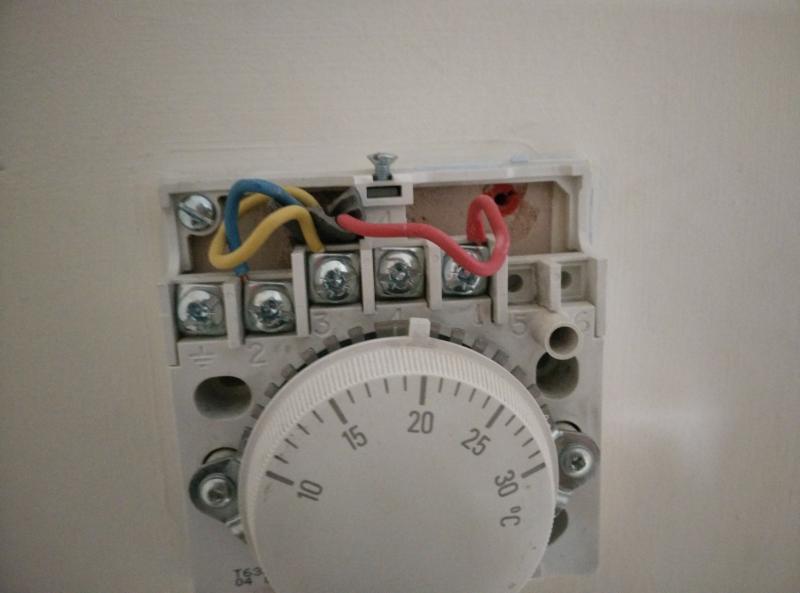
Terminal Identification: Matching wires to correct thermostat terminals
In the context of “Wiring Old Honeywell Thermostat,” Terminal Identification plays a pivotal role. Terminals are electrical connection points on the thermostat where wires from the HVAC system are attached. Matching wires to the correct terminals is critical to ensure proper functionality, safety, and system compatibility.
Incorrect terminal identification can lead to a range of issues, including:
Thermostat malfunction or failure Damage to the thermostat or HVAC equipment Electrical hazards, such as short circuits or fires
To avoid these risks, it is essential to carefully identify the terminals and match them to the appropriate wires. This involves understanding the purpose of each terminal, as well as the color coding and labeling conventions used by Honeywell and the HVAC industry.
Real-life examples of terminal identification within “Wiring Old Honeywell Thermostat” include:
- Connecting the red wire to the “R” terminal (power)
- Connecting the white wire to the “W” terminal (heating)
- Connecting the green wire to the “G” terminal (fan)
Understanding terminal identification is not only crucial for successful thermostat wiring but also for troubleshooting and maintenance. By knowing which wires are connected to which terminals, homeowners and technicians can quickly diagnose and resolve issues, ensuring the efficient and reliable operation of the HVAC system.
Color Coding: Standardizing wire colors for easy identification
Within the realm of “Wiring Old Honeywell Thermostat,” Color Coding emerges as a crucial aspect, simplifying the identification of wires and ensuring proper connections. Standardization of wire colors has revolutionized the wiring process, minimizing errors and enhancing the overall efficiency and safety of thermostat installation and maintenance.
-
Industry Standards
Color coding adheres to established industry standards, ensuring consistency across different manufacturers and models of thermostats and HVAC systems. This standardization allows technicians and homeowners to easily identify the purpose of each wire based on its color, regardless of the specific thermostat or equipment used.
-
Simplified Wiring
Color coding greatly simplifies the wiring process, especially for individuals who may not have extensive electrical experience. By matching colored wires to corresponding colored terminals, the risk of incorrect connections is significantly reduced, preventing potential malfunctions or safety hazards.
-
Enhanced Troubleshooting
In the event of troubleshooting or maintenance, color coding facilitates the quick identification of faulty wires or loose connections. By following the color-coded wires, technicians can trace the electrical pathway, locate the source of the issue, and implement the necessary repairs or adjustments.
-
Universal Compatibility
Color coding promotes universal compatibility between thermostats and HVAC systems from different manufacturers. Adherence to standardized color codes ensures that wires are connected correctly, regardless of the specific combination of thermostat and equipment used. This interchangeability enhances flexibility and simplifies system upgrades or replacements.
In conclusion, Color Coding plays a vital role in “Wiring Old Honeywell Thermostat,” providing a standardized and simplified approach to wire identification. By adhering to industry-established color codes, the wiring process becomes less daunting, errors are minimized, troubleshooting is facilitated, and universal compatibility is ensured. This standardization contributes to the safe, efficient, and reliable operation of Honeywell thermostats and the HVAC systems they control.
Safety Precautions: Ensuring electrical safety during the process
When undertaking “Wiring Old Honeywell Thermostat,” Safety Precautions are of paramount importance to safeguard against electrical hazards. These precautions form the cornerstone of responsible and successful thermostat installation and maintenance, ensuring the well-being of individuals and the integrity of the electrical system.
-
Electrical Hazard Awareness
Recognizing potential electrical hazards, such as exposed wires, faulty connections, or incorrect wiring, is crucial. Understanding the risks associated with electricity helps individuals take appropriate precautions to prevent accidents.
-
Power Isolation
Before commencing any wiring work, it is imperative to isolate the power supply to the thermostat and HVAC system. This involves switching off the circuit breaker or removing the fuse associated with the system to prevent live electrical currents during installation or maintenance.
-
Proper Grounding
Ensuring proper grounding of the thermostat and HVAC system is essential for safety. Grounding provides a safe path for electrical faults to dissipate, reducing the risk of electrical shocks or equipment damage.
-
Insulated Tools and Equipment
Utilizing insulated tools and equipment, such as pliers, screwdrivers, and wire strippers, is vital to prevent electrical shock. These tools have non-conductive handles and coverings to safeguard against accidental contact with live wires.
Adhering to these safety precautions is not only a responsible practice but also a legal requirement in many jurisdictions. By prioritizing electrical safety during “Wiring Old Honeywell Thermostat,” individuals can ensure a risk-free and code-compliant installation or maintenance process. Ignoring these precautions can lead to severe consequences, including electrical fires, personal injury, or even fatalities. Therefore, it is imperative to approach this task with the utmost care and attention to safety protocols.
Tools and Materials: Gathering necessary equipment for the job
In the context of “Wiring Old Honeywell Thermostat,” Tools and Materials play a crucial role in ensuring a successful and safe installation or maintenance process. Assembling the appropriate equipment empowers individuals to undertake this task with confidence and precision.
-
Essential Tools
Basic tools such as screwdrivers, pliers, and wire strippers are indispensable for manipulating wires, terminals, and other components during thermostat wiring. Choosing the correct size and type of tools for the job is essential to avoid damage to equipment or injury.
-
Safety Gear
Prioritizing safety involves utilizing insulated tools and wearing appropriate protective gear, including gloves and safety glasses. These precautions minimize the risk of electrical shock or eye injuries, ensuring a safe working environment.
-
Replacement Parts
Having replacement parts, such as fuses, wires, or terminals, on hand is advisable in case of any unexpected issues during the wiring process. This preparedness reduces the need for additional trips to hardware stores and minimizes downtime for the HVAC system.
-
Wire Management Tools
Tools like wire nuts, electrical tape, and cable ties assist in organizing and securing wires, preventing clutter and ensuring a neat and professional installation. Proper wire management also enhances the safety and reliability of the thermostat system.
By gathering the necessary Tools and Materials and utilizing them appropriately, individuals can approach “Wiring Old Honeywell Thermostat” with confidence and competence. These elements contribute to a smooth and successful installation or maintenance experience, ensuring the optimal performance and longevity of the HVAC system.
Troubleshooting Techniques: Diagnosing and resolving common issues
When faced with issues related to “Wiring Old Honeywell Thermostat,” employing effective Troubleshooting Techniques is crucial for restoring optimal functionality and ensuring a comfortable indoor environment. These techniques empower individuals to diagnose and resolve common problems, minimizing the need for professional assistance and maximizing system reliability.
-
Identifying Faulty Wiring
Inspecting the wiring for loose connections, damaged insulation, or incorrect connections can help pinpoint the source of electrical issues. Using a multimeter to test for continuity and voltage can further assist in identifying faulty wires.
-
Testing Thermostat Components
Checking thermostat components, such as the display, buttons, and sensors, for proper operation is essential. Replacing faulty components can resolve issues like unresponsive buttons or inaccurate temperature readings.
-
Examining HVAC Equipment
Troubleshooting may extend to the HVAC equipment connected to the thermostat. Inspecting the furnace, air conditioner, or heat pump for any issues, such as clogged filters, faulty motors, or refrigerant leaks, can help identify potential causes of system malfunctions.
-
Resetting the Thermostat
Resetting the thermostat to its factory settings can resolve software glitches or configuration errors. This simple step may restore normal operation without the need for extensive troubleshooting.
Mastering Troubleshooting Techniques empowers individuals to maintain their Honeywell thermostats and HVAC systems efficiently. By diagnosing and resolving common issues promptly, they can ensure a comfortable and energy-efficient indoor environment while avoiding costly repairs or premature system failures.
Compatibility Considerations: Ensuring thermostat compatibility with HVAC system
In the context of “Wiring Old Honeywell Thermostat,” Compatibility Considerations play a pivotal role in ensuring the seamless integration and effective operation of the thermostat with the existing HVAC system. Compatibility encompasses various aspects that directly impact the successful installation and performance of the thermostat.
Firstly, thermostats and HVAC systems operate on specific electrical specifications, such as voltage and amperage. Mismatched specifications can lead to electrical hazards, damage to equipment, or incorrect system behavior. Therefore, verifying compatibility ensures that the thermostat’s electrical requirements align with the capabilities of the HVAC system, preventing potential issues.
Moreover, thermostats communicate with HVAC equipment using specific protocols and technologies. For instance, some thermostats utilize proprietary communication methods, while others adhere to industry-standard protocols like Zigbee or Wi-Fi. Ensuring compatibility involves selecting a thermostat that supports the communication protocol employed by the HVAC system, enabling effective data exchange and system control.
Real-life examples of compatibility considerations within “Wiring Old Honeywell Thermostat” include matching the voltage rating of the thermostat to the power supply of the HVAC system, selecting a thermostat that supports the type of heating and cooling equipment (e.g., heat pump, gas furnace), and verifying compatibility with any existing smart home or home automation systems.
Understanding and addressing Compatibility Considerations is crucial for successful thermostat wiring and system operation. By ensuring compatibility between the thermostat and HVAC system, individuals can avoid costly mistakes, system malfunctions, and ensure optimal performance and energy efficiency.
System Functionality: Understanding how wiring impacts thermostat operation
Within the realm of “Wiring Old Honeywell Thermostat,” System Functionality emerges as a crucial aspect, delving into the intricate relationship between wiring and the seamless operation of the thermostat. Understanding how wiring configurations influence thermostat behavior is paramount to ensuring efficient and effective temperature control.
-
Electrical Circuitry
The thermostat’s wiring establishes electrical pathways, connecting it to the power source and HVAC equipment. Proper wiring ensures that the thermostat receives adequate power and can transmit control signals to the heating and cooling systems.
-
Temperature Sensing
The thermostat’s ability to accurately sense temperature relies on its wiring. Correctly wired temperature sensors enable the thermostat to gather accurate temperature readings, ensuring precise temperature control and occupant comfort.
-
System Compatibility
Wiring plays a pivotal role in ensuring compatibility between the thermostat and the HVAC system. Matching the thermostat’s wiring capabilities to the specific requirements of the heating and cooling equipment is essential for proper communication and system functionality.
-
Safety Features
Wiring is integral to the operation of safety features in the thermostat. For instance, emergency shutdown mechanisms and overheating protection rely on proper wiring to function effectively, safeguarding both the thermostat and the HVAC system from potential hazards.
Comprehending System Functionality empowers individuals to approach “Wiring Old Honeywell Thermostat” with confidence, ensuring that the thermostat operates as intended, delivers accurate temperature control, and maintains the desired indoor environment. By understanding the impact of wiring on the thermostat’s electrical circuitry, temperature sensing, compatibility, and safety features, individuals can make informed decisions and achieve optimal system performance.
Maintenance and Repair: Addressing ongoing thermostat upkeep
Within the realm of “Wiring Old Honeywell Thermostat,” Maintenance and Repair emerge as crucial aspects, ensuring the longevity and optimal performance of the thermostat over time. Regular upkeep and timely repairs are essential to prevent minor issues from escalating into more significant problems, ensuring a comfortable and energy-efficient indoor environment.
-
Battery Replacement
Honeywell thermostats often rely on batteries for power. Regular battery replacement, typically every 1-2 years, ensures uninterrupted operation and accurate temperature control.
-
Sensor Cleaning
Temperature sensors can accumulate dust and debris over time, affecting their accuracy. Periodic cleaning of these sensors using a soft brush or compressed air helps maintain precise temperature readings.
-
Terminal Inspection
Loose or corroded wire connections at terminals can disrupt the thermostat’s functionality. Regularly inspecting and tightening terminals ensures a secure electrical connection and prevents intermittent issues.
-
Firmware Updates
Honeywell releases firmware updates to address bugs, improve functionality, and enhance compatibility. Applying these updates keeps the thermostat operating at its best and ensures access to the latest features.
By incorporating these Maintenance and Repair practices into the overall care of “Wiring Old Honeywell Thermostat,” individuals can extend the thermostat’s lifespan, minimize the likelihood of breakdowns, and ensure continued comfort and energy efficiency in their homes.
Professional Assistance: When to seek expert guidance for complex tasks
Within the realm of “Wiring Old Honeywell Thermostat,” there arise situations where professional assistance becomes paramount. Identifying these instances ensures proper and safe execution of complex tasks, preventing potential hazards and ensuring optimal system performance.
-
Electrical Expertise
Electrical wiring involves working with live electrical currents, posing risks of shock or electrical fires. Seeking professional assistance from licensed electricians ensures adherence to electrical codes, safe handling of wires, and proper grounding techniques.
-
HVAC System Compatibility
Matching the thermostat to the specific HVAC system requires expertise in system compatibility. Professionals can assess the existing HVAC setup, determine compatibility issues, and recommend the appropriate thermostat model.
-
Advanced Features and Programming
Modern Honeywell thermostats offer advanced features like Wi-Fi connectivity, remote access, and complex programming options. Professional assistance can guide users through these complexities, ensuring optimal utilization of the thermostat’s capabilities.
-
Troubleshooting Complex Issues
Intermittent problems or persistent malfunctions can be challenging to diagnose and resolve. Professionals possess the experience and diagnostic tools to identify underlying causes and implement effective repairs.
Recognizing when to seek professional assistance empowers individuals to make informed decisions, ensuring the safe, efficient, and reliable operation of their Honeywell thermostats and HVAC systems.


Related Posts


