Wiring Nest Thermostat refers to the electrical connections required to install and operate a Nest Thermostat, a smart home device that manages heating, ventilation, and air conditioning (HVAC). For instance, to wire a Nest Thermostat, one must connect wires from the thermostat base to corresponding terminals on the HVAC system, ensuring proper power supply and communication between the devices.
Wiring Nest Thermostats offers numerous advantages. Smart thermostats allow users to remotely control and adjust their home’s temperature, leading to improved energy efficiency and comfort. Wireless connectivity and scheduling capabilities enable homeowners to maintain optimal temperature levels while away, reducing energy consumption. Historically, the advent of advanced wireless technologies has played a crucial role in the development of smart thermostats like Nest, allowing for remote control and real-time monitoring.
This article delves into the specific steps and considerations involved in wiring Nest Thermostats, providing a comprehensive guide to ensure safe and functional installation. By understanding the wiring process, homeowners can optimize their HVAC systems, enhance home comfort, and contribute to energy conservation.
Wiring a Nest Thermostat is a critical aspect of smart home automation, enabling efficient temperature management and energy conservation. Understanding the essential elements involved in the wiring process is crucial to ensure a successful and functional installation.
- Compatibility: Ensuring compatibility between the Nest Thermostat and HVAC system.
- Safety: Following safety guidelines and electrical codes during the wiring process.
- Tools: Gathering necessary tools, including screwdrivers, wire strippers, and a voltage tester.
- Wiring Diagram: Referencing the manufacturer’s wiring diagram for accurate connections.
- Power Supply: Identifying the power source for the Nest Thermostat and connecting it correctly.
- Thermostat Base: Wiring the thermostat base to the appropriate terminals on the HVAC system.
- Sensor Wires: Connecting sensor wires to extend the thermostat’s temperature sensing capabilities.
- Wi-Fi Connectivity: Establishing a stable Wi-Fi connection for remote control and access.
- Testing: Thoroughly testing the wired connections to ensure proper functionality.
- Troubleshooting: Identifying and resolving any wiring-related issues that may arise.
These key aspects provide a comprehensive overview of the wiring process for Nest Thermostats. By addressing each aspect carefully, homeowners can ensure a safe, efficient, and effective installation that optimizes their HVAC system’s performance and enhances home comfort.
Compatibility
Compatibility plays a critical role in the successful wiring and operation of a Nest Thermostat. Before embarking on the wiring process, it is essential to ensure compatibility between the thermostat and the existing HVAC system.
- Thermostat Model: The first step is to verify that the Nest Thermostat model is compatible with the specific HVAC system. Different Nest Thermostat models may have varying compatibility requirements.
- Power Requirements: The Nest Thermostat requires a compatible power source, typically provided by the HVAC system. It is crucial to ensure that the HVAC system can provide the necessary voltage and amperage.
- Wiring Configuration: The wiring configuration of the Nest Thermostat must match the wiring of the HVAC system. Mismatched wiring can lead to improper functionality or even damage to the thermostat or HVAC system.
- Features and Functionality: Consider the specific features and functionality desired from the Nest Thermostat. Some advanced features, such as remote control or scheduling, may require additional compatibility considerations.
Ensuring compatibility between the Nest Thermostat and HVAC system is essential for a seamless and effective installation. By carefully considering these factors, homeowners can avoid potential issues and optimize the performance of their smart thermostat.
Safety
When wiring a Nest Thermostat, adhering to safety guidelines and electrical codes is paramount. Electrical work, if not handled properly, can lead to electrical hazards such as shocks, fires, and damage to equipment. By following established safety measures, homeowners can minimize risks and ensure the safe and proper functioning of their Nest Thermostat.
Safety guidelines and electrical codes provide a framework for best practices in electrical installations. These guidelines cover various aspects, including proper wire handling, circuit protection, and grounding. By following these guidelines, homeowners can reduce the likelihood of electrical accidents and ensure the reliability of their electrical systems.
For instance, proper wire handling involves using the correct wire gauge for the intended current load and ensuring secure connections to prevent arcing or overheating. Circuit protection devices, such as fuses or circuit breakers, safeguard electrical circuits from overloads and short circuits. Grounding provides a safe path for excess electrical current to dissipate, reducing the risk of electrical shocks and equipment damage.
Understanding the importance of safety guidelines and electrical codes empowers homeowners to make informed decisions during the wiring process. By prioritizing safety, homeowners can avoid potential hazards and ensure the longevity and reliability of their Nest Thermostat and the entire electrical system.
Tools
When embarking on the task of wiring a Nest Thermostat, having the appropriate tools is crucial for ensuring a successful and safe installation. These tools enable homeowners to handle electrical components, prepare wires, and verify electrical connections, contributing to the overall efficiency and effectiveness of the wiring process.
- Screwdrivers: Used for tightening and loosening electrical terminals, securing wires, and assembling various components of the Nest Thermostat and HVAC system.
- Wire Strippers: Essential for removing the insulation from electrical wires, allowing for proper connections to terminals and ensuring secure electrical contact.
- Voltage Tester: A safety tool used to detect the presence of electrical voltage in wires, helping to prevent electrical shocks and ensuring that the system is de-energized before handling.
- Other Tools: Depending on the specific Nest Thermostat model and HVAC system configuration, additional tools such as a drill, level, or pliers may be necessary for mounting, securing, and completing the installation.
Having the right tools empowers homeowners to approach the wiring process with confidence and precision. By utilizing screwdrivers, wire strippers, voltage testers, and other necessary tools, homeowners can ensure proper electrical connections, minimize the risk of electrical hazards, and achieve a successful and functional Nest Thermostat installation.
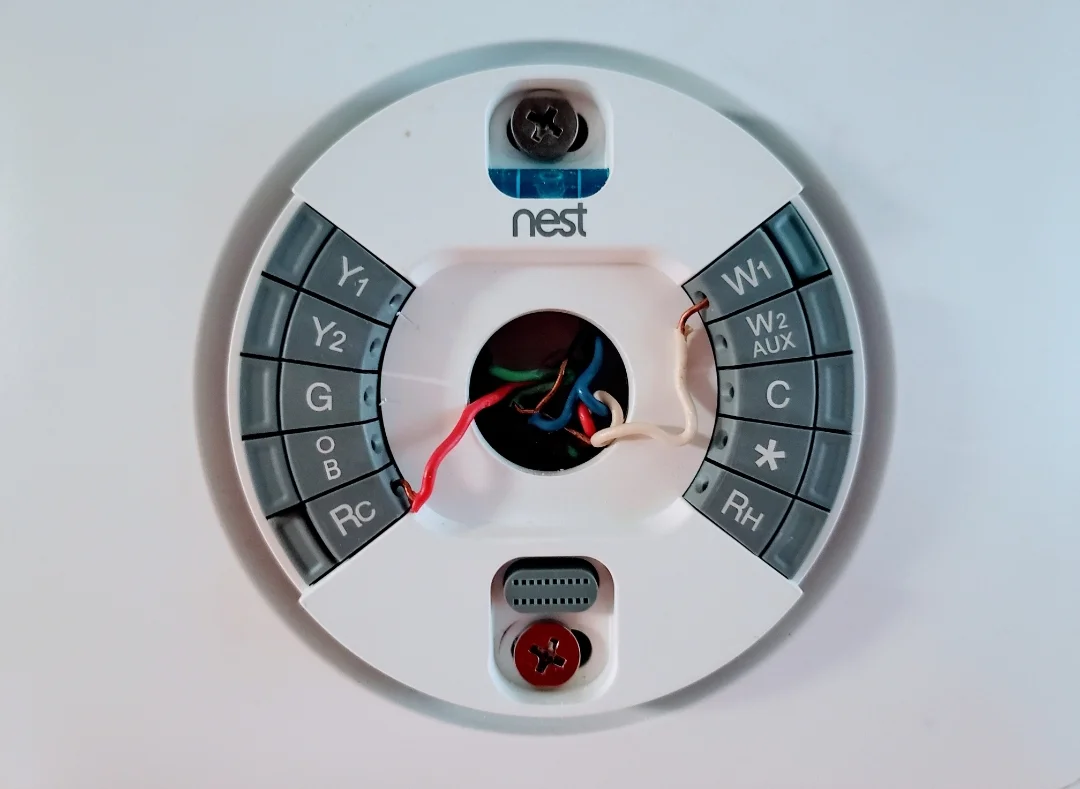
Wiring Diagram
When wiring a Nest Thermostat, referencing the manufacturer’s wiring diagram assumes paramount importance. This meticulously crafted document provides a visual representation of the electrical connections required for a successful and functional installation. By adhering to the specified guidelines, homeowners can ensure the safe and effective operation of their smart thermostat.
- Components and Terminals: The wiring diagram clearly identifies the various components of the Nest Thermostat and HVAC system, along with their corresponding terminals. This information is crucial for establishing proper electrical connections and avoiding mismatched wiring.
- Wire Color Coding: Most wiring diagrams utilize color-coded wires to differentiate between different functions. Understanding this color coding simplifies the wiring process, ensuring that wires are connected to the correct terminals.
- Power Requirements: The wiring diagram specifies the power requirements for the Nest Thermostat. This information helps homeowners determine the appropriate power source and ensure that the system is receiving the necessary voltage and amperage.
- Safety Features: Some wiring diagrams include safety features, such as grounding instructions and circuit protection recommendations. These measures contribute to the overall safety and reliability of the installation.
Referencing the manufacturer’s wiring diagram is not merely a suggestion but a critical step in the wiring process. By carefully following the provided instructions, homeowners can minimize the risk of electrical hazards, ensure optimal thermostat performance, and enjoy the benefits of a smart and efficient home.
Power Supply
The power supply serves as the lifeblood of a Nest Thermostat, enabling it to perform its essential functions of regulating temperature and managing HVAC systems. Without a reliable power source, the thermostat becomes inoperable, rendering the smart home automation capabilities inaccessible.
Identifying the appropriate power source and connecting it correctly are critical components of wiring a Nest Thermostat. The power requirements may vary depending on the specific model, and it is crucial to consult the manufacturer’s specifications to ensure compatibility. Common power sources include low-voltage wires from an HVAC system or an external power adapter plugged into a standard electrical outlet.
Incorrectly connecting the power supply can lead to a range of issues, including failure to power on, erratic behavior, or even electrical hazards. Adhering to the wiring diagram and following safety guidelines minimizes these risks and ensures the safe and efficient operation of the Nest Thermostat.
In practical applications, understanding the power supply requirements andenables homeowners to troubleshoot and resolve power-related issues with their Nest Thermostats independently. For instance, if the thermostat does not power on, diagnosing potential problems with the power supply and connections allows for timely rectification, restoring the system to optimal functionality.
Thermostat Base
Within the comprehensive process of “Wiring Nest Thermostat”, the “Thermostat Base: Wiring the thermostat base to the appropriate terminals on the HVAC system” assumes critical importance. This intricate aspect involves establishing secure electrical connections between the thermostat base and the HVAC system, ensuring seamless communication and effective temperature control.
- Terminal Identification: Identifying the correct terminals on both the thermostat base and the HVAC system is paramount. Mismatched connections can lead to improper functionality or even damage to the equipment.
- Wire Preparation: Proper preparation of wires, including stripping the insulation to expose bare copper conductors, is crucial for establishing reliable electrical connections.
- Secure Connections: Tightening the terminal screws firmly ensures secure connections between the thermostat base and the HVAC system, preventing loose connections that could compromise system performance.
- Power Considerations: Verifying the compatibility of the power supply with the thermostat base is essential. Incorrect power supply can lead to malfunctions or damage to the thermostat.
Understanding and meticulously executing the “Thermostat Base: Wiring the thermostat base to the appropriate terminals on the HVAC system” aspect not only ensures the proper functioning of the Nest Thermostat but also contributes to the overall reliability and efficiency of the HVAC system. Accurate wiring of the thermostat base establishes a stable foundation for effective temperature management and optimization of energy consumption.
Sensor Wires
In the context of “Wiring Nest Thermostat,” the aspect of “Sensor Wires: Connecting sensor wires to extend the thermostat’s temperature sensing capabilities” holds significant importance. By utilizing sensor wires, the thermostat can extend its reach beyond its immediate location, enabling more precise and comprehensive temperature monitoring and control within a given space.
- Remote Temperature Sensing: Sensor wires allow the thermostat to measure temperatures in remote areas of the home, such as individual rooms or outdoor spaces, ensuring a more accurate representation of the overall thermal environment.
- HVAC System Optimization: By gathering temperature data from various points, the thermostat can optimize the operation of the HVAC system, adjusting heating or cooling output to specific zones or areas as needed, resulting in improved comfort and energy efficiency.
- Improved Comfort and Control: Extending the thermostat’s temperature sensing capabilities with sensor wires empowers users with greater control over their home’s comfort levels. They can create personalized temperature zones, ensuring optimal comfort in different areas of the house.
- Energy Savings: By precisely controlling temperatures in specific areas, sensor wires contribute to energy savings. The thermostat can avoid unnecessary heating or cooling in unoccupied rooms or areas with specific temperature requirements, reducing energy consumption.
In conclusion, the “Sensor Wires: Connecting sensor wires to extend the thermostat’s temperature sensing capabilities” aspect plays a crucial role in enhancing the functionality and effectiveness of “Wiring Nest Thermostat.” It enables more precise temperature monitoring, optimizes HVAC system operation, improves comfort and control, and contributes to energy savings, ultimately creating a more comfortable and energy-efficient home environment.
Wi-Fi Connectivity
Within the context of “Wiring Nest Thermostat,” “Wi-Fi Connectivity: Establishing a stable Wi-Fi connection for remote control and access” assumes paramount importance as a critical component that unlocks the full potential of the smart thermostat. It empowers users with convenient and versatile control over their home’s temperature management, regardless of their physical location.
A stable Wi-Fi connection acts as a bridge between the Nest Thermostat and the user’s smartphone or tablet. Through a dedicated app, homeowners can remotely monitor and adjust the thermostat’s settings, ensuring a comfortable home environment even when they’re away. This connectivity also allows for scheduling, geofencing, and energy monitoring features, enhancing the thermostat’s functionality and efficiency.
Real-life examples abound to illustrate the practical applications of Wi-Fi connectivity in “Wiring Nest Thermostat.” Parents can remotely adjust the temperature of their child’s room to create a comfortable sleep environment. Individuals working late can preheat their homes on their commute back, ensuring a warm welcome upon arrival. Vacationers can remotely monitor their thermostats, adjusting temperatures to save energy while away and ensuring a comfortable return home.
Understanding the connection between “Wi-Fi Connectivity: Establishing a stable Wi-Fi connection for remote control and access” and “Wiring Nest Thermostat” empowers homeowners to make informed decisions about their smart home setup. It highlights the importance of a reliable Wi-Fi network to fully harness the benefits of remote control, scheduling, and energy-saving features. By ensuring a stable Wi-Fi connection, users can unlock the full potential of their Nest Thermostats, creating a comfortable, convenient, and energy-efficient home environment.
Testing
When undertaking “Wiring Nest Thermostat,” “Testing: Thoroughly testing the wired connections to ensure proper functionality” emerges as an indispensable component, directly influencing the thermostat’s performance and overall system integrity.
Properly testing the wired connections is crucial for several reasons. First, it verifies the accuracy of the wiring process, ensuring that all connections are secure and compliant with electrical codes. Second, testing helps identify potential issues or defects in the wiring, preventing malfunctions or safety hazards. By proactively detecting and resolving any discrepancies, homeowners can ensure the reliable and efficient operation of their Nest Thermostat.
Real-life examples underscore the practical significance of “Testing: Thoroughly testing the wired connections to ensure proper functionality.” For instance, loose connections can lead to intermittent thermostat operation or inaccurate temperature readings. Thorough testing can identify such issues, allowing for prompt corrective action. Additionally, testing can detect potential electrical faults, preventing the risk of short circuits or electrical fires.
Understanding the connection between “Testing: Thoroughly testing the wired connections to ensure proper functionality” and “Wiring Nest Thermostat” is essential for homeowners seeking a safe and effective smart home solution. By meticulously testing the wired connections, they can ensure the thermostat operates as intended, maintaining optimal home comfort, energy efficiency, and peace of mind.
Troubleshooting
Within the multifaceted process of “Wiring Nest Thermostat,” “Troubleshooting: Identifying and resolving any wiring-related issues that may arise” plays a pivotal role in ensuring the system’s seamless operation and long-term reliability. This aspect involves proactively addressing potential wiring-related challenges, minimizing disruptions, and maintaining optimal thermostat performance.
- Identifying Loose Connections: Loose connections can disrupt communication between the thermostat and the HVAC system, leading to inaccurate temperature readings or erratic behavior. Troubleshooting involves examining all wire connections, ensuring they are secure and properly tightened.
- Testing Wire Continuity: To ensure reliable data transmission, testing wire continuity is essential. Using a multimeter, each wire can be tested to verify its integrity and identify any breaks or damage that may affect thermostat functionality.
- Checking Power Supply: The Nest Thermostat requires a stable power supply to operate effectively. Troubleshooting involves verifying that the power source is providing the correct voltage and that the thermostat is properly connected to the power terminals.
- Resolving Wiring Errors: Mismatched or incorrect wiring can lead to malfunctions or safety hazards. Troubleshooting requires careful examination of the wiring diagram and physical inspection to identify and rectify any wiring errors, ensuring the system operates as intended.
Understanding the significance of “Troubleshooting: Identifying and resolving any wiring-related issues that may arise” empowers homeowners to maintain a well-functioning Nest Thermostat system. By proactively addressing potential wiring issues, they can prevent minor problems from escalating into major concerns, ensuring optimal home comfort, energy efficiency, and peace of mind.


Related Posts


