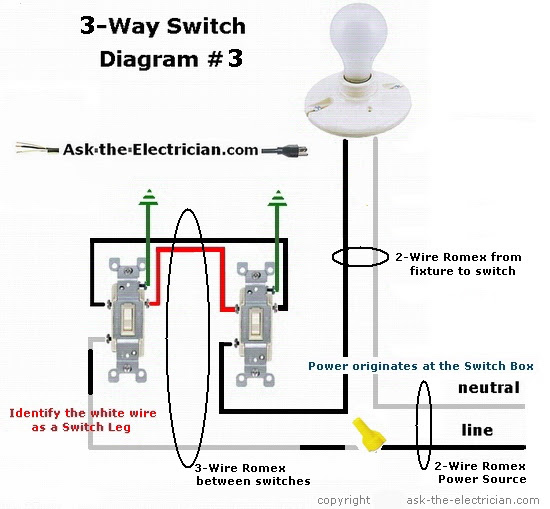
Wiring a Leviton 3 way switch, a crucial electrical component, involves connecting it to a power source, a light fixture, and another 3 way switch. When wired properly, this switch enables controlling a single light fixture from two different locations, such as the top and bottom of a staircase. It is commonly used in hallways, large rooms, and outdoor areas.
The Leviton 3 way switch offers several benefits and improvements. Its robust construction ensures longevity and reliability, while its UL listing guarantees compliance with safety standards. Moreover, its intuitive design simplifies installation, saving time and effort during electrical projects. Historically, the development of the 3 way switch revolutionized lighting control, providing greater convenience and flexibility in electrical systems.
Wiring a Leviton 3 way switch demands careful attention to detail and adherence to electrical codes. This article delves into the wiring process, offering step-by-step instructions, diagrams, and troubleshooting tips. It aims to empower homeowners and electricians with the knowledge and skills necessary to successfully install and maintain 3 way switches, ensuring optimal lighting control in various residential and commercial settings.
When wiring a Leviton 3 way switch, focusing on key aspects is paramount for a successful electrical installation. These aspects encompass various dimensions of the wiring process, ensuring safety, functionality, and longevity.
- Circuit Compatibility: Verifying compatibility between the switch and the electrical circuit is crucial, considering voltage, amperage, and load requirements.
- Wire Selection: Choosing the appropriate wire gauge and type is essential for safe current carrying capacity and insulation.
- Grounding: Establishing a proper ground connection ensures electrical safety and prevents shock hazards.
- Box Selection: Selecting an appropriate electrical box provides adequate space for wire connections and switch mounting.
- Switch Placement: Determining the optimal location for the switch ensures accessibility and ease of use.
- Wire Stripping: Stripping wire to the correct length exposes the conductor for secure connections.
- Terminal Connections: Tightening terminal screws securely ensures proper electrical contact and prevents overheating.
- Testing: Thoroughly testing the switch and circuit after wiring verifies proper functionality and identifies any potential issues.
Understanding and addressing these key aspects during the wiring process empowers individuals with the knowledge and skills to confidently tackle electrical projects involving Leviton 3 way switches. Whether it’s ensuring circuit compatibility, selecting appropriate wires, or testing for proper functionality, each aspect contributes to the safe and effective operation of the electrical system.
Circuit Compatibility
When embarking on a Leviton 3 way switch wiring project, ensuring circuit compatibility is paramount for a safe and efficient electrical installation. It entails examining three key electrical characteristics: voltage, amperage, and load requirements. Ignoring these factors can lead to circuit malfunctions, switch damage, and potential fire hazards.
- Voltage Compatibility: The switch must be rated for the voltage of the electrical circuit. Installing a switch with a lower voltage rating can cause overheating and switch failure, while using a switch with a higher voltage rating can damage the switch and connected devices.
- Amperage Compatibility: The switch must have an amperage rating that exceeds the total amperage draw of the connected light fixtures. Overloading a switch can cause overheating, switch failure, and potential fire hazards.
- Load Type Compatibility: The switch must be compatible with the type of load it will control. Leviton 3 way switches are typically rated for incandescent, fluorescent, or LED lighting loads. Using a switch with an incompatible load rating can affect switch performance and lifespan.
- Neutral Wire Requirement: 3 way switches require a neutral wire for proper operation. This wire provides a return path for electrical current and is typically white or gray in color.
Neglecting circuit compatibility can compromise the safety and functionality of the electrical system. Therefore, carefully assessing voltage, amperage, and load requirements before wiring a Leviton 3 way switch is critical. This ensures the switch operates safely, efficiently, and within its intended design parameters.
Wire Selection
In the context of wiring a Leviton 3 way switch, wire selection plays a critical role in ensuring the safe and efficient operation of the electrical system. The appropriate wire gauge and type directly influence the switch’s ability to handle electrical current without overheating or insulation failure.
Wire gauge refers to the thickness of the wire, which determines its current carrying capacity. Using a wire with too small a gauge can lead to excessive current draw, causing the wire to overheat and potentially start a fire. Conversely, using a wire with too large a gauge may not provide adequate current flow, affecting the switch’s performance.
Wire type is equally important. The type of insulation used on the wire determines its resistance to heat, moisture, and other environmental factors. Using the wrong type of wire can lead to insulation breakdown, electrical shock, or even fire. For example, in damp or outdoor locations, moisture-resistant wire is essential to prevent insulation damage and ensure safe operation.
Real-life examples underscore the importance of proper wire selection. In one instance, a homeowner used an undersized wire to connect a Leviton 3 way switch to a high-wattage light fixture. The excessive current draw caused the wire to overheat, melting the insulation and creating a fire hazard. In another case, a contractor used outdoor-rated wire for an indoor installation. The wire’s thicker insulation made it difficult to fit into the electrical box, leading to loose connections and intermittent switch operation.
Understanding the connection between wire selection and wiring a Leviton 3 way switch is crucial for ensuring the safety and reliability of the electrical system. By carefully choosing the appropriate wire gauge and type, homeowners and electricians can prevent potential hazards and ensure optimal switch performance. This understanding extends beyond residential applications, impacting commercial and industrial settings where electrical safety and efficiency are paramount.
Grounding
In the context of wiring a Leviton 3 way switch, grounding plays a crucial role in ensuring the safety of the electrical system and preventing potential shock hazards. Grounding provides a low-resistance path for electrical current to flow back to the electrical panel, creating a safe and controlled circuit. Without proper grounding, electrical faults or surges can result in dangerous voltage buildup on the switch or connected fixtures, posing a risk of electric shock.
Real-life examples illustrate the importance of grounding in Leviton 3 way switch wiring. In one instance, a homeowner neglected to ground the switch during installation. When a fault occurred in the lighting circuit, the switch became energized, causing a severe shock to the person operating it. In another case, improper grounding led to a ground fault circuit interrupter (GFCI) tripping repeatedly, disrupting power to the lights controlled by the switch.
Understanding the significance of grounding in wiring a Leviton 3 way switch is essential for ensuring the safety of the electrical system. By establishing a proper ground connection, homeowners and electricians can prevent shock hazards, protect against electrical faults, and ensure the reliable operation of the switch. This understanding extends beyond residential applications, impacting commercial and industrial settings where electrical safety is paramount.
Box Selection
In the context of wiring a Leviton 3 way switch, box selection is a crucial aspect that directly influences the safety, functionality, and longevity of the electrical installation. An appropriate electrical box ensures sufficient space for wire connections, switch mounting, and insulation, preventing overcrowding and potential hazards.
- Box Size: The size of the electrical box should be adequate to accommodate the switch, wire connections, and any additional components, such as wire nuts or junction terminals. Overcrowding the box can hinder proper wire management, making it difficult to establish secure connections and increasing the risk of overheating or short circuits.
- Box Type: Electrical boxes come in various types, including single-gang, double-gang, and multi-gang boxes. The type of box required depends on the number of switches or devices to be installed. Using the wrong type of box can result in insufficient space or difficulty mounting the switch securely.
- Box Material: Electrical boxes are typically made of metal or plastic. Metal boxes provide better durability and grounding, while plastic boxes are more economical and easier to work with. The choice of material should consider the environment and the specific requirements of the installation.
- Box Location: The location of the electrical box should be carefully determined to ensure accessibility, ease of use, and compliance with electrical codes. Factors to consider include switch height, proximity to other electrical devices, and potential obstacles.
Understanding the importance of box selection in wiring a Leviton 3 way switch empowers homeowners and electricians to make informed decisions during the installation process. By selecting an appropriate electrical box, they can ensure proper wire management, secure switch mounting, and long-term reliability of the electrical system. This understanding extends beyond residential applications, impacting commercial and industrial settings where electrical safety and efficiency are paramount.
Switch Placement
The placement of a Leviton 3 way switch plays a crucial role in the overall functionality and user experience of an electrical system. Determining the optimal location involves considering factors such as accessibility, ease of use, and compliance with electrical codes.
Switch placement directly influences how conveniently and safely users can control lighting or other electrical devices. A well-placed switch should be within easy reach and visible, avoiding any obstacles or awkward hand movements. This is especially important in high-traffic areas or for individuals with limited mobility.
For example, in a hallway, switches should be placed at the entrance and exit points to ensure convenient light control from either end. In a bedroom, the switch should be positioned near the bedside for easy access while getting in or out of bed. Proper switch placement also enhances the aesthetic appeal of a room, contributing to a cohesive and user-friendly environment.
Moreover, switch placement affects the wiring process. The location of the switch determines the length and routing of the electrical wires, influencing the overall cost and complexity of the installation. Careful planning and consideration of switch placement can help minimize wire usage and simplify the wiring process, especially in complex electrical systems.
Neglecting switch placement can lead to for users and potential safety hazards. Improperly placed switches may require users to fumble in the dark or strain to reach them, increasing the risk of accidents. Additionally, incorrect switch placement can make it difficult to maintain or troubleshoot the electrical system, leading to reduced efficiency and increased downtime.
Understanding the connection between switch placement and wiring a Leviton 3 way switch is essential for ensuring a safe, accessible, and user-friendly electrical system. By carefully considering the optimal location for the switch, homeowners and electricians can create electrical installations that meet both functional and aesthetic requirements.
Wire Stripping
In the context of wiring a Leviton 3 way switch, the process of wire stripping plays a critical role in ensuring the safety, reliability, and functionality of the electrical system. Wire stripping involves removing a portion of the wire’s insulation to expose the conductive metal beneath. This exposed conductor is then connected to the switch’s terminals to establish a secure electrical pathway.
The length of the stripped wire is crucial, as too little exposed conductor can result in a weak connection, leading to overheating, arcing, and potential electrical hazards. Conversely, stripping too much insulation can weaken the wire, making it susceptible to damage and increasing the risk of short circuits.
For instance, in one real-life scenario, an electrician failed to strip enough insulation from the wires when wiring a Leviton 3 way switch. As a result, the loose connection caused the switch to overheat and eventually failed, leaving the connected lights inoperable. In another case, excessive insulation stripping left the wires vulnerable, leading to a short circuit that tripped the circuit breaker and disrupted power to an entire room.
Understanding the connection between wire stripping and wiring a Leviton 3 way switch empowers homeowners and electricians to make informed decisions during the installation process. By ensuring that wires are stripped to the correct length, they can minimize the risk of electrical hazards, enhance the switch’s performance, and extend its lifespan. This understanding extends beyond residential applications, impacting commercial and industrial settings where electrical safety and reliability are paramount.
Terminal Connections
The connection between “Terminal Connections: Tightening terminal screws securely ensures proper electrical contact and prevents overheating.” and “Wiring Leviton 3 Way Switch” is critical in ensuring the safety, reliability, and functionality of an electrical system. When wiring a Leviton 3 way switch, loose or improperly tightened terminal screws can lead to a range of problems, including:
- Poor Electrical Contact: Loose terminal screws prevent the establishment of secure electrical contact between the switch and the wires, leading to arcing, overheating, and potential electrical fires.
- Increased Resistance: Loose terminal screws create higher electrical resistance, resulting in energy loss and reduced switch efficiency.
- Switch Malfunction: Overheating and increased resistance can cause the switch to malfunction, leading to intermittent operation or complete failure.
Real-life examples underscore the importance of proper terminal connections in wiring a Leviton 3 way switch. In one instance, a homeowner experienced flickering lights and intermittent switch operation. Upon inspection, it was discovered that the terminal screws on the switch were loose, causing poor electrical contact and arcing. In another case, a loose terminal screw led to overheating, damaging the switch and requiring its replacement.
Tightening terminal screws securely is a critical step in wiring a Leviton 3 way switch as it ensures proper electrical contact, minimizes resistance, and prevents overheating. This understanding is not only essential for the safety and reliability of the switch but also for the efficient operation of the electrical system.
In practical applications, ensuring proper terminal connections extends beyond residential settings, impacting commercial and industrial environments where electrical safety and reliability are paramount. By understanding the connection between terminal connections and wiring a Leviton 3 way switch, homeowners, electricians, and professionals can make informed decisions during installation and maintenance, minimizing the risk of electrical hazards and ensuring the optimal performance of electrical systems.
Testing
Testing is a critical component of wiring a Leviton 3 Way Switch as it ensures the proper functionality of the switch and the safety of the electrical system. Without thorough testing, potential issues may remain undetected, leading to electrical hazards or switch malfunction.
Real-life examples demonstrate the importance of testing in wiring a Leviton 3 Way Switch. In one instance, a homeowner skipped testing after installation and later discovered that the switch was not working correctly, resulting in intermittent lighting. Upon further inspection, it was found that a loose wire connection was causing the issue. In another case, a faulty switch was installed without testing, leading to a short circuit and a blown fuse.
The practical applications of this understanding extend beyond residential settings, impacting commercial and industrial environments where electrical safety and reliability are paramount. By understanding the connection between testing and wiring a Leviton 3 Way Switch, homeowners, electricians, and professionals can minimize the risk of electrical hazards and ensure the optimal performance of electrical systems.
In summary, testing after wiring a Leviton 3 Way Switch is crucial to verify functionality, identify potential issues, and ensure electrical safety. It is a vital step in the installation process, contributing to the reliability and longevity of the electrical system. Neglecting testing can lead to electrical hazards and switch malfunction, emphasizing the importance of thorough testing in electrical installations.


Related Posts


