Definition and example: A wiring diagram for a Harley Davidson motorcycle is a detailed schematic representation of the electrical system of the vehicle. It shows the layout of the electrical components, the connections between them, and the flow of electricity through the system.
Importance, benefits, and historical context: Wiring diagrams are essential for troubleshooting electrical problems, as they allow technicians to trace the path of electricity through the system and identify any breaks or shorts. They are also useful for planning modifications to the electrical system, such as adding accessories or upgrading components. The development of computer-aided design (CAD) software has made it easier to create and modify wiring diagrams, making them more accessible to do-it-yourselfers and professional mechanics alike.
Transition to main article topics: In this article, we will explore the different types of wiring diagrams used for Harley Davidson motorcycles, how to read and interpret them, and how to use them to troubleshoot electrical problems.
Wiring diagrams are essential for understanding and troubleshooting the electrical system of a Harley Davidson motorcycle. They provide a visual representation of the electrical components and their connections, making it possible to trace the flow of electricity through the system. This is important for diagnosing electrical problems, as it allows technicians to identify any breaks or shorts in the circuit. Wiring diagrams are also useful for planning modifications to the electrical system, such as adding accessories or upgrading components.
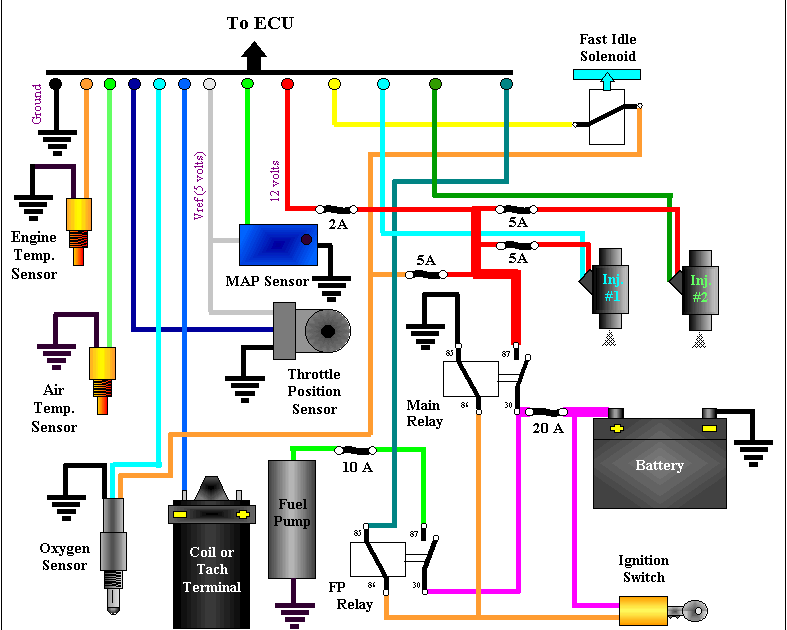
- Components: Wiring diagrams show the location and function of all the electrical components in the motorcycle, including the battery, starter, alternator, voltage regulator, ignition coils, and lighting.
- Connections: Wiring diagrams show how the electrical components are connected to each other, using color-coded lines to represent the different wires.
- Circuit protection: Wiring diagrams show the location of fuses and circuit breakers, which are designed to protect the electrical system from damage in the event of a short circuit.
- Grounding: Wiring diagrams show how the electrical system is grounded to the motorcycle’s frame, which is essential for completing the electrical circuit.
- Troubleshooting: Wiring diagrams can be used to troubleshoot electrical problems by tracing the flow of electricity through the system and identifying any breaks or shorts.
- Modifications: Wiring diagrams can be used to plan modifications to the electrical system, such as adding accessories or upgrading components.
- Customization: Wiring diagrams can be used to customize the electrical system to meet the specific needs of the rider.
- Performance: Wiring diagrams can be used to optimize the performance of the electrical system by ensuring that all components are properly connected and functioning.
- Safety: Wiring diagrams can be used to ensure that the electrical system is safe by identifying and correcting any potential hazards.
- Maintenance: Wiring diagrams can be used to perform maintenance on the electrical system, such as replacing fuses or cleaning connections.
By understanding the key aspects of wiring diagrams, Harley Davidson riders can troubleshoot electrical problems, make modifications to the electrical system, and ensure that their motorcycles are safe and running at peak performance.
Components
Wiring diagrams are essential for understanding and troubleshooting the electrical system of a Harley Davidson motorcycle. They provide a visual representation of the electrical components and their connections, making it possible to trace the flow of electricity through the system. This is important for diagnosing electrical problems, as it allows technicians to identify any breaks or shorts in the circuit. Wiring diagrams also show the location and function of all the electrical components in the motorcycle, including the battery, starter, alternator, voltage regulator, ignition coils, and lighting.
- Battery: The battery provides the electrical power to start the motorcycle and run the electrical system. It is important to maintain the battery properly to ensure that it is always charged and ready to use.
- Starter: The starter motor is responsible for starting the motorcycle engine. It is important to keep the starter motor clean and well-maintained to ensure that it is always able to start the engine.
- Alternator: The alternator is responsible for generating electricity to power the electrical system and charge the battery. It is important to keep the alternator clean and well-maintained to ensure that it is always able to generate electricity.
- Voltage regulator: The voltage regulator is responsible for regulating the voltage of the electrical system. It is important to keep the voltage regulator clean and well-maintained to ensure that it is always able to regulate the voltage.
By understanding the location and function of the electrical components in a Harley Davidson motorcycle, riders can troubleshoot electrical problems, make modifications to the electrical system, and ensure that their motorcycles are safe and running at peak performance.
Connections
Connections are a critical component of wiring diagrams for Harley Davidson motorcycles. They show how the electrical components are connected to each other, using color-coded lines to represent the different wires. This information is essential for understanding how the electrical system works and for troubleshooting electrical problems.
For example, if a rider is experiencing problems with their motorcycle’s lighting, they can use the wiring diagram to trace the flow of electricity from the battery to the headlight. This will help them to identify any breaks or shorts in the circuit that may be causing the problem.
Wiring diagrams can also be used to plan modifications to the electrical system, such as adding accessories or upgrading components. By understanding how the electrical components are connected, riders can ensure that they are making the correct connections and that the modifications will not damage the electrical system.
In short, connections are a critical part of wiring diagrams for Harley Davidson motorcycles. They provide essential information for understanding how the electrical system works, troubleshooting electrical problems, and planning modifications to the electrical system.
Circuit protection: Wiring diagrams show the location of fuses and circuit breakers, which are designed to protect the electrical system from damage in the event of a short circuit.
In the context of “Wiring Diagram Harley Davidson”, circuit protection plays a crucial role in ensuring the safety and longevity of the motorcycle’s electrical system. Wiring diagrams provide detailed information on the location of fuses and circuit breakers, which serve as critical safeguards against electrical faults and potential damage to components.
- Fuses: Fuses are designed to break the circuit and prevent excessive current flow in the event of a short circuit or overload. Wiring diagrams indicate the location and amperage rating of fuses, allowing for quick identification and replacement if blown.
- Circuit breakers: Circuit breakers function similarly to fuses, but they can be reset rather than replaced. Wiring diagrams specify the location and trip current of circuit breakers, enabling riders to reset them if tripped due to a temporary overload.
- Grounding: Wiring diagrams also illustrate the grounding points in the electrical system. Proper grounding is essential for safety, as it provides a low-resistance path for excess current to flow back to the battery’s negative terminal.
- Component protection: By interrupting the flow of excessive current, fuses and circuit breakers protect sensitive electrical components from damage. This includes modules such as the engine control unit (ECU), ignition system, and lighting.
Understanding the location and function of circuit protection elements through wiring diagrams empowers Harley Davidson riders to diagnose and resolve electrical issues effectively. It also promotes safe riding practices by preventing electrical fires and component failures that could compromise the motorcycle’s performance and safety.
Grounding
In the context of “Wiring Diagram Harley Davidson”, grounding plays a vital role in ensuring the proper functioning and safety of the motorcycle’s electrical system. It provides a low-resistance path for electrical current to flow back to the battery’s negative terminal, completing the electrical circuit and preventing dangerous voltage spikes or imbalances.
- Frame Grounding: The motorcycle’s frame serves as the primary grounding point for the electrical system. Wiring diagrams indicate the specific locations where electrical components are connected to the frame, ensuring a solid and reliable ground connection.
- Engine Grounding: The engine block is another crucial grounding point, particularly for components such as the starter motor and ignition system. Proper grounding of the engine ensures efficient starting and optimal performance.
- Component Grounding: Individual electrical components, such as lights, switches, and sensors, also require proper grounding to function correctly. Wiring diagrams specify the grounding points for each component, allowing for easy identification and troubleshooting.
- Ground Loops: Avoiding ground loops is essential in electrical system design. Ground loops occur when multiple grounding paths exist, creating unintended current flow and potential electrical noise. Wiring diagrams help identify and eliminate potential ground loops, ensuring a clean and efficient electrical system.
Understanding the principles and practices of grounding through wiring diagrams empowers Harley Davidson riders and mechanics to diagnose and resolve electrical issues effectively. Proper grounding ensures the safe and reliable operation of the motorcycle’s electrical system, preventing component damage, electrical malfunctions, and potential hazards.
Troubleshooting
Within the context of “Wiring Diagram Harley Davidson”, troubleshooting plays a central role in diagnosing and resolving electrical issues that may arise in the motorcycle’s electrical system. Wiring diagrams serve as essential tools for effective troubleshooting, providing a detailed roadmap of the electrical system’s components and their interconnections.
Troubleshooting through wiring diagrams involves tracing the flow of electricity through the system, allowing Harley Davidson riders and mechanics to pinpoint the exact location of electrical faults. By identifying breaks or shorts in the circuit, they can determine the root cause of the problem and implement the appropriate repair or replacement.
Real-life examples of troubleshooting using wiring diagrams in “Wiring Diagram Harley Davidson” include:
- Diagnosing a faulty headlight by tracing the circuit from the battery to the headlight bulb, identifying a break in the wiring.
- Resolving a starting issue by following the wiring diagram to locate a loose connection in the starter circuit.
- Troubleshooting an intermittent electrical failure by examining the wiring diagram to identify potential grounding issues or loose connections.
Understanding the principles of troubleshooting with wiring diagrams empowers Harley Davidson enthusiasts to maintain and repair their motorcycles confidently and effectively. It enables them to identify and resolve electrical problems, ensuring the motorcycle’s optimal performance and safety on the road.
Modifications
Within the context of “Wiring Diagram Harley Davidson”, modifications to the electrical system play a significant role in customizing and enhancing the motorcycle’s performance, aesthetics, and functionality. Wiring diagrams serve as essential tools for planning and executing these modifications, providing a structured and detailed roadmap of the electrical system’s components and their interconnections.
- Accessory Integration: Wiring diagrams enable the seamless integration of accessories such as additional lighting, audio systems, or GPS devices. By following the wiring diagram, riders can identify the appropriate connection points, ensuring proper functionality and preventing electrical conflicts.
- Component Upgrades: Wiring diagrams guide the upgrading of electrical components, such as replacing halogen headlights with LEDs or installing a high-output alternator. The diagrams provide insights into the compatibility of new components with the existing electrical system, ensuring optimal performance and longevity.
- Performance Enhancement: Modifications to the electrical system can enhance the motorcycle’s performance. Wiring diagrams facilitate the installation of ignition upgrades, fuel injection tuners, or exhaust systems. These modifications require careful planning to ensure proper integration with the motorcycle’s electronic control units.
- Safety and Convenience: Wiring diagrams support modifications that improve safety and convenience. Examples include the installation of heated grips, auxiliary lighting, or voltage monitoring systems. By following the diagrams, riders can ensure that these additions are wired correctly, avoiding potential electrical hazards.
Overall, the ability to modify the electrical system using wiring diagrams empowers Harley Davidson riders to personalize their motorcycles, enhance their riding experience, and optimize their performance. Wiring diagrams play a crucial role in ensuring that modifications are planned and executed safely and effectively.
Customization
Within the realm of “Wiring Diagram Harley Davidson,” customization holds significant importance. Wiring diagrams empower riders to tailor the electrical system of their motorcycles to suit their individual preferences, enhance performance, and cater to specific requirements. By understanding the intricacies of the electrical system through wiring diagrams, riders can unleash their creativity and craft a motorcycle that truly reflects their riding style and needs.
- Tailored Lighting: Wiring diagrams enable riders to customize their motorcycle’s lighting system. They can install additional LED lights, modify the wiring for unique lighting patterns, or upgrade the headlight for enhanced visibility. These modifications not only improve the aesthetics of the motorcycle but also contribute to increased safety on the road.
- Performance Enhancements: Wiring diagrams provide insights into the electrical system’s architecture, allowing riders to make informed decisions regarding performance upgrades. They can install aftermarket ignition systems, fuel injection controllers, or exhaust systems. These modifications can optimize engine performance, resulting in improved acceleration, power, and fuel efficiency.
- Accessory Integration: Wiring diagrams facilitate the seamless integration of various accessories into the motorcycle’s electrical system. Riders can install heated grips for cold-weather comfort, GPS navigation systems for route planning, or audio systems for entertainment. By following the wiring diagrams, riders can ensure that these accessories are properly connected and functioning optimally.
- Safety and Convenience Features: Wiring diagrams also support the installation of safety and convenience features. Riders can add voltage monitoring systems to keep track of battery health, install auxiliary lighting for increased visibility at night, or integrate security systems to protect their motorcycles from theft. These modifications contribute to a safer and more enjoyable riding experience.
In conclusion, the ability to customize the electrical system using wiring diagrams empowers Harley Davidson riders to personalize their motorcycles, enhance their riding experience, and optimize performance. Wiring diagrams play a crucial role in enabling riders to tailor their motorcycles to meet their specific needs, creating unique and customized machines that reflect their individuality and passion for riding.
Performance
Within the realm of “Wiring Diagram Harley Davidson,” optimizing performance is paramount. Wiring diagrams empower riders to enhance the electrical system’s efficiency, reliability, and overall performance by ensuring that all components are properly connected and functioning. By understanding the intricate connections and components through wiring diagrams, riders can identify areas for improvement and implement modifications to maximize the motorcycle’s potential.
- Optimized Ignition System: Wiring diagrams provide insights into the ignition system’s components, allowing riders to upgrade spark plugs, ignition coils, and ignition modules. These upgrades can improve combustion efficiency, leading to increased power, smoother acceleration, and reduced emissions.
- Enhanced Charging System: Wiring diagrams facilitate the analysis of the charging system, enabling riders to upgrade the alternator, voltage regulator, and battery. These upgrades ensure a reliable power supply, prevent battery drain, and support the addition of electrical accessories.
- Improved Lighting: Wiring diagrams guide the installation of upgraded lighting systems, such as LED headlights and auxiliary lighting. These upgrades enhance visibility, safety, and the motorcycle’s overall aesthetics.
- Reduced Electrical Losses: Wiring diagrams help identify areas of potential electrical losses, such as loose connections, damaged wires, and poor grounding. By addressing these issues, riders can minimize electrical resistance, improve current flow, and enhance the performance of electrical components.
In conclusion, wiring diagrams play a crucial role in optimizing the performance of the electrical system in “Wiring Diagram Harley Davidson.” By understanding the schematics and connections through wiring diagrams, riders can make informed decisions regarding upgrades and modifications. These optimizations not only enhance the motorcycle’s performance but also contribute to increased safety, reliability, and riding enjoyment.
Safety
Wiring diagrams play a crucial role in ensuring the safety of the electrical system in “Wiring Diagram Harley Davidson.” By providing a detailed schematic representation of the electrical components and their connections, wiring diagrams empower riders to identify and correct any potential hazards that could lead to electrical malfunctions, fires, or other safety concerns.
A critical aspect of electrical safety is the prevention of short circuits, which can occur when two conductors with different electrical potentials come into contact. Wiring diagrams allow riders to trace the path of electrical current through the system and identify any points where wires may be vulnerable to damage or insulation breakdown. By addressing these potential hazards, riders can prevent short circuits and ensure the safe operation of the electrical system.
Furthermore, wiring diagrams help riders identify and correct issues with grounding, which is essential for the proper functioning and safety of the electrical system. A proper ground connection provides a low-resistance path for electrical current to flow back to the battery, preventing voltage spikes and potential electrical hazards. Wiring diagrams guide riders in ensuring that all electrical components are properly grounded, reducing the risk of electrical shocks, fires, and other safety concerns.
In conclusion, the connection between “Safety: Wiring diagrams can be used to ensure that the electrical system is safe by identifying and correcting any potential hazards” and “Wiring Diagram Harley Davidson” is critical. Wiring diagrams empower riders to understand the complexities of the electrical system, identify potential hazards, and implement corrective measures to ensure the safe operation of their motorcycles.
Maintenance
In the context of “Wiring Diagram Harley Davidson,” understanding the connection between maintenance and wiring diagrams is crucial for ensuring the optimal performance and longevity of the motorcycle’s electrical system. Wiring diagrams provide a visual representation of the electrical components and their connections, enabling riders to perform maintenance tasks efficiently and effectively.
Replacing fuses and cleaning connections are two common maintenance tasks that can be easily performed with the guidance of wiring diagrams. Fuses protect the electrical system from damage caused by excessive current flow, and they may need to be replaced if they blow due to a fault. Wiring diagrams indicate the location and amperage rating of fuses, making it easy to identify and replace blown fuses.
Cleaning connections is another important maintenance task, as dirty or corroded connections can lead to electrical problems. Wiring diagrams help riders locate and access electrical connections, allowing them to clean and inspect the terminals to ensure proper conductivity. By maintaining clean and secure connections, riders can prevent electrical malfunctions, voltage drops, and potential safety hazards.
Overall, the connection between “Maintenance: Wiring diagrams can be used to perform maintenance on the electrical system, such as replacing fuses or cleaning connections” and “Wiring Diagram Harley Davidson” is critical for ensuring the proper functioning and longevity of the motorcycle’s electrical system. By understanding the schematics and connections through wiring diagrams, riders can perform essential maintenance tasks, identify potential problems, and ensure the safe and reliable operation of their motorcycles.


Related Posts


