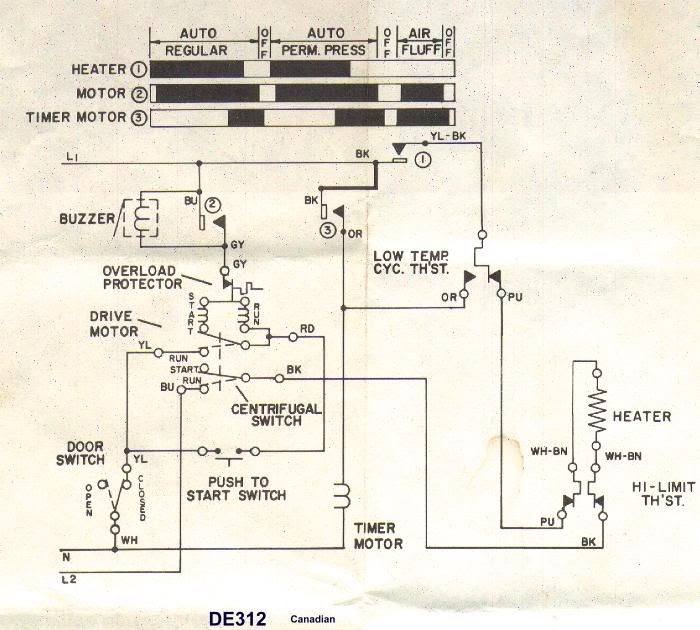
Wiring Diagram For Maytag Dryer is a detailed representation of the electrical connections within a Maytag dryer. It illustrates the path of electrical current from the power source through various components to the motor and heating elements. Each wire is identified by color, gauge, and function.
Wiring diagrams play a crucial role in the installation, maintenance, and troubleshooting of electrical systems. They provide a clear visual guide for technicians to trace wire connections, identify potential faults, and ensure proper functioning.
One key historical development in the field of electrical diagrams was the development of computer-aided design (CAD) software. CAD programs allow engineers to create accurate and detailed wiring diagrams digitally, saving time and reducing errors.
In this article, we will delve deeper into the components, functions, and applications of wiring diagrams for Maytag dryers. We will explore the different types of wires used, the safety precautions to consider, and the advancements in wiring technology.
Wiring diagrams for Maytag dryers are essential for understanding the electrical connections and troubleshooting any issues that may arise. They provide a visual representation of the electrical system, making it easier to identify and resolve problems.
- Components: Wiring diagrams show the different electrical components of the dryer, such as the motor, heating element, and thermostat.
- Connections: Diagrams illustrate how these components are connected to each other and to the power source.
- Troubleshooting: By following the wiring diagram, technicians can trace the flow of electricity and identify any breaks or faults in the system.
- Installation: Wiring diagrams are used during the installation of a new dryer to ensure that all electrical connections are made correctly.
- Maintenance: Diagrams can be used for regular maintenance tasks, such as cleaning and inspecting electrical components.
- Safety: Wiring diagrams help ensure that the dryer is operating safely by providing information about proper grounding and electrical connections.
- Efficiency: By understanding the electrical connections, technicians can identify any inefficiencies in the system and make adjustments to improve performance.
- Compliance: Wiring diagrams are often required for compliance with electrical codes and standards.
In conclusion, wiring diagrams for Maytag dryers are invaluable tools for understanding, troubleshooting, and maintaining these appliances. They provide a clear visual representation of the electrical system, making it easier to identify and resolve problems, ensuring safety, and improving efficiency.
Components
Wiring diagrams for Maytag dryers illustrate the electrical connections between various components, including the motor, heating element, and thermostat. These components are crucial for the proper functioning of the dryer.
The motor is responsible for rotating the dryer drum, while the heating element generates heat to dry the clothes. The thermostat monitors the temperature inside the dryer and regulates the heating element accordingly. These components work together to ensure that the clothes are dried efficiently and safely.
Understanding the connections between these components is essential for troubleshooting and repairing Maytag dryers. By referring to the wiring diagram, technicians can quickly identify the source of a problem and make the necessary repairs.
For example, if the dryer is not heating, the wiring diagram can help technicians determine if the problem is with the heating element, the thermostat, or a loose connection. This information helps them isolate the issue and fix it quickly.
In conclusion, the components shown in wiring diagrams for Maytag dryers play a vital role in the functioning of the appliance. Understanding the connections between these components is crucial for troubleshooting, repairing, and maintaining Maytag dryers.
Connections
In the context of “Wiring Diagram For Maytag Dryer”, the aspect of “Connections: Diagrams illustrate how these components are connected to each other and to the power source” plays a crucial role in understanding the electrical system of the dryer. It provides a blueprint for technicians to trace the flow of electricity and identify any potential faults.
- Power Source Connection: Wiring diagrams show how the dryer is connected to the main power source, typically a household electrical outlet. This connection provides the electrical energy necessary to operate the dryer’s components.
- Component Interconnections: Diagrams illustrate the electrical connections between the various components within the dryer, such as the motor, heating element, thermostat, and control panel. These interconnections allow the components to communicate and function together.
- Grounding: Wiring diagrams indicate the grounding connections, which are essential for safety. Grounding provides a path for electrical current to flow safely to the ground in the event of a fault, preventing electrical shock.
- Wire Types and Colors: Diagrams specify the types of wires used in the dryer’s electrical system, along with their color coding. This information helps technicians identify and trace wires easily, facilitating troubleshooting and repairs.
In conclusion, the “Connections: Diagrams illustrate how these components are connected to each other and to the power source” aspect of “Wiring Diagram For Maytag Dryer” is vital for understanding the electrical system and ensuring the safe and efficient operation of the appliance.
Troubleshooting
In the context of “Wiring Diagram For Maytag Dryer”, the aspect of “Troubleshooting: By following the wiring diagram, technicians can trace the flow of electricity and identify any breaks or faults in the system” holds immense significance. It empowers technicians with a systematic approach to diagnose and resolve electrical issues within the dryer.
- Visual Inspection: Wiring diagrams provide a visual representation of the electrical system, allowing technicians to inspect the connections and identify any loose wires, damaged insulation, or burnt components.
- Continuity Testing: Using a multimeter, technicians can perform continuity tests to check if the electrical current is flowing properly through the wires. This helps identify breaks or faults in the wiring.
- Voltage Testing: By measuring the voltage at various points in the circuit, technicians can determine if there is a voltage drop or interruption, indicating a potential fault.
- Component Isolation: Wiring diagrams enable technicians to isolate individual components, such as the motor or heating element, and test them separately to pinpoint the source of the problem.
Overall, “Troubleshooting: By following the wiring diagram, technicians can trace the flow of electricity and identify any breaks or faults in the system” is an essential aspect of “Wiring Diagram For Maytag Dryer”. It provides a structured and efficient method for diagnosing and resolving electrical issues, ensuring the safe and reliable operation of Maytag dryers.
Installation
In the context of “Wiring Diagram For Maytag Dryer”, the aspect of “Installation: Wiring diagrams are used during the installation of a new dryer to ensure that all electrical connections are made correctly” plays a critical role in setting up and operating the dryer safely and efficiently. Wiring diagrams provide a step-by-step guide for technicians and homeowners to follow during the installation process.
An improperly installed dryer can pose electrical hazards, such as short circuits, electrical fires, or shock hazards. By using a wiring diagram, installers can ensure that all electrical connections are made according to the manufacturer’s specifications and local electrical codes.
The wiring diagram guides the installer through the process of connecting the dryer to the power source, grounding the appliance, and connecting the various electrical components, including the motor, heating element, and control panel.
For example, the diagram will specify the type of electrical wire to use, the color coding of the wires, and the proper termination of wire connections. It will also indicate the location of the ground terminal and the need for proper grounding to prevent electrical shock.
By following the wiring diagram during installation, technicians and homeowners can ensure that the dryer is connected correctly, reducing the risk of electrical problems and ensuring optimal performance.
In summary, “Installation: Wiring diagrams are used during the installation of a new dryer to ensure that all electrical connections are made correctly” is a crucial aspect of “Wiring Diagram For Maytag Dryer”. It helps ensure the safety and proper functioning of the appliance, providing a systematic approach to electrical connections and reducing the risk of electrical hazards.
Maintenance
In the context of “Wiring Diagram For Maytag Dryer”, the aspect of “Maintenance: Diagrams can be used for regular maintenance tasks, such as cleaning and inspecting electrical components” highlights the importance of ongoing care to ensure the safe and efficient operation of a Maytag dryer. Wiring diagrams play a vital role in guiding maintenance procedures, enabling technicians and homeowners to perform regular checks and upkeep.
By referring to the wiring diagram, technicians can identify the location and function of each electrical component within the dryer. This information is crucial for proper cleaning and inspection, as it helps technicians understand the potential risks and hazards associated with each component.
For example, the wiring diagram will indicate the location of electrical terminals, wire connections, and potential hot spots that require careful attention during maintenance. By following the diagram, technicians can systematically inspect these areas for signs of wear, corrosion, or damage.
Regular cleaning and inspection of electrical components, as guided by the wiring diagram, can help prevent electrical faults, extend the lifespan of the dryer, and ensure optimal performance. By proactively addressing potential issues, technicians can minimize the risk of breakdowns, costly repairs, or even electrical accidents.
In summary, “Maintenance: Diagrams can be used for regular maintenance tasks, such as cleaning and inspecting electrical components” is a critical aspect of “Wiring Diagram For Maytag Dryer”. It emphasizes the importance of ongoing maintenance to ensure the safety, reliability, and longevity of Maytag dryers.
Safety
Within the context of “Wiring Diagram For Maytag Dryer”, the aspect of “Safety: Wiring diagrams help ensure that the dryer is operating safely by providing information about proper grounding and electrical connections” holds paramount importance. It underscores the crucial role of wiring diagrams in safeguarding the user and the appliance from electrical hazards.
- Prevention of Electrical Shock: Wiring diagrams provide clear guidelines for proper grounding, which is essential for preventing electrical shock. By ensuring that the dryer is properly grounded, the risk of current leakage is minimized, protecting the user from potentially fatal accidents.
- Elimination of Fire Hazards: Improper electrical connections can lead to overheating and electrical fires. Wiring diagrams specify the correct wire gauge and insulation requirements for each component, ensuring that the electrical system can safely handle the current load. This reduces the risk of electrical fires, safeguarding both the dryer and the surrounding environment.
- Compliance with Electrical Codes: Wiring diagrams help ensure that the dryer’s electrical installation meets the requirements of local electrical codes and standards. These codes are in place to minimize the risk of electrical accidents and ensure the overall safety of the electrical system.
- Facilitating Troubleshooting: In the event of an electrical issue, wiring diagrams provide a valuable tool for troubleshooting. By tracing the electrical connections, technicians can quickly identify the source of the problem, reducing repair time and minimizing the risk of further damage to the dryer.
In conclusion, “Safety: Wiring diagrams help ensure that the dryer is operating safely by providing information about proper grounding and electrical connections” is a critical aspect of “Wiring Diagram For Maytag Dryer”. Wiring diagrams empower technicians and homeowners alike to install, maintain, and troubleshoot Maytag dryers safely and effectively, preventing electrical hazards and ensuring the longevity of the appliance.
Efficiency
Within the context of “Wiring Diagram For Maytag Dryer”, the concept of “Efficiency: By understanding the electrical connections, technicians can identify any inefficiencies in the system and make adjustments to improve performance” plays a crucial role in optimizing the dryer’s operation and energy consumption. Wiring diagrams provide a comprehensive understanding of the electrical connections within the dryer, enabling technicians to analyze and identify areas where efficiency can be improved.
For instance, by studying the wiring diagram, technicians can assess the electrical resistance of different components, such as the heating element and motor. High resistance can lead to energy loss and reduced efficiency. By identifying these inefficiencies, technicians can make adjustments, such as upgrading to more efficient components or optimizing the electrical connections, to minimize energy wastage and improve the dryer’s overall performance.
Furthermore, wiring diagrams can help technicians identify potential sources of electrical interference or electromagnetic radiation, which can impact the dryer’s operation and efficiency. By understanding the electrical connections, they can implement measures to mitigate these effects, ensuring the dryer operates at its optimal efficiency.
In summary, “Efficiency: By understanding the electrical connections, technicians can identify any inefficiencies in the system and make adjustments to improve performance” is a critical aspect of “Wiring Diagram For Maytag Dryer”. It empowers technicians to analyze, optimize, and maintain the dryer’s electrical system, leading to improved energy efficiency, enhanced performance, and reduced operating costs.
Compliance
Within the context of “Wiring Diagram For Maytag Dryer”, compliance with electrical codes and standards is of paramount importance. Wiring diagrams play a vital role in ensuring that a Maytag dryer is installed and maintained in accordance with these regulations, safeguarding the user and the property from electrical hazards.
Electrical codes and standards are established by regulatory bodies to ensure the safety and integrity of electrical installations. These codes specify the minimum requirements for electrical wiring, components, and equipment, including dryers. Wiring diagrams provide a detailed representation of the dryer’s electrical system, allowing inspectors to verify that it meets the applicable codes and standards.
For example, the National Electrical Code (NEC) in the United States requires that all electrical installations, including dryers, comply with its provisions to ensure safety and prevent electrical fires. Wiring diagrams help ensure that the dryer’s electrical connections, grounding, and other safety features meet the NEC requirements. This compliance is essential for obtaining building permits, passing electrical inspections, and maintaining insurance coverage.
Moreover, wiring diagrams facilitate troubleshooting and repairs by providing a clear visual representation of the electrical system. This enables technicians to quickly identify and resolve any electrical issues, ensuring that the dryer operates safely and efficiently.
In summary, compliance with electrical codes and standards is a critical aspect of “Wiring Diagram For Maytag Dryer”. Wiring diagrams are indispensable tools for ensuring that Maytag dryers meet these requirements, safeguarding user safety, preventing electrical hazards, and facilitating efficient troubleshooting and repairs.


![[DIAGRAM] Pigtail Wire Diagrams For Dryers](https://i0.wp.com/i.stack.imgur.com/HnRZA.jpg?w=665&ssl=1)


Related Posts


