A wiring diagram for a John Deere 318 is a detailed technical drawing that illustrates the various electrical connections, components, and wiring within the lawn tractor’s electrical system. It provides a visual representation of the electrical circuitry, including the connections between different components, the location of fuses and relays, and the routing of electrical harnesses and wires.
Wiring diagrams are essential for understanding, troubleshooting, and repairing electrical problems within the John Deere 318. They enable technicians, mechanics, and do-it-yourselfers to quickly identify the location and function of electrical components, trace electrical connections, and pinpoint the source of electrical faults. Additionally, wiring diagrams assist in the modification or installation of electrical accessories and upgrades on the lawn tractor.
The development of advanced computerized diagnostic tools and automated wiring diagrams has greatly enhanced the accuracy and efficiency of electrical troubleshooting. However, the fundamental purpose and value of wiring diagrams remain unchanged, providing a clear and comprehensive representation of the electrical system for both professional and home-based enthusiasts.
Wiring diagrams play a pivotal role in the efficient maintenance, repair, and modification of electrical systems. Understanding the essential aspects of a wiring diagram for a John Deere 318 lawn tractor is crucial for anyone working with its electrical components.
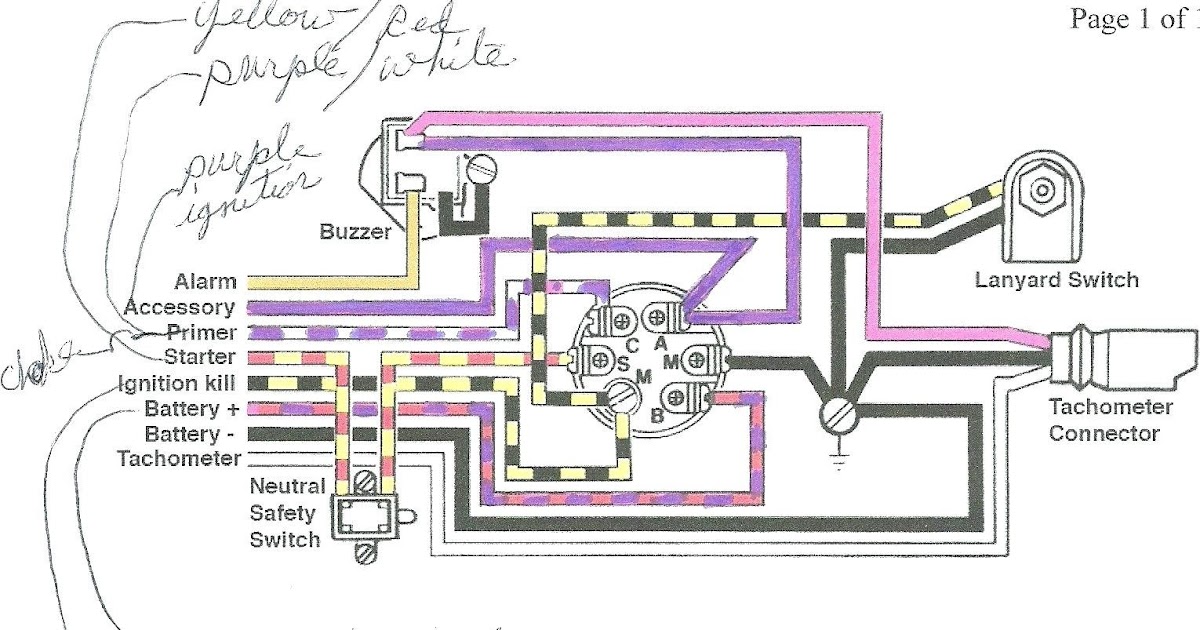
- Components: A wiring diagram identifies and locates each electrical component within the system, such as the battery, starter, ignition coil, and lights.
- Connections: It illustrates the electrical connections between components, including the flow of current through wires, terminals, and connectors.
- Circuits: Wiring diagrams group components into circuits, each with a specific function, such as the starting circuit or lighting circuit.
- Fuses and relays: These protective devices are shown in the diagram, indicating their location and function in safeguarding the electrical system from overloads.
- Grounding: The diagram shows the grounding points where electrical components are connected to the chassis or frame to provide a common reference point.
- Wire colors and gauges: Wiring diagrams use color coding and wire gauge designations to help identify and differentiate electrical wires.
- Harness routing: The diagram depicts the routing of electrical harnesses, which bundle and protect wires as they travel through the tractor.
- Testing points: Test points are indicated on the diagram, allowing technicians to measure voltage, continuity, and other electrical parameters.
- Troubleshooting guide: Some wiring diagrams include a troubleshooting guide that provides step-by-step instructions for diagnosing and resolving common electrical problems.
- Compatibility: The diagram specifies the compatibility of the wiring diagram with different model years and variations of the John Deere 318 lawn tractor.
These aspects provide a comprehensive understanding of the electrical system, facilitating efficient troubleshooting, repairs, and modifications. They enable technicians and enthusiasts to identify faulty components, trace electrical faults, and ensure the safe and reliable operation of the John Deere 318 lawn tractor’s electrical system.
Components
A thorough understanding of the individual electrical components within a system, such as the battery, starter, ignition coil, and lights, is a critical prerequisite for comprehending the overall functionality of a wiring diagram for the John Deere 318 lawn tractor. These components represent the building blocks of the electrical system, each serving a specific purpose and interacting with other components to achieve the desired electrical functions.
Without a clear identification and understanding of these components, it would be challenging to interpret the wiring diagram effectively and perform electrical troubleshooting or repairs. The diagram relies on the accurate representation of components and their connections to provide a comprehensive view of the system’s behavior.
For instance, knowing the location and function of the battery allows technicians to identify the source of power for the entire electrical system. Similarly, understanding the role of the starter enables them to diagnose starting problems, while the ignition coil’s location and function are crucial for troubleshooting ignition-related issues. Each component plays a vital role, and their precise identification is essential for accurate wiring diagram interpretation.
Therefore, a comprehensive wiring diagram for the John Deere 318 must include detailed information on the electrical components, their locations, and their interconnections. This understanding empowers technicians and enthusiasts to effectively maintain, repair, and modify the electrical system, ensuring the safe and reliable operation of the lawn tractor.
Connections
Understanding the electrical connections within a “Wiring Diagram For John Deere 318” is paramount, as they represent the backbone of the electrical system. These connections dictate the flow of electrical current between components, enabling the various electrical functions of the lawn tractor.
Without a clear depiction of the connections, it would be impossible to trace the path of electrical current and identify potential issues. The diagram provides a visual representation of the electrical pathways, allowing technicians and enthusiasts to troubleshoot problems, repair faults, and modify the electrical system.
For instance, if a technician encounters an electrical issue with the lighting system, they can refer to the wiring diagram to identify the electrical connections between the battery, light switch, and light fixtures. This enables them to systematically check for loose connections, damaged wires, or faulty components, ultimately leading to an accurate diagnosis and repair.
Therefore, the “Connections: It illustrates the electrical connections between components, including the flow of current through wires, terminals, and connectors” is a critical component of a “Wiring Diagram For John Deere 318.” It provides a comprehensive overview of the electrical system’s connectivity, empowering technicians and enthusiasts to maintain, repair, and modify the electrical system with confidence.
Circuits
Circuitry plays a pivotal role within the “Wiring Diagram For John Deere 318”, as it organizes and structures the electrical system into logical and functional units. These circuits are meticulously designed to perform specific tasks, ensuring the smooth operation of the lawn tractor’s electrical components.
- Components of a Circuit: Each circuit comprises various electrical components connected in a specific configuration. These components may include power sources, switches, resistors, capacitors, and loads, all working together to achieve a desired electrical function.
- Types of Circuits: The “Wiring Diagram For John Deere 318” typically includes several types of circuits, such as starting circuits, lighting circuits, charging circuits, and safety circuits. Each circuit is tailored to a specific function, optimizing the electrical system’s performance.
- Circuit Protection: Circuits are often equipped with protective devices such as fuses or circuit breakers. These devices safeguard the electrical system by interrupting current flow in the event of overloads or short circuits, preventing damage to components and ensuring the safety of the operator.
- Troubleshooting Circuits: When troubleshooting electrical issues, technicians often isolate and test individual circuits. By systematically examining each circuit, they can efficiently pinpoint the source of the problem, reducing downtime and ensuring a speedy repair.
Understanding the concept of circuits and their implementation in the “Wiring Diagram For John Deere 318” is crucial for effective electrical system maintenance and repair. By recognizing the functions of different circuits, technicians and enthusiasts can diagnose and resolve issues swiftly, minimizing disruptions and ensuring the reliable operation of the lawn tractor.
Fuses and relays
Within the context of “Wiring Diagram For John Deere 318,” the inclusion of fuses and relays holds great significance. These protective devices play a vital role in ensuring the safety and longevity of the electrical system by preventing damage from overloads and short circuits.
- Types of Protective Devices: Fuses and relays, though both serving a protective function, operate on different principles. Fuses are single-use devices that break the circuit when excessive current flows, while relays are reusable switches that can be tripped and reset.
- Location and Identification: The “Wiring Diagram For John Deere 318” clearly marks the location of fuses and relays within the electrical system. This enables technicians to quickly identify and access these devices for inspection or replacement.
- Overload Protection: Fuses and relays are calibrated to specific current ratings. When an electrical circuit draws excessive current, the fuse blows or the relay trips, interrupting the flow of electricity and preventing damage to sensitive components.
- Short Circuit Protection: In the event of a short circuit, where a low-resistance path allows excessive current to flow, fuses and relays act as sacrificial elements, blowing or tripping to protect the electrical system from potentially catastrophic damage.
By incorporating fuses and relays into the “Wiring Diagram For John Deere 318,” designers prioritize the safety and reliability of the electrical system. Understanding the function and location of these protective devices empowers technicians and enthusiasts to maintain and repair the electrical system effectively, minimizing downtime and ensuring the smooth operation of the lawn tractor.
Grounding
Within the “Wiring Diagram For John Deere 318,” grounding plays a crucial role in ensuring the safe and reliable operation of the electrical system. It establishes a common reference point for electrical circuits, providing a stable voltage level and preventing electrical faults.
- Chassis and Frame Grounding: The chassis and frame of the lawn tractor serve as the primary grounding points. Electrical components are connected to these metal structures, creating a low-resistance path for electrical current to flow back to the battery’s negative terminal.
- Safety and Fault Prevention: Proper grounding minimizes the risk of electrical shocks and prevents damage to electrical components. By providing a defined path for current flow, grounding ensures that stray currents do not accumulate and cause electrical hazards.
- Voltage Stability: Grounding establishes a stable voltage reference point for all electrical circuits. This prevents voltage fluctuations that could disrupt the operation of sensitive electronic components, such as sensors and control modules.
- Noise Reduction: Grounding helps reduce electrical noise and interference within the electrical system. By providing a low-impedance path for unwanted currents, grounding minimizes noise and improves the overall performance of the electrical system.
Understanding the concept of grounding and its implementation in the “Wiring Diagram For John Deere 318” is essential for effective electrical system maintenance and troubleshooting. Proper grounding ensures the safety, reliability, and optimal performance of the lawn tractor’s electrical system.
Wire colors and gauges
Within the context of “Wiring Diagram For John Deere 318,” the use of color coding and wire gauge designations plays a critical role in facilitating the identification and differentiation of electrical wires. This standardized approach provides a systematic and efficient method for technicians and enthusiasts to navigate the complex electrical system of the lawn tractor.
Color coding involves assigning specific colors to wires based on their function or purpose. This color-coding scheme is consistent throughout the wiring diagram, allowing for quick and easy identification of wires belonging to the same circuit or component. For instance, in the “Wiring Diagram For John Deere 318,” red wires typically indicate power supply, black wires represent ground connections, and yellow wires are often used for lighting circuits.
In addition to color coding, wire gauge designations provide information about the thickness and current-carrying capacity of each wire. This is crucial for ensuring proper electrical system operation and preventing potential hazards. Thicker wires with larger gauge numbers can handle higher currents, while thinner wires with smaller gauge numbers are suitable for lower current applications. The “Wiring Diagram For John Deere 318” specifies the appropriate wire gauge for each connection, allowing technicians to select the correct wire size for the intended purpose.
Understanding the relationship between wire colors and gauges and their application in the “Wiring Diagram For John Deere 318” is essential for successful electrical system maintenance and repair. By leveraging this knowledge, technicians can accurately trace circuits, identify faulty components, and ensure the safe and reliable operation of the lawn tractor’s electrical system.
Harness routing
Electrical harnesses play a vital role within the “Wiring Diagram For John Deere 318” as they provide a structured and organized method for managing the intricate network of wires within the lawn tractor’s electrical system. These harnesses serve the dual purpose of bundling and protecting the individual wires, ensuring their integrity and preventing damage or entanglement.
The routing of electrical harnesses is meticulously detailed in the “Wiring Diagram For John Deere 318,” providing a clear visual representation of the path taken by each harness throughout the tractor. This information is crucial for technicians and enthusiasts alike, as it enables them to trace and identify wires, diagnose electrical faults, and perform maintenance or repair tasks efficiently.
For instance, if a technician encounters an electrical issue related to the lighting system, the “Wiring Diagram For John Deere 318” will guide them to the specific harness responsible for powering the lights. By following the depicted routing, they can quickly locate the harness, inspect the wires for damage or loose connections, and determine the root cause of the problem.
Understanding the concept and significance of harness routing within the “Wiring Diagram For John Deere 318” empowers technicians and enthusiasts to maintain, troubleshoot, and modify the electrical system with confidence. By leveraging this knowledge, they can ensure the safe and reliable operation of the lawn tractor, minimizing downtime and maximizing its performance.
Testing points
Within the context of “Wiring Diagram For John Deere 318,” testing points serve as strategically placed nodes within the electrical system, providing technicians with crucial access points for electrical measurements. These test points are meticulously marked on the diagram, enabling technicians to efficiently and accurately diagnose and troubleshoot electrical issues.
By utilizing appropriate testing equipment, such as multimeters or oscilloscopes, technicians can leverage these test points to measure various electrical parameters, including voltage, current, resistance, and continuity. This in-depth analysis empowers them to pinpoint the exact location of electrical faults, identify malfunctioning components, and assess the overall health of the electrical system.
For instance, if a technician encounters an electrical problem related to the starting system, the “Wiring Diagram For John Deere 318” will guide them to the designated test points within the starting circuit. By measuring voltage and continuity at these test points, the technician can determine if the issue lies with the battery, starter motor, or associated wiring, allowing for targeted repairs.
Understanding the significance and practical applications of testing points within the “Wiring Diagram For John Deere 318” is paramount for effective electrical system maintenance and troubleshooting. By leveraging these test points, technicians can perform comprehensive electrical diagnostics, ensuring the safe and reliable operation of the lawn tractor.
Troubleshooting Guide
Within the comprehensive “Wiring Diagram For John Deere 318,” the inclusion of a troubleshooting guide holds immense significance for technicians and enthusiasts alike. This guide provides a structured and methodical approach to diagnosing and resolving common electrical problems, empowering users to maintain and repair the electrical system with confidence.
- Step-by-Step Instructions: Troubleshooting guides break down complex electrical issues into a series of manageable steps. Each step provides clear instructions, guiding users through the process of identifying potential causes, testing components, and implementing effective solutions.
- Common Electrical Problems: These guides typically address a wide range of frequently encountered electrical problems. From simple issues like blown fuses to more complex problems involving faulty sensors or wiring shorts, the guide provides tailored troubleshooting procedures for each scenario.
- Real-Life Examples: To enhance understanding, troubleshooting guides often incorporate real-life examples and case studies. These examples illustrate the practical application of troubleshooting techniques, helping users relate the guide’s instructions to actual electrical system issues.
- Time and Cost Savings: By providing systematic troubleshooting procedures, the guide helps users identify and resolve electrical problems efficiently. This not only saves valuable time but also reduces the cost of repairs by enabling users to pinpoint the exact cause of the issue without resorting to trial-and-error methods.
The troubleshooting guide within the “Wiring Diagram For John Deere 318” serves as an invaluable resource for maintaining and repairing the electrical system. Its clear instructions, targeted problem-solving techniques, and real-life examples empower users to diagnose and resolve electrical issues swiftly and effectively, ensuring the optimal performance and longevity of the lawn tractor.
Compatibility
Within the context of “Wiring Diagram For John Deere 318,” compatibility plays a crucial role in ensuring the accuracy and applicability of the diagram across different model years and variations of the lawn tractor. This compatibility information is a critical component, as it enables users to determine whether the diagram aligns with their specific tractor model and configuration.
The inclusion of compatibility details within the “Wiring Diagram For John Deere 318” offers several key benefits. Firstly, it prevents users from using an incorrect diagram that may not match their tractor’s electrical system, which could lead to errors or potential damage. Secondly, it ensures that the troubleshooting and repair procedures outlined in the diagram are directly relevant to the user’s tractor model, increasing the likelihood of a successful repair.
For example, consider a scenario where a user with a 1992 John Deere 318 attempts to use a wiring diagram intended for a 1995 model. While the overall electrical system may share similarities, there could be subtle differences in the wiring configuration or component placement. Using an incompatible diagram could result in confusion or incorrect troubleshooting, potentially leading to further issues.
In practical applications, the compatibility information in the “Wiring Diagram For John Deere 318” empowers users to confidently identify the correct diagram for their specific tractor model and variation. This ensures that the diagram serves as a reliable guide for maintaining, troubleshooting, and repairing the electrical system, ultimately contributing to the safe and efficient operation of the lawn tractor.


Related Posts


