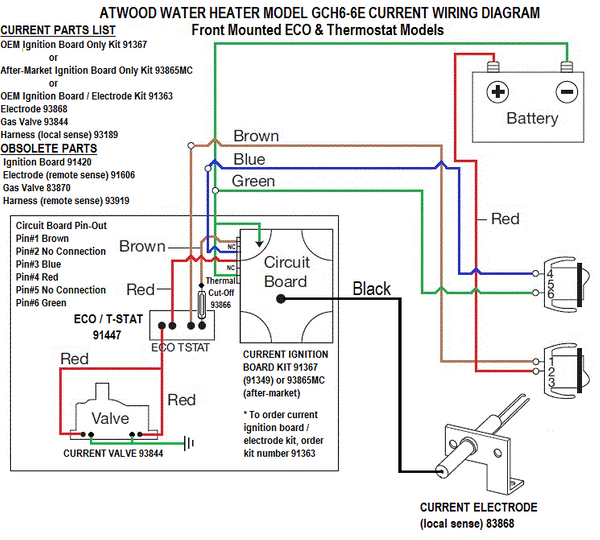
A wiring diagram for an Atwood water heater visually depicts the electrical connections, components, and wiring required for proper installation and operation. It provides a detailed plan, including wire colors, terminal locations, and safety precautions, ensuring safe and efficient water heating.
Wiring diagrams are crucial for electricians, DIY enthusiasts, and RV owners to understand the electrical system and troubleshoot any issues. They help prevent electrical hazards, ensure optimal performance, and facilitate repairs or upgrades.
A significant historical development in wiring diagrams for Atwood water heaters was the adoption of color-coding for wires, simplifying identification and reducing installation errors. This standardized approach has greatly improved safety and ease of use.
Wiring diagrams are essential for understanding the electrical system of an Atwood water heater, ensuring safe and efficient operation. Key aspects to consider include:
- Electrical Connections: Wiring diagrams specify the proper connections between the water heater, power source, and other electrical components.
- Component Locations: They indicate the placement of electrical components, such as switches, relays, and fuses.
- Wire Colors: Color-coded wires simplify identification and reduce installation errors.
- Terminal Locations: Diagrams show the terminals where wires should be connected on each component.
- Safety Precautions: They highlight safety measures, such as proper grounding and wire insulation.
- Troubleshooting: Wiring diagrams aid in troubleshooting electrical problems by providing a visual representation of the system.
- Maintenance: They facilitate regular maintenance, such as inspecting and cleaning electrical connections.
- Upgrades: Diagrams help plan and execute upgrades or modifications to the electrical system.
- Compliance: Wiring diagrams ensure compliance with electrical codes and standards.
Understanding these aspects allows for proper installation, safe operation, and efficient maintenance of Atwood water heaters, contributing to overall system reliability and longevity.
Electrical Connections
Understanding electrical connections is crucial in the context of wiring diagrams for Atwood water heaters. These diagrams provide detailed instructions on how to safely and correctly connect the water heater to the power source and other electrical components in the system.
- Power Source Connection: Wiring diagrams specify the type of power source (e.g., AC or DC) and voltage required for the water heater. They indicate the proper connection points and wire gauge to ensure adequate power supply.
- Grounding: Grounding is essential for safety. Wiring diagrams show how to properly ground the water heater to prevent electrical shock and damage to the unit.
- Thermostat Wiring: The thermostat controls the water temperature. Wiring diagrams provide instructions on connecting the thermostat to the water heater, ensuring accurate temperature regulation.
- Element Connections: Heating elements are responsible for heating the water. Wiring diagrams specify the correct wiring of the heating elements, including the use of proper connectors and terminals.
Proper electrical connections are fundamental for the safe and efficient operation of Atwood water heaters. By following the wiring diagrams and adhering to electrical codes, users can ensure a reliable hot water supply while minimizing the risk of electrical hazards.
Component Locations
Within the context of wiring diagrams for Atwood water heaters, “Component Locations” holds great significance. Wiring diagrams not only depict the electrical connections but also provide precise instructions on where each electrical component should be placed within the system. This detailed information is crucial for several reasons:
- Ease of Installation: Clearly defined component locations simplify the installation process, ensuring that all components are positioned correctly for optimal performance.
- Safety: Proper placement of electrical components minimizes the risk of electrical hazards, such as short circuits and overheating.
- Maintenance and Troubleshooting: Knowing the exact location of each component facilitates maintenance and troubleshooting tasks, allowing for quick identification and resolution of any issues.
- Upgradability: If upgrades or modifications to the water heater’s electrical system are necessary, the wiring diagram serves as a guide for determining the appropriate placement of new components.
Overall, the precise specification of component locations in wiring diagrams for Atwood water heaters contributes to the safe, efficient, and reliable operation of the water heating system.
Wire Colors
The use of color-coded wires in wiring diagrams for Atwood water heaters greatly simplifies the identification and connection of wires, significantly reducing the likelihood of installation errors. This is achieved by assigning specific colors to wires based on their function or purpose, creating a standardized system.
In the context of Atwood water heaters, color-coded wires play a critical role in ensuring proper electrical connections. Each wire is assigned a specific color, such as red for power, black for ground, and white for neutral. By following the color-coding scheme provided in the wiring diagram, installers can easily identify the corresponding terminals on the water heater and connect the wires correctly.
The impact of color-coded wires is evident in both residential and commercial settings. For instance, in a residential home, a homeowner may need to replace a faulty heating element in their Atwood water heater. By referring to the wiring diagram and following the color-coded wires, they can locate the appropriate terminals and connect the new heating element without any confusion or errors.
Similarly, in a commercial establishment such as a restaurant or hotel, the maintenance staff may be responsible for troubleshooting and repairing electrical issues with multiple Atwood water heaters. The color-coded wires enable them to quickly identify and trace wires, facilitating efficient and accurate repairs.
In summary, the use of color-coded wires in wiring diagrams for Atwood water heaters is a crucial element in ensuring correct installation and minimizing errors. It simplifies wire identification, reduces the risk of misconnections, and enhances the safety and reliability of the water heating system.
Terminal Locations
Within the context of “Wiring Diagram For Atwood Water Heater”, the aspect of “Terminal Locations: Diagrams show the terminals where wires should be connected on each component” plays a critical role in ensuring the safe and efficient operation of the water heater. These diagrams provide precise instructions on the specific terminals where wires should be connected on each component, enabling proper electrical connections and optimizing system performance.
- Identification of Terminals: Wiring diagrams clearly indicate the terminals on each component, making it easy to identify the correct connection points for the corresponding wires.
- Correct Polarity: For components that require specific polarity, such as diodes or electrolytic capacitors, wiring diagrams specify the proper orientation of the terminals to ensure correct polarity and prevent damage to the component.
- Multiple Connections: In cases where multiple wires need to be connected to a single terminal, wiring diagrams indicate the appropriate terminal type and the maximum number of connections allowed.
- Safety Precautions: Some terminals may require special handling or precautions, such as the use of insulated connectors or heat shrink tubing. Wiring diagrams highlight these safety measures to prevent electrical hazards.
Overall, the precise specification of terminal locations in wiring diagrams for Atwood water heaters is essential for ensuring reliable electrical connections, preventing component damage, and maintaining the overall safety and functionality of the water heating system.
Safety Precautions
Safety precautions are a vital component of wiring diagrams for Atwood water heaters. These diagrams provide detailed instructions on the proper grounding and wire insulation techniques, which are crucial for ensuring the safe and reliable operation of the water heater. By following these safety precautions, homeowners and technicians can minimize the risk of electrical hazards, such as shocks, fires, and damage to the water heater.
Proper grounding is essential for preventing electrical shocks. A ground wire provides a path for excess electricity to flow safely into the ground, preventing it from traveling through the water heater’s metal casing or other components. Wiring diagrams clearly indicate the proper grounding points on the water heater, ensuring that it is securely connected to the grounding system.
Adequate wire insulation is equally important for preventing electrical hazards. Wiring diagrams specify the appropriate insulation type and thickness for each wire, based on its voltage and current-carrying capacity. Proper insulation prevents electrical shorts and fires, ensuring the safe operation of the water heater.
Real-life examples of safety precautions in wiring diagrams for Atwood water heaters include:
- Instructions on how to properly connect the ground wire to the water heater’s chassis.
- Specifications for the type and thickness of insulation required for each wire.
- Warnings against using damaged or frayed wires.
- Reminders to turn off the power before performing any electrical work.
Understanding the safety precautions outlined in wiring diagrams for Atwood water heaters is crucial for ensuring the safe and efficient operation of these appliances. By following these guidelines, homeowners and technicians can prevent electrical hazards, protect the water heater from damage, and maintain a safe environment.
Troubleshooting
Within the context of “Wiring Diagram For Atwood Water Heater”, the aspect of “Troubleshooting: Wiring diagrams aid in troubleshooting electrical problems by providing a visual representation of the system” holds significant importance. Wiring diagrams serve as invaluable tools for diagnosing and resolving electrical issues within the water heater system.
One of the key challenges in troubleshooting electrical problems is identifying the root cause of the malfunction. Wiring diagrams provide a comprehensive visual representation of the entire electrical system, enabling technicians to trace the flow of electricity and identify any points of failure. This visual representation simplifies the troubleshooting process, allowing for a more efficient and accurate diagnosis.
Real-life examples of the practical applications of wiring diagrams in troubleshooting Atwood water heaters include:
- Identifying a faulty heating element by tracing the electrical connections from the thermostat to the element.
- Troubleshooting a tripped circuit breaker by examining the wiring diagram to determine which circuit is affected.
- Diagnosing a malfunctioning control board by analyzing the wiring connections and voltage readings at various points on the board.
Understanding the connection between “Troubleshooting: Wiring diagrams aid in troubleshooting electrical problems by providing a visual representation of the system” and “Wiring Diagram For Atwood Water Heater” empowers homeowners and technicians with the ability to effectively maintain and repair their water heating systems. By leveraging the visual representation provided by wiring diagrams, they can pinpoint electrical issues, determine the appropriate course of action, and restore the system to proper operation.
Maintenance
Within the context of “Wiring Diagram For Atwood Water Heater”, the aspect of “Maintenance: They facilitate regular maintenance, such as inspecting and cleaning electrical connections.” holds great significance. Wiring diagrams serve as valuable tools for ensuring the long-term reliability and optimal performance of Atwood water heaters through proper maintenance procedures.
- Inspecting Electrical Connections: Wiring diagrams provide a visual representation of all electrical connections within the water heater, allowing for regular inspections to identify any loose, damaged, or corroded connections. This proactive approach helps prevent electrical hazards, ensuring the safe and efficient operation of the water heater.
- Cleaning Electrical Connections: Over time, electrical connections can accumulate dust, dirt, and other contaminants, leading to reduced conductivity and potential malfunctions. Wiring diagrams enable technicians to locate and clean these connections, restoring optimal electrical flow and preventing performance issues.
- Identifying Potential Problems: Regular maintenance of electrical connections allows for the early detection of potential problems, such as loose terminals, frayed wires, or signs of overheating. By addressing these issues promptly, homeowners and technicians can prevent minor problems from escalating into major failures.
Understanding the “Maintenance: They facilitate regular maintenance, such as inspecting and cleaning electrical connections.” aspect of “Wiring Diagram For Atwood Water Heater” empowers individuals to maintain their water heaters in optimal condition, extending their lifespan, enhancing safety, and ensuring a reliable supply of hot water.
Upgrades
Within the comprehensive framework of “Wiring Diagram For Atwood Water Heater”, the aspect of “Upgrades: Diagrams help plan and execute upgrades or modifications to the electrical system” holds significant importance. As Atwood water heaters age or as user needs evolve, the need for upgrades or modifications to the electrical system may arise. Wiring diagrams serve as indispensable tools in planning and executing these upgrades, ensuring safety, efficiency, and optimal performance.
- Electrical Component Replacement: Wiring diagrams provide a visual guide for replacing faulty or outdated electrical components, such as heating elements, thermostats, or circuit breakers. By identifying the correct wiring connections and terminals, homeowners or technicians can seamlessly integrate new components into the electrical system.
- Circuit Expansion: Expanding the electrical circuit to accommodate additional appliances or devices requires careful planning to ensure adequate power supply and prevent overloading. Wiring diagrams help determine the appropriate wire gauge, circuit breaker size, and connection points.
- Safety Enhancements: Upgrades such as installing ground fault circuit interrupters (GFCIs) or surge protectors enhance the safety of the electrical system. Wiring diagrams provide precise instructions on how to connect these devices to the existing wiring, minimizing the risk of electrical shocks or fires.
- Energy Efficiency Improvements: Replacing incandescent bulbs with LED fixtures, installing timers or programmable thermostats can improve the energy efficiency of the water heater. Wiring diagrams guide the proper wiring of these energy-saving devices, ensuring optimal performance and reduced energy consumption.
In summary, “Upgrades: Diagrams help plan and execute upgrades or modifications to the electrical system” is a crucial aspect of “Wiring Diagram For Atwood Water Heater”. Homeowners and technicians rely on wiring diagrams to safely and effectively upgrade or modify the electrical system, ensuring the continued reliability, safety, and efficiency of Atwood water heaters.
Compliance
Within the context of “Wiring Diagram For Atwood Water Heater”, the aspect of “Compliance: Wiring diagrams ensure compliance with electrical codes and standards.” holds significant importance. Understanding this connection empowers individuals to adhere to established electrical regulations, ensuring the safety and reliability of Atwood water heaters.
Electrical codes and standards are established to safeguard individuals from electrical hazards, including shocks, fires, and electrocution. Wiring diagrams play a pivotal role in ensuring compliance with these regulations by providing precise instructions on how to wire the water heater according to the specified requirements.
Real-life examples of “Compliance: Wiring diagrams ensure compliance with electrical codes and standards.” within “Wiring Diagram For Atwood Water Heater” include:
- Adhering to the National Electrical Code (NEC) guidelines for proper wire sizing, circuit protection, and grounding.
- Complying with local building codes that mandate the use of specific wiring methods and materials.
- Meeting the requirements of insurance companies, which often require electrical installations to be compliant with established standards.
Understanding the practical applications of “Compliance: Wiring diagrams ensure compliance with electrical codes and standards.” empowers individuals to:
- Ensure the safe and reliable operation of their water heater by following established electrical practices.
- Avoid potential electrical hazards that could jeopardize the safety of their home or business.
- Meet the requirements of insurance policies, ensuring coverage in the event of an electrical incident.
In summary, “Compliance: Wiring diagrams ensure compliance with electrical codes and standards.” is a critical component of “Wiring Diagram For Atwood Water Heater”. Wiring diagrams serve as indispensable tools for ensuring the safety, reliability, and code compliance of Atwood water heaters. Homeowners, technicians, and inspectors rely on these diagrams to ensure that electrical installations meet the required standards, minimizing the risk of electrical hazards and safeguarding the well-being of individuals and property.


Related Posts


