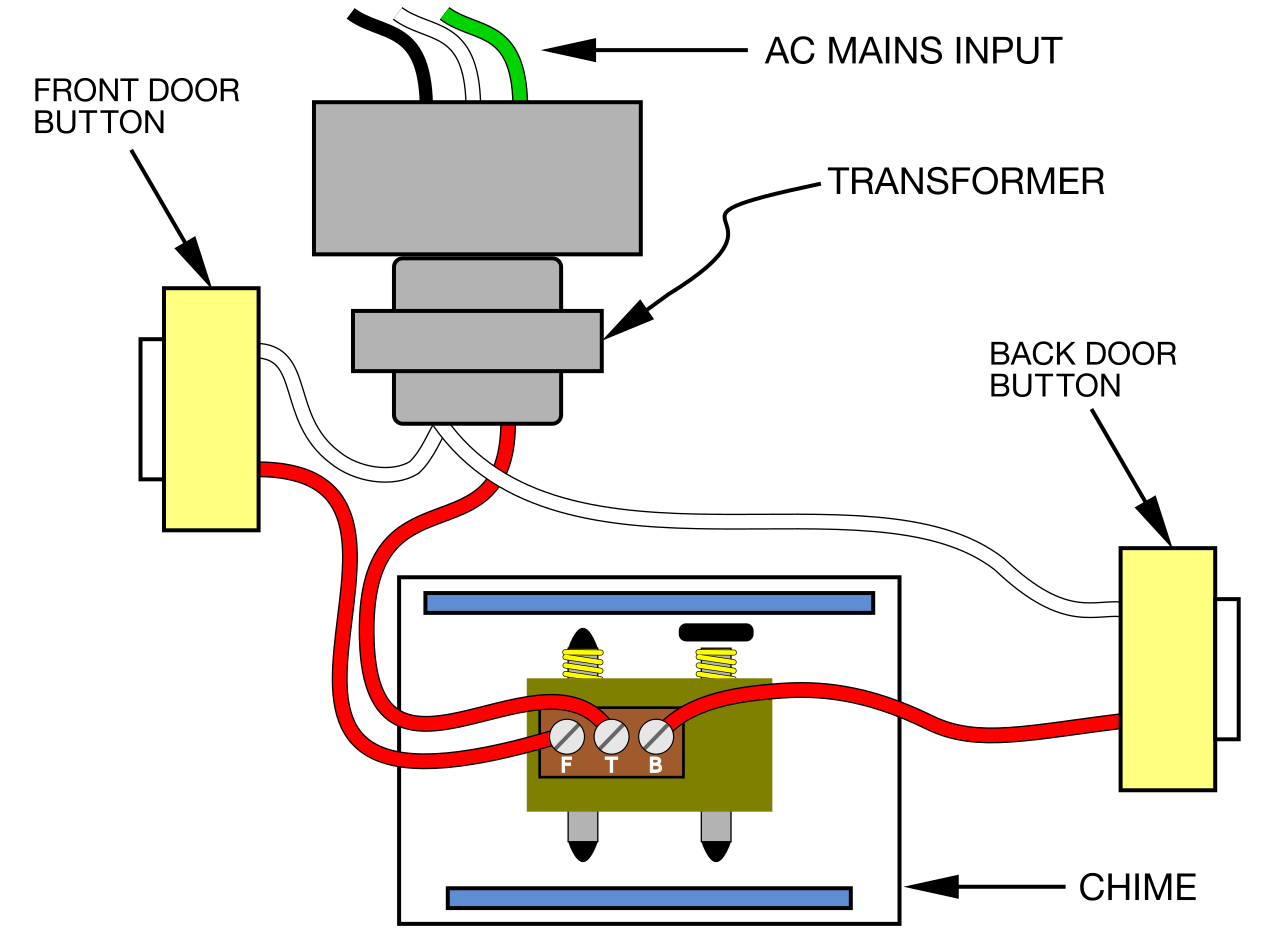
A wiring diagram for a doorbell outlines the electrical connections and components necessary to install a functional doorbell system. It typically includes the doorbell chime, transformer, push button, and wiring. For instance, a typical doorbell wiring diagram might involve connecting the transformer to a power source, and then connecting the transformer to the chime and push button. Wires from the chime and push button are then connected to each other, completing the circuit.
Wiring diagrams for doorbells are important because they provide step-by-step instructions on how to safely and effectively install a doorbell system. They ensure that the doorbell is wired correctly, preventing electrical hazards and ensuring proper operation. A key historical development in doorbell wiring diagrams was the introduction of wireless doorbells in the late 20th century, which eliminated the need for complex wiring and simplified installation.
This article will delve into the various components of a doorbell wiring diagram, exploring their functions, connections, and the considerations involved in designing and installing a doorbell system.
Wiring diagrams for doorbells are essential for ensuring proper installation and safe operation. They outline the electrical connections and components necessary to create a functional doorbell system. Understanding the key aspects of a wiring diagram for a doorbell is crucial for both electrical professionals and DIY enthusiasts.
- Components: Transformer, chime, push button, wires
- Connections: Power source to transformer, transformer to chime and push button, chime to push button
- Circuit: Completion of electrical pathway for doorbell to operate
- Safety: Prevention of electrical hazards, such as short circuits and shocks
- Installation: Step-by-step instructions for proper wiring
- Maintenance: Troubleshooting and repair guidance
- Design: Considerations for doorbell placement, chime selection, and wire type
- Wireless: Elimination of complex wiring, simplified installation
These aspects are interconnected and essential for a well-functioning doorbell system. For instance, proper component selection and connections ensure safety and reliable operation, while understanding the circuit helps in troubleshooting and maintenance. The design considerations impact the aesthetics and functionality of the doorbell system, and the advent of wireless technology has revolutionized doorbell installation.
Components
In a wiring diagram for a doorbell, the transformer, chime, push button, and wires play critical roles in creating a functional doorbell system. The transformer steps down the voltage from the main power source to a safe level for the doorbell components. The chime produces the audible signal when the doorbell button is pressed. The push button initiates the doorbell circuit when pressed. Wires connect all these components, allowing electricity to flow and the doorbell to operate.
Each component is essential for the proper functioning of the doorbell system. Without the transformer, the doorbell would not receive the necessary power to operate. Without the chime, there would be no audible signal to indicate that the doorbell has been pressed. Without the push button, the doorbell circuit would not be completed, and the chime would not sound. Wires are crucial for completing the electrical circuit and ensuring that all components are connected.
Practical applications of this understanding include troubleshooting and repairing doorbell systems. For example, if the doorbell is not working, checking the transformer, chime, push button, and wires for any loose connections or damage can help identify the source of the problem. Additionally, when installing a new doorbell system, understanding the connections between these components is essential for ensuring proper operation and safety.
In conclusion, the components of a doorbell wiring diagram – transformer, chime, push button, and wires – are interdependent and essential for the system to function properly. Understanding their connections and roles is crucial for troubleshooting, repair, and installation, enabling effective maintenance and reliable doorbell operation.
Connections
Within the context of a wiring diagram for a doorbell, the connections between the power source, transformer, chime, and push button are crucial for establishing a functional system. These connections ensure that electricity flows properly, enabling the doorbell to operate as intended. Understanding these connections is essential for both the installation and maintenance of doorbell systems.
- Power source to transformer: The power source, typically a household electrical outlet, provides the necessary voltage to the transformer. The transformer steps down the voltage to a safer level for the doorbell components.
- Transformer to chime: The transformer supplies power to the chime, which produces the audible signal when the doorbell button is pressed.
- Transformer to push button: The transformer also provides power to the push button, enabling it to complete the electrical circuit when pressed.
- Chime to push button: The chime and push button are connected to complete the electrical circuit. When the push button is pressed, the circuit is closed, allowing electricity to flow from the transformer to the chime, producing the audible signal.
These connections are essential for the proper functioning of the doorbell system. Without the proper connections, the doorbell will not operate correctly or may even pose a safety hazard. Understanding these connections is crucial for troubleshooting and repairing doorbell systems, as well as for ensuring safe and reliable operation.
Circuit
Within the context of a wiring diagram for a doorbell, the circuit plays a critical role in establishing a functional system. When the circuit is complete, electricity can flow properly, enabling the doorbell to operate as intended. Understanding the circuit and its components is essential for both the installation and maintenance of doorbell systems.
- Power Source: The power source, typically a household electrical outlet, provides the necessary voltage to the transformer.
- Transformer: The transformer steps down the voltage from the power source to a safer level for the doorbell components.
- Chime: The chime produces the audible signal when the doorbell button is pressed.
- Push Button: The push button completes the electrical circuit when pressed, allowing electricity to flow from the transformer to the chime.
When all these components are connected correctly, the circuit is complete, and the doorbell system operates as intended. Without a complete circuit, the doorbell will not function properly or may even pose a safety hazard. Understanding the circuit and its components is crucial for troubleshooting and repairing doorbell systems, as well as for ensuring safe and reliable operation.
Safety
In the context of a wiring diagram for a doorbell, safety is paramount. Electrical hazards, such as short circuits and shocks, can occur if the wiring is not done correctly. A wiring diagram provides a clear and concise plan for installing a doorbell system, ensuring that all electrical connections are made safely and securely.
Short circuits occur when electricity finds an easier path to the ground than through the intended circuit. This can cause the wires to overheat and potentially start a fire. Shocks occur when electricity flows through the human body, which can be dangerous or even fatal. A wiring diagram helps to prevent these hazards by providing a clear plan for the wiring, ensuring that all connections are made correctly.
Real-life examples of electrical hazards in doorbell wiring include:
- Using the wrong gauge wire, which can overheat and cause a fire.
- Not properly connecting the wires, which can create a loose connection and cause arcing or sparking.
- Not using a ground wire, which can lead to shocks.
Understanding the connection between safety and wiring diagrams for doorbells is essential for preventing electrical hazards. By following the instructions in the wiring diagram carefully, you can ensure that your doorbell system is installed safely and correctly, protecting yourself, your family, and your home from electrical hazards.
Installation
Within the context of a wiring diagram for a doorbell, the installation instructions play a critical role in ensuring the proper and safe functioning of the doorbell system. These instructions provide a step-by-step guide for wiring the doorbell, ensuring that all electrical connections are made correctly and securely. Without proper installation, the doorbell may not work correctly or may even pose a safety hazard.
Real-life examples of the importance of proper installation include:
- Improperly connecting the wires can create a loose connection, which can lead to arcing or sparking, potentially causing a fire.
- Incorrectly grounding the doorbell can result in electrical shocks, posing a danger to anyone using the doorbell or working on the electrical system.
Understanding the connection between installation instructions and wiring diagrams for doorbells is essential for ensuring the safe and reliable operation of the doorbell system. By following the instructions carefully and ensuring that the wiring is done correctly, you can prevent electrical hazards and ensure that your doorbell functions as intended.
Maintenance
Maintenance plays a crucial role in ensuring the optimal performance and longevity of a doorbell system. Wiring diagrams provide clear and concise instructions for troubleshooting and repair, enabling users to diagnose and fix common issues, thereby reducing downtime and improving overall system reliability.
- Identifying faulty components: Wiring diagrams help pinpoint malfunctioning components, such as loose connections, damaged wires, or faulty switches. By isolating the problematic component, users can quickly and efficiently replace or repair it.
- Understanding circuit behavior: Wiring diagrams provide a visual representation of the electrical circuit, allowing users to trace the flow of electricity and identify potential points of failure. This understanding aids in troubleshooting and repair by enabling users to predict the behavior of the circuit under different conditions.
- Real-life examples: Wiring diagrams can assist in resolving common doorbell issues, such as intermittent operation, no sound, or continuous ringing. By following the diagram and testing specific components, users can diagnose the problem and implement the necessary repairs.
- Preventing future problems: Regular maintenance and troubleshooting using wiring diagrams can help prevent future problems by identifying potential weaknesses or areas for improvement in the doorbell system. By proactively addressing these issues, users can extend the lifespan of the system and minimize the likelihood of unexpected failures.
Wiring diagrams are essential tools for maintaining a functional doorbell system. They provide users with the knowledge and guidance necessary to troubleshoot and repair common issues, ensuring reliable operation and longevity. By understanding the wiring diagram and following the maintenance instructions, users can keep their doorbell system operating optimally and avoid costly repairs or replacements.
Design
In the context of a wiring diagram for a doorbell, design considerations play a critical role in determining the functionality, aesthetics, and overall user experience of the doorbell system. These considerations include the placement of the doorbell, the selection of the chime, and the choice of wire type, each of which has a direct impact on the wiring diagram and the effectiveness of the doorbell installation.
The placement of the doorbell is crucial for ensuring that the doorbell can be easily heard and accessed by visitors. The wiring diagram must take into account the distance between the doorbell and the chime, as well as the location of any obstacles that may interfere with the sound transmission. The selection of the chime is also important, as different chimes produce different sounds and volumes. The wiring diagram should specify the type of chime being used and the appropriate wiring connections. Finally, the choice of wire type is essential for ensuring the proper functioning and safety of the doorbell system. The wiring diagram must specify the gauge and type of wire that is suitable for the specific doorbell system.
Real-life examples of the connection between design considerations and wiring diagrams for doorbells include:
- If the doorbell is placed too far away from the chime, the sound may be too faint to be heard from inside the house. The wiring diagram should account for this by specifying the use of a longer wire or a more powerful chime.
- If the wrong type of wire is used, it may not be able to handle the electrical current required by the doorbell, which could lead to safety hazards. The wiring diagram should clearly specify the appropriate wire type for the specific doorbell system.
Understanding the connection between design considerations and wiring diagrams for doorbells is essential for ensuring the effective and safe operation of the doorbell system. By carefully considering the placement of the doorbell, the selection of the chime, and the choice of wire type, and by accurately reflecting these considerations in the wiring diagram, homeowners and electricians can create a doorbell system that meets their specific needs and provides optimal performance.
Wireless
The advent of wireless technology has revolutionized the installation and use of doorbells, eliminating the need for complex wiring and simplifying the setup process. In the context of a wiring diagram for a doorbell, “Wireless: Elimination of complex wiring, simplified installation” represents a significant advancement that has transformed the way doorbells are designed and implemented.
A traditional doorbell system requires multiple wires to connect the doorbell button, chime, transformer, andThis complex wiring can be time-consuming and challenging to install, especially in existing buildings or when running wires through walls and ceilings is not feasible. Wireless doorbells, on the other hand, use radio frequency (RF) or Bluetooth technology to communicate between the doorbell button and the chime, eliminating the need for physical wire connections. This greatly simplifies the installation process, as the doorbell components can be placed anywhere within the wireless range without the hassle of running wires.
Real-life examples of the practical applications of wireless doorbells within wiring diagrams include:
- Installing a doorbell in a rental property or apartment where drilling holes or running wires through walls is not permitted.
- Adding a doorbell to an existing home without the need for extensive renovations or rewiring.
- Placing a doorbell button in a convenient location, such as near a side door or gate, without having to worry about wire length or routing.
Understanding the connection between “Wireless: Elimination of complex wiring, simplified installation” and “Wiring Diagram For A Doorbell” is crucial for homeowners, renters, and electricians alike. By embracing wireless technology, individuals can enjoy the convenience and flexibility of doorbells without the complexities and limitations of traditional wired systems. Wireless doorbells have become a popular choice for both new construction and retrofit projects, offering ease of installation, portability, and a wide range of design options to complement any home dcor.


Related Posts


