Wiring an amplifier involves connecting the amplifier to other components in an audio system, such as a sound source, speakers, and power supply. A typical example is connecting a car amplifier to a car stereo, speakers, and battery.
Proper wiring ensures optimal signal transfer, prevents damage to equipment, and allows for customization of the audio system. It has revolutionized the audio industry by enabling the use of powerful amplifiers in various applications, from home stereos to live sound reinforcement systems.
This article will delve into the different wiring configurations, techniques, and safety precautions involved in wiring an amplifier, providing a comprehensive guide for both beginners and experienced audio enthusiasts.
Wiring an amplifier is a crucial aspect of any audio system, as it ensures optimal signal transfer, prevents damage to equipment, and allows for customization. Understanding the key aspects of wiring an amp is essential for both beginners and experienced audio enthusiasts.
- Power supply: Ensures a stable and sufficient power source for the amplifier.
- Signal input: Connects the amplifier to the audio source, such as a preamp or CD player.
- Speaker output: Connects the amplifier to the speakers, delivering the amplified audio signal.
- Grounding: Provides a common reference point for all components, reducing noise and interference.
- Crossovers: Filters the audio signal to separate it into different frequency ranges for different speakers.
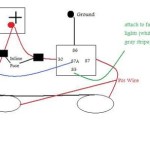
- Fuses: Protects the amplifier from damage caused by electrical faults or overloads.
- Wiring gauge: Determines the thickness and current-carrying capacity of the wiring used.
- Connections: Various types of connectors are used to make secure and reliable connections between components.
These aspects are interconnected and play a vital role in the overall performance and safety of an audio system. Proper wiring techniques, such as using the correct wire gauge and making secure connections, are essential to avoid power loss, noise, and potential hazards.
Power supply
In the context of wiring an amplifier, the power supply plays a pivotal role in delivering a stable and adequate current to the amplifier, ensuring its optimal performance and preventing damage. Various components and considerations come into play when establishing an effective power supply for an amplifier setup.
- Electrical outlet: The power source for the amplifier typically originates from a standard electrical outlet, which provides alternating current (AC) at a specific voltage and frequency.
- Power cord: A power cord connects the amplifier to the electrical outlet, carrying the AC power to the amplifier’s internal power supply circuitry.
- Transformer: The transformer steps down the AC voltage from the power outlet to a lower voltage suitable for the amplifier’s internal circuitry.
- Capacitors: Capacitors store electrical energy and provide a reservoir of power to the amplifier, smoothing out any fluctuations in the power supply.
A well-designed power supply ensures that the amplifier receives a clean and stable power source, which is crucial for delivering undistorted and powerful audio output. Conversely, an inadequate or unstable power supply can lead to noise, distortion, overheating, and potential damage to the amplifier.
Signal input
In the context of wiring an amplifier, the signal input is crucial as it establishes the connection between the amplifier and the audio source. This connection allows the audio signal from the source to be amplified and sent to the speakers. Various components and considerations come into play when establishing an effective signal input for an amplifier setup.
- Source device: The audio source can be a variety of devices such as a preamplifier, CD player, turntable, or even a smartphone. These devices generate the audio signal that is sent to the amplifier.
- Input jacks: Amplifiers have input jacks, typically RCA or XLR connectors, that receive the audio signal from the source device. The type of input jacks available depends on the amplifier’s design and intended use.
- Signal cables: Signal cables are used to connect the source device to the amplifier’s input jacks. These cables carry the audio signal from the source to the amplifier, and their quality can impact the sound quality of the system.
- Signal processing: Some amplifiers have built-in signal processing capabilities, such as equalization or tone controls. These features allow for fine-tuning the audio signal before it is amplified, giving the user more control over the sound quality.
A properly configured signal input ensures that the audio signal from the source device is cleanly and efficiently transferred to the amplifier, allowing for optimal sound reproduction. Conversely, a poorly wired or mismatched signal input can result in noise, distortion, or even damage to the amplifier.
Speaker output
Speaker output is a crucial aspect of “Wiring An Amp” as it establishes the connection between the amplifier and the speakers, allowing the amplified audio signal to reach the speakers and produce sound. This connection involves various components and considerations, each playing a vital role in the overall performance and sound quality of the audio system.
- Speaker terminals: Amplifiers have speaker terminals, typically binding posts or banana plugs, that provide the connection points for the speaker wires. These terminals must be securely tightened to ensure good electrical contact and prevent any loose connections that could affect sound quality.
- Speaker wires: Speaker wires are used to connect the amplifier’s speaker terminals to the speakers. The gauge or thickness of the speaker wires should be appropriate for the power output of the amplifier and the distance between the amplifier and the speakers.
- Speaker impedance: The impedance of the speakers must match the impedance of the amplifier’s speaker outputs. Mismatched impedance can lead to reduced power output, distortion, or even damage to the amplifier.
- Speaker placement: The placement of the speakers in relation to the listening area can significantly affect the sound quality. Factors such as speaker height, distance from walls, and toe-in angle should be considered for optimal sound reproduction.
Properly wiring the speaker output ensures that the amplified audio signal is delivered to the speakers efficiently and without distortion or loss of power. It is essential to use appropriate speaker wires, match impedance, and consider speaker placement to achieve the best possible sound quality from your audio system.
Grounding
In the context of “Wiring An Amp,” grounding plays a crucial role in ensuring a clean and reliable audio signal by providing a common reference point for all components in the system. This helps reduce noise, interference, and ground loops, which can degrade the sound quality and performance of the amplifier.
- Chassis Ground: The metal chassis of the amplifier serves as a central grounding point, connecting all components to a common reference. This helps prevent noise from entering the signal path and reduces the risk of electrical shocks.
- Signal Ground: A dedicated signal ground wire connects the ground terminals of all input and output jacks to the chassis ground. This ensures that all audio signals share the same reference point, minimizing noise and hum.
- Power Supply Ground: The power supply of the amplifier also has a dedicated ground connection to the chassis. This ensures that the power supply and the audio circuitry share a common reference, reducing noise and interference.
- Ground Loops: Ground loops occur when multiple grounding paths exist in the system, creating a loop where current can flow. Ground loops can cause noise, hum, and other interference issues. Proper grounding techniques help prevent ground loops by ensuring that all components share a single, dedicated grounding point.
Overall, proper grounding is essential for maintaining a clean and noise-free audio signal in a wired amplifier system. By providing a common reference point for all components, grounding reduces noise, interference, and ground loops, resulting in improved sound quality and performance.
Crossovers
In the context of “Wiring An Amp,” crossovers play a crucial role in optimizing sound reproduction by dividing the audio signal into specific frequency ranges and directing them to appropriate speakers. This process ensures that each speaker handles the frequencies it is designed to reproduce most efficiently, resulting in improved overall sound quality and clarity.
-
Passive Crossovers:
Passive crossovers are electronic circuits that use capacitors and inductors to filter the audio signal. They are typically installed between the amplifier and the speakers and are designed to split the signal into two or more frequency ranges.
-
Active Crossovers:
Active crossovers use operational amplifiers and other active components to filter the audio signal. They offer greater flexibility and control compared to passive crossovers and are often used in high-end audio systems.
-
Bi-Amping:
Bi-amping involves using two amplifiers, one for the low frequencies and another for the high frequencies. This allows for more precise control over the sound reproduction and can improve sound quality, especially in high-power systems.
-
Subwoofers:
Subwoofers aredesigned to reproduce low frequencies. They are often used in conjunction with crossovers to handle the lowest frequency range, allowing other speakers to focus on the midrange and high frequencies.
Properly wiring and configuring crossovers is essential for achieving optimal sound reproduction in a multi-speaker audio system. By dividing the audio signal into specific frequency ranges and directing them to appropriate speakers, crossovers ensure that each speaker operates within its optimal range, resulting in a balanced and cohesive sound experience.
Fuses
Within the context of “Wiring An Amp,” fuses play a critical role in safeguarding the amplifier from potential damage caused by electrical faults or overloads. These protective devices are meticulously engineered to interrupt the flow of current when it exceeds a predetermined safe level, effectively isolating the amplifier from harmful electrical surges or short circuits.
- Circuit Protection: Fuses are designed to protect the amplifier’s internal circuitry from damage caused by excessive current. When a fault occurs, the fuse blows, breaking the circuit and preventing further damage to the amplifier’s sensitive components.
- Overload Prevention: Fuses prevent overloads by limiting the amount of current that can flow through the amplifier. If the demand for power exceeds the amplifier’s capacity, the fuse will blow, preventing damage to the amplifier and potentially preventing electrical fires.
- Fault Isolation: Fuses act as a sacrificial element, isolating the amplifier from electrical faults in other components of the audio system. By blowing the fuse, the amplifier is disconnected from the fault, preventing damage to the amplifier and allowing other components to continue operating safely.
- Safety Assurance: Fuses provide an added layer of safety to the amplifier and the entire audio system. By preventing electrical faults and overloads from damaging the amplifier, fuses help ensure the safe operation of the system and protect against potential hazards such as electrical fires.
In conclusion, the use of fuses in “Wiring An Amp” is of paramount importance for protecting the amplifier from electrical faults and overloads. Fuses act as circuit protectors, overload preventers, fault isolators, and safety assurers, safeguarding the amplifier and the audio system from potential damage and hazards. Proper fuse selection and installation are essential for ensuring the reliable and safe operation of any audio amplification system.
Wiring gauge
In the context of “Wiring An Amp,” the selection of appropriate wiring gauge is crucial for ensuring optimal performance and preventing potential hazards. Wiring gauge refers to the thickness and current-carrying capacity of the wire, which directly affects the efficiency and safety of the electrical connection between the amplifier and other components in the audio system.
Using wiring with an insufficient gauge can lead to several adverse effects. Thin wires may struggle to handle the current demands of the amplifier, resulting in power loss, voltage drop, and overheating. This can compromise the sound quality, reduce the amplifier’s efficiency, and even pose a fire hazard. Conversely, using excessively thick wires is unnecessary and can increase the cost and complexity of the installation without providing any significant benefits.
Real-life examples of the importance of wiring gauge in “Wiring An Amp” include:
- Power supply wiring: The wiring used to connect the amplifier to the power source must be thick enough to carry the required current without overheating or causing voltage drop.
- Speaker wiring: The wiring used to connect the amplifier to the speakers should be able to handle the current and power demands of the speakers without causing excessive resistance or power loss.
- Grounding wire: The grounding wire, which connects the amplifier to the chassis or a dedicated ground point, should be of sufficient gauge to ensure proper grounding and prevent noise and interference.
Understanding the relationship between wiring gauge and “Wiring An Amp” allows for the selection of appropriate wire sizes that meet the specific requirements of the audio system. This ensures efficient power transfer, minimizes signal loss, prevents overheating, and enhances the overall performance and safety of the system.
Connections
In the context of “Wiring An Amp,” the selection and proper use of connectors play a critical role in ensuring the secure and reliable transfer of electrical signals and power between various components of the audio system. Connectors provide a means of establishing electrical connections between the amplifier, power source, speakers, and other devices, facilitating the flow of audio signals and power.
The choice of appropriate connectors depends on several factors, including the type of signal being transmitted (e.g., speaker-level, line-level, or power), the current and voltage requirements, and the physical constraints of the installation. Common types of connectors used in “Wiring An Amp” include:
- RCA connectors: Used for unbalanced audio signals, such as those from CD players or preamplifiers.
- XLR connectors: Used for balanced audio signals, often preferred in professional audio applications.
- Speaker terminals: Binding posts or banana plugs used to connect the amplifier to speakers.
- Power connectors: Typically IEC connectors for AC power input and speaker terminals for power distribution to speakers.
Properly connecting these components ensures that the audio signal is transmitted with minimal loss or interference, and that the amplifier receives adequate power to operate efficiently. Poor connections can lead to noise, distortion, or even damage to equipment.
In summary, the use of appropriate connectors in “Wiring An Amp” is essential for establishing secure and reliable electrical connections, ensuring optimal signal transfer and power distribution. Understanding the types of connectors available and their proper use is crucial for achieving a well-functioning and safe audio system.


Related Posts


