Wiring a smart thermostat involves connecting it to the electrical system of the house. It replaces a traditional thermostat and offers advanced features, such as remote access and scheduling, to optimize the heating and cooling system for improved energy efficiency.
Smart thermostats have gained significant relevance due to their ability to reduce energy consumption and enhance comfort. They learn usage patterns, adjust temperature settings automatically, and provide insights into energy usage. The introduction of Wi-Fi and smartphone connectivity has further increased their popularity, allowing homeowners to control their thermostats from anywhere.
This article will delve into the intricacies of wiring a smart thermostat, exploring its anatomy, electrical requirements, and wiring procedures. We will also highlight the safety precautions and compatibility considerations to ensure a successful installation.
Wiring a smart thermostat is a crucial aspect of home automation, offering numerous benefits and requiring careful attention to detail. It involves connecting the smart thermostat to the electrical system of the house, replacing a traditional thermostat with advanced features.
- Electrical Compatibility: Ensuring the smart thermostat is compatible with the electrical system of the house, including voltage and amperage requirements.
- Circuit Identification: Identifying the correct circuit breaker or fuse that controls the heating and cooling system.
- Wire Labeling: Understanding the color coding and labeling of wires to connect the thermostat correctly.
- Terminal Connections: Connecting the wires to the appropriate terminals on the smart thermostat, typically labeled with letters or symbols.
- Powering the Thermostat: Supplying power to the smart thermostat, either through batteries or a direct connection to the electrical system.
- Mounting the Thermostat: Securing the smart thermostat to the wall or other designated location.
- Testing the Thermostat: Verifying the functionality of the smart thermostat by adjusting temperature settings and observing system response.
- Wi-Fi Connectivity: Configuring the smart thermostat to connect to a home Wi-Fi network for remote access and control.
- App Integration: Installing and connecting the smart thermostat to a smartphone app for user-friendly operation and scheduling.
These aspects are interconnected and essential for successful wiring and operation of a smart thermostat. Proper wiring ensures reliable communication between the thermostat and the heating and cooling system, while compatibility and correct connections prevent electrical hazards.
Electrical Compatibility
Electrical compatibility is a critical component of wiring a smart thermostat. Before installation, it is essential to ensure that the smart thermostat is compatible with the electrical system of the house, including voltage and amperage requirements. This compatibility check helps prevent electrical hazards, ensures reliable communication between the thermostat and the heating and cooling system, and optimizes the performance of the smart thermostat.
For instance, if the smart thermostat requires 24 volts of alternating current (VAC) and the electrical system of the house provides 120 VAC, a transformer must be installed to step down the voltage to a compatible level. Failure to do so can damage the smart thermostat and create electrical hazards.
Understanding electrical compatibility and wiring a smart thermostat accordingly is crucial for safe and efficient operation. It allows homeowners to harness the benefits of smart thermostats, such as remote access, scheduling, and energy optimization, without compromising the integrity of the electrical system.
Circuit Identification
Circuit identification is a crucial step in wiring a smart thermostat, ensuring the device is connected to the correct electrical circuit that powers the heating and cooling system. Misidentification can lead to electrical hazards, incorrect operation of the thermostat, or damage to the system.
- Electrical Panel Inspection: Locate the electrical panel, typically found in a basement, garage, or utility room. Inside the panel, identify the circuit breakers or fuses labeled for the heating and cooling system. These may be labeled as “HVAC,” “Furnace,” or “Air Conditioner.”
- Circuit Tracing: If the electrical panel does not have clear labels, use a circuit tracer to identify the circuit that powers the heating and cooling system. Turn off all circuit breakers or fuses except the main breaker, then connect the circuit tracer to the thermostat wires. Activate each circuit breaker or fuse one at a time until the circuit tracer indicates power.
- Voltage Verification: Once the circuit is identified, use a voltmeter to verify the voltage matches the voltage requirements of the smart thermostat. Most smart thermostats require 24 volts of alternating current (VAC), so ensure the circuit provides the correct voltage.
- Amperage Rating: Check the amperage rating of the circuit breaker or fuse to ensure it is sufficient to handle the load of the smart thermostat and the heating and cooling system. The amperage rating should be higher than the maximum current draw of the system.
Proper circuit identification ensures a safe and reliable connection between the smart thermostat and the heating and cooling system. By following these steps and adhering to electrical safety guidelines, homeowners can ensure the smart thermostat is correctly wired and operating as intended.
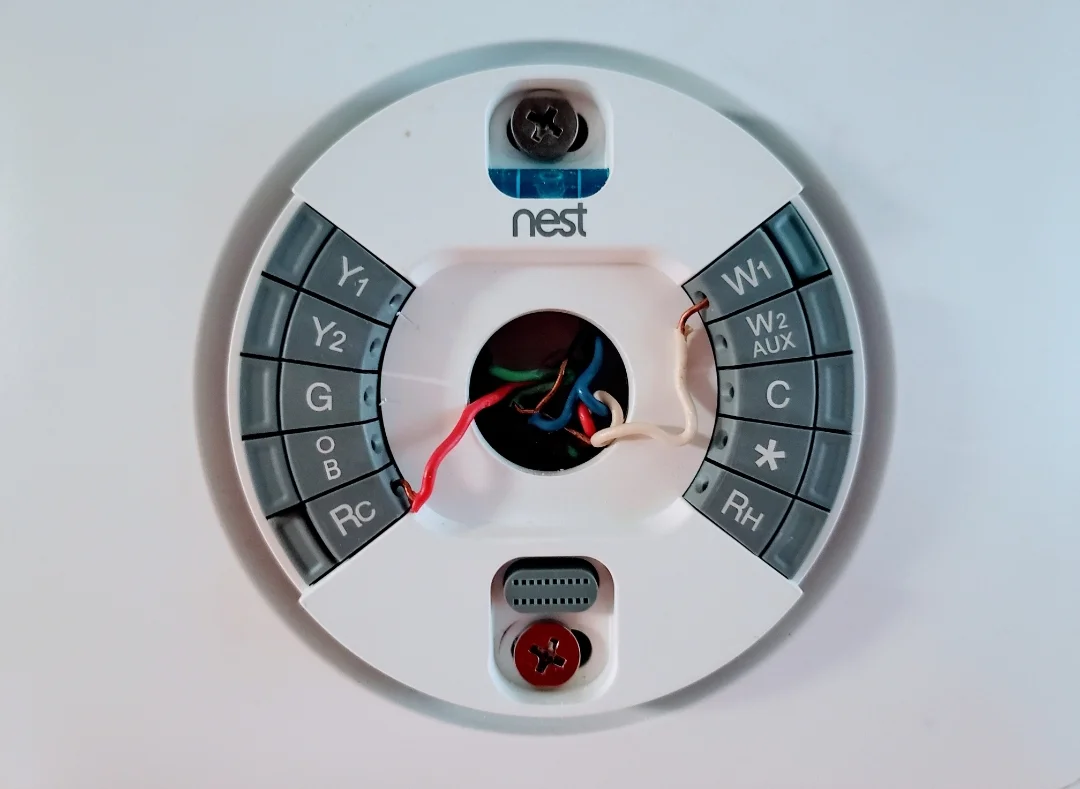
Wire Labeling
In the context of “Wiring a Smart Thermostat,” wire labeling plays a critical role in ensuring the proper and safe connection of the thermostat to the heating and cooling system. Wires used in thermostat wiring are typically color-coded and labeled to facilitate easy identification and to adhere to electrical standards.
- Color Coding: Wires are assigned specific colors to indicate their function and voltage level. For example, red wires typically carry power, black wires are used for switching, and yellow wires are for low-voltage control signals.
- Terminal Labels: Smart thermostats have terminals labeled with letters or symbols that correspond to the function of each wire. These labels, such as “R” for power, “C” for common, and “W” for heat, guide the user in connecting the wires to the correct terminals.
- Wire Labels: In some cases, wires may have printed labels or tags that explicitly state their function. These labels provide an additional layer of clarity, especially when dealing with multiple wires or complex wiring configurations.
- Standard Wiring Diagrams: Standard wiring diagrams, often provided by the thermostat manufacturer or included in the installation manual, serve as a visual guide to assist in the correct wiring of the thermostat. These diagrams illustrate the proper placement of wires based on their color coding and terminal labels.
Understanding wire labeling and adhering to color coding and terminal labels is essential for avoiding wiring errors that could lead to incorrect thermostat operation, system damage, or even electrical hazards. Proper wire labeling ensures a reliable connection between the thermostat and the heating and cooling system, optimizing its performance and contributing to the overall safety and efficiency of the home.
Terminal Connections
In the context of “Wiring a Smart Thermostat,” terminal connections play a critical role in establishing proper communication and functionality between the thermostat and the heating and cooling system. These connections involve attaching the wires to designated terminals on the smart thermostat, typically labeled with letters or symbols that correspond to their specific function.
Terminal connections are a critical component of wiring a smart thermostat because they ensure that power, signals, and control commands are transmitted accurately and safely. Incorrect or loose connections can lead to erratic thermostat operation, system malfunctions, or even electrical hazards. By adhering to the terminal labels and connecting the wires accordingly, homeowners can establish a reliable and secure connection between the thermostat and the heating and cooling system.
For instance, consider a smart thermostat with terminals labeled “R” for power, “C” for common, and “W” for heat. Connecting the red wire to the “R” terminal, the white wire to the “C” terminal, and the blue wire to the “W” terminal ensures that power is supplied, a common ground is established, and the heating system is activated when the thermostat calls for heat. Proper terminal connections are essential for the smart thermostat to function as intended, optimizing energy efficiency, comfort levels, and remote control capabilities.
Understanding terminal connections and wiring a smart thermostat correctly is crucial for homeowners looking to upgrade their home automation systems. It empowers them to harness the benefits of smart thermostats, such as remote scheduling, energy monitoring, and personalized temperature control, while ensuring the safety and reliability of their heating and cooling systems.
Powering the Thermostat
In the context of “Wiring A Smart Thermostat”, powering the thermostat is a fundamental aspect that ensures its functionality and seamless operation. This involves supplying a reliable source of power to the thermostat, enabling it to control and regulate the heating and cooling system effectively. There are two primary methods for powering a smart thermostat: through batteries or a direct connection to the electrical system.
-
Battery Power:
Battery power provides a convenient and wireless solution for powering smart thermostats. Batteries, typically AA or AAA, are inserted into a designated compartment within the thermostat, supplying the necessary voltage to operate the device. This method is ideal for situations where running wires to the thermostat’s location is impractical or aesthetically unappealing. However, battery life is finite, and periodic replacement is required to ensure uninterrupted operation.
-
Direct Electrical Connection:
A direct electrical connection involves wiring the smart thermostat to the electrical system of the house. This method provides a continuous and reliable power source, eliminating the need for battery replacements. It requires careful wiring and adherence to electrical codes to ensure safe and proper operation. Direct electrical connection is typically preferred for permanent thermostat installations and offers greater stability and longevity compared to battery power.
The choice between battery power and a direct electrical connection depends on factors such as the thermostat’s location, the availability of existing wiring, and personal preferences. Both methods have their advantages and disadvantages, and homeowners should consider these factors when selecting the appropriate powering option for their smart thermostat installation.
Mounting the Thermostat
Mounting the smart thermostat securely to the wall or other designated location is a critical component of “Wiring a Smart Thermostat.” It establishes a stable and reliable physical connection between the thermostat and the wall, ensuring proper operation and preventing accidental dislodging or damage to the device.
During the wiring process, the thermostat’s electrical connections are established while it is mounted in place. Secure mounting ensures that wires are not strained or damaged due to movement or accidental knocks, which could lead to electrical hazards or thermostat malfunctions. Additionally, proper mounting allows for easy access to the thermostat’s display and buttons for user interaction, such as adjusting temperature settings or accessing advanced features.
Real-life examples of mounting a smart thermostat include securing it to a wall in a living room, hallway, or bedroom, or mounting it on a tabletop or shelf in a room where wall mounting is not feasible. The choice of mounting location depends on factors such as the room’s layout, furniture arrangement, and the user’s preferred placement for convenient temperature control.
Understanding the connection between mounting the thermostat and wiring a smart thermostat is essential for ensuring the device’s proper installation and functionality. Secure mounting provides a stable base for electrical connections, prevents damage to the thermostat or wiring, and enhances the user experience by allowing for convenient access and operation.
Testing the Thermostat
Testing the thermostat is a crucial component of “Wiring A Smart Thermostat” as it ensures the proper functionality of the system after the wiring process is complete. By adjusting temperature settings and observing the system’s response, homeowners can verify if the thermostat is communicating effectively with the heating and cooling equipment, and if the desired temperature changes are being executed as intended.
Real-life examples of testing the thermostat include setting a higher temperature during winter and observing if the heating system turns on and raises the room temperature accordingly. Conversely, setting a lower temperature during summer should trigger the cooling system to turn on and lower the room temperature.
Understanding the connection between testing the thermostat and wiring a smart thermostat is essential for ensuring the system operates as expected. Without proper testing, homeowners may encounter issues with temperature control, energy efficiency, and overall comfort levels. By thoroughly testing the thermostat after wiring, homeowners can ensure a seamless and efficient smart thermostat system.
Wi-Fi Connectivity
Wi-Fi connectivity is a critical component of “Wiring A Smart Thermostat” as it enables the thermostat to connect to the home’s Wi-Fi network, providing remote access and control capabilities to the user. By connecting the smart thermostat to Wi-Fi, homeowners can leverage their smartphones, tablets, or computers to adjust temperature settings, monitor energy usage, and receive alerts from anywhere with an internet connection.
A real-life example of Wi-Fi connectivity within “Wiring A Smart Thermostat” is when a homeowner is away on vacation and wants to adjust the temperature of their home remotely. By accessing the smart thermostat’s mobile app on their smartphone, they can make changes to the temperature settings to ensure their home is comfortable upon their return.
Understanding the connection between Wi-Fi connectivity and wiring a smart thermostat is essential for homeowners looking to maximize the benefits of their smart home system. By properly configuring Wi-Fi connectivity during the wiring process, homeowners can enjoy the convenience and energy-saving advantages of remote thermostat control, leading to enhanced comfort and lower energy bills.
App Integration
In the context of “Wiring A Smart Thermostat,” app integration plays a pivotal role in enhancing the user experience and extending the functionality of the smart thermostat. By installing and connecting the smart thermostat to a smartphone app, homeowners gain remote access, user-friendly operation, and advanced scheduling capabilities, transforming their home’s temperature control into a seamless and intuitive experience.
-
Remote Control and Monitoring:
App integration allows homeowners to remotely adjust temperature settings, monitor energy consumption, and receive alerts from anywhere with an internet connection. This real-time control empowers users to maintain a comfortable home environment, even when they’re away.
-
Scheduling and Programming:
Smart thermostat apps offer advanced scheduling features, enabling homeowners to create customized heating and cooling schedules that align with their daily routines and preferences. This automation eliminates the need for manual adjustments and optimizes energy usage.
-
Energy Efficiency Insights:
Through the app, homeowners can access detailed energy usage reports, gain insights into their heating and cooling patterns, and identify opportunities for energy savings. This data-driven approach helps users make informed decisions to reduce their energy consumption.
-
Enhanced User Interface:
Smartphone apps provide a user-friendly interface that simplifies thermostat operation. With intuitive navigation, clear displays, and personalized settings, homeowners can easily interact with their smart thermostats and tailor their home’s temperature to their exact preferences.
App integration is an essential aspect of “Wiring A Smart Thermostat” that offers convenience, energy efficiency, and enhanced control. By leveraging smartphone apps, homeowners can unlock the full potential of their smart thermostats, creating a comfortable, energy-efficient, and connected home.


Related Posts


