Wiring a door chime involves connecting electrical wires to the chime and door button, allowing the chime to sound when the button is pressed. This establishes a communication system between the door and the interior of a building, alerting occupants to the presence of visitors.
Its benefits include enhanced security, as it notifies homeowners of visitors, and convenience, providing an audible signal for entry. Historically, the invention of the electric doorbell in the late 19th century revolutionized door chimes, making them more reliable and widely accessible.
This article will delve into the technical aspects and best practices of wiring a door chime, considering factors such as voltage, wire gauge, and chime placement. We will also explore advanced features like wireless chimes and smart doorbell integration, showcasing their advantages and installation methods.
Wiring a door chime is a seemingly simple task, yet it encompasses various essential aspects that influence its functionality, safety, and overall effectiveness. Understanding these aspects is crucial for a successful and long-lasting installation.
- Voltage: Door chimes typically operate on low voltage, commonly 12-24 volts, ensuring safety and compatibility with most household electrical systems.
- Wire Gauge: The thickness of the electrical wire used affects current carrying capacity and voltage drop. Thicker wires (lower gauge numbers) minimize resistance and ensure reliable power transmission.
- Transformer: A transformer steps down the household voltage to the lower voltage required by the chime, ensuring safety and preventing damage.
- Chime Placement: The location of the chime should consider audibility, aesthetics, and accessibility for maintenance or replacement.
- Push Button: The type and placement of the push button impact the ease of use and durability of the system.
- Wiring Diagram: Following a clear wiring diagram is essential to ensure proper connections and avoid electrical hazards.
- Tools and Materials: Having the right tools and materials, such as a voltage tester, wire strippers, and appropriate wire connectors, is crucial for a safe and efficient installation.
- Safety Precautions: Electrical work can be hazardous. Always ensure the power is turned off before starting any wiring and follow established safety guidelines.
These aspects are interconnected and influence the overall performance and longevity of the door chime system. Proper consideration of each aspect ensures a reliable and effective communication system between the door and the interior of a building.
Voltage
The voltage used in door chimes is a critical consideration in wiring. Low voltage, typically 12-24 volts, is employed for several reasons. Firstly, it enhances safety by reducing the risk of electrical shock or fire hazards. Secondly, low voltage aligns with the capabilities of most household electrical systems, ensuring compatibility and preventing damage to the chime or electrical circuits.
Using low voltage in door chimes is a standard practice, ensuring widespread compatibility and adherence to electrical safety guidelines. This standardized approach simplifies the wiring process and eliminates the need for specialized electrical knowledge or equipment.
Understanding the voltage requirements of door chimes is essential for proper wiring. Mismatched voltage can lead to malfunctions, damage to the chime or electrical system, and potential safety hazards. Therefore, it is crucial to select a chime that corresponds to the voltage of the household electrical system and to follow the specified wiring instructions carefully.
Wire Gauge
In the context of wiring a door chime, wire gauge plays a pivotal role in ensuring the efficient and reliable transmission of electrical current. Selecting the appropriate wire gauge is crucial to prevent voltage drop, minimize power loss, and maintain optimal chime performance.
- Current Carrying Capacity: Thicker wires, denoted by lower gauge numbers, can carry more electrical current without overheating. This is particularly important for door chimes that require a sufficient current flow to generate a clear and audible sound.
- Voltage Drop: As electricity travels through a wire, it encounters resistance, which can cause a voltage drop. Thicker wires offer less resistance, minimizing voltage drop and ensuring that the chime receives the required voltage to operate effectively.
- Power Loss: Voltage drop can lead to power loss, reducing the chime’s volume or preventing it from sounding altogether. Thicker wires minimize power loss by maintaining a higher voltage level throughout the circuit.
- Long Wire Runs: In situations where the wire run from the chime to the push button is long, thicker wires become even more critical. This is because longer wires introduce more resistance, and thicker wires compensate for this by reducing voltage drop and ensuring reliable signal transmission.
Understanding wire gauge and its implications is essential for proper door chime wiring. By selecting the appropriate wire gauge, homeowners and electricians can ensure that the chime operates as intended, providing clear and audible notifications of visitors.
Transformer
Within the context of “Wiring A Door Chime”, the transformer plays a crucial role in ensuring the safe and efficient operation of the chime. Its primary function is to reduce the household voltage, typically 120 volts AC, to a lower voltage, usually 12-24 volts AC, which is required by the chime to produce sound.
- Voltage Conversion: The transformer’s core purpose is to convert the higher household voltage to a lower voltage suitable for the chime. This voltage conversion is necessary to prevent damage to the chime’s delicate components and ensure its safe operation.
- Safety: By stepping down the voltage, the transformer enhances the safety of the door chime system. Lower voltage reduces the risk of electrical shock or fire hazards, making it safer for homeowners and electricians to install and maintain the chime.
- Compatibility: Transformers are designed to match the specific voltage requirements of different door chimes. This compatibility ensures that the chime receives the correct voltage to operate effectively, producing a clear and audible sound when the doorbell button is pressed.
- Efficiency: Transformers are highly efficient devices, ensuring minimal power loss during the voltage conversion process. This efficiency contributes to the overall energy efficiency of the door chime system, reducing electricity consumption.
In summary, the transformer plays a critical role in “Wiring A Door Chime” by safely converting household voltage to the lower voltage required by the chime, enhancing safety, ensuring compatibility, and contributing to the overall efficiency of the system.
Chime Placement
In “Wiring A Door Chime”, chime placement holds significant importance due to several reasons. Firstly, the chime’s audibility is paramount. It should be placed in a location that allows its sound to be clearly heard throughout the intended area, ensuring visitors can be notified upon arrival. Secondly, aesthetics play a role, as the chime should complement the dcor and overall design of the home. A well-placed chime can enhance the visual appeal of the entryway.
Furthermore, accessibility for maintenance or replacement is crucial. The chime should be positioned in a way that allows for easy access in case of any repairs or upgrades. This foresight ensures that future maintenance or replacement can be carried out without significant disruption or inconvenience.
A practical example of chime placement is installing it near the entrance door, at a height that makes the sound easily audible from different parts of the house. Additionally, selecting a chime that harmonizes with the home’s architectural style and color scheme demonstrates the consideration of both functionality and aesthetics.
Understanding the significance of chime placement enables homeowners and electricians to make informed decisions during the installation process. By prioritizing audibility, aesthetics, and accessibility, they can create a door chime system that effectively fulfills its purpose while also complementing the home’s design and ensuring ease of maintenance.
Push Button
In the context of “Wiring A Door Chime”, the push button is a critical component that initiates the notification process. Its type and placement significantly influence the ease of use and durability of the overall system.
- Button Material and Design: The material and design of the push button affect its durability and resistance to wear and tear. Metal buttons are generally more durable than plastic ones, while larger buttons are easier to press, especially in low-light conditions or for individuals with limited dexterity.
- Wired vs. Wireless: Wired push buttons are physically connected to the chime unit, providing a reliable connection. Wireless push buttons, on the other hand, offer greater flexibility in placement but may be susceptible to interference or battery depletion.
- Button Placement: The placement of the push button should consider accessibility and visibility. It should be positioned at a comfortable height for most users and in a location that is not easily obstructed by landscaping or other objects.
- Illuminated Buttons: Illuminated push buttons provide visibility in low-light conditions, making them easier to locate and use at night or in dimly lit areas.
Understanding these factors allows homeowners and electricians to select and install the most suitable push button for their specific needs and environment. By considering the type and placement of the push button, they can create a door chime system that is both user-friendly and durable, ensuring reliable notification of visitors for years to come.
Wiring Diagram
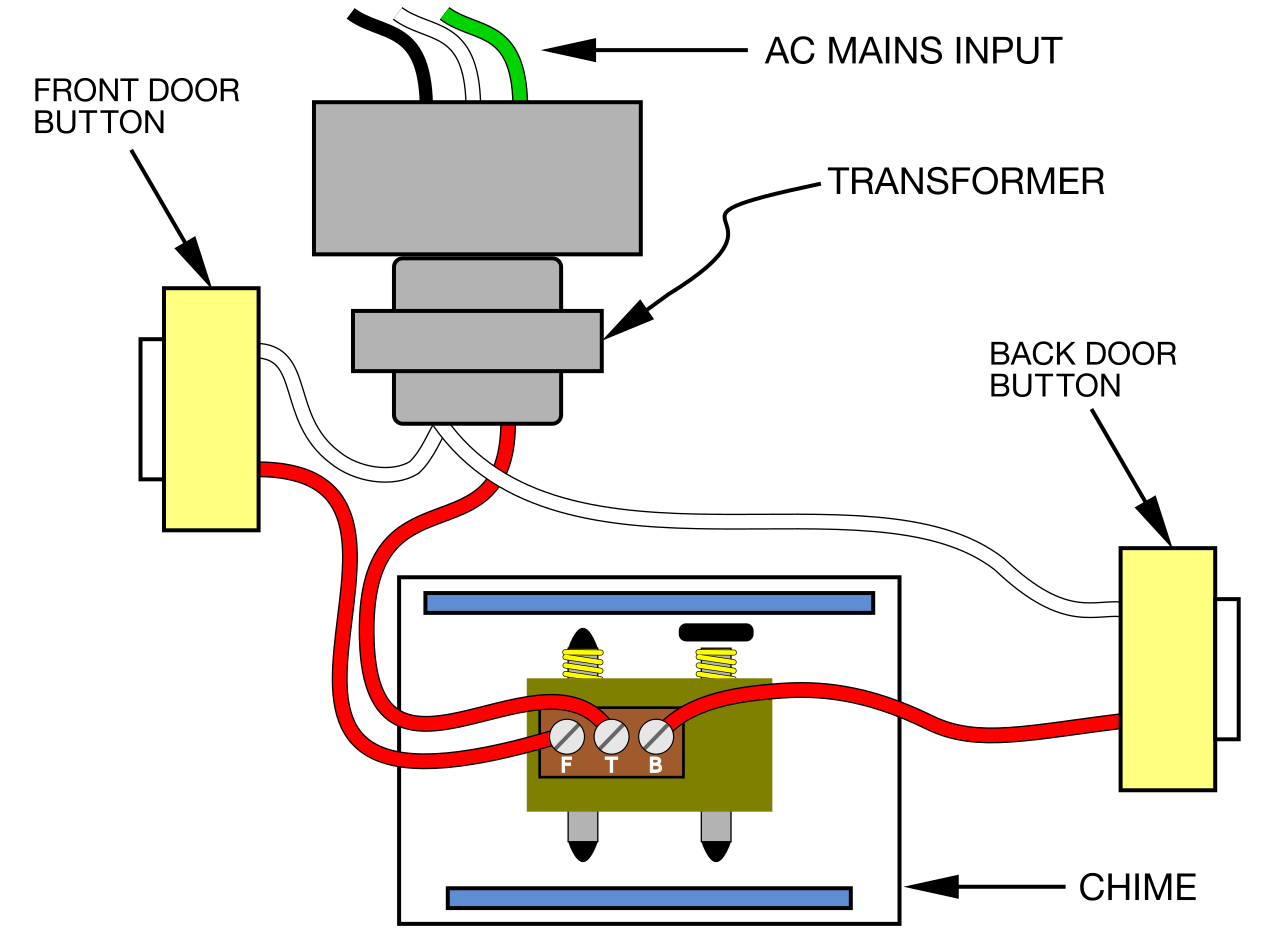
In the context of “Wiring A Door Chime”, a wiring diagram serves as a roadmap, guiding the installation process and ensuring the system’s functionality and safety. Ignoring or deviating from a clear wiring diagram can lead to improper connections, electrical hazards, and unsatisfactory performance.
- Accurate Component Identification: A wiring diagram provides a detailed representation of the chime system’s components, their connections, and their respective roles. This visual guide helps identify each component accurately, reducing the risk ofwiring caused by confusion or misinterpretation.
- Safe Electrical Connections: Wiring diagrams specify the correct polarity and wire connections, ensuring that current flows safely through the system. Following these instructions prevents short circuits, electrical fires, and damage to the chime or other components.
- Functional Verification: A properly executed wiring diagram ensures that each component is connected in the correct sequence and orientation, enabling the chime system to function as intended. This verification process helps identify and resolve potential issues before the system is energized, minimizing the risk of malfunctions.
- Maintenance and Troubleshooting: A clear wiring diagram becomes invaluable during maintenance or troubleshooting. It provides a visual reference for tracing connections, identifying faulty components, and resolving issues efficiently. This documentation reduces downtime and ensures the system’s continued reliability.
Adhering to a well-defined wiring diagram is not merely a recommendation but a crucial step in “Wiring A Door Chime”. Its significance extends beyond the initial installation, serving as a valuable resource throughout the system’s lifespan. By following a clear wiring diagram, homeowners and electricians can ensure the chime system operates safely, reliably, and as intended, providing peace of mind and effective visitor notification.
Tools and Materials
In the context of “Wiring A Door Chime”, having the right tools and materials is not a mere suggestion but a fundamental requirement for ensuring a safe and efficient installation. Each tool and material plays a specific role in the process, contributing to the overall success and reliability of the chime system.
For instance, a voltage tester is essential for verifying the presence and absence of voltage in the electrical circuit. This simple tool helps prevent electrical shocks and potential damage to the chime or other components. Wire strippers, another indispensable tool, enable the removal of insulation from electrical wires, allowing for proper connections and minimizing the risk of short circuits.
Appropriate wire connectors, such as wire nuts or crimp connectors, serve the critical function of joining electrical wires securely. These connectors ensure a reliable electrical connection, preventing loose or intermittent connections that could lead to system malfunctions or even electrical hazards. Using the correct type and size of wire connectors for the specific wire gauge is essential for maintaining proper current flow and preventing overheating.
The absence of the right tools and materials can lead to several challenges during the installation process. Without a voltage tester, individuals may inadvertently work on live wires, increasing the risk of electrical accidents. Improperly stripped wires can result in poor connections, leading to voltage drop, intermittent operation, or even complete system failure. Substandard or incorrectly sized wire connectors can cause loose connections, arcing, and potential fire hazards.
In summary, “Tools and Materials: Having the right tools and materials, such as a voltage tester, wire strippers, and appropriate wire connectors, is crucial for a safe and efficient installation.” is an integral aspect of “Wiring A Door Chime”. Understanding the importance of using the correct tools and materials empowers individuals to undertake the installation process with confidence, ensuring the chime system functions reliably, safely, and as intended.
Safety Precautions
When it comes to “Wiring A Door Chime”, safety precautions are of paramount importance. Electrical work, if not handled properly, can pose significant risks. Therefore, adhering to established safety guidelines and ensuring the power is turned off before commencing any wiring is crucial. This comprehensive approach encompasses several key facets:
- Identifying Potential Hazards: Before starting any electrical work, it is essential to identify potential hazards, such as exposed wires, faulty connections, or outdated components. These hazards can lead to electrical shocks, fires, or other accidents.
- Power Isolation: Turning off the power at the circuit breaker or fuse box is a fundamental safety measure. This step eliminates the risk of electrical shock and allows for safe handling of electrical components.
- Proper Grounding: Ensuring proper grounding provides a safe path for electrical current to flow in case of a fault. This prevents the buildup of dangerous voltage on the chime system and reduces the risk of electrical shock.
- Following Electrical Codes: Adhering to established electrical codes and standards, such as the National Electrical Code (NEC), is essential to ensure the safety and reliability of the door chime system. These codes provide guidelines for proper wiring techniques, component selection, and installation practices.
By understanding and implementing these safety precautions, individuals can minimize the risks associated with “Wiring A Door Chime”. Prioritizing safety throughout the installation process ensures a functional and hazard-free door chime system that enhances the security and convenience of a home.


Related Posts


