Wiring a 2-Way Light Switch involves connecting two switches to control a single light fixture from different locations, typically at the top and bottom of stairs. In a home, this allows for convenient light control as one enters or exits a room or hallway.
The 2-way switch system offers several advantages: it eliminates the need to walk through a dark space to turn on the lights, enhances safety in poorly lit areas, and adds convenience in multi-story buildings. Historically, the development of the 2-way switch in the late 19th century revolutionized home lighting, marking a significant advancement in electrical wiring.
In this comprehensive article, we will delve into the detailed steps and wiring diagrams for installing a 2-way light switch system, exploring its practical applications and providing valuable tips for successful implementation.
When wiring a 2-way light switch, careful consideration of several essential aspects is crucial for a successful and safe installation. These aspects encompass both technical requirements and practical considerations.
- Wiring Diagram: A precise visual representation of the electrical connections.
- Electrical Code: Compliance with local regulations ensures safety and functionality.
- Tools: Having the right tools for the job makes the process efficient and accurate.
- Safety Precautions: Prioritizing safety measures minimizes electrical hazards.
- Switch Compatibility: Choosing compatible switches ensures proper operation.
- Lighting Load: Understanding the power requirements of the connected light fixture.
- Switch Placement: Careful planning of switch locations enhances convenience and functionality.
- Troubleshooting: Identifying and resolving common issues ensures a successful installation.
These aspects are interconnected and play a vital role in the successful implementation of a 2-way light switch system. By understanding and considering each aspect thoroughly, you can ensure that the installation meets electrical standards, is safe and reliable, and provides the desired functionality and convenience.
Wiring Diagram
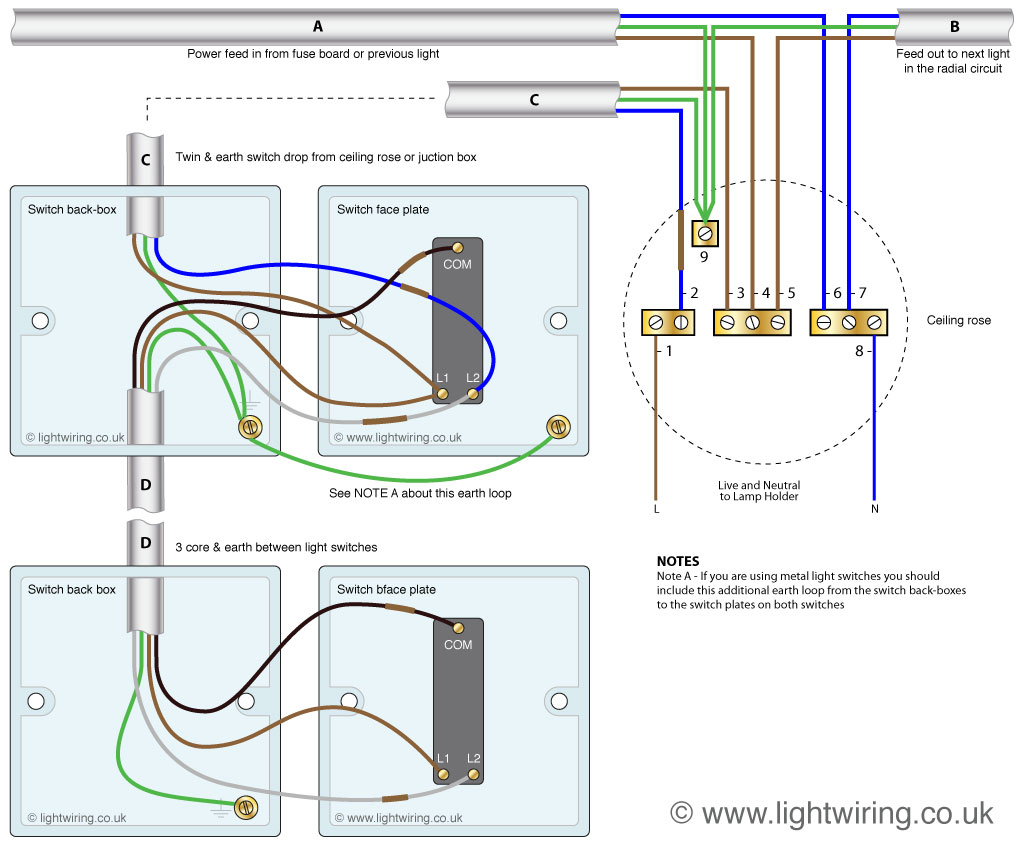
When wiring a 2-way light switch, a wiring diagram is essential for understanding the electrical connections and ensuring a successful installation. It provides a clear and concise representation of the circuit, including the switches, light fixture, and power source.
- Components: A wiring diagram will show all the necessary components, including switches, wires, and connectors, and how they are connected.
- Connections: The diagram will indicate where each wire should be connected, including the terminals on the switches and the light fixture.
- Switch Types: Different types of switches, such as single-pole, double-pole, and three-way switches, have different wiring configurations. The wiring diagram will show the correct type of switch to use and how to wire it.
- Troubleshooting: If there is a problem with the light switch circuit, a wiring diagram can be helpful in troubleshooting the issue.
By following the wiring diagram carefully, you can ensure that the 2-way light switch is installed correctly and operates safely and reliably. It is important to note that wiring diagrams may vary depending on the specific switches and light fixture used, so it is always best to refer to the manufacturer’s instructions for the specific products being installed.
Electrical Code
When wiring a 2-way light switch, adherence to electrical codes and regulations is paramount to ensure the safety and proper functioning of the electrical system. These codes provide guidelines for the installation, maintenance, and use of electrical equipment, ensuring that electrical systems meet minimum safety standards and operate efficiently.
- Safe Installation: Electrical codes specify the proper methods for installing electrical wiring and equipment, including the use of appropriate wire sizes, conduit, and grounding techniques. By following these codes, you can minimize the risk of electrical fires, shocks, and other hazards.
- Reliable Operation: Electrical codes also ensure that electrical systems operate reliably and efficiently. By adhering to code requirements for circuit design, load calculations, and equipment selection, you can ensure that your 2-way light switch system will function as intended, providing convenient and reliable light control.
- Compliance Inspections: In many areas, electrical installations are subject to inspections by local authorities to ensure compliance with electrical codes. Passing these inspections is essential for obtaining permits and ensuring that your electrical system is safe and up to code.
- Insurance Coverage: Compliance with electrical codes is often a requirement for insurance coverage. In the event of an electrical fire or other incident, insurance companies may deny coverage if the electrical system was not installed or maintained in accordance with code requirements.
By understanding and following the electrical codes and regulations that apply to your area, you can ensure that your 2-way light switch system is installed safely and operates reliably, providing peace of mind and protection for your home and family.
Tools
When it comes to wiring a 2-way light switch, having the right tools is essential for ensuring an efficient and accurate installation. The appropriate tools allow you to work safely, make precise connections, and troubleshoot any issues that may arise.
One of the most important tools for wiring a 2-way light switch is a voltage tester. This tool allows you to verify that the power is off before you begin working on the switch. Other essential tools include a wire stripper, a screwdriver, and electrical tape. These tools will allow you to strip the insulation from the wires, connect the wires to the switch terminals, and insulate the connections.
Using the right tools can save you time and frustration. For example, if you try to strip the insulation from a wire with a knife, you may nick the wire and damage it. Using a wire stripper will give you a clean, precise cut. Similarly, if you try to tighten a screw with a pair of pliers, you may strip the screw head. Using a screwdriver will give you a better grip on the screw and help you to avoid damaging it.
In addition to the basic tools mentioned above, there are a few other specialized tools that can be helpful when wiring a 2-way light switch. These tools include a circuit tester, a non-contact voltage tester, and a wire tracer. These tools can help you to identify the correct wires to connect to the switch and troubleshoot any problems that may occur.
Having the right tools for the job is essential for any electrical project, including wiring a 2-way light switch. By using the appropriate tools, you can ensure a safe, efficient, and accurate installation.
Safety Precautions
When wiring a 2-way light switch, safety precautions are of paramount importance to prevent electrical hazards and ensure a secure installation. Failing to adhere to appropriate safety measures can lead to severe consequences, ranging from minor shocks to life-threatening electrical fires.
- Turn off power: Before any electrical work, always switch off the power supply at the circuit breaker or fuse box. This essential step eliminates the risk of electric shock or electrocution.
- Use insulated tools: Always utilize tools with insulated handles to prevent current from passing through your body. Insulated screwdrivers, pliers, and wire strippers provide a protective barrier against electrical shock.
- Cover terminals: Once the switch is wired, ensure all terminals are securely fastened and covered with electrical tape. Exposed terminals can create short circuits or cause arcing, leading to electrical fires.
- Ground the system: Proper grounding provides a safe path for excess electricity to flow in case of a fault. Ensure the electrical system is correctly grounded to prevent electrical shocks and equipment damage.
By prioritizing safety precautions, you safeguard yourself and your property from potential electrical hazards during the wiring process. Always remember that electricity is a powerful force, and handling it with caution is crucial for a successful and safe 2-way light switch installation.
Switch Compatibility
When embarking on a 2-way light switch wiring project, switch compatibility plays a crucial role in ensuring the system’s seamless and efficient functioning. It involves selecting switches that are specifically designed to work together to control a single light fixture from two different locations, such as the top and bottom of stairs or hallways. Choosing compatible switches requires careful consideration of several key factors to guarantee successful installation and operation.
- Voltage and Current: Switches must be compatible with the voltage and current requirements of the electrical system and the connected light fixture. Using switches rated for a lower voltage or current than required can lead to overheating, switch failure, or even electrical fires.
- Switch Type: There are various types of switches used for 2-way lighting, including single-pole, double-pole, and three-way switches. Selecting the correct switch type is essential for proper circuit configuration and switch functionality.
- Wiring Configuration: The wiring configuration of the switches must match the intended circuit design. Some switches have screw terminals for wire connections, while others may utilize push-in terminals or other specific wiring mechanisms.
- Manufacturer Specifications: Adhering to the manufacturer’s specifications for switch compatibility is crucial. Using switches from different manufacturers or mixing incompatible models can result in improper operation, switch damage, or safety hazards.
Understanding and considering these factors when selecting compatible switches ensures a reliable and safe 2-way light switch system. In addition, it is advisable to consult with a qualified electrician for professional guidance and to adhere to local electrical codes and regulations to ensure compliance and safety.
Lighting Load
In the context of wiring a 2-way light switch, understanding the lighting load is crucial for ensuring the proper functioning and safety of the electrical system. The lighting load refers to the total amount of power consumed by the light fixture or fixtures that will be controlled by the 2-way switch.
The lighting load is a critical component of wiring a 2-way light switch because it determines the type of switch and wiring required. Switches have a maximum amperage rating, which is the maximum amount of current they can handle safely. The amperage rating of the switch must be equal to or greater than the total amperage draw of the connected light fixture(s). If the switch is undersized for the lighting load, it can overheat and fail, potentially causing an electrical fire.
For example, if you are wiring a 2-way light switch to control a single incandescent light bulb with a power rating of 60 watts, you would need to choose a switch with an amperage rating of at least 0.5 amps (60 watts / 120 volts = 0.5 amps). If you are wiring a 2-way light switch to control multiple light fixtures, you would need to add up the wattage of all the fixtures to determine the total lighting load and select a switch with an appropriate amperage rating.
Understanding the lighting load is also important for determining the size of the wire that is used to connect the switch to the light fixture(s). The wire size must be large enough to safely carry the current draw of the lighting load. If the wire is too small, it can overheat and become a fire hazard.
By understanding the lighting load and choosing the correct switch and wire size, you can ensure that your 2-way light switch is installed safely and operates reliably.
Switch Placement
In the context of wiring a 2-way light switch, switch placement plays a crucial role in enhancing the convenience and functionality of the lighting system. Careful planning of switch locations ensures that the switches are positioned in the most optimal and practical spots, providing easy and intuitive control of the lights.
One of the key considerations when determining switch placement is the accessibility and ease of use. Switches should be placed at convenient heights and within easy reach, allowing users to effortlessly turn the lights on or off without straining or fumbling. This is especially important in areas where frequent switching is required, such as hallways, entrances, or staircases.
Beyond accessibility, switch placement should also take into account the aesthetics and overall design of the space. Switches should complement the dcor and blend seamlessly with the surroundings, avoiding visual clutter or disruption. Additionally, placing switches in logical and intuitive locations helps users to quickly identify and operate the correct switch, enhancing the user experience.
For instance, in a living room, a 2-way light switch can be placed at both the entrance and the seating area, allowing users to conveniently control the lights from either location. In a bedroom, a 2-way switch can be positioned by the bedside and the door, providing easy access to light control from both ends of the room. Understanding the relationship between switch placement and the overall functionality of the lighting system empowers homeowners and electricians to create lighting designs that are both practical and aesthetically pleasing.
Troubleshooting
When discussing the intricacies of “Wiring A 2 Way Light Switch,” it is imperative to delve into the crucial aspect of “Troubleshooting: Identifying and resolving common issues ensures a successful installation.” Troubleshooting empowers homeowners and electricians to analyze potential problems and employ effective solutions, guaranteeing a seamless lighting experience.
-
Identifying Loose Connections:
Loose connections are a prevalent cause of electrical malfunctions. Inspecting and tightening all wire connections, including those at the switch, light fixture, and electrical box, can resolve these issues. -
Testing Switch Functionality:
A faulty switch can disrupt the circuit. Utilizing a voltage tester to verify if the switch is receiving and transmitting power helps isolate the problem, guiding towards switch replacement if necessary. -
Checking Bulb Compatibility:
Incompatibility between the switch and the light bulb can lead to flickering or no illumination. Ensuring the bulb’s wattage and type align with the switch’s specifications ensures proper operation. -
Inspecting Circuit Breaker:
An overloaded circuit or tripped circuit breaker can interrupt power supply. Resetting the breaker or replacing blown fuses restores power and eliminates the issue.
By embracing a proactive approach to troubleshooting, homeowners can minimize the likelihood of electrical issues and maintain a safe and functional lighting system. Identifying and resolving common problems empowers individuals to maintain their electrical systems, avoiding unnecessary repairs and ensuring the continued smooth operation of their 2-way light switches.


Related Posts


