A single doorbell wiring diagram outlines the electrical connections between a doorbell chime and a push-button switch, typically used for residential homes or small businesses. For instance, a common wiring diagram might involve connecting the transformer to a power source, then connecting the transformer to the chime and the push-button switch.
Understanding doorbell wiring diagrams is crucial for proper installation, maintenance, and troubleshooting. They provide clear instructions on component connections, wire sizing, and circuit protection, ensuring optimal doorbell system functionality. Historically, the development of wireless doorbells has simplified the wiring process, reducing the need for complex diagrams.
This article delves deeper into single doorbell wiring diagrams, discussing advanced configurations, troubleshooting techniques, and safety considerations. By understanding these diagrams, homeowners and electricians can ensure reliable and secure doorbell installations.
Single doorbell wiring diagrams are crucial for understanding the electrical connections between a doorbell chime and a push-button switch. They provide clear instructions on component connections, wire sizing, and circuit protection, ensuring optimal doorbell system functionality.
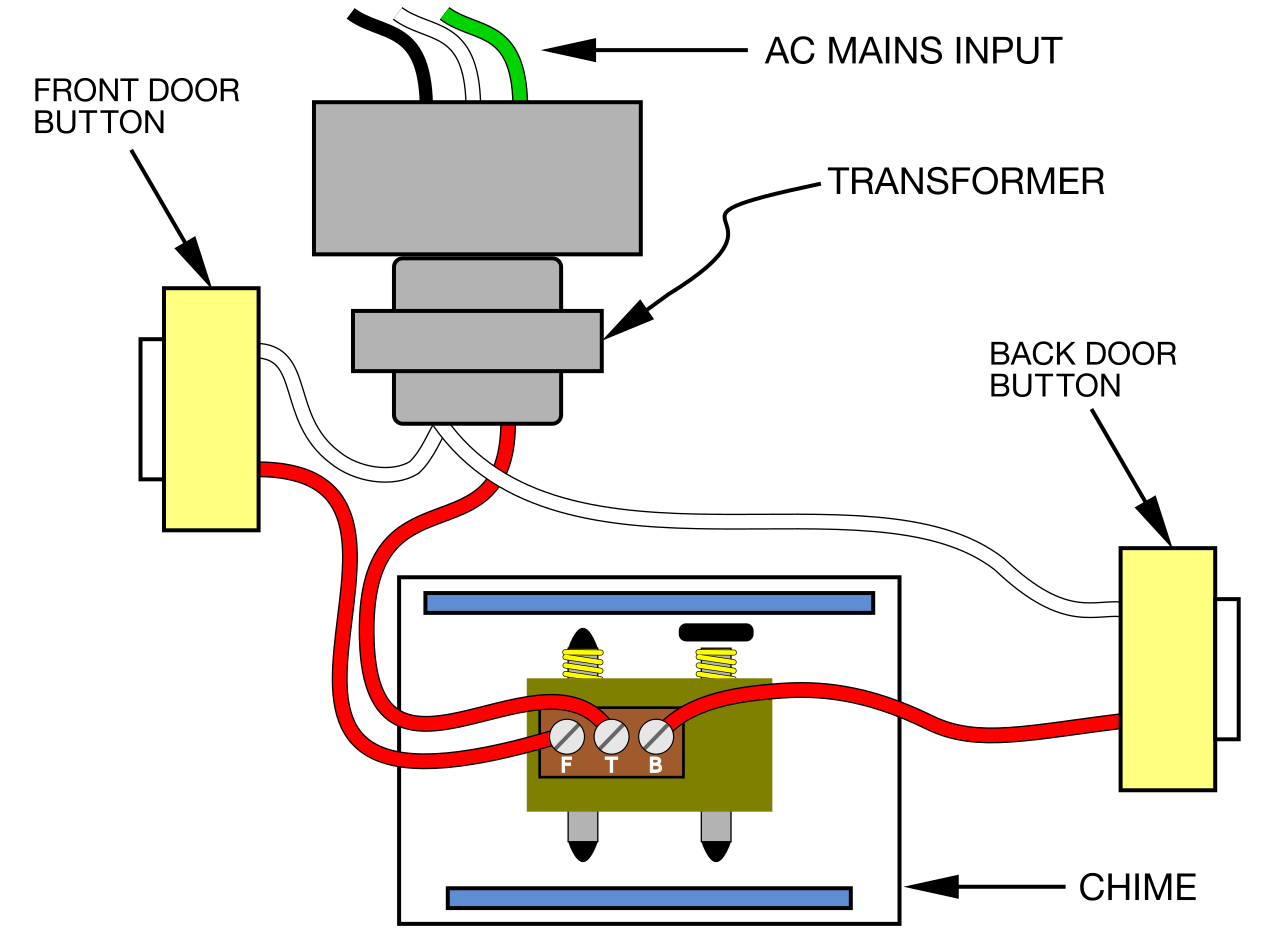
- Components: Transformer, chime, push-button switch, wires
- Connections: Transformer to power source, transformer to chime, chime to push-button switch
- Wire sizing: AWG (American Wire Gauge) determines wire thickness
- Circuit protection: Fuses or circuit breakers protect against overcurrent
- Power source: Typically 120VAC or 240VAC
- Tools: Wire strippers, screwdrivers, electrical tape
- Safety: Follow electrical codes, turn off power before working
- Troubleshooting: Check connections, test voltage, replace faulty components
- Advanced configurations: Multiple chimes, doorbells with cameras
These aspects provide a comprehensive understanding of single doorbell wiring diagrams, enabling homeowners and electricians to ensure reliable and secure doorbell installations. For instance, knowing the correct wire sizing helps prevent overheating and electrical hazards, while understanding circuit protection safeguards the system from damage. Furthermore, advanced configurations allow for enhanced functionality, such as doorbell systems with integrated cameras for added security.
Components
Within the realm of single doorbell wiring diagrams, the primary components play a pivotal role in establishing a functional and reliable doorbell system. These components, namely the transformer, chime, push-button switch, and wires, form the backbone of the electrical connections that facilitate the operation of a doorbell.
-
Transformer
The transformer serves as the heart of the doorbell system, converting the incoming AC voltage to a lower voltage suitable for the chime and push-button switch. Common transformer ratings for doorbells range from 12VAC to 24VAC.
-
Chime
The chime is the sound-producing component that generates the audible signal when the push-button switch is pressed. Chimes come in various melodies and volumes, allowing for customization based on personal preferences.
-
Push-button switch
The push-button switch initiates the doorbell circuit when pressed. It completes the electrical circuit, allowing current to flow from the transformer to the chime.
-
Wires
Wires serve as the pathways for electrical current to travel throughout the doorbell system. Proper wire selection is crucial, considering factors such as gauge, insulation, and length, to ensure efficient and safe operation.
Understanding the functions and interconnections of these components is paramount for successful doorbell wiring. By carefully following wiring diagrams and adhering to electrical codes, homeowners and electricians can ensure the proper installation and maintenance of single doorbell systems.
Connections
In the realm of single doorbell wiring diagrams, the connections between the transformer, chime, and push-button switch form the cornerstone of a functional doorbell system. These connections establish the electrical pathways that allow the doorbell to operate as intended.
The transformer serves as the power source for the doorbell system, converting the incoming AC voltage to a lower voltage suitable for the chime and push-button switch. This step-down transformation ensures safe and efficient operation of the doorbell components.
From the transformer, connections are made to the chime and push-button switch. The chime is connected to the transformer to receive power and generate the audible signal when the push-button switch is pressed. The push-button switch completes the circuit when pressed, allowing current to flow from the transformer to the chime, triggering the sound.
Understanding these connections is critical for successful doorbell wiring. Incorrect connections can result in malfunctioning or even hazardous conditions. By carefully following wiring diagrams and adhering to electrical codes, homeowners and electricians can ensure the proper installation and maintenance of single doorbell systems.
Wire sizing
In the context of single doorbell wiring diagrams, wire sizing plays a crucial role in ensuring proper system functionality and safety. The American Wire Gauge (AWG) standard defines the thickness of electrical wires, which directly impacts their current-carrying capacity and resistance. Selecting the appropriate wire size is essential to prevent overheating, voltage drop, and potential electrical hazards.
When designing a single doorbell wiring diagram, the length of the wire run and the current draw of the doorbell components must be considered. Longer wire runs require thicker wires to minimize voltage drop, while higher current draw necessitates wires with a larger cross-sectional area to handle the increased current flow. AWG wire sizes range from 0 AWG (thickest) to 40 AWG (thinnest), with lower AWG numbers indicating thicker wires. For most residential doorbell systems, AWG sizes between 14 AWG and 18 AWG are commonly used.
Proper wire sizing is critical for ensuring the doorbell system operates reliably and safely. Undersized wires can lead to excessive voltage drop, resulting in a weak or faint doorbell chime. In extreme cases, undersized wires can overheat, posing a fire hazard. Conversely, oversized wires, while not as detrimental, can be more expensive and less flexible to work with.
Understanding the relationship between wire sizing and single doorbell wiring diagrams empowers homeowners and electricians to make informed decisions when installing or troubleshooting doorbell systems. By carefully selecting the appropriate wire size based on the system requirements, they can ensure optimal performance, safety, and longevity of the doorbell system.
Circuit protection
In the realm of single doorbell wiring diagrams, circuit protection plays a critical role in safeguarding the system from electrical hazards and ensuring reliable operation. Fuses or circuit breakers serve as essential components within these diagrams, providing protection against overcurrent conditions that could potentially damage the doorbell system or pose a fire risk.
Overcurrent occurs when the electrical current flowing through a circuit exceeds its designed capacity. This can arise due to various factors, such as faulty wiring, short circuits, or overloading the circuit with too many devices. When overcurrent occurs, fuses or circuit breakers act as sacrificial elements, interrupting the current flow to prevent damage to the system.
In single doorbell wiring diagrams, fuses or circuit breakers are typically installed in series with the doorbell components. When an overcurrent condition is detected, the fuse blows or the circuit breaker trips, breaking the circuit and preventing the excessive current from reaching the doorbell chime or push-button switch. This protective mechanism helps prevent damage to the doorbell components, electrical fires, and potential injuries.
Understanding the critical role of circuit protection in single doorbell wiring diagrams is essential for homeowners and electricians alike. By incorporating proper circuit protection measures, they can ensure the safe and reliable operation of their doorbell systems, minimizing the risk of electrical hazards and costly repairs.
Power source
In the realm of single doorbell wiring diagrams, understanding the power source is paramount, as it dictates the electrical specifications of the entire system. Doorbell systems typically operate on either 120VAC (volts alternating current) or 240VAC, depending on regional electrical standards and the specific doorbell components used.
The power source serves as the driving force behind the doorbell system, providing the necessary voltage to power the transformer, chime, and push-button switch. The transformer, a critical component in doorbell wiring diagrams, steps down the incoming AC voltage from the power source to a lower voltage, typically 12VAC or 24VAC, which is suitable for the chime and push-button switch. This step-down transformation ensures safe and efficient operation of the doorbell components.
Real-life examples of power source considerations in single doorbell wiring diagrams are prevalent. In North America, where the standard electrical supply is 120VAC, doorbell systems are typically designed around this voltage. In contrast, in Europe and many other regions, where the electrical supply is 240VAC, doorbell systems are designed to operate on this higher voltage. Electricians and homeowners must carefully consider the power source when selecting and installing doorbell components to ensure compatibility and safe operation.
Understanding the connection between power source and single doorbell wiring diagrams is not merely theoretical but has practical significance. It enables informed decision-making when designing, installing, and troubleshooting doorbell systems. Proper selection of components that match the power source voltage ensures optimal performance, longevity, and safety of the doorbell system. Neglecting this aspect can lead to malfunctions, damage to components, or even electrical hazards.
In conclusion, the power source, typically 120VAC or 240VAC, plays a crucial role in single doorbell wiring diagrams. It dictates the electrical specifications of the system, including the transformer and chime voltage. Understanding this connection empowers homeowners and electricians to make informed choices, ensuring safe and reliable operation of their doorbell systems.
Tools
When embarking on a single doorbell wiring diagram project, having the appropriate tools is imperative for ensuring a successful and safe installation. These tools, namely wire strippers, screwdrivers, and electrical tape, play pivotal roles in preparing, connecting, and securing the electrical components.
-
Wire strippers
Wire strippers are essential for removing the insulation from electrical wires, allowing for proper connections. They come in various types, including automatic, semi-automatic, and manual strippers, each suited for different wire gauges and insulation types.
-
Screwdrivers
Screwdrivers are utilized for tightening and loosening screws that secure electrical components, such as the doorbell chime and push-button switch, to their respective mounting surfaces. Different types of screwdrivers, including flathead, Phillips, and Robertson, correspond to specific screw head designs.
-
Electrical tape
Electrical tape serves as an insulating material, protecting exposed wire connections and preventing electrical shorts. It is commonly used to wrap around wire splices or the terminals of electrical components to ensure a secure and insulated connection.
-
Safety glasses
Although not explicitly listed as a tool, safety glasses are crucial personal protective equipment when working with electrical components. They shield the eyes from flying debris or potential electrical sparks during the installation process.
Comprehending the functions and proper usage of these tools empowers homeowners and electricians to approach single doorbell wiring diagrams with confidence. By utilizing the right tools for the job, individuals can ensure accurate and reliable electrical connections, minimizing potential hazards and ensuring the doorbell system operates as intended.
Safety
When working with electricity, safety should always be the top priority. This is especially true when dealing with doorbell wiring, as improper handling can lead to electrical shocks, fires, or even more severe accidents. To ensure a safe and successful installation, it is crucial to follow electrical codes and turn off the power before beginning any work.
-
Identify potential hazards
Before starting any electrical work, take the time to identify potential hazards. Look for damaged wires, loose connections, or any other issues that could pose a risk. If you are unsure about something, it is always best to consult with a qualified electrician.
-
Turn off the power
Once you have identified the potential hazards, the next step is to turn off the power to the doorbell circuit. This can be done by flipping the circuit breaker or removing the fuse that powers the circuit. Once the power is off, you can safely begin working on the doorbell wiring.
-
Follow electrical codes
When working with electrical wiring, it is important to follow the electrical codes for your area. These codes are in place to ensure the safety of electrical installations and to prevent accidents. Familiarize yourself with the electrical codes before starting any work, and be sure to follow them carefully.
-
Use proper tools and equipment
When working with electricity, it is important to use the proper tools and equipment. This includes using insulated tools, wearing gloves, and using a voltage tester to ensure that the power is off before beginning work. Using the proper tools and equipment will help to keep you safe and prevent accidents.
By following these safety precautions, you can help to ensure a safe and successful doorbell wiring installation. Remember, safety should always be your top priority when working with electricity.
Troubleshooting
Troubleshooting plays a crucial role in maintaining a functional doorbell wiring system. It involves a series of steps to identify and resolve issues that may arise, ensuring the doorbell operates reliably. Key aspects of troubleshooting include checking connections, testing voltage, and replacing faulty components.
-
Connection Inspection
Loose or faulty connections can disrupt the electrical flow, causing the doorbell to malfunction. Inspecting connections at the transformer, chime, push-button switch, and wire terminals ensures proper contact and eliminates loose wires.
-
Voltage Testing
Using a multimeter, testing voltage at various points in the circuit helps identify voltage drop or lack of power. This helps pinpoint issues with the power source, transformer, or wiring, ensuring the doorbell receives the necessary voltage to operate.
-
Component Replacement
If connections and voltage check out, faulty components may be the cause of the problem. Replacing the chime, push-button switch, or transformer with known-good components can isolate and resolve the issue, restoring the doorbell’s functionality.
-
Advanced Troubleshooting
For more complex issues, further troubleshooting may involve checking for shorts, ground faults, or other electrical problems. This may require specialized tools and knowledge, and consulting an electrician is recommended.
Understanding and implementing these troubleshooting steps empowers homeowners and electricians to diagnose and resolve common doorbell wiring issues, ensuring a functional and reliable doorbell system. By checking connections, testing voltage, replacing faulty components, and performing advanced troubleshooting when necessary, individuals can maintain the integrity of their doorbell wiring diagrams and enjoy a consistently working doorbell.
Advanced configurations
Within the realm of single doorbell wiring diagrams, advanced configurations introduce greater functionality and versatility to doorbell systems. One such advancement is the integration of multiple chimes, allowing homeowners to install chimes in different locations throughout their property. This configuration enables a more extensive and customizable sound distribution, ensuring the doorbell can be heard from various rooms or outdoor areas.
Furthermore, the incorporation of doorbells with cameras adds an extra layer of security and convenience to single doorbell wiring diagrams. These devices combine the functionality of a doorbell with a surveillance camera, allowing homeowners to not only hear but also see who is at their door. This visual verification enhances security, as it provides a clear identification of visitors before opening the door, potentially deterring unwanted guests or suspicious activities.
Real-life examples of advanced configurations within single doorbell wiring diagrams are prevalent in modern homes and businesses. For instance, a homeowner may install multiple chimes in different rooms, such as the kitchen, living room, and master bedroom, to ensure they can hear the doorbell from any location within the house. Additionally, a business owner may opt for a doorbell with a camera to monitor customer traffic and deter potential theft or vandalism.
Understanding the connection between advanced configurations and single doorbell wiring diagrams empowers homeowners and electricians to design and implement doorbell systems that meet their specific needs and preferences. By incorporating multiple chimes or doorbells with cameras, they can enhance the functionality, security, and convenience of their doorbell systems, creating a more personalized and secure environment.


Related Posts


