Definition and Example: A schematic diagram is a simplified representation of an electrical circuit, using symbols and lines to illustrate the connections between components. It provides a clear visual representation of the circuit’s structure and functionality. For example, a schematic RV wiring diagram would outline the electrical system’s layout, including the battery, converter, outlets, and lighting.
Importance, Benefits, and Historical Context: Schematic diagrams are essential for understanding, troubleshooting, and modifying electrical systems. They provide a standardized language for representing circuits, making them accessible to a wide range of professionals. A key historical development was the introduction of standardized symbols in the early 20th century, which greatly improved the clarity and universality of schematic diagrams.
Transition to Main Article Topics: Delving deeper into the world of RV wiring, this article will explore the specific components of an RV electrical system, how they work together, and best practices for installation and maintenance.
Understanding the essential aspects of “Schematic RV Wiring For Dummies” is crucial for comprehending and working with electrical systems in recreational vehicles. These aspects provide a framework for understanding the components, connections, and functionality of RV wiring.
- Components: Battery, converter, outlets, lighting, wiring
- Connections: Circuits, terminals, connectors, splices
- Layout: Diagrams, blueprints, schematics
- Safety: Codes, regulations, grounding
- Troubleshooting: Tools, techniques, multimeter
- Maintenance: Inspection, cleaning, repairs
- Upgrading: New components, additional circuits
- Resources: Manuals, online forums, professionals
- DIY vs. Professional: When to tackle projects yourself, when to seek help
These aspects are interconnected, forming a comprehensive understanding of RV wiring. For instance, understanding the components and their connections is essential for troubleshooting electrical issues. Similarly, knowing the safety codes and regulations ensures the safe and reliable operation of the electrical system. By exploring each aspect in detail, readers can gain a thorough knowledge of RV wiring, enabling them to confidently maintain, upgrade, and troubleshoot their electrical systems.
Components: Battery, converter, outlets, lighting, wiring
Within the realm of “Schematic RV Wiring For Dummies,” understanding the fundamental components of an RV’s electrical system is paramount. These components form the backbone of the RV’s electrical infrastructure, enabling the operation of appliances, lighting, and other essential systems.
- Battery: The battery serves as the primary source of power for the RV’s electrical system. It stores electrical energy, providing a steady supply of voltage to various components.
- Converter: The converter transforms alternating current (AC) power from the RV’s shore power connection or generator into direct current (DC) power, which is used by the RV’s appliances and lighting.
- Outlets: Outlets provide connection points for various electrical devices and appliances within the RV, allowing occupants to power their electronics and other equipment.
- Lighting: Lighting fixtures illuminate the interior and exterior of the RV, providing visibility and creating a comfortable living environment.
- Wiring: Electrical wiring connects all the components of the RV’s electrical system, allowing the flow of electricity throughout the vehicle.
These components work in conjunction to provide a functional and reliable electrical system in an RV. Proper installation, maintenance, and understanding of these components are crucial for ensuring the safety and efficiency of the RV’s electrical infrastructure.
Connections: Circuits, terminals, connectors, splices
Within the realm of “Schematic RV Wiring For Dummies,” understanding the connections between circuits, terminals, connectors, and splices is critical for comprehending the flow of electricity and the functionality of the RV’s electrical system. These connections form the pathways through which electrical current travels, ensuring that power is distributed to various components and appliances.
Terminals provide connection points for wires to attach to components, while connectors join wires together, creating a continuous electrical path. Splices are used to extend or repair wires, maintaining the integrity of the electrical circuit. Circuits, on the other hand, are closed loops that allow electricity to flow from the power source, through the components, and back to the source.
Real-life examples of these connections abound within RV wiring schematics. The battery, for instance, is connected to the converter via terminals and wires, forming a circuit that supplies power to the RV’s electrical system. Outlets and lighting fixtures are connected to circuits through wires and connectors, allowing them to draw power and function properly.
Practical applications of understanding these connections include the ability to troubleshoot electrical issues, make repairs, and modify or upgrade the RV’s electrical system. By identifying the type of connection and its location within the schematic, RV owners can pinpoint problems and take appropriate action to restore functionality.
In summary, ” Connections: Circuits, terminals, connectors, splices” are fundamental components of “Schematic RV Wiring For Dummies.” Understanding these connections empowers RV owners to maintain, troubleshoot, and modify their electrical systems, ensuring the safe and reliable operation of their recreational vehicles.
Layout: Diagrams, blueprints, schematics
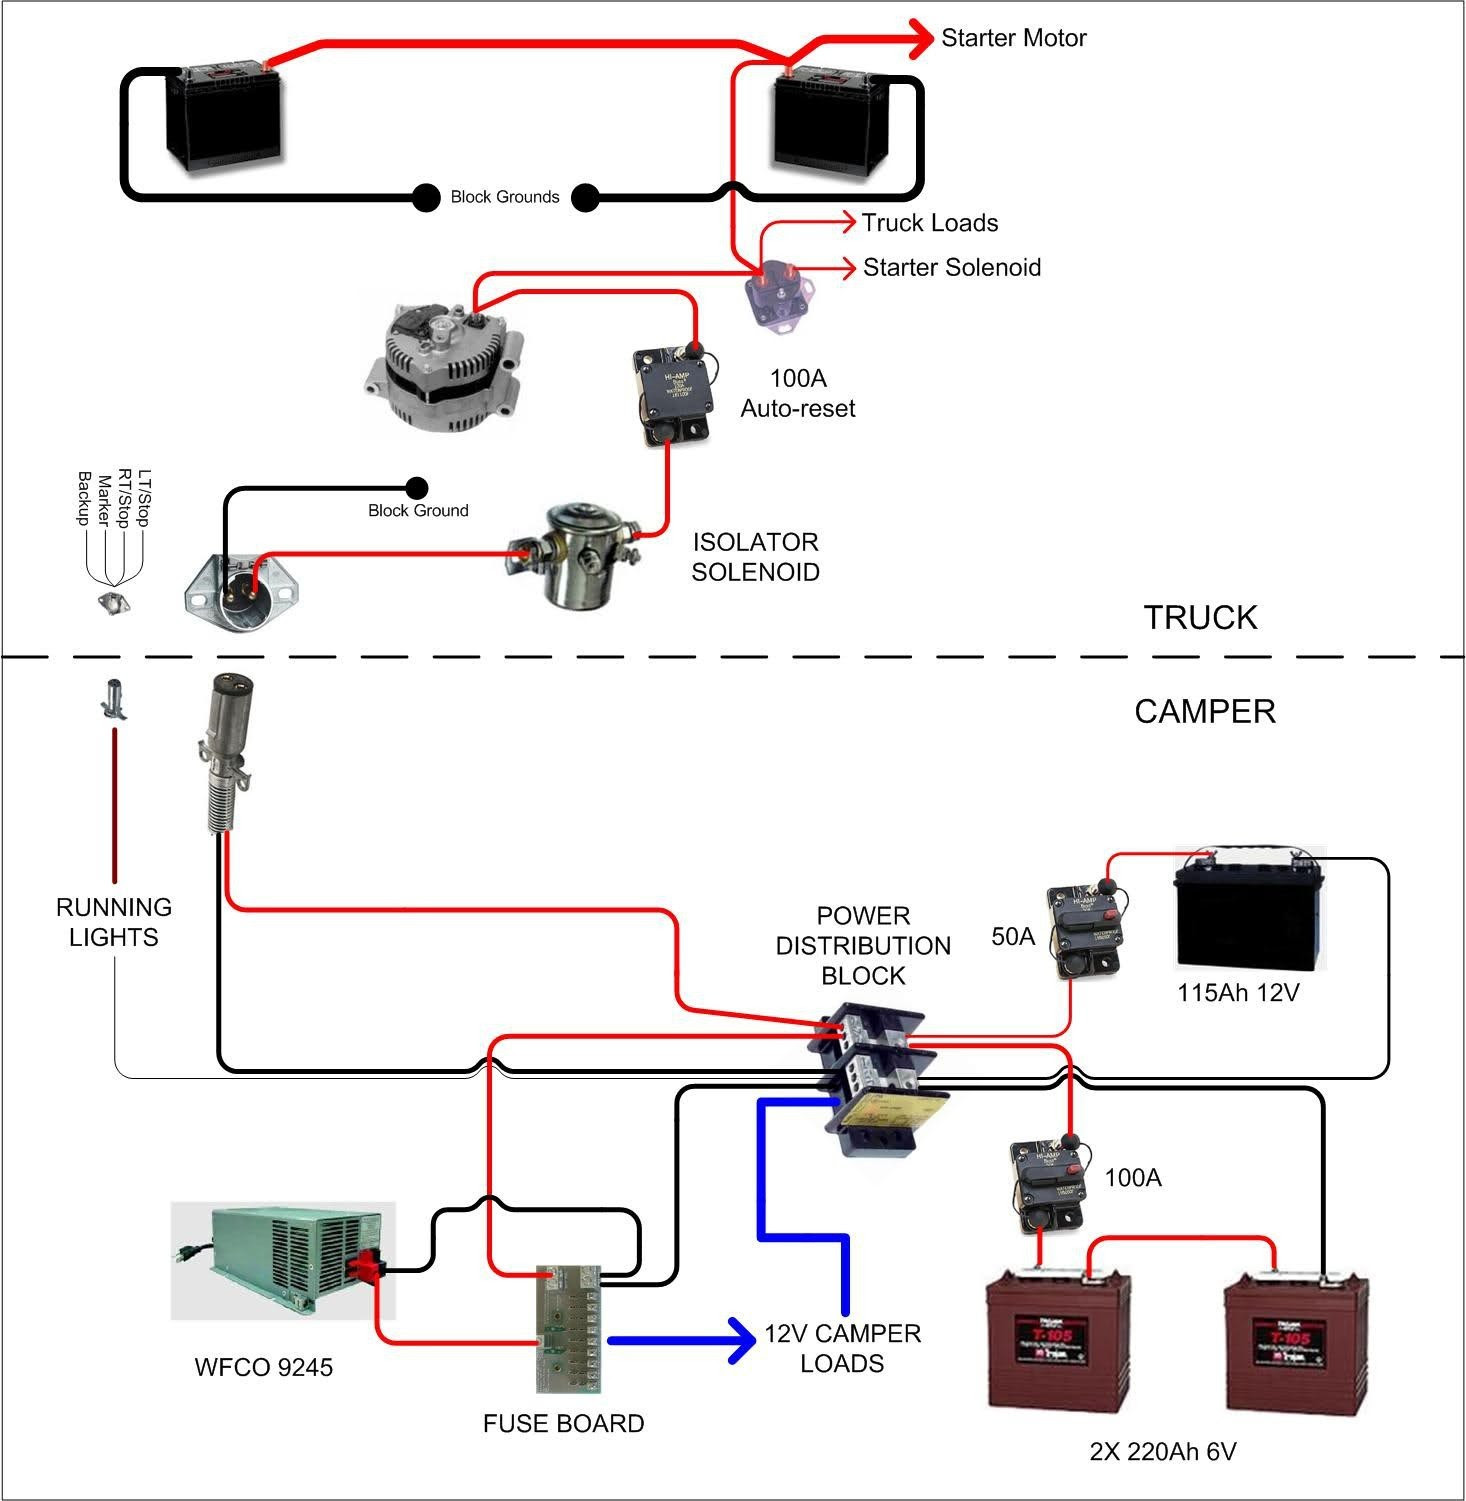
Schematics, diagrams, and blueprints form the cornerstone of “Schematic RV Wiring For Dummies,” providing visual representations of an RV’s electrical system. Their importance stems from their ability to simplify complex electrical concepts, making them accessible to individuals with varying levels of electrical knowledge.
Diagrams and blueprints offer a comprehensive overview of the electrical system, outlining the and connections of various components. Schematics, on the other hand, provide a more detailed representation, focusing on the electrical circuits and their interactions. By studying these layouts, RV owners can gain a thorough understanding of how the electrical system operates and how to troubleshoot potential issues.
Real-life examples of schematic RV wiring diagrams can be found in RV owner’s manuals and online resources. These diagrams provide step-by-step instructions for installing, maintaining, and repairing the electrical system. They also serve as valuable references when troubleshooting electrical problems, as they allow RV owners to trace circuits and identify potential.
Understanding the layout of RV wiring is essential for ensuring the safe and efficient operation of the electrical system. By interpreting schematics and diagrams, RV owners can make informed decisions about electrical modifications and upgrades. Additionally, this understanding empowers them to troubleshoot and repair electrical issues, reducing the need for costly professional assistance.
In summary, ” Layout: Diagrams, blueprints, schematics” is a critical component of “Schematic RV Wiring For Dummies.” These visual representations provide a clear understanding of the RV’s electrical system, enabling owners to maintain, troubleshoot, and modify their electrical systems with confidence.
Safety: Codes, regulations, grounding
In the realm of “Schematic RV Wiring For Dummies,” understanding safety codes, regulations, and grounding is paramount. These elements form the foundation for ensuring the safe and reliable operation of an RV’s electrical system, protecting both the occupants and the vehicle itself from electrical hazards.
Electrical codes and regulations establish minimum safety standards for RV wiring, outlining requirements for wire size, circuit protection, and grounding. Adhering to these codes is crucial for preventing electrical fires, shocks, and other accidents. Grounding, in particular, plays a vital role in protecting against electrical shocks by providing a low-resistance path for stray electrical current to flow back to the source.
Real-life examples of safety codes and grounding within “Schematic RV Wiring For Dummies” include specifying the proper wire gauge for different circuits, indicating the location of grounding points, and outlining the requirements for grounding the RV’s electrical system to the chassis. By following these guidelines, RV owners can ensure that their electrical system meets safety standards and operates without posing a risk to themselves or their vehicle.
Understanding safety codes, regulations, and grounding is not only essential for ensuring a safe RV electrical system but also empowers RV owners to make informed decisions about electrical modifications and upgrades. By adhering to these guidelines, they can confidently maintain, troubleshoot, and improve their RV’s electrical system, enhancing its functionality and longevity.
Troubleshooting: Tools, techniques, multimeter
Within the realm of “Schematic RV Wiring For Dummies,” troubleshooting electrical issues is a fundamental skill. The ability to identify and resolve electrical problems ensures the safe and reliable operation of the RV’s electrical system, allowing occupants to enjoy a comfortable and hassle-free experience. This aspect encompasses a range of tools, techniques, and the use of a multimeter, which collectively empower RV owners to diagnose and rectify electrical faults.
- Visual Inspection: A thorough visual inspection of the electrical system is the first step in troubleshooting. This involves checking for loose connections, damaged wires, and any signs of overheating or burning. Simple issues can often be resolved by tightening connections or replacing damaged components.
- Circuit Testing: Using a multimeter, RV owners can test the continuity of circuits to identify breaks or faults. This involves measuring the resistance or voltage at various points in the circuit to determine if electricity is flowing properly.
- Load Testing: Load testing involves placing a load on the electrical system to assess its ability to supply adequate power. This can be done by turning on multiple appliances or using a dedicated load tester to simulate a realistic load. Any significant voltage drops or flickering lights indicate potential issues with the system’s capacity.
- Ground Fault Detection: Ground fault circuit interrupters (GFCIs) are essential safety devices that protect against electrical shocks. Troubleshooting GFCI outlets involves testing their functionality and resetting them if they have tripped.
These troubleshooting techniques, combined with the use of a multimeter, provide RV owners with the means to diagnose and resolve a wide range of electrical problems. By understanding the basics of electricity and applying these troubleshooting methods, RV owners can maintain a safe and reliable electrical system, ensuring the comfort and safety of their RV experience.
Maintenance: Inspection, cleaning, repairs
Within the realm of “Schematic RV Wiring For Dummies,” regular maintenance, inspection, cleaning, and repairs are critical components for ensuring the longevity and reliability of the RV’s electrical system. Neglecting these essential tasks can lead to a range of electrical issues, affecting the functionality of appliances, lighting, and other electrical components.
Regular inspections involve visually checking the electrical system for any signs of damage or deterioration. This includes examining wires for any fraying, loose connections, or signs of overheating. Cleaning is equally important, as dirt, dust, and corrosion can accumulate over time, affecting the conductivity and performance of electrical components. Routine cleaning with a soft brush or compressed air can help prevent these issues.
Repairs are an inevitable part of RV electrical system maintenance. These may range from simple tasks, such as replacing a blown fuse or tightening a loose connection, to more complex repairs involving wiring or component replacement. By addressing these issues promptly, RV owners can prevent minor problems from escalating into major electrical failures.
Understanding the importance of ” Maintenance: Inspection, cleaning, repairs” empowers RV owners to proactively maintain their electrical systems, extending their lifespan and ensuring a safe and enjoyable RV experience. Regular maintenance also contributes to the overall value of the RV, as a well-maintained electrical system is a key factor in determining the vehicle’s resale value.
Upgrading: New components, additional circuits
Within the realm of “Schematic RV Wiring For Dummies,” understanding the process of upgrading electrical components and adding additional circuits is crucial for maximizing the functionality and efficiency of an RV’s electrical system. This aspect delves into the considerations, components, and implications of upgrading various electrical components, enabling RV owners to enhance their RV’s electrical capabilities.
- Component Upgrades: Replacing existing electrical components with more efficient or advanced models can significantly improve the performance and reliability of the electrical system. For instance, upgrading to LED lighting can reduce energy consumption and provide brighter illumination.
- Circuit Additions: Adding additional electrical circuits allows for the expansion of the electrical system to accommodate new appliances or devices. This may involve installing new wiring, circuit breakers, and outlets to support the increased electrical load.
- Solar Panel Installation: Incorporating solar panels into the electrical system enables the generation of renewable energy, reducing reliance on external power sources and promoting energy independence.
- Battery Upgrades: Upgrading the RV’s battery system, such as increasing the battery capacity or installing lithium-ion batteries, can provide longer power autonomy and support higher electrical demands.
Understanding the implications of ” Upgrading: New components, additional circuits” is essential for ensuring the safety and functionality of the RV’s electrical system. Factors such as electrical load, wire size, and circuit protection must be carefully considered to prevent overloading and potential electrical hazards. By following recommended guidelines and industry best practices, RV owners can confidently upgrade their electrical systems, enhancing the comfort, convenience, and overall enjoyment of their RV experience.
Resources: Manuals, online forums, professionals
Within the realm of “Schematic RV Wiring For Dummies,” leveraging a diverse range of resources is paramount for gaining a comprehensive understanding of RV electrical systems and tackling troubleshooting or upgrade tasks with confidence. These resources encompass user manuals, online forums, and professional expertise, each playing a critical role in empowering RV owners to maintain and enhance their electrical systems effectively.
User manuals provided by RV manufacturers serve as invaluable guides, offering detailed schematics, wiring diagrams, and instructions tailored to the specific RV model. These manuals provide a solid foundation for understanding the electrical system’s layout, component functions, and recommended maintenance procedures. By carefully studying the user manual, RV owners can gain a thorough grasp of their electrical system, enabling them to make informed decisions regarding upgrades or repairs.
Online forums and communities dedicated to RV electrical systems offer a wealth of collective knowledge and experience. These platforms facilitate interactions between RV owners, allowing them to share troubleshooting tips, discuss best practices, and seek advice from fellow enthusiasts. By engaging in these online discussions, RV owners can tap into a vast pool of practical knowledge, gaining insights and solutions from individuals who have faced similar electrical challenges.
Seeking professional assistance from qualified RV electricians is another valuable resource for RV electrical system maintenance and upgrades. These experts possess specialized knowledge and experience, enabling them to diagnose complex electrical issues, perform repairs, and implement upgrades safely and efficiently. By consulting with professionals, RV owners can ensure that their electrical systems operate at optimal performance and adhere to industry standards and safety regulations.
Understanding the connection between ” Resources: Manuals, online forums, professionals” and “Schematic RV Wiring For Dummies” is crucial for RV owners seeking to maintain, troubleshoot, and upgrade their electrical systems with confidence. By utilizing these resources effectively, RV owners can access a wealth of information, practical advice, and expert guidance, empowering them to make informed decisions and ensure the safe and reliable operation of their RV’s electrical system.
DIY vs. Professional: When to tackle projects yourself, when to seek help
Within the realm of “Schematic RV Wiring For Dummies,” understanding the distinction between do-it-yourself (DIY) projects and seeking professional assistance is crucial for ensuring the safety, reliability, and longevity of your RV’s electrical system. This aspect delves into the factors to consider when deciding whether to tackle electrical tasks yourself or entrust them to qualified professionals.
- Electrical Knowledge and Experience: Assess your electrical knowledge and experience level. Simple tasks, such as replacing light fixtures or switches, may be suitable for DIY, while complex projects involving rewiring or installing major components should be left to professionals.
- Tools and Equipment: Consider the specialized tools and equipment required for the project. If you lack the necessary tools or lack proficiency in using them, seeking professional help is advisable.
- Time Constraints and Availability: Evaluate your time constraints and availability. DIY projects can be time-consuming, and attempting complex tasks without sufficient time can lead to mistakes or safety hazards.
- Safety Considerations: Electricity poses inherent risks. If you are not confident in your ability to work with electricity safely, it is imperative to seek professional assistance to avoid potential electrical shocks or fires.
Understanding the implications of ” DIY vs. Professional: When to tackle projects yourself, when to seek help” empowers RV owners to make informed decisions regarding their electrical system maintenance and upgrades. By carefully assessing their skills, resources, and the complexity of the project, RV owners can ensure that electrical tasks are performed safely, efficiently, and to a high standard, contributing to the overall enjoyment and safety of their RV experience.


Related Posts


