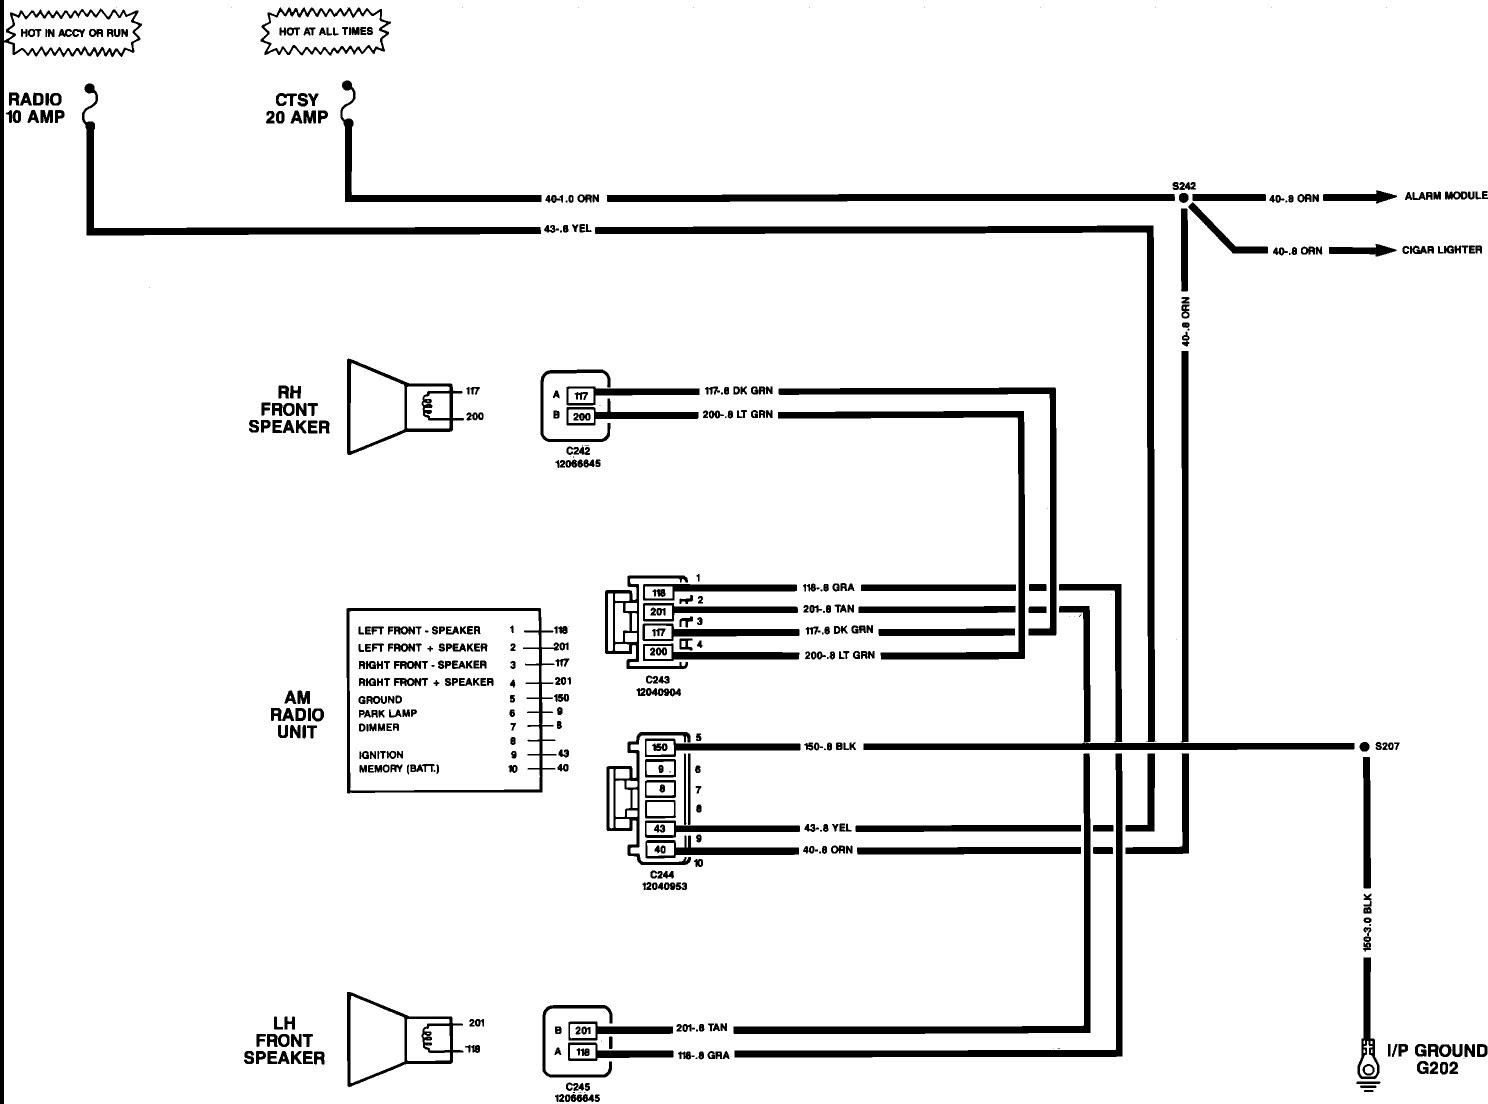
A “Radio Wiring Diagram 2004 Chevy Silverado” is a visual representation of the electrical connections within the radio system of a 2004 Chevrolet Silverado pickup truck. It illustrates the specific wiring layout, including wire colors, connections, and component locations, facilitating the installation, repair, or troubleshooting of the radio.
Wiring diagrams are indispensable for automotive technicians as they provide a comprehensive understanding of the intricate electrical systems within vehicles. By consulting the diagram, technicians can efficiently locate wires, diagnose faults, and ensure proper functioning of the radio. The development of standardized wiring diagrams has greatly simplified the servicing and maintenance of vehicles, making them more accessible and reliable.
This article will delve into the essential components of a radio wiring diagram for a 2004 Chevy Silverado, exploring its structure, interpretation, and practical applications. By understanding the principles of radio wiring diagrams, individuals can gain valuable knowledge for performing electrical repairs and maintaining the optimal performance of their vehicles.
Understanding the essential aspects of a Radio Wiring Diagram for a 2004 Chevy Silverado is vital for electrical repairs and maintenance. These aspects encompass:
- Components: Radio, speakers, amplifier, wiring harness
- Connections: Wire colors, connectors, terminals
- Layout: Physical arrangement of components and wires
- Voltage: Power requirements for the radio
- Grounding: Ensuring proper electrical flow
- Troubleshooting: Identifying and fixing electrical issues
- Installation: Step-by-step instructions for installing the radio
- Safety: Precautions to avoid electrical hazards
These aspects are interconnected and provide a comprehensive understanding of the radio wiring system. For instance, knowing the wire colors and connections enables technicians to trace and identify wires, while understanding the layout helps in locating components and routing wires efficiently. Furthermore, troubleshooting becomes easier with a clear understanding of the voltage and grounding requirements. By considering all these aspects, individuals can ensure the proper functioning and reliability of the radio system in their 2004 Chevy Silverado.
Components
Within the context of a Radio Wiring Diagram for a 2004 Chevy Silverado, understanding the various components – radio, speakers, amplifier, and wiring harness – is paramount. These components work together to deliver an optimal audio experience, and their proper integration is essential for a functional and reliable radio system.
Radio: The central component of the system, responsible for receiving and processing audio signals. It includes features such as a tuner, amplifier, and controls for volume, balance, and equalization. Speakers: Transducers that convert electrical signals into sound waves. They are typically mounted in the vehicle’s doors, rear deck, or dashboard, and their size, power handling, and frequency response determine the overall sound quality. Amplifier: An electronic device that increases the power of audio signals, allowing speakers to produce louder and more dynamic sound. Amplifiers can be built into the radio or installed separately to enhance the audio performance. Wiring Harness: A set of wires and connectors that provides the electrical connections between the radio, speakers, amplifier, and vehicle’s electrical system. It ensures the proper flow of power and audio signals throughout the system.
Understanding the roles and interconnections of these components is crucial for troubleshooting, upgrading, or installing a new radio system in a 2004 Chevy Silverado. By referring to the Radio Wiring Diagram, individuals can identify the specific wires and connections associated with each component, ensuring a successful and efficient installation or repair.
Connections
In the context of a Radio Wiring Diagram for a 2004 Chevy Silverado, “Connections: Wire colors, connectors, terminals” play a crucial role in establishing and maintaining electrical pathways within the vehicle’s audio system. Understanding these connections is vital for troubleshooting, repair, and modification of the radio system.
- Wire Colors: Wires used in automotive electrical systems, including those in the radio wiring harness, are typically color-coded to denote their function and simplify identification. These colors follow standardized conventions, ensuring consistency across different vehicle makes and models.
- Connectors: Connectors are used to establish electrical connections between different components of the radio system, such as the radio itself, speakers, and wiring harness. They come in various shapes and sizes, depending on the number of wires they accommodate and the amperage they can handle.
- Terminals: Terminals are the points where wires are connected to connectors or components. They provide a secure and reliable electrical contact, ensuring proper signal transmission and power flow.
- Grounding: Grounding is an essential aspect of electrical systems, and the radio system in a 2004 Chevy Silverado is no exception. Grounding provides a reference point for electrical circuits, ensuring proper functioning of the radio and other electrical components.
Comprehending the connections between wire colors, connectors, terminals, and grounding is vital for anyone working with the radio wiring diagram of a 2004 Chevy Silverado. These connections form the backbone of the audio system, enabling the transmission of power and audio signals throughout the vehicle. By understanding these connections, individuals can effectively troubleshoot issues, make modifications, and ensure the optimal performance of their vehicle’s radio system.
Layout
In the context of a Radio Wiring Diagram for a 2004 Chevy Silverado, the physical arrangement of components and wires, often referred to as “Layout,” plays a critical role in ensuring the proper functioning and reliability of the audio system. The layout dictates where each component, such as the radio, speakers, amplifier (if applicable), and wiring harness, will be placed within the vehicle and how the wires will be routed to connect them.
A well-planned layout is essential for several reasons. Firstly, it helps to minimize interference and noise in the audio system. By carefully positioning components and routing wires away from sources of electrical interference, such as the vehicle’s ignition system or other electrical devices, the layout can help to ensure a clean and clear audio signal. Secondly, a logical layout simplifies the installation and maintenance of the radio system. When components are arranged in an organized and accessible manner, it becomes easier to troubleshoot problems, make modifications, or upgrade the system in the future.
Real-life examples of the layout’s importance in a Radio Wiring Diagram for a 2004 Chevy Silverado include:
- Positioning the radio in a location that provides easy access to controls while minimizing distractions for the driver.
- Mounting speakers in optimal locations for sound dispersion and imaging, taking into account factors such as speaker size, frequency response, and listening position.
- Routing wires through grommets and protective sleeves to prevent damage from vibration or sharp edges, ensuring the longevity and reliability of the system.
Understanding the principles of layout in a Radio Wiring Diagram for a 2004 Chevy Silverado allows individuals to make informed decisions about component placement and wire routing, resulting in a well-functioning and enjoyable audio system. This understanding is not only beneficial for professional installers but also for DIY enthusiasts looking to upgrade or troubleshoot their vehicle’s radio system.
Voltage
Within the context of a “Radio Wiring Diagram 2004 Chevy Silverado,” understanding the voltage requirements for the radio is crucial for ensuring its proper functioning and longevity. The radio, like any electrical device, requires a specific voltage to operate, and the wiring diagram provides essential information on meeting this requirement.
- Battery Voltage: The vehicle’s battery provides the primary power source for the radio. The wiring diagram indicates the voltage of the battery, typically 12 volts in most automotive applications, and the wiring must be designed to handle this voltage.
- Radio Specifications: Different radios have specific voltage requirements, which are usually indicated in the owner’s manual or on the radio itself. The wiring diagram ensures that the radio is connected to a power source that meets these requirements.
- Wiring Gauge: The thickness or gauge of the wiring used in the radio circuit is crucial. The wiring diagram specifies the appropriate gauge based on the voltage and current requirements of the radio to prevent overheating or damage to the system.
- Fuses and Circuit Protection: Fuses or circuit breakers are incorporated into the wiring diagram to protect the radio and electrical system from overcurrent conditions. The diagram indicates the amperage rating of these protective devices, ensuring they can handle the radio’s power consumption.
Comprehending the voltage requirements for the radio empowers individuals to troubleshoot electrical issues, upgrade their audio systems, or install aftermarket radios. By adhering to the specifications outlined in the “Radio Wiring Diagram 2004 Chevy Silverado,” they can ensure a reliable and optimal audio experience while safeguarding the electrical integrity of their vehicle.
Grounding
In the context of a “Radio Wiring Diagram 2004 Chevy Silverado,” grounding plays a critical role in ensuring the proper functioning of the audio system. Grounding provides a reference point for electrical circuits, allowing current to flow properly and preventing electrical malfunctions or damage to components.
- Chassis Ground: The metal frame of the vehicle, typically connected to the negative terminal of the battery, serves as the main grounding point for the electrical system, including the radio.
- Dedicated Ground Wires: In addition to the chassis ground, dedicated ground wires are often used to connect specific components, such as the radio, to the chassis or other grounding points, ensuring a reliable electrical connection.
- Ground Loops: Ground loops occur when multiple grounding paths exist for current to flow, creating interference and noise in the audio system. Proper grounding techniques help to eliminate ground loops.
- Electrical Safety: Proper grounding is crucial for electrical safety. It prevents electrical shocks, protects components from damage, and ensures the safe operation of the radio system.
Understanding the principles of grounding is essential for troubleshooting electrical issues, upgrading audio systems, or installing aftermarket radios. By adhering to the specifications outlined in the “Radio Wiring Diagram 2004 Chevy Silverado,” individuals can ensure a reliable and optimal audio experience while maintaining the electrical integrity of their vehicle.
Troubleshooting
Within the context of a Radio Wiring Diagram for a 2004 Chevy Silverado, troubleshooting electrical issues is a critical aspect of maintaining a functional and reliable audio system. By understanding the principles of troubleshooting and referring to the wiring diagram, individuals can identify and resolve common electrical problems, ensuring optimal performance and minimizing the risk of damage to components.
- Identifying Faulty Components: Using a voltmeter or other diagnostic tools, technicians can test individual components, such as the radio, speakers, or amplifier, to determine if they are functioning correctly. This helps narrow down the source of the issue and allows for targeted repairs or replacements.
- Checking Wiring Connections: Loose or damaged wiring connections can cause intermittent or persistent electrical problems. Troubleshooting involves visually inspecting connectors and wires for signs of corrosion, breaks, or improper connections, ensuring a secure and reliable electrical flow.
- Grounding Issues: Inadequate or faulty grounding can lead to various electrical malfunctions. Troubleshooting involves checking the continuity of ground connections, ensuring that components are properly grounded to the vehicle’s chassis, and resolving any grounding-related issues.
- Power Supply Problems: Electrical issues can sometimes be traced back to the power supply. Troubleshooting involves verifying the voltage output of the battery or alternator, checking fuse or circuit breaker integrity, and ensuring that the radio is receiving adequate power.
By understanding the principles of troubleshooting and utilizing the Radio Wiring Diagram for a 2004 Chevy Silverado as a reference, individuals can systematically identify and resolve electrical issues, restoring the audio system to optimal functionality. Troubleshooting not only ensures a better listening experience but also promotes the longevity and reliability of the vehicle’s electrical components.
Installation
Within the context of a “Radio Wiring Diagram 2004 Chevy Silverado,” installation instructions play a critical role in ensuring the successful and safe integration of a new or replacement radio into the vehicle’s audio system. These instructions provide a step-by-step guide, detailing the necessary procedures for removing the old radio, preparing the wiring harness, connecting the new radio, and testing its functionality.
The relationship between “Installation: Step-by-step instructions for installing the radio” and “Radio Wiring Diagram 2004 Chevy Silverado” is inseparable. The wiring diagram serves as the blueprint for the installation process, providing essential information about the wire colors, connectors, and connections required to integrate the new radio with the vehicle’s electrical system. Without the wiring diagram, installers would face significant challenges in identifying the correct wires and making secure connections, increasing the risk of electrical issues or damage to components.
Real-life examples of “Installation: Step-by-step instructions for installing the radio” within “Radio Wiring Diagram 2004 Chevy Silverado” include:
- Identifying the correct wire colors for power, ground, speakers, and other connections based on the wiring diagram.
- Matching the connectors on the new radio to the corresponding connectors on the vehicle’s wiring harness, as per the diagram.
- Testing the functionality of the new radio, including power, audio output, and button responsiveness, to ensure proper installation.
Understanding the connection between “Installation: Step-by-step instructions for installing the radio” and “Radio Wiring Diagram 2004 Chevy Silverado” is crucial for both professional installers and DIY enthusiasts. By following the instructions and referencing the wiring diagram, individuals can gain the knowledge and confidence to perform radio installations safely and effectively, ensuring a seamless integration of the new radio into their vehicle’s audio system.
Safety
When working with electrical systems, it is paramount to prioritize safety to prevent electrical hazards and ensure the well-being of individuals. In the context of a “Radio Wiring Diagram 2004 Chevy Silverado,” safety precautions play a critical role in guiding installers and users toward safe practices during the installation, troubleshooting, and maintenance of the vehicle’s audio system.
The “Radio Wiring Diagram 2004 Chevy Silverado” serves as a comprehensive guide for understanding the electrical connections within the audio system, but it also incorporates essential safety precautions to mitigate potential hazards. These precautions provide indispensable instructions on how to handle electrical components, avoid short circuits, and prevent electrical shocks. By adhering to these safety guidelines, individuals can minimize risks and ensure a safe working environment.
Real-life examples of “Safety: Precautions to avoid electrical hazards” within the “Radio Wiring Diagram 2004 Chevy Silverado” include:
- Warnings against touching exposed wires or terminals to prevent electrical shocks.
- Instructions to disconnect the negative terminal of the battery before commencing any electrical work to isolate the audio system from the vehicle’s power source.
- Cautions against overloading circuits or exceeding the current-carrying capacity of wires to prevent overheating and potential fires.
Understanding the connection between “Safety: Precautions to avoid electrical hazards” and “Radio Wiring Diagram 2004 Chevy Silverado” is crucial for anyone working with the vehicle’s audio system. By prioritizing safety and following the guidelines outlined in the wiring diagram, individuals can prevent accidents, protect themselves and others from harm, and ensure the longevity of the electrical components within the audio system.


Related Posts


