A Pioneer reverse camera wiring diagram is a graphical representation of the electrical connections required for installing a rear-facing camera on a Pioneer vehicle infotainment system. It outlines the necessary wiring between the camera, display unit, and vehicle’s electrical system, ensuring proper functionality and integration with the vehicle’s reverse gear.
The wiring diagram is crucial for maintaining the camera’s power supply, video signal transmission, and connection with the vehicle’s reverse lights. By providing detailed instructions on wire colors, pin assignments, and ground points, it enables installers to execute a seamless and error-free installation. The benefits of utilizing a Pioneer reverse camera wiring diagram include improved safety, convenience, and enhanced driving experience.
Historically, reverse cameras were only found on high-end vehicles, but advancements in technology and the introduction of affordable aftermarket solutions have made them widely accessible. The use of Pioneer reverse camera wiring diagrams has played a significant role in the proliferation of this safety feature, contributing to the overall reduction of accidents and property damage.
Understanding the essential aspects of a Pioneer Reverse Camera Wiring Diagram is crucial for ensuring a successful and effective installation. These aspects encompass the technical specifications, functional components, and integration with the vehicle’s electrical system.
- Compatibility: Ensuring compatibility between the camera and the Pioneer infotainment system is paramount for seamless integration and functionality.
- Power Supply: Determining the appropriate power source and wiring harness for the camera’s operation is essential.
- Video Signal Transmission: Understanding the type of video signal (analog or digital) and the required cabling for transmission to the display unit is crucial.
- Reverse Trigger: Identifying the vehicle’s reverse light circuit and integrating the camera’s activation with the reverse gear is essential for automatic camera activation.
- Grounding: Establishing a proper ground connection is vital for ensuring stable operation and preventing electrical issues.
- Wire Colors and Pin Assignments: Accurately identifying the wire colors and pin assignments based on the specific Pioneer model is essential for correct wiring.
- Mounting and Placement: Selecting the optimal mounting location for the camera and ensuring proper alignment is crucial for achieving the desired field of view.
- Troubleshooting: Understanding potential issues and their corresponding solutions can help resolve installation or operational problems.
- Safety Precautions: Adhering to safety guidelines and precautions during installation is essential to prevent electrical hazards or damage to the vehicle’s systems.
These key aspects provide a comprehensive understanding of the Pioneer Reverse Camera Wiring Diagram, enabling installers to approach the installation process with confidence and precision. By considering each aspect meticulously, they can ensure a reliable and functional reverse camera system, enhancing both safety and driving convenience.
Compatibility
Compatibility between the camera and the Pioneer infotainment system is a critical component of the Pioneer Reverse Camera Wiring Diagram. Without ensuring compatibility, the camera may not function properly or integrate seamlessly with the vehicle’s system. The wiring diagram provides detailed instructions on how to connect the camera to the infotainment system, ensuring that the two devices can communicate effectively.
For instance, if the camera is not compatible with the infotainment system’s video input format, the image may not be displayed correctly or may experience lag or distortion. Similarly, if the camera’s power requirements are not met by the infotainment system, it may not power on or may operate intermittently.
Understanding the compatibility requirements and following the wiring diagram’s instructions carefully can help installers avoid these issues and ensure a successful installation. This compatibility check is crucial for achieving a fully functional reverse camera system that enhances safety and driving convenience.
Power Supply
The power supply aspect of the Pioneer Reverse Camera Wiring Diagram is crucial for ensuring the camera’s reliable and consistent operation. This involves determining the appropriate power source and selecting the correct wiring harness to connect the camera to the vehicle’s electrical system. The diagram provides detailed instructions on how to identify the power source, connect the wires, and ensure proper grounding.
- Power Source Identification: Identifying the correct power source for the camera is essential. This involves locating a constant power source that is available even when the vehicle is turned off, such as the battery or a dedicated fuse box.
- Wiring Harness Selection: Choosing the appropriate wiring harness is important for ensuring a secure and reliable connection between the camera and the power source. The wiring harness should be compatible with the camera’s power requirements and should provide adequate protection against electrical hazards.
- Wire Gauge and Length: The wire gauge and length should be carefully considered to minimize voltage drop and ensure efficient power transmission. The diagram specifies the recommended wire gauge and length based on the camera’s power consumption and the distance between the camera and the power source.
- Grounding: Proper grounding is essential for the camera’s stable operation and to prevent electrical noise. The diagram provides instructions on how to identify suitable grounding points on the vehicle’s chassis.
Understanding the power supply requirements and following the wiring diagram’s instructions carefully can help installers avoid common issues such as insufficient power supply, electrical interference, and camera malfunctions. By ensuring a reliable and stable power supply, the Pioneer Reverse Camera Wiring Diagram enables the camera to operate effectively, enhancing safety and driving convenience.
Video Signal Transmission
Video signal transmission is a fundamental aspect of the Pioneer Reverse Camera Wiring Diagram. It involves understanding the type of video signal (analog or digital) and selecting the appropriate cabling to ensure clear and reliable transmission of the camera’s video feed to the display unit.
- Signal Type (Analog vs. Digital): Reverse cameras can transmit video signals in either analog or digital format. Analog signals are typically transmitted via composite cables, while digital signals require more advanced cabling such as HDMI or Ethernet. The wiring diagram specifies the compatible signal type for the specific camera and display unit being used.
- Cable Selection: The type of video signal determines the required cabling. Analog signals can be transmitted using standard composite cables, while digital signals require specialized cables such as HDMI or Ethernet cables. The wiring diagram provides guidance on selecting the appropriate cable based on the camera’s video output and the display unit’s input capabilities.
- Cable Length and Quality: The length and quality of the video cable can impact the signal transmission. Longer cables can introduce signal loss and interference, so it is important to use a cable of the appropriate length and quality to ensure optimal video performance.
- Signal Interference: Electrical interference from other vehicle systems can affect video signal transmission. The wiring diagram provides recommendations for routing the video cable away from potential sources of interference, such as ignition systems or electrical motors.
Understanding these aspects of video signal transmission is crucial for achieving a clear and stable video feed from the reverse camera to the display unit. By carefully following the instructions in the Pioneer Reverse Camera Wiring Diagram and selecting the appropriate components, installers can ensure optimal video performance, enhancing safety and the overall driving experience.
Reverse Trigger
Within the context of the Pioneer Reverse Camera Wiring Diagram, the reverse trigger plays a crucial role in ensuring the seamless and automatic activation of the camera when the vehicle is shifted into reverse gear. This aspect involves identifying the vehicle’s reverse light circuit, which provides the electrical signal indicating that the vehicle is in reverse, and integrating it with the camera’s activation mechanism.
- Reverse Light Circuit Identification: Locating the reverse light circuit is essential for tapping into the electrical signal that indicates when the vehicle is in reverse. The wiring diagram provides guidance on identifying the correct circuit, typically found in the vehicle’s taillight assembly or fuse box.
- Connection to Camera Activation: Establishing a connection between the reverse light circuit and the camera’s activation mechanism ensures that the camera powers on and begins transmitting video when the vehicle is shifted into reverse. The wiring diagram specifies the appropriate wiring connections and polarity to ensure proper camera activation.
- Automatic Camera Activation: The integrated reverse trigger enables automatic camera activation, eliminating the need for manual switching or additional controls. This enhances convenience and safety by providing the driver with a clear rear view as soon as the vehicle is shifted into reverse.
- Customization Options: Some Pioneer reverse cameras offer customization options, such as adjustable trigger delay or compatibility with aftermarket sensors, allowing installers to tailor the camera’s activation behavior to specific vehicle requirements.
Understanding the reverse trigger aspect of the Pioneer Reverse Camera Wiring Diagram empowers installers to configure a fully functional and reliable reverse camera system. By meticulously following the diagram’s instructions and paying attention to the details of the reverse trigger integration, they can ensure that the camera activates automatically when needed, enhancing safety and providing peace of mind while reversing the vehicle.
Grounding
Grounding, as it pertains to the Pioneer Reverse Camera Wiring Diagram, is a crucial aspect that ensures the camera’s stable operation and prevents potential electrical issues. Establishing a proper ground connection provides a reference point for electrical circuits, allowing current to flow properly and minimizing the risk of malfunctions or safety hazards.
- Chassis Ground: The chassis ground is a common grounding point for many automotive electrical components, including the reverse camera. Connecting the camera’s ground wire to a clean, unpainted surface on the vehicle’s chassis ensures a reliable electrical path.
- Dedicated Ground Wire: Using a dedicated ground wire specifically for the reverse camera, rather than relying on the vehicle’s chassis as the sole grounding point, can enhance the stability and performance of the camera.
- Multiple Ground Points: In some cases, multiple grounding points may be necessary to ensure a strong and reliable ground connection. This is especially important for cameras mounted on non-metallic surfaces or in areas with limited grounding options.
- Ground Loop Prevention: Proper grounding helps prevent ground loops, which can cause electrical noise and interference in the video signal. Ensuring that all components, including the camera, display unit, and power source, share a common ground reference minimizes the risk of ground loop issues.
Understanding and implementing proper grounding techniques, as outlined in the Pioneer Reverse Camera Wiring Diagram, is essential for the reliable and trouble-free operation of the reverse camera system. By paying attention to the grounding aspects and following the diagram’s instructions, installers can minimize electrical issues, ensure clear video transmission, and enhance the overall safety and functionality of the vehicle.
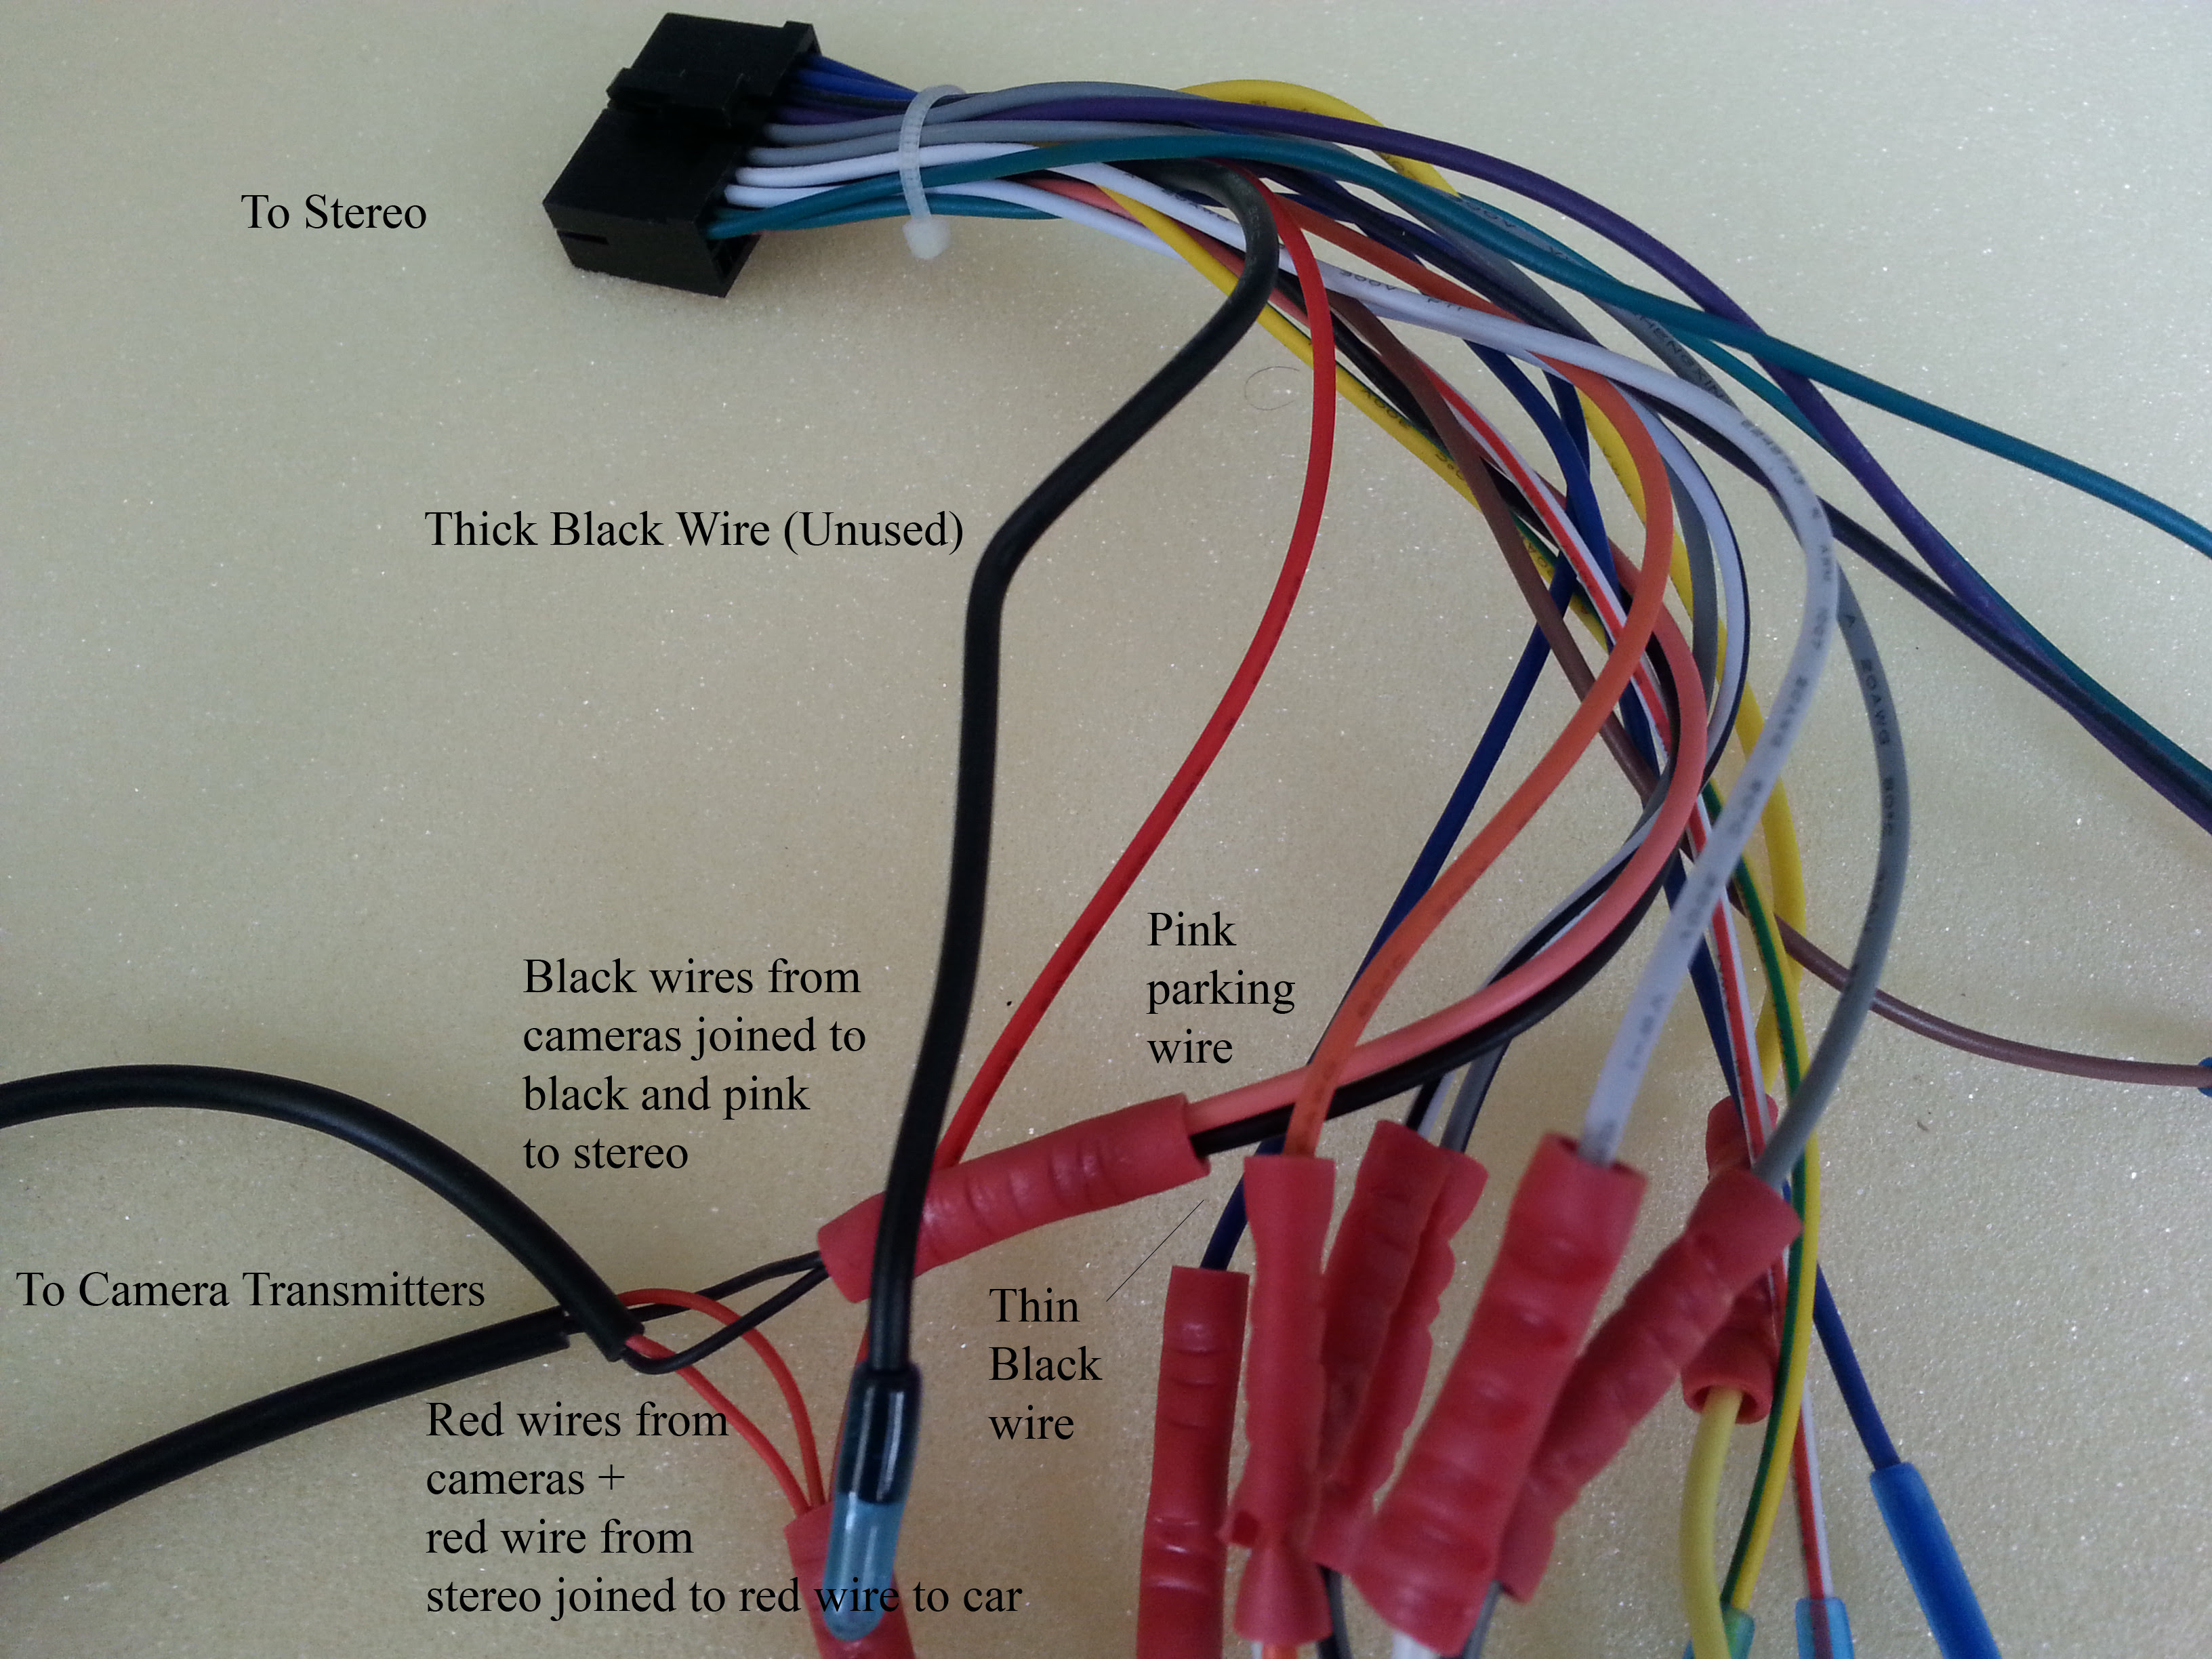
Wire Colors and Pin Assignments
Within the context of the Pioneer Reverse Camera Wiring Diagram, accurate identification of wire colors and pin assignments is a pivotal aspect for ensuring proper installation and functionality of the reverse camera system. The wiring diagram serves as a detailed guide, outlining the specific wire colors and pin assignments corresponding to each Pioneer model, providing installers with the necessary information to establish correct electrical connections.
Understanding the significance of wire colors and pin assignments stems from the fact that Pioneer reverse cameras adhere to specific wiring standards and protocols. Each wire, distinguished by its color, is assigned a unique function, such as power supply, video signal transmission, or triggering the camera’s activation. Similarly, pin assignments on the camera’s connector correspond to specific wires, ensuring proper communication and operation.
Misidentification or incorrect wiring of these elements can lead to various issues, including power failure, distorted or absent video display, or malfunctioning camera activation. For instance, connecting the power wire to an inappropriate pin assignment may result in insufficient power supply to the camera, rendering it inoperable. Likewise, incorrect video signal wiring can lead to scrambled or distorted images on the display unit.
Therefore, meticulously following the Pioneer Reverse Camera Wiring Diagram and adhering to the specified wire colors and pin assignments is crucial for a successful installation. This attention to detail ensures that each wire is connected to its intended function and pin assignment, enabling the camera to operate flawlessly and providing the driver with a clear and reliable rear view.
Mounting and Placement
Within the context of the Pioneer Reverse Camera Wiring Diagram, the mounting and placement of the camera hold significant importance in achieving the desired field of view and ensuring the camera’s effectiveness. The wiring diagram provides detailed instructions and recommendations for selecting the optimal mounting location and aligning the camera correctly, ensuring that the captured accurately represents the area behind the vehicle.
The mounting location of the camera is critical as it directly affects the field of view and the clarity of the displayed image. Proper placement ensures that the camera is positioned at an angle that provides a clear and unobstructed view of the rear surroundings, minimizing blind spots and maximizing visibility. Incorrect mounting can result in a limited field of view, making it difficult for the driver to see objects or obstacles behind the vehicle.
Alignment is another important aspect that complements the mounting location. The camera should be aligned correctly to ensure that the horizon is level and the displayed image is undistorted. Proper alignment prevents the grnt from appearing tilted or skewed, which can hinder the driver’s ability to accurately judge distances and potential hazards.
Real-life examples further illustrate the significance of mounting and placement. For instance, consider a reverse camera mounted too low on the vehicle’s bumper. This placement may result in a limited field of view, as the camera is unable to capture the area directly behind the vehicle due to the bumper’s obstruction. Conversely, a camera mounted too high may have an excessive field of view, making it difficult for the driver to discern objects that are closer to the vehicle.
Understanding the principles of mounting and placement allows installers to make informed decisions and select the optimal location for the reverse camera. By following the guidelines outlined in the Pioneer Reverse Camera Wiring Diagram and considering factors such as the vehicle’s dimensions, the intended use, and the desired field of view, installers can ensure that the camera is positioned and aligned correctly, providing the driver with the best possible rear visibility and enhancing overall safety.
Troubleshooting
Within the context of Pioneer Reverse Camera Wiring Diagrams, troubleshooting plays a crucial role in ensuring a successful installation and continued operational reliability. By understanding potential issues and their corresponding solutions, installers and users can effectively resolve any problems that may arise during the installation or operation of the reverse camera system.
- Identifying Common Issues: A thorough understanding of common issues associated with reverse camera installations, such as power supply problems, video signal interference, and camera alignment concerns, empowers installers to quickly identify and address these issues.
- Error Code Interpretation: Pioneer reverse cameras often provide error codes or diagnostic messages that can help pinpoint the source of a problem. Troubleshooting guides and technical documentation provide valuable information on interpreting these codes and taking appropriate corrective actions.
- Testing and Verification: Using appropriate testing equipment and following systematic troubleshooting procedures, installers can verify the functionality of individual components, such as the camera, display unit, and wiring harness, to isolate and resolve issues.
- Compatibility Considerations: Ensuring compatibility between the reverse camera and the vehicle’s electrical system is essential. Troubleshooting may involve verifying compatibility issues, such as voltage and current requirements, and implementing appropriate solutions, such as using voltage regulators or CAN bus interfaces.
By incorporating troubleshooting techniques into the Pioneer Reverse Camera Wiring Diagram, installers and users gain the knowledge and tools to diagnose and resolve issues efficiently. This not only ensures a successful installation but also enhances the overall reliability and performance of the reverse camera system, ultimately contributing to improved safety and driving convenience.
Safety Precautions
Within the context of Pioneer Reverse Camera Wiring Diagrams, safety precautions play a critical role in ensuring a safe and successful installation. By adhering to established safety guidelines and precautions, installers can minimize the risk of electrical hazards, prevent damage to the vehicle’s electrical systems, and ensure the reliable operation of the reverse camera system.
Electrical hazards, such as short circuits and electrical fires, can occur if proper safety measures are not followed during installation. The Pioneer Reverse Camera Wiring Diagram emphasizes these precautions to guide installers in handling electrical connections, routing wires, and connecting components safely.
For instance, the wiring diagram instructs installers to disconnect the vehicle’s battery before commencing any electrical work. This precaution prevents the risk of electrical shock or damage to the vehicle’s electrical components if accidental contact is made with live wires.
Furthermore, the diagram specifies the appropriate wire gauge and insulation requirements for different electrical connections. Using wires with inadequate gauge or insulation can lead to overheating, voltage drop, or even electrical fires. By following the recommended wire specifications, installers can ensure that the electrical system can handle the power requirements of the reverse camera without compromising safety.
In addition to electrical hazards, improper installation can also damage the vehicle’s existing electrical systems. The wiring diagram provides detailed instructions on how to identify and connect to the vehicle’s reverse light circuit, power source, and ground points. Incorrect connections can lead to malfunctions in the vehicle’s electrical systems, such as blown fuses or damage to electronic components.
Understanding and adhering to the safety precautions outlined in the Pioneer Reverse Camera Wiring Diagram is essential for a safe and successful installation. By following these guidelines, installers can minimize risks, protect the vehicle’s electrical systems, and ensure the reliable and safe operation of the reverse camera system.


![[DIAGRAM] Pioneer Backup Camera Wiring Diagram](https://i0.wp.com/cimg7.ibsrv.net/gimg/g35driver.com-vbulletin/1500x1500/80-71ha7ummncl_sl1500__e670a6dcdf2b5898b21ac770aa7c9645d426cf25.jpg?w=665&ssl=1)


Related Posts


