Defintion: A Pioneer double DIN wiring diagram defines the connections necessary to install a Pioneer double DIN head unit into a vehicle’s dashboard.
Example: When replacing the factory radio in a 2007 Honda Civic with a Pioneer AVH-X5800BHS double DIN head unit, the wiring diagram provides guidance on how to connect the head unit’s power, ground, speaker, and antenna wires to the vehicle’s wiring harness.
Importance: Using a Pioneer double DIN wiring diagram ensures proper installation, prevents electrical damage, and optimizes audio performance. Historically, the development of standardized wiring diagrams has simplified vehicle audio installation.
This article delves into the specific connections, potential challenges, and troubleshooting measures when using a Pioneer double DIN wiring diagram for vehicle audio installation.
A Pioneer double DIN wiring diagram is crucial for seamless installation and optimal performance of a Pioneer double DIN head unit in a vehicle’s audio system. It outlines the essential connections between the head unit and the vehicle’s electrical system, ensuring proper functionality and preventing electrical hazards.
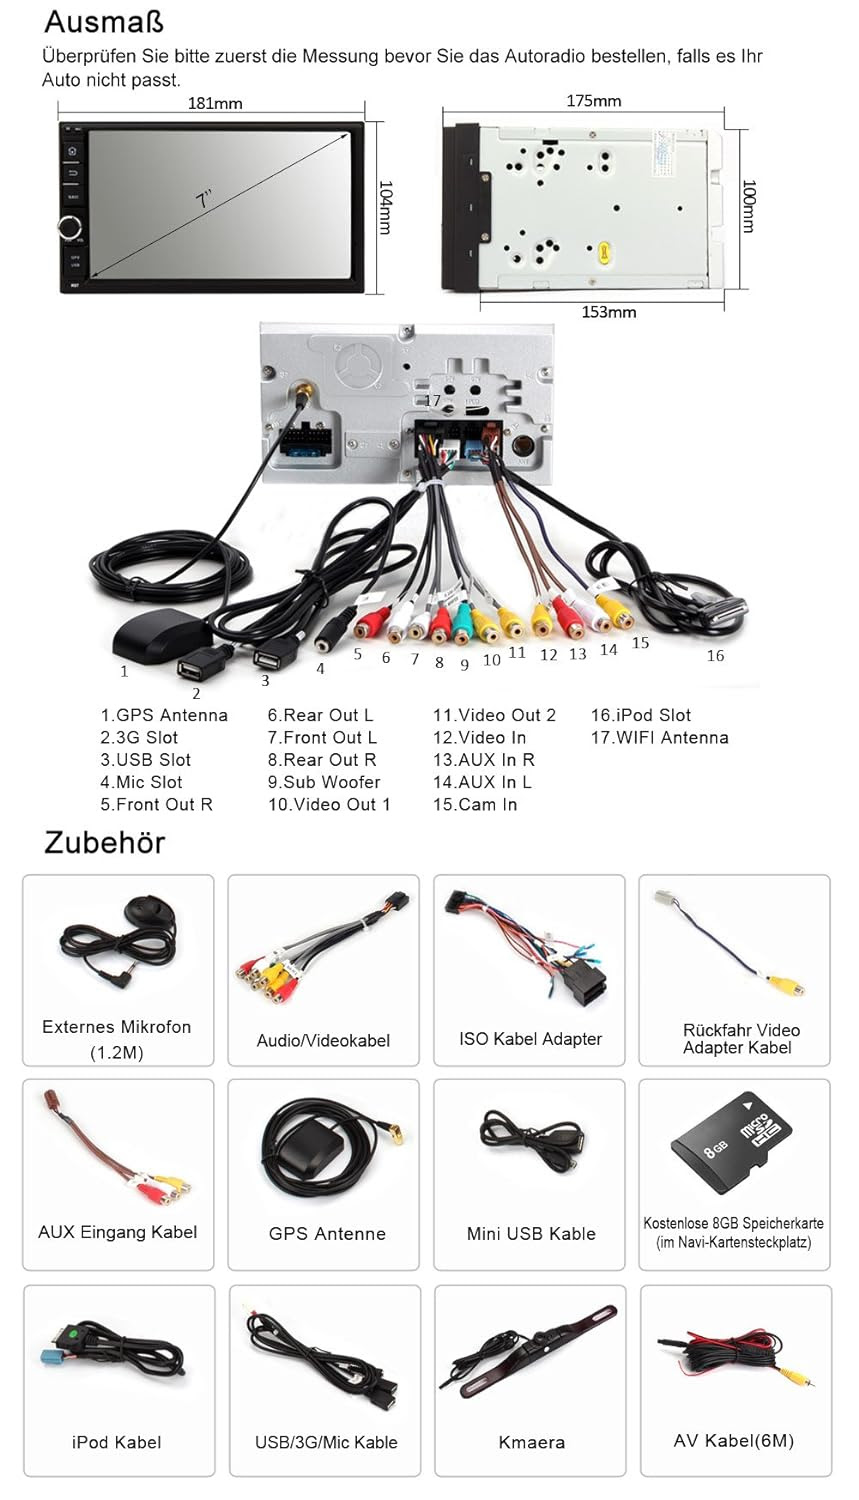
- Compatibility: Ensures compatibility between the head unit and vehicle’s wiring harness.
- Power: Defines connections for constant and switched power, providing stable operation.
- Ground: Specifies the grounding point for the head unit, ensuring electrical stability.
- Speakers: Outlines the connections for front, rear, and subwoofer speakers, delivering optimal audio output.
- Antenna: Guides the connection to the vehicle’s antenna, enabling radio reception.
- Illumination: Indicates the connections for illumination wires, allowing the head unit to dim with the vehicle’s lights.
- Steering Wheel Controls: Provides connections for steering wheel control integration, enhancing convenience.
- Parking Brake: Specifies the connection to the parking brake wire, ensuring compliance with safety regulations.
- Reverse Trigger: Outlines the connection for the reverse trigger wire, enabling features like backup camera display.
- Accessory: Defines connections for additional accessories, such as amplifiers or navigation modules.
Understanding these key aspects of a Pioneer double DIN wiring diagram empowers installers with the knowledge to perform accurate and reliable installations, maximizing the performance and functionality of the audio system while maintaining electrical integrity and safety.
Compatibility
Compatibility between the head unit and vehicle’s wiring harness is a crucial aspect of a successful Pioneer double DIN installation. The wiring diagram serves as a guide to ensure proper connections, preventing electrical damage and ensuring optimal audio performance.
Pioneer double DIN head units are designed to work with a wide range of vehicles. However, each vehicle has unique electrical configurations, making it essential to consult the wiring diagram to identify the correct connections for the specific vehicle model. Failure to match the connections correctly can result in blown fuses, damaged components, or poor audio quality.
Real-life examples highlight the importance of compatibility. For instance, when installing a Pioneer AVH-X5800BHS head unit in a 2007 Honda Civic, the wiring diagram indicates that the red wire on the head unit should be connected to the constant 12V power source in the vehicle’s harness. This ensures that the head unit receives power even when the ignition is off, allowing for features like clock retention and preset memory.
Understanding the compatibility aspect of a Pioneer double DIN wiring diagram empowers installers to perform accurate installations, maximizing the performance and functionality of the audio system while maintaining electrical integrity and safety.
Power
Within the context of a Pioneer double DIN wiring diagram, the power section plays a critical role in ensuring stable operation of the head unit. It defines the connections for constant and switched power, which are essential for maintaining functionality and preventing electrical issues.
Constant power, typically indicated by a red wire in the wiring diagram, provides a continuous 12-volt supply to the head unit, allowing it to retain memory settings, clock, and other features even when the vehicle is turned off. Switched power, usually denoted by a yellow wire, is connected to the vehicle’s ignition system, providing power only when the ignition is turned on. This allows the head unit to power up and function when the vehicle is in operation.
Real-life examples demonstrate the significance of proper power connections. For instance, when installing a Pioneer AVH-X5800BHS head unit in a 2007 Honda Civic, the wiring diagram indicates that the red wire should be connected to a constant 12V source, such as the battery terminal or a fuse block. The yellow wire, on the other hand, should be connected to a switched 12V source, such as the ignition harness. This ensures that the head unit retains its settings when the vehicle is turned off and powers up automatically when the ignition is turned on.
Understanding the power connections in a Pioneer double DIN wiring diagram is crucial for installers to perform accurate and reliable installations, maximizing the performance and functionality of the audio system while maintaining electrical integrity and safety.
Ground
Within the context of a Pioneer double DIN wiring diagram, the grounding section holds critical importance in ensuring electrical stability and proper functionality of the head unit. It specifies the grounding point, typically indicated by a black wire in the wiring diagram, which provides a direct electrical connection to the vehicle’s chassis. This connection serves as a reference point for electrical circuits, preventing voltage fluctuations and ensuring the head unit operates as intended.
Establishing a proper ground connection is crucial for several reasons. Firstly, it provides a safe path for electrical current to flow, preventing damage to the head unit or other components due to electrical surges or shorts. Secondly, a good ground connection minimizes electrical noise and interference, resulting in improved audio quality and reduced distortion.
Real-life examples underscore the importance of proper grounding. When installing a Pioneer AVH-X5800BHS head unit in a 2007 Honda Civic, the wiring diagram indicates that the black ground wire should be connected to a metal surface on the vehicle’s chassis, ensuring a solid electrical connection. Failure to establish a proper ground connection can lead to various issues, such as erratic behavior of the head unit, reduced audio performance, or even electrical damage.
Understanding the grounding section of a Pioneer double DIN wiring diagram empowers installers to perform accurate and reliable installations, maximizing the performance and functionality of the audio system while maintaining electrical integrity and safety.
Speakers
The speaker section of a Pioneer double DIN wiring diagram is paramount for establishing proper audio connections and achieving optimal sound quality. It defines the wiring scheme for various speaker types, ensuring a seamless and immersive audio experience.
-
Front Speakers
Front speakers are typically the primary source of audio in a vehicle. The wiring diagram specifies the connections for the left and right front speakers, allowing installers to deliver balanced and accurate stereo sound.
-
Rear Speakers
Rear speakers enhance the soundstage and provide a more immersive audio experience. The wiring diagram outlines the connections for the left and right rear speakers, ensuring proper phasing and optimal sound distribution throughout the vehicle.
-
Subwoofer
A subwoofer adds depth and impact to the audio system by reproducing low frequencies. The wiring diagram includes connections for a powered subwoofer, allowing installers to integrate it seamlessly into the system and enjoy enhanced bass response.
-
Speaker Impedance and Power Handling
The wiring diagram also provides information on speaker impedance and power handling, which are critical factors for matching the head unit’s output to the speakers’ capabilities. Understanding these specifications ensures optimal sound quality and prevents damage to the speakers.
By understanding the speaker connections outlined in a Pioneer double DIN wiring diagram, installers can create a tailored audio system that meets their specific requirements, delivering a dynamic and immersive sound experience while maintaining system integrity.
Antenna
In the realm of Pioneer double DIN wiring diagrams, the antenna section holds significance in ensuring seamless integration of the head unit with the vehicle’s antenna system, enabling optimal radio reception.
-
Antenna Adapter
When the vehicle’s factory antenna connector differs from the head unit’s input, an antenna adapter becomes necessary. The wiring diagram provides guidance on selecting the appropriate adapter, ensuring a proper fit and maintaining signal integrity.
-
Antenna Power
Some antennas require a power supply to amplify the radio signal. The wiring diagram specifies the connection for the antenna power wire, ensuring the antenna receives the necessary voltage for optimal performance.
-
AM/FM Antenna Connections
The wiring diagram outlines the connections for both AM and FM antennas, enabling the head unit to receive a wide range of radio stations. Proper connections are crucial for clear and static-free radio reception.
-
Antenna Troubleshooting
In case of poor radio reception or signal issues, the wiring diagram assists in troubleshooting. It provides guidance on checking connections, testing the antenna, and identifying potential problems, ensuring a swift resolution.
Understanding the antenna section of a Pioneer double DIN wiring diagram empowers installers to establish a robust connection between the head unit and the vehicle’s antenna system. This ensures excellent radio reception, allowing users to enjoy their favorite stations with clarity and consistency, enhancing the overall audio experience while on the road.
Illumination
Within the context of a Pioneer double DIN wiring diagram, the illumination section plays a crucial role in integrating the head unit with the vehicle’s lighting system, ensuring a seamless and visually cohesive driving experience.
The illumination wires in the wiring diagram provide a connection between the head unit and the vehicle’s dimmer switch, allowing the head unit’s display brightness to adjust automatically based on the vehicle’s lighting conditions. When the vehicle’s headlights are turned on, the illumination wires send a signal to the head unit, triggering it to dim its display, reducing glare and improving visibility at night.
Real-life examples demonstrate the practical significance of the illumination connections. In a scenario where a Pioneer AVH-X5800BHS head unit is installed in a 2007 Honda Civic, the wiring diagram specifies the connection of the orange illumination wire to the vehicle’s dimmer switch. This ensures that when the Civic’s headlights are turned on, the head unit’s display dims accordingly, providing optimal viewing conditions for the driver.
Understanding the illumination section of a Pioneer double DIN wiring diagram enables installers to create a fully integrated audio system that adapts to the vehicle’s lighting environment. By establishing proper illumination connections, installers can enhance the user experience, ensuring safe and comfortable driving conditions while maintaining the head unit’s functionality and aesthetics.
Steering Wheel Controls
Within the context of a Pioneer double DIN wiring diagram, the section dedicated to steering wheel controls holds significance in enabling seamless integration between the head unit and the vehicle’s steering wheel buttons, enhancing convenience and safety while driving.
-
Button Mapping
The wiring diagram provides guidance on mapping the steering wheel buttons to specific functions on the head unit, such as volume control, track skipping, or answering calls, allowing for intuitive and hands-free operation.
-
Compatibility
Compatibility between the head unit and the vehicle’s steering wheel control interface is crucial. The wiring diagram ensures that the appropriate connections are made based on the specific vehicle model, ensuring seamless integration and functionality.
-
Real-Life Example
In a scenario where a Pioneer AVH-X5800BHS head unit is installed in a 2007 Honda Civic, the wiring diagram specifies the connections for the steering wheel control interface, enabling the driver to control volume, change tracks, and answer calls from the steering wheel buttons.
-
Enhanced Safety
Steering wheel controls minimize the need for drivers to take their hands off the wheel to operate the head unit, reducing distractions and enhancing overall driving safety.
Understanding the steering wheel control integration section of a Pioneer double DIN wiring diagram allows installers to establish a fully functional connection between the head unit and the vehicle’s steering wheel buttons. This integration provides drivers with a convenient and safe way to control various head unit functions without compromising their focus on the road.
Parking Brake
Within the context of a Pioneer double DIN wiring diagram, the parking brake section holds paramount importance in ensuring adherence to safety regulations and enhancing the overall user experience. By specifying the connection to the vehicle’s parking brake wire, the wiring diagram ensures that certain features of the head unit are disabled while the vehicle is in motion, promoting safe driving practices.
-
Safety Compliance
The primary purpose of the parking brake connection is to comply with safety regulations. In many regions, it is illegal to operate a vehicle with a video display that is visible to the driver while the vehicle is in motion. By connecting the head unit to the parking brake wire, the video display is disabled when the vehicle is not in park, preventing potential distractions and reducing the risk of accidents.
-
Real-Life Examples
In a practical scenario, when a Pioneer AVH-X5800BHS head unit is installed in a 2007 Honda Civic, the wiring diagram instructs the installer to connect the parking brake wire to the vehicle’s parking brake switch. This ensures that the head unit’s video display remains disabled while the vehicle is in drive, ensuring the driver’s focus remains on the road.
-
Navigation Features
Beyond safety compliance, the parking brake connection also plays a role in enabling certain navigation features. Some head units offer advanced navigation capabilities, such as turn-by-turn directions and real-time traffic updates. These features require the vehicle to be in park for safe and accurate operation. The parking brake connection ensures that these features are only accessible when the vehicle is stationary.
-
Video Playback Restrictions
Additionally, the parking brake connection can restrict the playback of certain video content while the vehicle is in motion. This is particularly relevant for head units that support DVD or Blu-ray playback. By prohibiting video playback while driving, the parking brake connection helps prevent distracted driving and promotes safer road conditions.
In summary, the parking brake section of a Pioneer double DIN wiring diagram plays a crucial role in ensuring safety compliance, enhancing the user experience, and promoting responsible driving practices. By disabling certain features while the vehicle is in motion, the parking brake connection helps minimize distractions and create a safer driving environment.
Reverse Trigger
Within the context of a Pioneer double DIN wiring diagram, the reverse trigger section plays a vital role in integrating a backup camera system into the vehicle’s head unit. It defines the connection between the head unit and the vehicle’s reverse gear signal, enabling the automatic display of the backup camera feed on the head unit’s screen when the vehicle is shifted into reverse.
The reverse trigger wire serves as a crucial component of the Pioneer double DIN wiring diagram, as it establishes the communication channel between the head unit and the backup camera. Without this connection, the head unit would not be able to detect when the vehicle is in reverse, and the backup camera feed would not be displayed, potentially compromising the driver’s safety and convenience.
Real-life examples further illustrate the practical significance of the reverse trigger connection. When installing a Pioneer AVH-X5800BHS head unit in a 2007 Honda Civic, the wiring diagram specifies the connection of the reverse trigger wire to the vehicle’s reverse light circuit. This ensures that when the Civic is shifted into reverse, the head unit automatically switches to the backup camera display, providing the driver with a clear view of the rear surroundings for safe maneuvering.
Understanding the reverse trigger section of a Pioneer double DIN wiring diagram empowers installers with the knowledge to seamlessly integrate backup camera systems into the vehicle’s audio-visual setup. This understanding contributes to enhanced driving safety, convenience, and overall driving experience.
Accessory
Within the context of a Pioneer Double Din Wiring Diagram, the accessory section plays a crucial role in expanding the system’s capabilities by allowing the integration of additional accessories. It defines the connections for various devices, such as amplifiers, navigation modules, or other peripherals, providing a seamless and customizable audio-visual experience.
The inclusion of an accessory section in the Pioneer Double Din Wiring Diagram is driven by the growing demand for enhanced audio and navigation features in modern vehicles. Amplifiers, for instance, can greatly improve the power output and sound quality of the audio system, while navigation modules provide real-time guidance and navigation assistance. By incorporating the accessory section, the wiring diagram empowers installers with the knowledge to connect and integrate these additional components, creating a tailored and feature-rich audio-visual setup.
Real-life examples further demonstrate the practical significance of the accessory section. When installing a Pioneer AVH-X5800BHS head unit in a 2007 Honda Civic, the wiring diagram includes dedicated connections for an external amplifier. This allows the installer to add an amplifier to the system, significantly enhancing the audio output and providing a more immersive listening experience. Similarly, if the vehicle is not equipped with a factory navigation system, the wiring diagram provides guidance on connecting an aftermarket navigation module, enabling the driver to benefit from turn-by-turn directions and other navigation features.
Understanding the accessory section of a Pioneer Double Din Wiring Diagram is essential for installers who seek to create advanced and customized audio-visual systems. It empowers them to integrate a wide range of accessories, maximizing the functionality and user experience of the head unit while maintaining system integrity and performance.


Related Posts


