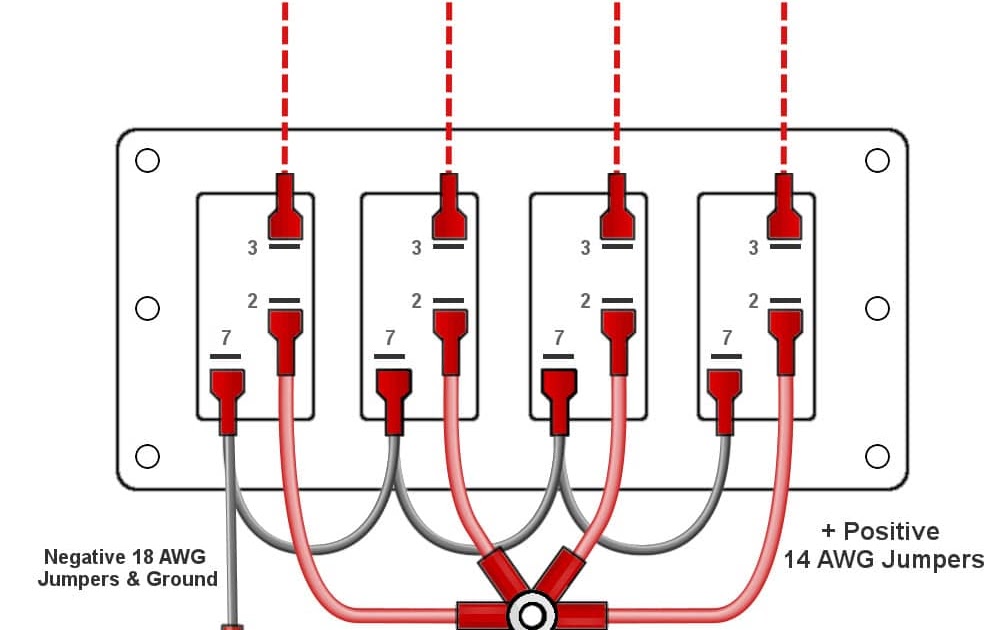
A Nilight Rocker Switch Wiring Diagram visually represents the wiring connections and components necessary for installing a Nilight rocker switch, a type of electrical switch used in automotive applications. For instance, a wiring diagram may guide the user in connecting the switch to a power source, LED lights, and a ground.
These diagrams play a crucial role in ensuring proper electrical connections, preventing malfunctions and electrical hazards. Their benefits include simplified installation, troubleshooting, and system modifications. Historically, the development of self-adhesive diagrams has enhanced convenience and accessibility for DIY enthusiasts and professionals alike.
This article delves into the intricacies of Nilight rocker switch wiring diagrams, exploring their components, installation considerations, and troubleshooting techniques. It aims to provide comprehensive guidance for those seeking to effectively utilize these diagrams in their electrical projects.
Nilight rocker switch wiring diagrams play a critical role in guiding the installation and troubleshooting of electrical systems. Understanding their essential aspects is paramount for ensuring proper functionality and safety.
- Components: Switches, wires, connectors, power sources
- Connections: Diagrams depict the flow of electricity
- Functionality: Instructions for switch operation and lighting
- Safety: Guidelines to prevent electrical hazards
- Troubleshooting: Aid in diagnosing and resolving issues
- Customization: Diagrams facilitate modifications and additions
- Compatibility: Ensures compatibility with specific switches and systems
- Installation: Step-by-step guidance for proper wiring connections
- Example: A diagram may show how to wire a switch to control LED lights
These aspects are interconnected and essential for a comprehensive understanding of Nilight rocker switch wiring diagrams. They provide a visual representation of the electrical system, enabling users to make informed decisions during installation and maintenance. By following these diagrams carefully, individuals can ensure the safe and effective operation of their electrical systems.
Components
In the context of Nilight rocker switch wiring diagrams, components such as switches, wires, connectors, and power sources play a critical role in understanding the functionality and connections of an electrical system. These components are interconnected and interdependent, forming the backbone of a Nilight rocker switch wiring diagram.
The switch acts as the primary control element, allowing users to turn on or off the electrical circuit. Wires serve as the pathways for electricity to flow, connecting the switch to the power source and the load (e.g., LED lights). Connectors ensure secure and reliable connections between wires and other components. Finally, the power source provides the electrical energy necessary to operate the system.
Real-life examples of these components within a Nilight rocker switch wiring diagram include a toggle switch, stranded copper wires, insulated spade connectors, and a 12-volt battery. Understanding the connections and interactions between these components enables users to troubleshoot issues, make modifications, and ensure the safe and efficient operation of their electrical systems.
In summary, components such as switches, wires, connectors, and power sources form the foundation of Nilight rocker switch wiring diagrams. Their proper selection, installation, and maintenance are crucial for the effective functioning of electrical systems. By comprehending the relationships between these components, users can gain a deeper understanding of electrical circuits and make informed decisions when working with Nilight rocker switch wiring diagrams.
Connections
In the context of Nilight rocker switch wiring diagrams, the connections between components play a critical role in determining the flow of electricity and the overall functionality of the system. Diagrams depict these connections in a clear and concise manner, enabling users to understand how electricity flows from the power source to the load (e.g., LED lights) and back to the ground.
Understanding the connections in a Nilight rocker switch wiring diagram is essential for several reasons. First, it allows users to troubleshoot issues more effectively. By tracing the flow of electricity through the diagram, users can identify potential points of failure and take corrective actions. Second, it enables users to make modifications or additions to the system with confidence. By understanding how the components are connected, users can ensure that their changes will not disrupt the functionality of the system.
Real-life examples of connections within a Nilight rocker switch wiring diagram include the connections between the switch terminals, the power source terminals, the load terminals, and the ground terminals. These connections are typically represented by lines or arrows on the diagram, and they indicate the direction of electricity flow. By following these connections, users can gain a clear understanding of how the system operates.
In summary, the connections depicted in Nilight rocker switch wiring diagrams are critical for understanding the flow of electricity and for troubleshooting, modifying, and maintaining the system. By comprehending these connections, users can ensure that their electrical systems operate safely and efficiently.
Functionality
In the context of Nilight rocker switch wiring diagrams, understanding the functionality of the switch plays a critical role in ensuring the proper operation of the lighting system. Diagrams provide detailed instructions on how the switch should be connected to the power source and the load (e.g., LED lights), taking into account factors such as voltage, amperage, and polarity. These instructions are essential for ensuring that the switch operates safely and effectively.
The relationship between functionality and a Nilight rocker switch wiring diagram can be summarized as follows. Without clear instructions on switch operation and lighting, the diagram would be incomplete and potentially ineffective. By providing these instructions, the diagram enables users to understand how to connect the switch correctly, ensuring proper electrical flow and preventing malfunctions. Real-life examples of functionality instructions within a Nilight rocker switch wiring diagram might include step-by-step instructions on how to wire the switch to a 12-volt battery and how to connect the switch to the LED lights.
Understanding the functionality of a Nilight rocker switch wiring diagram has several practical applications. First, it enables users to troubleshoot issues more effectively. By understanding how the switch is supposed to operate, users can identify potential problems and take corrective actions. Second, it allows users to make modifications or additions to the system with confidence. By comprehending the functionality of the switch, users can ensure that their changes will not disrupt the operation of the system. Finally, it provides a foundation for understanding more complex electrical systems. By studying the functionality of a Nilight rocker switch wiring diagram, users can gain a deeper understanding of electrical circuits and their applications.
In summary, the functionality of a Nilight rocker switch wiring diagram is critical for understanding how to operate the switch correctly and for troubleshooting, modifying, and maintaining the system. By comprehending the functionality of the switch, users can ensure that their electrical systems operate safely and efficiently.
Safety
In the context of Nilight rocker switch wiring diagrams, safety guidelines play a critical role in preventing electrical hazards and ensuring the safe operation of electrical systems. These guidelines provide detailed instructions on how to handle, install, and maintain electrical components to minimize the risk of electrical shocks, fires, and other accidents. Understanding and adhering to these guidelines is essential for ensuring the safety of both the user and the electrical system.
The relationship between safety guidelines and Nilight rocker switch wiring diagrams is one of cause and effect. Without clear and comprehensive safety guidelines, wiring diagrams would be incomplete and potentially dangerous. By providing these guidelines, diagrams enable users to understand the proper handling and installation procedures for electrical components, reducing the risk of electrical hazards. Real-life examples of safety guidelines within a Nilight rocker switch wiring diagram might include instructions on how to properly insulate wires, how to connect wires to terminals, and how to mount the switch in a safe location.
Understanding the safety guidelines within a Nilight rocker switch wiring diagram has several practical applications. First, it enables users to install and maintain electrical systems safely and effectively. By following the guidelines, users can minimize the risk of electrical hazards and ensure the longevity of their electrical systems. Second, it provides a foundation for understanding more complex electrical systems. By studying the safety guidelines in a Nilight rocker switch wiring diagram, users can gain a deeper understanding of electrical safety principles and their applications. Finally, it promotes a culture of electrical safety. By emphasizing the importance of safety guidelines, wiring diagrams help to raise awareness of electrical hazards and encourage users to prioritize safety when working with electrical systems.
In summary, safety guidelines are a critical component of Nilight rocker switch wiring diagrams. By providing detailed instructions on how to handle, install, and maintain electrical components safely, these guidelines help to prevent electrical hazards and ensure the safe operation of electrical systems. Understanding and adhering to these guidelines is essential for both the user and the electrical system.
Troubleshooting
In the context of Nilight Rocker Switch Wiring Diagrams, troubleshooting plays a critical role in diagnosing and resolving issues that may arise during installation or operation. Wiring diagrams provide a visual representation of the electrical connections, enabling users to identify potential problems and implement corrective actions.
Troubleshooting is a crucial component of Nilight Rocker Switch Wiring Diagrams for several reasons. First, it allows users to identify and fix problems quickly and efficiently. By following the step-by-step instructions and troubleshooting tips provided in the diagram, users can pinpoint the source of the issue and take appropriate measures to resolve it. Second, troubleshooting helps prevent further damage to the electrical system. By identifying and addressing problems early on, users can minimize the risk of more extensive damage that could require costly repairs or replacements.
Real-life examples of troubleshooting within a Nilight Rocker Switch Wiring Diagram include identifying loose connections, incorrect wire sizing, and faulty components. The diagram provides guidance on how to check for these issues and suggests solutions to resolve them. Understanding how to troubleshoot using the diagram enables users to address common problems without the need for professional assistance.
In summary, troubleshooting is an essential aspect of Nilight Rocker Switch Wiring Diagrams. By providing users with a systematic approach to diagnosing and resolving issues, these diagrams empower users to maintain and repair their electrical systems with confidence. Understanding the troubleshooting techniques outlined in the diagram promotes electrical safety, prevents further damage, and ensures the optimal performance of the electrical system.
Customization
Within the context of Nilight Rocker Switch Wiring Diagrams, customization plays a pivotal role, empowering users to modify and expand their electrical systems. Wiring diagrams serve as a roadmap for these modifications, providing a comprehensive overview of the electrical connections and components involved.
-
Flexibility in Component Selection:
Diagrams enable users to select and incorporate specific components that align with their unique requirements. This flexibility allows for customization of switch types, amperage ratings, and lighting configurations. -
Real-Time Adaptations:
Wiring diagrams provide a dynamic framework for adapting the system to changing needs. Users can easily add or remove components, such as additional lights or accessories, without compromising the integrity of the electrical system. -
Future Expansion:
Diagrams facilitate future expansion by providing a clear understanding of the system’s capabilities. Users can plan for future modifications and additions, ensuring that the electrical system can grow alongside their needs. -
Simplified Troubleshooting:
Customization through wiring diagrams simplifies troubleshooting in modified systems. By providing a visual representation of the modified connections, users can quickly identify and resolve any issues that may arise.
In conclusion, the customization capabilities offered by Nilight Rocker Switch Wiring Diagrams empower users to tailor their electrical systems to specific requirements, adapt to changing needs, and plan for future expansion. These diagrams not only provide a roadmap for modifications and additions but also enhance the overall flexibility, functionality, and maintainability of the electrical system.
Compatibility
In the context of Nilight Rocker Switch Wiring Diagrams, compatibility plays a critical role in ensuring that the wiring diagram accurately reflects the specific switches and systems being used. Without proper compatibility, the diagram may provide incorrect or incomplete instructions, leading to potential malfunctions or safety hazards.
Compatibility is a fundamental aspect of Nilight Rocker Switch Wiring Diagrams for several reasons. First, it ensures that the diagram accurately represents the electrical characteristics of the specific switch being used. This includes factors such as voltage rating, amperage capacity, and terminal configuration. Second, compatibility ensures that the diagram takes into account the specific requirements of the system being installed. This may include the type of lighting being used (e.g., LED, incandescent), the number of lights being connected, and the overall power consumption of the system.
Real-life examples of compatibility within a Nilight Rocker Switch Wiring Diagram include:
- Matching the switch type to the voltage and amperage requirements of the lighting.
- Ensuring that the switch is compatible with the type of lighting being used (e.g., LED, incandescent).
- Verifying that the wiring diagram takes into account the total power consumption of the system and the capacity of the switch.
Understanding the importance of compatibility within Nilight Rocker Switch Wiring Diagrams has several practical applications. First, it enables users to select the correct switch for their specific application, ensuring safe and reliable operation. Second, it allows users to verify that the wiring diagram is accurate and complete, reducing the risk of errors during installation. Third, it provides a foundation for troubleshooting and resolving any issues that may arise, as users can identify potential compatibility issues and take corrective actions.
In summary, compatibility is a critical component of Nilight Rocker Switch Wiring Diagrams, ensuring that the diagram accurately reflects the specific switches and systems being used. By understanding the importance of compatibility, users can select the correct switch, verify the accuracy of the diagram, and troubleshoot any issues that may arise, resulting in a safe and reliable electrical system.
Installation
Within the context of Nilight Rocker Switch Wiring Diagrams, installation instructions play a critical role in ensuring the safe and reliable operation of electrical systems. These diagrams provide step-by-step guidance for proper wiring connections, enabling users to install Nilight rocker switches correctly and avoid potential electrical hazards.
Installation instructions are a fundamental component of Nilight Rocker Switch Wiring Diagrams for several reasons. First, they ensure that users have a clear understanding of the wiring process, regardless of their electrical experience level. Second, they help prevent errors during installation, which could lead to malfunctions or safety issues. Third, they provide a valuable reference for troubleshooting and maintenance tasks in the future.
Real-life examples of installation instructions within a Nilight Rocker Switch Wiring Diagram include:
- Detailed instructions on how to connect the switch to a power source, such as a battery.
- Step-by-step guidance on how to wire the switch to the lighting load, such as LED lights.
- Clear instructions on how to mount the switch in a suitable location.
Understanding the importance of installation instructions within Nilight Rocker Switch Wiring Diagrams has several practical applications. First, it enables users to install Nilight rocker switches confidently and correctly, ensuring the proper functioning of their electrical systems. Second, it helps users avoid potential electrical hazards, such as short circuits or electrical fires, by providing clear and concise instructions. Third, it provides a valuable resource for troubleshooting and maintenance tasks, allowing users to quickly identify and resolve any issues that may arise.
In summary, installation instructions are a critical component of Nilight Rocker Switch Wiring Diagrams. They provide step-by-step guidance for proper wiring connections, ensuring the safe and reliable operation of electrical systems. Understanding the importance of these instructions empowers users to install Nilight rocker switches correctly, avoid electrical hazards, and maintain their electrical systems effectively.
Example
Within the context of Nilight Rocker Switch Wiring Diagrams, a common example is the illustration of how to wire a switch to control LED lights. This specific scenario holds significant importance as it showcases the practical application of these diagrams in various electrical projects. By examining its components, real-life examples, and implications, we gain a deeper understanding of the relevance and functionality of Nilight Rocker Switch Wiring Diagrams.
- Components: These diagrams provide a detailed overview of the electrical components involved in the wiring process, including the switch, LED lights, wires, and connectors. They specify the type, size, and quantity of each component required for a successful installation.
- Real-Life Examples: Nilight Rocker Switch Wiring Diagrams often include real-life examples of how to wire a switch to control LED lights in different scenarios. These examples may range from simple single-switch setups to more complex multi-switch configurations, catering to various project requirements.
- Implications: The example of wiring a switch to control LED lights highlights the versatility and adaptability of Nilight Rocker Switch Wiring Diagrams. They empower users to customize their electrical systems based on their specific needs, whether it’s for home lighting, automotive applications, or industrial projects.
- Safety Considerations: These diagrams emphasize the importance of safety by providing guidelines for proper wire insulation, switch mounting, and circuit protection. By adhering to these instructions, users can minimize the risk of electrical hazards and ensure the safe operation of their electrical systems.
In summary, the example of wiring a switch to control LED lights serves as a practical demonstration of how Nilight Rocker Switch Wiring Diagrams guide users through the electrical wiring process. They provide detailed instructions, real-life examples, and safety considerations, empowering users to confidently install and maintain their electrical systems.


Related Posts


