Definition: A nest wiring diagram heat pump is a visual representation of the electrical connections needed to install and operate a heat pump system with a Nest thermostat. It provides a clear roadmap for electricians and homeowners, ensuring proper wiring and optimal performance of the heat pump.
Importance and Benefits: Accurate wiring is crucial for the efficient operation and safety of a heat pump system. The diagram simplifies the wiring process, minimizing the risk of errors and ensuring the system operates safely and reliably. Additionally, proper wiring optimizes energy efficiency, reducing operating costs and environmental impact. Historically, heat pump wiring diagrams were complex and challenging to interpret. The advent of Nest thermostats introduced user-friendly, simplified diagrams, empowering homeowners to participate in the installation process.
Transition: This article will delve deeper into the components, wiring connections, and troubleshooting tips for a Nest wiring diagram heat pump, equipping readers with a comprehensive understanding of this essential aspect of heat pump installation and operation.
Understanding the essential aspects of a Nest Wiring Diagram Heat Pump is crucial for its successful installation and operation. These aspects encompass the individual components, their functions, and the overall wiring scheme, ensuring the efficient and safe operation of the heat pump system.
- Components: Comprehending the function of each component, such as the thermostat, outdoor unit, and indoor unit, is essential.
- Wiring Connections: Accurately connecting the wires between the components ensures proper communication and operation of the system.
- Electrical Requirements: Determining the correct voltage, amperage, and circuit breaker size is crucial for safe and efficient operation.
- Safety Features: Understanding the built-in safety features, such as overcurrent protection and high-pressure switches, is essential for preventing accidents.
- Troubleshooting: Identifying common wiring issues and their solutions helps resolve problems quickly and effectively.
- Optimization: Learning how to optimize the wiring configuration can improve the system’s efficiency and performance.
- Compatibility: Ensuring compatibility between the Nest thermostat and the heat pump system is vital for seamless integration.
- Codes and Regulations: Adhering to local electrical codes and regulations ensures compliance and safety.
- Professional Installation: While some may attempt DIY installation, hiring a qualified electrician is recommended for complex systems or to ensure optimal performance and safety.
Components
Within the context of a Nest Wiring Diagram Heat Pump, understanding the role and function of each component is paramount for successful installation and operation. These components work in tandem to regulate temperature and provide efficient heating and cooling.
- Thermostat: The brain of the system, the thermostat communicates with other components to maintain the desired temperature. It receives user input, processes data, and sends signals to the outdoor and indoor units.
- Outdoor Unit: Located outside the home, the outdoor unit houses the compressor, condenser, and expansion valve. It releases or absorbs heat from the refrigerant, transferring it between the indoor and outdoor environments.
- Indoor Unit: Installed inside the home, the indoor unit contains the evaporator coil and blower fan. It circulates air over the evaporator coil, transferring heat to or from the refrigerant and distributing conditioned air throughout the space.
- Refrigerant Lines: Copper tubing connects the outdoor and indoor units, carrying the refrigerant through the system. The refrigerant undergoes phase changes, absorbing and releasing heat as it circulates.
Comprehending the function of each component enables proper wiring connections, ensuring efficient heat transfer and optimal system performance. Miswiring can lead to malfunctions, reduced efficiency, and potential safety hazards. Therefore, it is crucial to thoroughly understand the components involved in a Nest Wiring Diagram Heat Pump before attempting installation or troubleshooting.
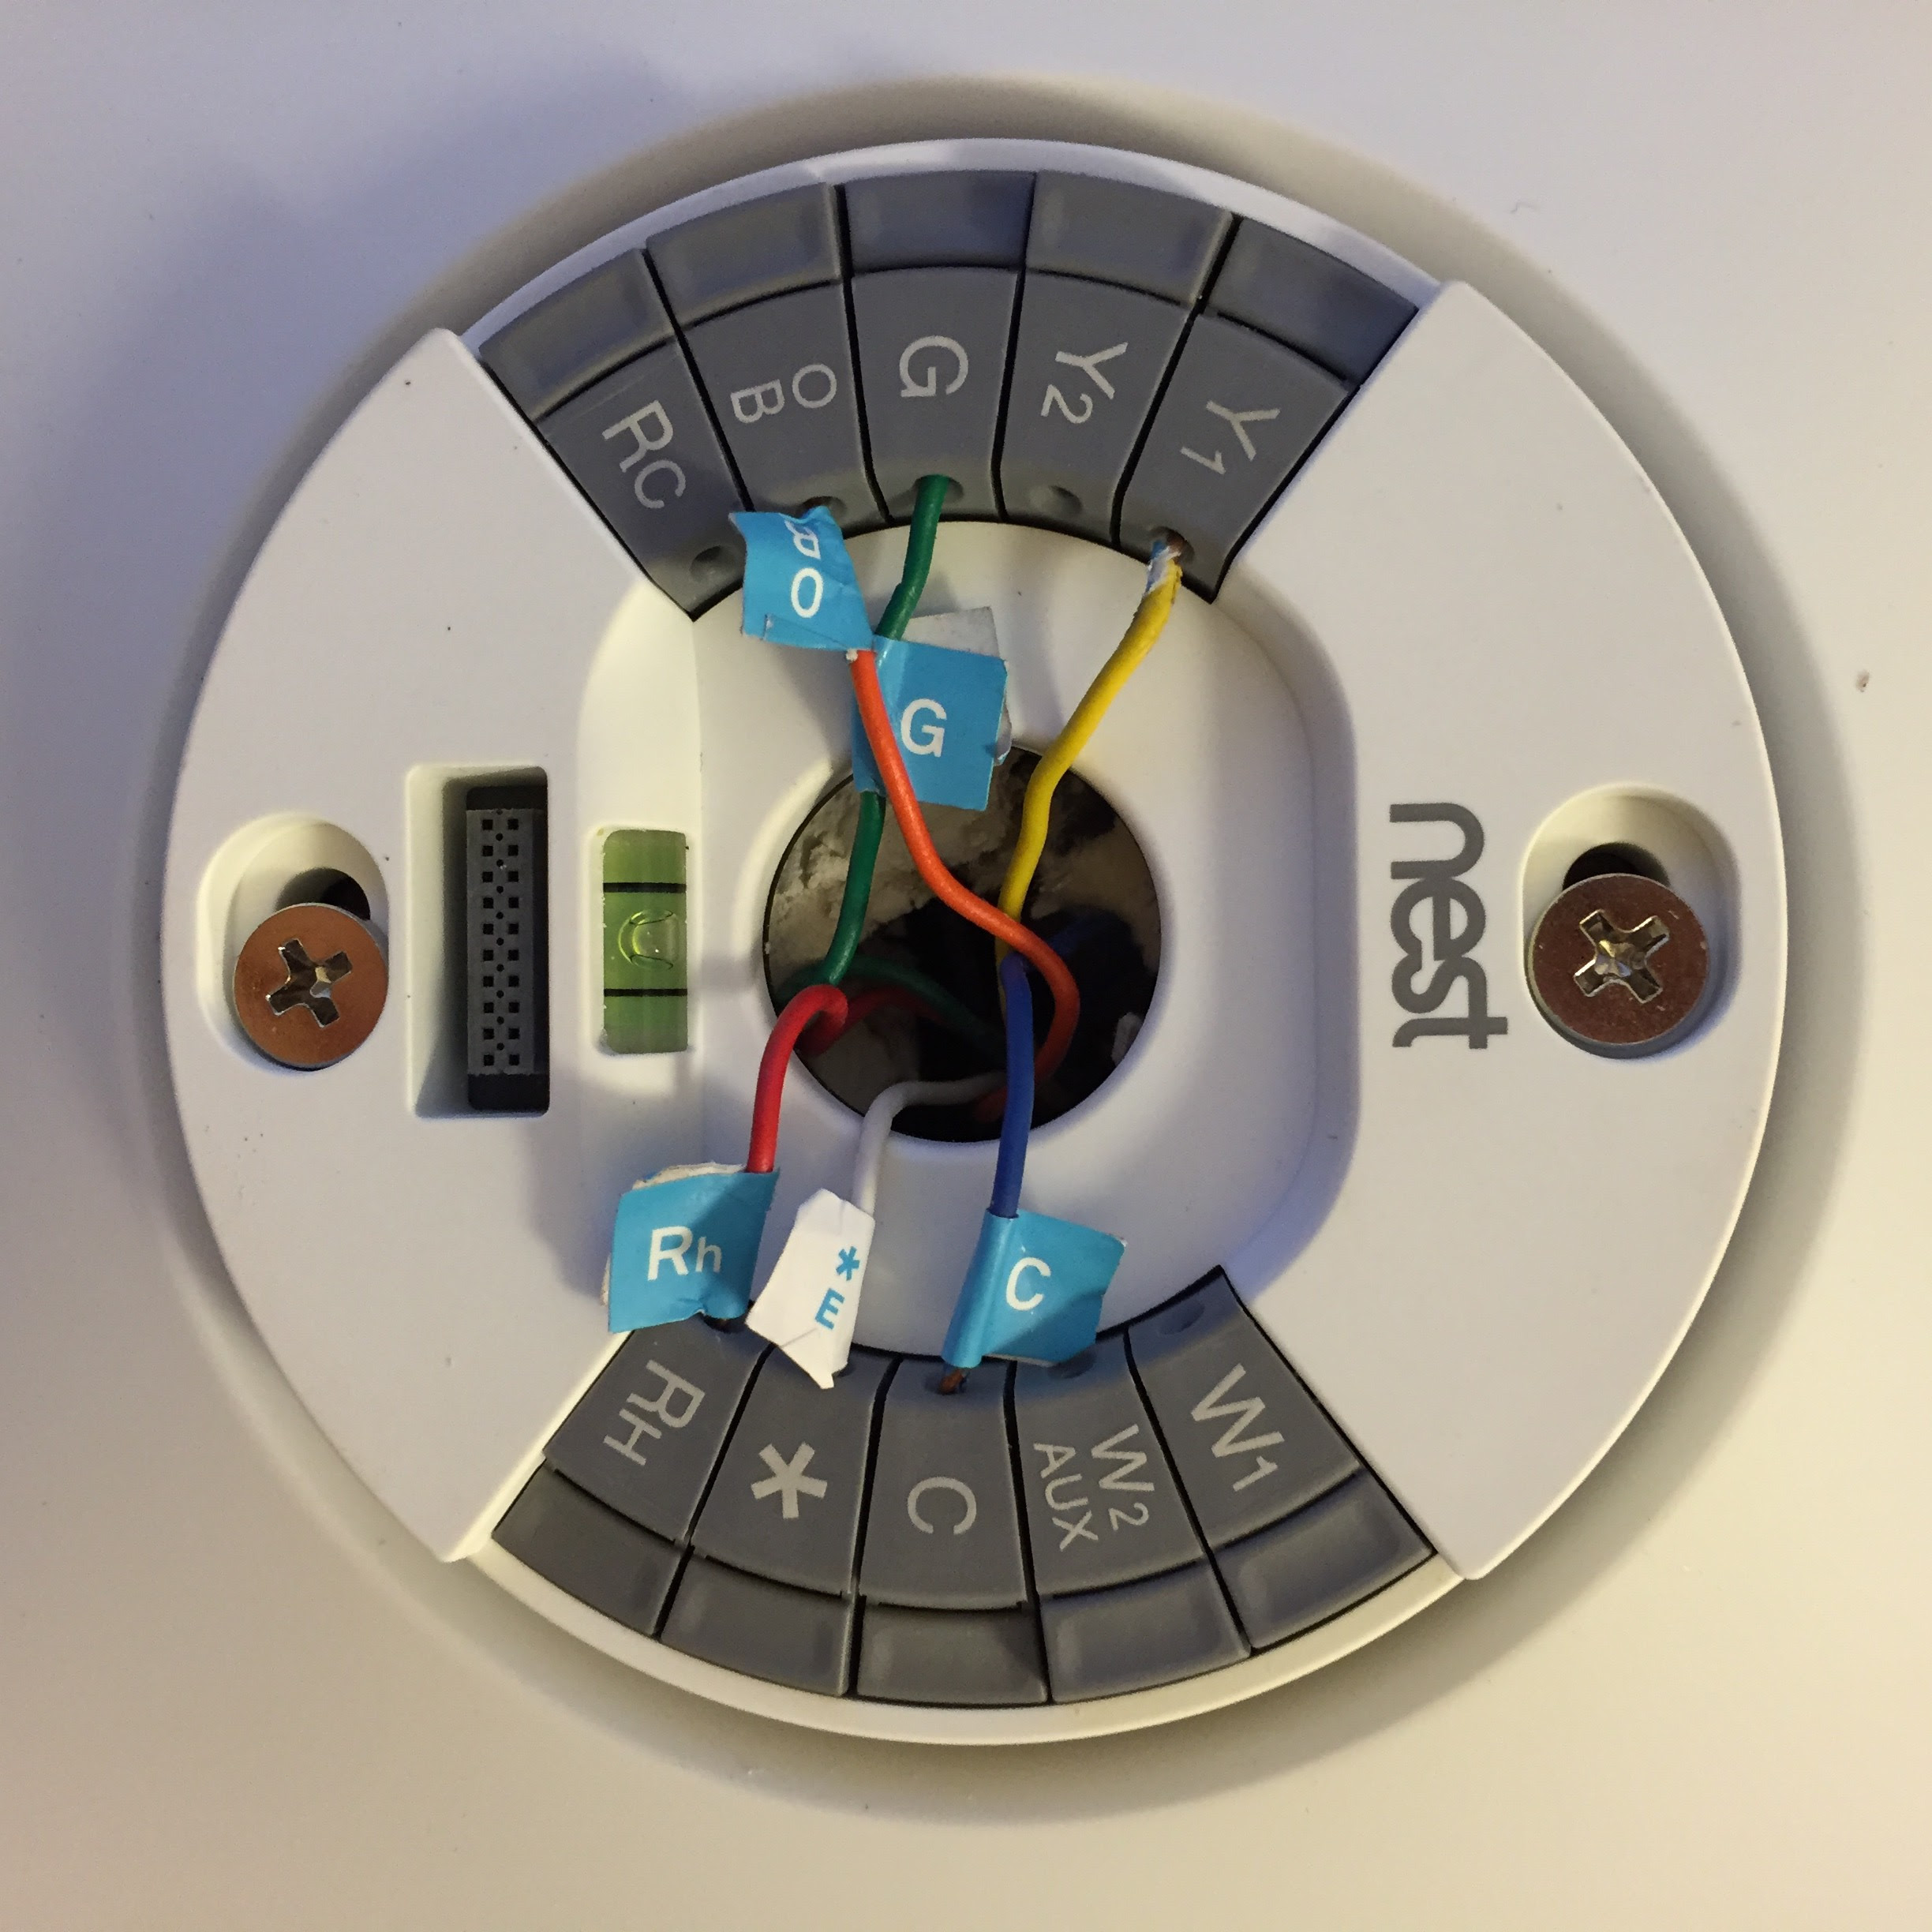
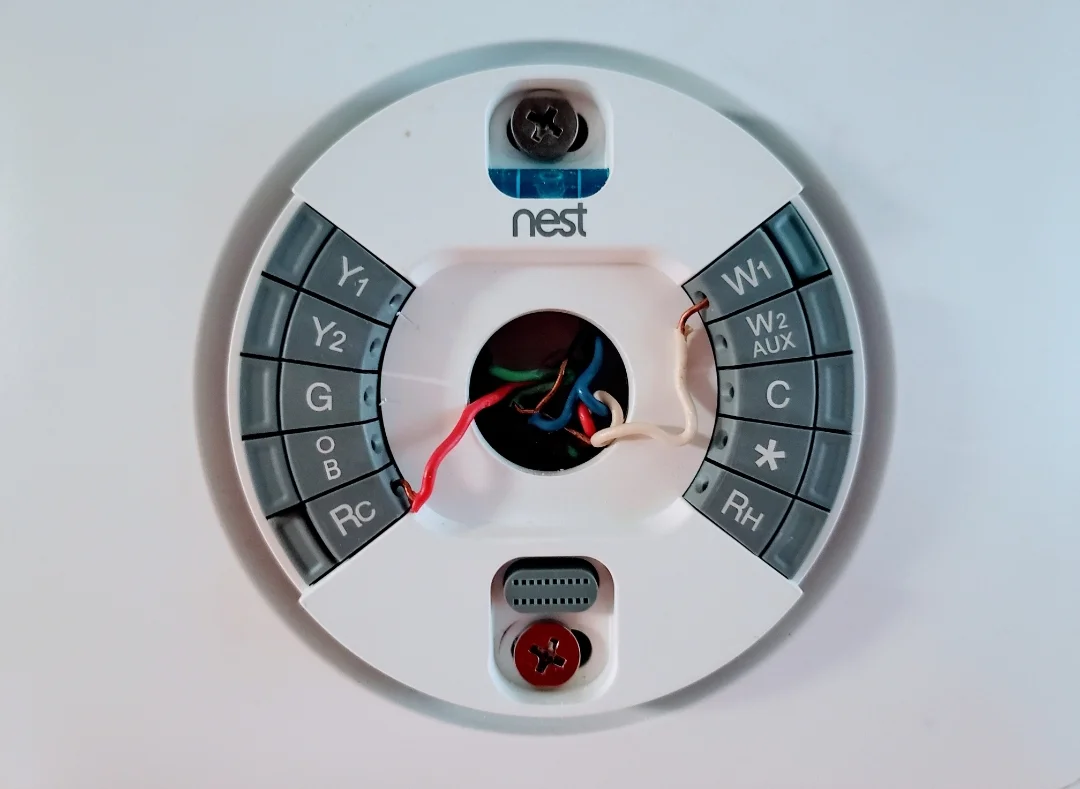
Wiring Connections
In the context of a Nest Wiring Diagram Heat Pump, accurate wiring connections are the foundation for establishing proper communication and ensuring seamless operation of the entire system. This intricate network of wires serves as the nervous system, transmitting signals and electrical power between the thermostat, outdoor unit, indoor unit, and other components.
Precision in wiring connections directly impacts the system’s ability to effectively regulate temperature and maintain a comfortable indoor environment. Incorrect wiring can lead to a cascade of issues, including system malfunctions, reduced efficiency, and potential safety hazards. Conversely, when wiring is executed correctly, the system can operate at its optimal level, ensuring efficient energy usage, reliable performance, and a comfortable living space.
Real-life examples abound, illustrating the critical role of accurate wiring connections. For instance, improper wiring of the thermostat can lead to inaccurate temperature readings, resulting in inadequate heating or cooling. Miswiring of the outdoor unit can compromise its ability to transfer heat effectively, leading to reduced efficiency and increased energy consumption. These scenarios highlight the importance of meticulous attention to detail during the wiring process.
Understanding the principles of wiring connections empowers homeowners and technicians alike to troubleshoot and resolve issues more effectively. By comprehending the cause-and-effect relationship between wiring connections and system performance, individuals can make informed decisions and take appropriate actions to ensure a well-functioning Nest Wiring Diagram Heat Pump.
In summary, accurate wiring connections are not merely a component of a Nest Wiring Diagram Heat Pump; they are the lifeblood that enables efficient and reliable operation. This understanding underscores the importance of meticulous attention to detail during installation and maintenance, ensuring a comfortable and energy-efficient indoor environment for years to come.
Electrical Requirements
Within the context of a Nest Wiring Diagram Heat Pump, electrical requirements hold paramount importance, ensuring the system’s safe and efficient operation. These requirements encompass the precise voltage, amperage, and circuit breaker size, each playing a critical role in the system’s performance and longevity.
- Voltage: Voltage, measured in volts (V), represents the electrical potential difference between two points in a circuit. Incorrect voltage can lead to damage to components, reduced efficiency, or even electrical fires. The Nest Wiring Diagram Heat Pump requires a specific voltage to operate effectively and safely.
- Amperage: Amperage, measured in amperes (A), indicates the flow of electrical current through a circuit. Overloading a circuit with excessive amperage can cause overheating, tripped circuit breakers, or electrical fires. The Nest Wiring Diagram Heat Pump must be connected to a circuit with sufficient amperage capacity to handle its operating current.
- Circuit Breaker Size: Circuit breakers serve as safety devices, designed to interrupt the flow of electricity when it exceeds a predetermined amperage. The circuit breaker size must be carefully selected to match the amperage requirements of the Nest Wiring Diagram Heat Pump. An undersized circuit breaker may trip prematurely, while an oversized circuit breaker may fail to protect the system from electrical hazards.
- Grounding: Proper grounding is essential for safety. The Nest Wiring Diagram Heat Pump must be grounded to prevent electrical shock and ensure safe operation. Grounding provides a low-resistance path for electrical current to flow in the event of a fault, diverting it away from sensitive components and personnel.
Adhering to the electrical requirements outlined in the Nest Wiring Diagram Heat Pump is paramount for safe and efficient operation. Mismatches in voltage, amperage, or circuit breaker size can have detrimental consequences, including reduced performance, component damage, and electrical hazards. Therefore, it is crucial to consult with a qualified electrician to ensure that the electrical system meets the specific requirements of the Nest Wiring Diagram Heat Pump.
Safety Features
The Nest Wiring Diagram Heat Pump is equipped with a comprehensive suite of safety features designed to prevent accidents and ensure the safe operation of the system. These safeguards are crucial for protecting both the equipment and the occupants of the building.
- Overcurrent Protection: Overcurrent protection devices, such as fuses and circuit breakers, are essential for preventing electrical fires. They monitor the flow of current in the system and interrupt the circuit if it exceeds a safe level. This prevents overheating and potential damage to components or the building itself.
- High-Pressure Switches: High-pressure switches protect the system from excessive pressure buildup in the refrigerant lines. If the pressure exceeds a safe threshold, the switch will automatically shut off the system to prevent damage to the compressor or other components.
- Freeze Protection: Freeze protection mechanisms prevent the system from operating in freezing temperatures, which can cause damage to the outdoor unit. These mechanisms may include temperature sensors or low-ambient control boards that monitor the outdoor temperature and disable the system if it falls below a safe level.
- Refrigerant Leak Detection: Some Nest Wiring Diagram Heat Pumps are equipped with refrigerant leak detection systems. These systems monitor the refrigerant levels in the system and alert the user if a leak is detected. Early detection of refrigerant leaks is crucial for preventing environmental damage and ensuring the system’s continued safe operation.
These safety features are essential for the safe and reliable operation of a Nest Wiring Diagram Heat Pump. By understanding their function and importance, homeowners can ensure that their system is properly maintained and operated, minimizing the risk of accidents or damage.
Troubleshooting
Within the context of a Nest Wiring Diagram Heat Pump, troubleshooting plays a critical role in maintaining optimal system performance and resolving issues promptly. By identifying common wiring issues and understanding their solutions, homeowners and technicians can effectively diagnose and address problems, ensuring the system operates safely and efficiently.
Wiring issues can manifest in various forms, ranging from loose connections to incorrect wire sizing. These issues can lead to a myriad of symptoms, such as the system failing to turn on, inadequate cooling or heating, or strange noises emanating from the unit. A comprehensive understanding of potential wiring issues empowers individuals to pinpoint the root cause of the problem and implement appropriate solutions.
For instance, if the Nest thermostat fails to communicate with the outdoor unit, the issue may lie in a faulty wire connection or a damaged wire. By checking the wiring connections and replacing any damaged wires, the problem can be resolved swiftly, restoring communication between the thermostat and the outdoor unit.
Furthermore, understanding wiring issues and their solutions enables proactive maintenance, preventing minor problems from escalating into more severe ones. Regular inspection and testing of wire connections can identify loose or damaged wires before they cause system malfunctions. This proactive approach extends the lifespan of the heat pump system and ensures uninterrupted comfort throughout the year.
In summary, troubleshooting wiring issues is an indispensable aspect of maintaining a Nest Wiring Diagram Heat Pump. By understanding common wiring problems and implementing effective solutions, homeowners and technicians can ensure the system operates at its peak performance, providing a comfortable and energy-efficient indoor environment.
Optimization
Within the realm of Nest Wiring Diagram Heat Pumps, optimization plays a pivotal role in maximizing system efficiency and performance. By understanding and implementing optimization techniques, homeowners and technicians can unlock the full potential of their heat pump systems, achieving greater energy efficiency, enhanced comfort, and reduced operating costs.
- Wire Sizing: Selecting the appropriate wire size is crucial for minimizing energy loss and ensuring the system operates at optimal voltage. Oversized wires can lead to unnecessary power consumption, while undersized wires may cause voltage drop and reduced performance.
- Circuit Balancing: Balancing the circuits ensures that each component receives the correct amount of power. This prevents overloading and premature failure of components, extending the lifespan of the system and improving overall efficiency.
- Thermostat Placement: The thermostat should be strategically placed in a central location with good air circulation. This ensures accurate temperature readings and prevents the system from overworking or underperforming due to localized temperature variations.
- Regular Maintenance: Regular maintenance, including cleaning, inspecting, and tightening electrical connections, helps prevent loose wires, corrosion, and other issues that can compromise system efficiency. By addressing potential problems early on, homeowners can maintain optimal performance and avoid costly repairs.
Optimization is an ongoing process that requires regular attention and adjustment to evolving conditions. By understanding the principles of wiring optimization and implementing the techniques outlined above, homeowners and technicians can significantly enhance the performance of their Nest Wiring Diagram Heat Pump systems, resulting in greater energy efficiency, improved comfort, and reduced operating costs.
Compatibility
Within the context of Nest Wiring Diagram Heat Pumps, compatibility plays a pivotal role in achieving seamless integration between the Nest thermostat and the heat pump system. This compatibility ensures effective communication, efficient operation, and optimal performance of the entire system.
The Nest thermostat and heat pump system must be compatible to allow for proper communication and control. Without compatibility, the thermostat may not be able to send signals to the heat pump, resulting in improper temperature regulation and reduced efficiency. Furthermore, incompatibility can lead to system malfunctions, error messages, and premature failures.
Real-life examples underscore the importance of compatibility. For instance, if a Nest thermostat is paired with an incompatible heat pump system, the thermostat may be unable to control the system’s heating and cooling functions effectively. This can lead to discomfort, increased energy consumption, and potential damage to the system.
Understanding the significance of compatibility empowers homeowners and technicians to make informed decisions when selecting and installing a Nest Wiring Diagram Heat Pump system. By ensuring compatibility between the Nest thermostat and the heat pump system, individuals can harness the full benefits of the system, including precise temperature control, energy efficiency, and remote monitoring capabilities.
In summary, compatibility between the Nest thermostat and the heat pump system is a critical aspect of Nest Wiring Diagram Heat Pumps. Ensuring compatibility enables seamless integration, effective communication, and optimal performance, contributing to a comfortable, energy-efficient, and reliable indoor environment.
Codes and Regulations
Within the context of Nest Wiring Diagram Heat Pumps, adhering to local electrical codes and regulations is paramount for ensuring compliance and safety. These codes and regulations establish minimum standards for electrical installations, providing a framework for safe and efficient operation of the heat pump system.
Electrical codes and regulations address various aspects of electrical installations, including wire sizing, circuit protection, grounding, and bonding. By adhering to these codes, homeowners and technicians can minimize the risk of electrical fires, shocks, and other hazards. Furthermore, compliance with local regulations is often a requirement for obtaining building permits and passing inspections.
For instance, proper wire sizing is crucial for preventing overheating and potential fires. Electrical codes specify the minimum wire size based on the current carrying capacity and the length of the circuit. Using undersized wires can lead to excessive voltage drop, reduced efficiency, and increased risk of overheating. Similarly, proper grounding and bonding ensure that electrical current is safely directed away from sensitive components and personnel in the event of a fault.
Understanding the importance of codes and regulations empowers homeowners and technicians to make informed decisions during the installation and maintenance of Nest Wiring Diagram Heat Pumps. By adhering to these codes, individuals can ensure the safe and compliant operation of their heat pump systems, minimizing risks and safeguarding their property and occupants.
In summary, codes and regulations play a critical role in the safe and compliant operation of Nest Wiring Diagram Heat Pumps. By understanding and adhering to these codes, homeowners and technicians can ensure the proper installation, maintenance, and operation of their heat pump systems, creating a safe and energy-efficient indoor environment.
Professional Installation
In the context of Nest Wiring Diagram Heat Pumps, professional installation plays a pivotal role in ensuring the system’s safe, efficient, and reliable operation. While DIY installation may seem tempting, it is crucial to understand the complexities involved and the potential risks associated with improper installation.
A Nest Wiring Diagram Heat Pump involves intricate electrical connections and requires a deep understanding of electrical principles and safety protocols. Attempting DIY installation without the necessary expertise and experience can lead to incorrect wiring, electrical hazards, and compromised system performance. Hiring a qualified electrician, on the other hand, ensures that the system is installed according to industry standards, local codes, and the manufacturer’s specifications.
Qualified electricians possess the knowledge, skills, and tools to handle complex electrical systems safely and effectively. They can identify potential issues, select the appropriate wiring materials, and ensure proper grounding and bonding. Moreover, they can provide valuable advice on system placement, thermostat configuration, and ongoing maintenance.
Real-life examples abound, illustrating the importance of professional installation. Improper wiring can lead to electrical fires, equipment damage, and even personal injury. Conversely, professional installation ensures the system operates at its optimal efficiency, providing consistent comfort and energy savings.
In summary, while DIY installation may be suitable for simple electrical tasks, it is strongly recommended to hire a qualified electrician for the installation of a Nest Wiring Diagram Heat Pump. Professional installation ensures the system is installed safely, efficiently, and in compliance with all applicable codes and standards, providing peace of mind and long-term benefits.


Related Posts


