Nest Thermostat Installation Wiring refers to the electrical connections required to install and operate a Nest Thermostat, a smart home device that controls heating and cooling systems. For instance, connecting the blue wire (C-wire) to the C terminal provides continuous power to the thermostat, enabling its proper functioning.
Proper Nest Thermostat wiring is vital for safety, cost-effectiveness, and enhanced home comfort. It optimizes energy consumption, eliminates the need for frequent battery changes, and ensures accurate temperature regulation. A key historical development was the introduction of the C-wire requirement, which significantly improved device stability and functionality.
In this article, we will delve into the types of wiring required for Nest Thermostat installation, the benefits of proper wiring, common wiring issues and their troubleshooting methods, and best practices for ensuring a seamless installation process.
Nest Thermostat Installation Wiring encompasses a range of essential aspects that are crucial for understanding its proper functioning and ensuring a seamless installation process.
- Compatibility: Ensuring compatibility with your HVAC system.
- Safety: Adhering to electrical codes and ensuring safe operation.
- Power Source: Understanding the power requirements and options.
- Wiring Types: Familiarizing yourself with common wire types and their functions.
- Tools and Materials: Gathering the necessary tools and materials for installation.
- Step-by-Step Instructions: Following clear and detailed installation instructions.
- Troubleshooting: Identifying and resolving common wiring issues.
- Customization: Setting up personalized temperature preferences and schedules.
- Maintenance: Ensuring regular maintenance for optimal performance.
- Professional Assistance: Seeking professional help when necessary.
These aspects are interconnected and play a vital role in the successful installation and operation of your Nest Thermostat. Proper wiring ensures accurate temperature control, energy efficiency, and the prevention of potential safety hazards. Understanding these aspects empowers you to make informed decisions throughout the installation process and ensures a comfortable and efficient home environment.
Compatibility
Ensuring compatibility between your Nest Thermostat and HVAC system is a crucial aspect of “Nest Thermostat Installation Wiring”. Compatibility issues can lead to malfunctions, safety hazards, and suboptimal performance. Understanding the compatibility factors will help you make informed decisions during the installation process.
- Type of HVAC System: Nest Thermostats are compatible with most common HVAC systems, including gas furnaces, heat pumps, and central air conditioners. However, it’s essential to check the specific model of your thermostat to ensure compatibility with your system.
- Wiring Configuration: The wiring configuration of your HVAC system must match the requirements of the Nest Thermostat. Most Nest Thermostats require a C-wire (common wire) for continuous power, but some models can operate without one. Determine the wiring configuration of your system before installation.
- Voltage Requirements: Nest Thermostats operate on either 24VAC or 120/240VAC. Ensure that your HVAC system provides the correct voltage for your thermostat model.
- Features and Functionality: Different Nest Thermostat models offer varying features and functionality. Consider the specific features you need, such as remote control, scheduling, and energy monitoring, and ensure that your HVAC system can support these features.
Verifying compatibility before installation will minimize potential issues and ensure a seamless experience with your Nest Thermostat. If you have any doubts about compatibility, consult the manufacturer’s documentation or seek professional assistance.
Safety
When it comes to “Nest Thermostat Installation Wiring”, “Safety: Adhering to electrical codes and ensuring safe operation” is of paramount importance. Electrical codes and safety regulations exist to minimize the risk of electrical hazards, such as electrical fires, shocks, and injuries. By adhering to these codes and ensuring safe operation, you not only protect yourself and your loved ones but also prevent damage to your property.
For instance, proper wiring is essential for the safe operation of your Nest Thermostat. Incorrect wiring can lead to loose connections, overheating, and potential fire hazards. By following the manufacturer’s instructions and adhering to electrical codes, you can ensure that your thermostat is wired correctly and safely.
Furthermore, using the correct gauge of wire is crucial. Thinner wires can overheat and pose a fire hazard, while thicker wires can be difficult to work with and may not fit into the thermostat’s terminals. By using the correct wire gauge, you ensure that the electrical current can flow safely and efficiently through the thermostat.
In summary, understanding the connection between “Safety: Adhering to electrical codes and ensuring safe operation” and “Nest Thermostat Installation Wiring” is essential for a safe and successful installation. By following electrical codes and safety regulations, using the correct wire gauge, and ensuring proper wiring, you can minimize the risk of electrical hazards and protect yourself, your family, and your property.
Power Source
When it comes to “Nest Thermostat Installation Wiring”, “Power Source: Understanding the power requirements and options” plays a critical role. The Nest Thermostat requires a constant power supply to operate its features, such as temperature control, scheduling, and remote access. Understanding the power requirements and options available will help you ensure that your thermostat is properly powered and functioning correctly.
The primary power source for the Nest Thermostat is a C-wire (common wire). The C-wire provides a continuous 24VAC power supply to the thermostat, ensuring that it remains powered even when the heating or cooling system is not in operation. Without a C-wire, the thermostat may experience power interruptions or require frequent battery changes.
If a C-wire is not available in your existing wiring configuration, there are alternative power options available. One option is to use the Nest Power Connector, which converts AC power from the heating or cooling system into the required 24VAC power for the thermostat. Another option is to use a battery-powered Nest Thermostat, which eliminates the need for a C-wire but requires regular battery changes.
Understanding the power requirements and options available for your Nest Thermostat is essential for ensuring proper installation and operation. By choosing the correct power source and ensuring that your wiring configuration meets the requirements of the thermostat, you can avoid potential issues and enjoy the full functionality of your Nest Thermostat.
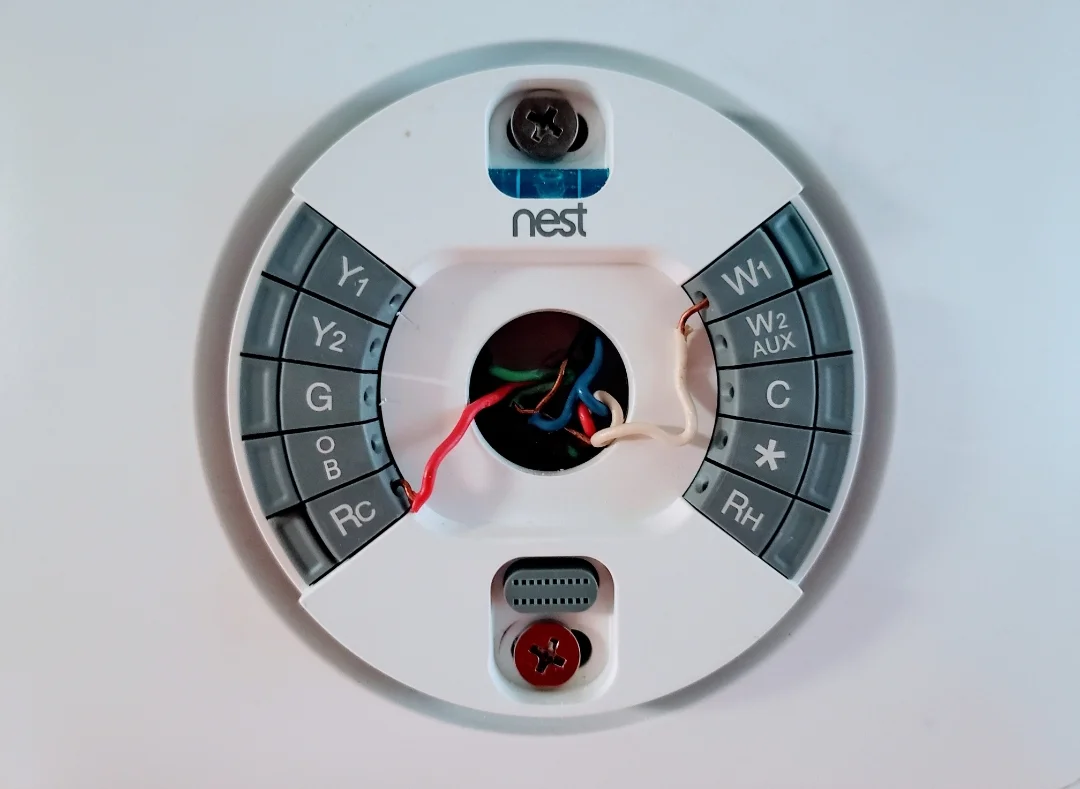
Wiring Types
In “Nest Thermostat Installation Wiring”, understanding the different types of wires and their functions is paramount. Proper identification and handling of these wires ensure a successful installation and optimal performance of your thermostat.
-
Conductor Type
Wires can be composed of copper or aluminum, each with unique properties. Copper wires are more commonly used due to their superior conductivity and durability, while aluminum wires are less expensive but more prone to corrosion.
-
Wire Gauge
The thickness of a wire, known as its gauge, determines its current-carrying capacity. Thicker wires (lower gauge numbers) can handle higher currents, while thinner wires (higher gauge numbers) are suitable for lower currents. Using the appropriate wire gauge is crucial for safe and efficient operation.
-
Wire Color Coding
Wires are often color-coded to indicate their function. For example, in Nest Thermostat wiring, the red wire typically represents power, the green wire is for ground, and the yellow wire is for the heating system. Understanding these color codes simplifies the wiring process.
-
Wire Labeling
In complex wiring systems, wires may be labeled with numbers or letters to facilitate identification and tracking. This labeling aids in troubleshooting and maintenance, especially when dealing with multiple wires of the same color.
By becoming familiar with the various wire types and their functions, you gain a deeper understanding of “Nest Thermostat Installation Wiring”. This knowledge helps you avoid potential wiring errors, ensures a safe and reliable installation, and empowers you to maintain your thermostat effectively.
Tools and Materials
In the realm of “Nest Thermostat Installation Wiring”, assembling the right tools and materials is a critical step that lays the foundation for a successful installation. Overlooked or missing components can lead to delays, frustration, and potential safety hazards. Understanding the essential tools and materials required empowers you to approach the installation process with confidence and efficiency.
-
Essential Tools
A basic toolkit is indispensable for any electrical installation. This includes screwdrivers (Phillips and flathead), wire strippers, pliers, and a voltage tester. Ensure your tools are insulated and in good working condition to safeguard yourself from electrical hazards.
-
Wiring Materials
The core of the installation involves working with wires. Secure an adequate supply of thermostat wire, ensuring it is compatible with your specific thermostat model and wiring configuration. Additionally, you may need wire connectors, electrical tape, and a wire nut driver to securely join and insulate wire connections.
-
Mounting Hardware
Properly mounting your Nest Thermostat is essential for both aesthetics and functionality. Identify the type of mounting hardware required for your wall surface and ensure you have the appropriate screws, anchors, and a level to ensure accurate placement.
-
Safety Gear
Prioritizing safety is paramount. Wear appropriate safety gear such as safety glasses and non-slip gloves to protect yourself from potential hazards during installation. Remember, dealing with electrical wiring requires caution and adherence to safety protocols.
By meticulously gathering the necessary tools and materials, you lay the groundwork for a smooth and successful Nest Thermostat installation. Overlooking this aspect can result in unnecessary hurdles and compromise the safety and effectiveness of your installation. Approaching this task with preparedness and attention to detail ensures a rewarding and trouble-free experience.
Step-by-Step Instructions
In the realm of “Nest Thermostat Installation Wiring”, the significance of following clear and detailed installation instructions cannot be overstated. These instructions serve as a roadmap, guiding the installer through each step of the process, ensuring a successful and safe installation. Without proper instructions, the risk of errors, incorrect wiring, and potential hazards increases significantly.
The cause-and-effect relationship between “Step-by-Step Instructions: Following clear and detailed installation instructions.” and “Nest Thermostat Installation Wiring” is evident. Precise instructions empower the installer to understand the purpose and function of each wire, its correct placement, and the necessary safety precautions. By meticulously following these instructions, the installer can avoid misinterpretations, improper connections, and potential damage to the thermostat or electrical system.
Real-life examples further illustrate the importance of following step-by-step instructions. Incorrect wiring due to misreading instructions could lead to a faulty thermostat, inaccurate temperature control, or even electrical hazards. Conversely, adhering to clear instructions ensures proper connections, accurate programming, and optimal performance of the Nest Thermostat. This not only enhances comfort and energy efficiency but also contributes to the safety and longevity of the entire HVAC system.
The practical applications of understanding the connection between “Step-by-Step Instructions: Following clear and detailed installation instructions.” and “Nest Thermostat Installation Wiring” extend beyond the immediate installation process. By developing a thorough understanding of the wiring process, homeowners and technicians can troubleshoot minor issues, make adjustments as needed, and maintain the thermostat effectively throughout its lifespan.
In conclusion, “Step-by-Step Instructions: Following clear and detailed installation instructions.” are an indispensable component of “Nest Thermostat Installation Wiring”, providing a structured and safe approach to the process. Understanding this connection empowers installers with the knowledge and confidence to execute a successful installation, ensuring optimal performance, energy efficiency, and peace of mind.
Troubleshooting
In the realm of “Nest Thermostat Installation Wiring”, troubleshooting common wiring issues is a crucial aspect that contributes to the overall success and efficiency of the installation process. Addressing these issues promptly and effectively ensures optimal performance, comfort, and safety in your home’s heating and cooling system.
-
Identifying Wiring Faults
The ability to identify potential wiring faults is paramount in troubleshooting. This includes examining wire connections for looseness, damage, or incorrect connections. Using a multimeter to test for continuity and proper voltage levels can help pinpoint the source of the issue.
-
Addressing Thermostat Malfunctions
If the thermostat is not functioning correctly, troubleshooting involves checking the power supply, ensuring the thermostat is properly seated on its baseplate, and inspecting the wiring connections to and from the thermostat.
-
Resolving System Compatibility Issues
Compatibility issues between the thermostat and the HVAC system can manifest in various ways. Troubleshooting requires verifying that the thermostat is compatible with the system’s voltage, wiring configuration, and specific heating and cooling equipment.
-
Understanding Error Codes
Nest thermostats display error codes to indicate specific issues. Troubleshooting involves identifying the error code and referring to the manufacturer’s documentation or online resources to determine the appropriate corrective actions.
By developing a comprehensive understanding of troubleshooting techniques and potential wiring issues, homeowners and technicians can proactively address problems, minimize downtime, and ensure the reliable operation of their Nest thermostats. This not only enhances comfort and energy efficiency but also contributes to the longevity of the entire HVAC system.
Customization
Customization is a vital aspect of “Nest Thermostat Installation Wiring” as it empowers homeowners to tailor their heating and cooling systems to suit their unique preferences and lifestyle. This involves setting personalized temperature schedules, adjusting energy-saving settings, and leveraging geofencing capabilities.
The cause-and-effect relationship between “Customization: Setting up personalized temperature preferences and schedules.” and “Nest Thermostat Installation Wiring” is evident in the enhanced comfort and energy efficiency it provides. By programming the thermostat to automatically adjust temperatures based on daily routines and preferences, homeowners can reduce energy consumption while maintaining a comfortable living environment.
Real-life examples of “Customization: Setting up personalized temperature preferences and schedules.” within “Nest Thermostat Installation Wiring” include setting different temperature ranges for various times of the day (e.g., warmer temperatures during waking hours and cooler temperatures at night), creating custom schedules for weekdays and weekends, and using geofencing to automatically adjust temperatures when occupants are away from home.
The practical applications of understanding the connection between “Customization: Setting up personalized temperature preferences and schedules.” and “Nest Thermostat Installation Wiring” extend beyond energy savings and comfort. By tailoring the thermostat to individual needs, homeowners can create a more personalized and responsive heating and cooling system, ultimately enhancing their overall living experience.
In summary, “Customization: Setting up personalized temperature preferences and schedules.” is an integral component of “Nest Thermostat Installation Wiring”, allowing homeowners to optimize comfort, reduce energy consumption, and enjoy a more personalized heating and cooling experience. Understanding this connection empowers individuals to make informed decisions during the installation process and reap the benefits of a customized and efficient HVAC system.
Maintenance
In the realm of “Nest Thermostat Installation Wiring”, regular maintenance plays a pivotal role in preserving the longevity and optimal performance of your Nest thermostat. Understanding the connection between “Maintenance: Ensuring regular maintenance for optimal performance.” and “Nest Thermostat Installation Wiring” empowers homeowners to proactively care for their thermostats, ensuring continued comfort and energy efficiency.
The cause-and-effect relationship between these two aspects is evident. Regular maintenance helps prevent potential issues and malfunctions by identifying and addressing minor problems before they escalate into major repairs. By keeping the thermostat clean, free of dust and debris, and ensuring secure wiring connections, homeowners can minimize the risk of interruptions or premature failure.
Real-life examples of “Maintenance: Ensuring regular maintenance for optimal performance.” within “Nest Thermostat Installation Wiring” include periodically cleaning the thermostat’s display and sensors, checking the batteries (if applicable), and inspecting the wiring for any signs of damage or loose connections. These simple yet effective maintenance tasks contribute to the long-term reliability and accuracy of the thermostat.
The practical applications of understanding the connection between “Maintenance: Ensuring regular maintenance for optimal performance.” and “Nest Thermostat Installation Wiring” extend beyond preventing costly repairs. Regular maintenance helps ensure consistent and precise temperature control, leading to improved comfort and energy savings. By keeping the thermostat operating at its best, homeowners can optimize the performance of their HVAC system, resulting in reduced energy consumption and lower utility bills.
In summary, “Maintenance: Ensuring regular maintenance for optimal performance.” is an integral component of “Nest Thermostat Installation Wiring”, enabling homeowners to safeguard their investment, enhance comfort, and maximize energy efficiency. Understanding this connection empowers individuals to make informed decisions regarding thermostat care and maintenance, contributing to a more sustainable and cost-effective home environment.
Professional Assistance
In the realm of “Nest Thermostat Installation Wiring”, seeking professional assistance when necessary is a crucial aspect that should not be overlooked. This connection is particularly relevant for individuals who lack the requisite technical expertise, encounter complex wiring configurations, or face unforeseen challenges during the installation process.
The cause-and-effect relationship between “Professional Assistance: Seeking professional help when necessary.” and “Nest Thermostat Installation Wiring” is evident. Engaging a qualified electrician or HVAC technician ensures the safe and efficient installation of your Nest thermostat. They possess the knowledge, experience, and specialized tools to handle electrical wiring, troubleshoot potential issues, and guarantee the proper functioning of your thermostat. By seeking professional assistance, you minimize the risk of electrical hazards, incorrect wiring, and suboptimal performance.
Real-life examples of “Professional Assistance: Seeking professional help when necessary.” within “Nest Thermostat Installation Wiring” include scenarios where the existing wiring configuration is complex or incompatible with the Nest thermostat, requiring modifications or additional wiring. Professional assistance is also advisable when dealing with electrical faults, such as loose connections or damaged wires, which can pose safety concerns. Additionally, if you encounter any difficulties or error messages during the installation process, consulting a professional can help identify and resolve the issue promptly.
The practical applications of understanding the connection between “Professional Assistance: Seeking professional help when necessary.” and “Nest Thermostat Installation Wiring” extend beyond ensuring a successful installation. Engaging a professional electrician or HVAC technician can provide peace of mind, knowing that your thermostat is installed correctly and operating as intended. This proactive approach not only enhances the longevity of your thermostat but also contributes to the overall safety and energy efficiency of your home’s heating and cooling system.


Related Posts


