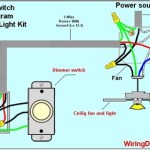
A LED Dimmer Switch Wiring Diagram depicts how to configure an electrical circuit that modulates LED light intensity using a dimmer switch. Real-world applications include controlling the ambiance in homes, offices, and restaurants.
Dimming LED lights offers advantages such as energy efficiency by reducing power consumption, and customizing lighting to specific tasks or moods. A pivotal development in dimming technologies was the introduction of solid-state electronic dimming, replacing inefficient mechanical methods.
This article will delve into the specific wiring diagrams for various LED dimmer switch types, their compatibility with different LED light fixtures, and troubleshooting common wiring issues.
Understanding the key aspects of LED Dimmer Switch Wiring Diagrams is essential for proper electrical installation and safe operation of LED lighting systems.
- Circuit Design: Configuration and compatibility of electrical components.
- Load Compatibility: Matching dimmer switch capacity with LED fixture requirements.
- Wiring Methods: Techniques for connecting wires to dimmer switches and fixtures.
- Dimming Range: Adjustable range of light intensity provided by the dimmer.
- Phase Control: Regulation of AC power to control LED brightness.
- Control Types: Methods for operating the dimmer, such as rotary knob or push button.
- Compatibility with LED Types: Ensuring compatibility between dimmer switches and different LED technologies.
- Safety Features: Protection against electrical hazards, overheating, and short circuits.
- Troubleshooting: Identifying and resolving common wiring issues.
- Code Compliance: Adherence to electrical codes and regulations.
These aspects come together to ensure the effective and safe operation of LED dimmer switch circuits. Proper wiring and compatibility considerations prevent potential hazards, optimize LED performance, and enhance the user experience.
Circuit Design
Within the framework of LED Dimmer Switch Wiring Diagrams, circuit design encompasses the strategic configuration and compatibility of electrical components to achieve optimal performance and safety in LED lighting systems. This involves selecting appropriate components, ensuring their compatibility, and arranging them in a logical and efficient manner.
- Power Source: The electrical source that supplies power to the LED dimmer switch and lighting fixtures. This can be AC mains power or a DC power supply.
- Dimmer Switch: The device that regulates the flow of electricity to the LED fixtures, enabling control over light intensity. Dimmers come in various types, such as rotary, push-button, and touch-sensitive.
- LED Driver: A component that converts the AC or DC power to a voltage and current suitable for the LED fixtures. It ensures proper operation and protection of the LEDs.
- LED Fixtures: The lighting units that house the LED light sources. Fixtures can vary in design, shape, and size, and must be compatible with the dimmer switch and driver.
By carefully considering the configuration and compatibility of these components, LED Dimmer Switch Wiring Diagrams ensure that electrical systems operate safely and efficiently, providing users with precise control over the ambiance and functionality of their LED lighting.
Load Compatibility
Within the intricacies of LED Dimmer Switch Wiring Diagrams, load compatibility plays a critical role in ensuring the harmonious coexistence of electrical components and LED fixtures. Mismatched capacities can lead to suboptimal performance, safety hazards, and diminished lifespan of the system. Thus, understanding and adhering to load compatibility guidelines is paramount for successful LED lighting installations.
- Wattage and Current Draw: The dimmer switch’s wattage rating must exceed the total wattage of the connected LED fixtures. Similarly, the dimmer’s current capacity should be higher than the combined current draw of the LEDs.
- Dimming Range: The dimmer switch’s dimming range should be compatible with the LED fixtures’ dimming capabilities. Mismatched ranges can result in flickering, uneven dimming, or premature LED failure.
- LED Driver Compatibility: Some dimmers require compatible LED drivers to function correctly. These drivers regulate the power supplied to the LEDs and ensure proper dimming operation.
- Load Type: Dimmers are designed to work with specific load types, such as resistive or inductive loads. LED fixtures typically present a resistive load, but it’s essential to verify compatibility before installation.
By considering these facets of load compatibility, LED Dimmer Switch Wiring Diagrams empower electrical professionals and DIY enthusiasts alike to create safe and efficient lighting systems. Proper matching of dimmer switch capacity and LED fixture requirements ensures optimal performance, longevity, and a satisfying user experience.
Wiring Methods
Within the realm of “Led Dimmer Switch Wiring Diagram”, “Wiring Methods: Techniques for connecting wires to dimmer switches and fixtures” stands as a crucial aspect, dictating the safe and efficient flow of electricity. Understanding these methods empowers individuals to execute proper electrical connections, ensuring optimal performance and longevity of the lighting system:
- Terminal Connections: Wires are secured beneath screws or spring-loaded terminals on dimmer switches and fixtures, establishing a secure electrical contact. Proper tightening torque is essential for reliable connections.
- Wire Stripping: Removing the insulation from wire ends to expose the conductive metal is crucial. Using a wire stripper ensures precise and consistent stripping, preventing short circuits.
- Polarity Observance: In certain wiring configurations, it is imperative to connect wires while observing correct polarity. Mismatched polarity can lead to improper dimmer operation or damage to components.
- Wire Management: Organizing and securing wires within electrical boxes or enclosures prevents tangling, strain, and potential damage. Proper wire management also enhances the aesthetics and safety of the installation.
By adhering to established wiring methods, electrical professionals and DIY enthusiasts can confidently connect dimmer switches and fixtures, ensuring a safe and functional LED lighting system. These techniques lay the foundation for reliable electrical connections, preventing potential hazards and ensuring optimal lighting performance.
Dimming Range
Within the realm of “LED Dimmer Switch Wiring Diagrams,” “Dimming Range: Adjustable range of light intensity provided by the dimmer” emerges as a crucial component, dictating the extent to which users can control the brightness of their LED lighting systems. This adjustable range empowers individuals to tailor the ambiance of their spaces, adapt to varying lighting needs, and optimize energy efficiency.
The dimming range is primarily determined by the dimmer switch’s design and compatibility with the connected LED fixtures. Dimmer switches employ different technologies, such as phase-cut or pulse-width modulation (PWM), to regulate the flow of electricity to the LEDs, thereby controlling light intensity. It is essential to select a dimmer switch that offers a dimming range suitable for the intended application, ensuring smooth and flicker-free dimming performance.
In practical applications, the dimming range plays a pivotal role in creating specific lighting scenarios. For instance, in a living room setting, users may desire a wide dimming range to transition from bright daytime lighting to cozy evening ambiance. Conversely, in a bedroom, a narrower dimming range might be preferred for subtle adjustments to create a more intimate atmosphere.
Understanding the connection between “Dimming Range: Adjustable range of light intensity provided by the dimmer” and “LED Dimmer Switch Wiring Diagrams” empowers electrical professionals and DIY enthusiasts alike to design and install lighting systems that meet the specific requirements of each space. By considering the desired ambiance, the compatibility of dimmer switches and LED fixtures, and the capabilities of the wiring diagram, individuals can create tailored lighting solutions that enhance functionality, comfort, and energy efficiency.
Phase Control
Within the context of “LED Dimmer Switch Wiring Diagrams,” phase control stands as a fundamental concept governing the regulation of AC power to achieve precise control over LED brightness. By manipulating the phase angle at which AC power is supplied to the LEDs, phase control dimmers effectively adjust the amount of electrical energy delivered, thereby altering the light output. This technique forms the cornerstone of many LED dimmer switch designs.
The significance of phase control in LED dimmer switch wiring is evident in its ability to deliver smooth and flicker-free dimming performance. Traditional mechanical dimmers, which relied on variable resistors, often introduced noticeable flickering or uneven dimming due to abrupt changes in power delivery. In contrast, phase control dimmers provide a gradual and continuous adjustment of light intensity, ensuring a seamless and visually pleasing dimming experience.
Real-life examples of phase control in LED dimmer switch wiring can be found in various residential, commercial, and industrial applications. In homes, phase control dimmers are commonly used to control the lighting in living rooms, bedrooms, and dining areas, allowing users to adjust the ambiance to suit different activities and preferences. In commercial settings, such as retail stores and restaurants, phase control dimmers help create dynamic lighting scenarios that enhance the customer experience and product visibility. Additionally, in industrial environments, phase control dimmers are employed to regulate the brightness of LED lighting in warehouses, factories, and other large-scale facilities.
Understanding the connection between phase control and LED dimmer switch wiring empowers individuals to design and install lighting systems that meet specific requirements. Whether seeking to create a cozy atmosphere in a living room or optimize energy efficiency in a commercial space, phase control dimmers offer a versatile and effective solution for controlling LED brightness. By carefully considering the compatibility between dimmers, LED fixtures, and wiring diagrams, electrical professionals and DIY enthusiasts can harness the full potential of phase control to achieve optimal lighting performance and ambiance.
Control Types
Within the realm of “LED Dimmer Switch Wiring Diagrams,” “Control Types: Methods for operating the dimmer, such as rotary knob or push button” stands as a pivotal aspect, dictating the user interface and ease of controlling the lighting system. The choice of control type directly influences the user experience and the overall functionality of the lighting installation.
Rotary knobs and push buttons represent the most common control types for LED dimmer switches. Rotary knobs offer a smooth and intuitive method of adjusting light intensity by rotating the knob clockwise or counterclockwise. Push buttons, on the other hand, provide a more tactile and precise control, allowing users to increase or decrease brightness with each press.
The selection of control type depends on personal preference and the specific application. Rotary knobs are often preferred for their ease of use and fine-tuning capabilities, while push buttons may be more suitable for situations where precise and rapid adjustments are required. In commercial or industrial settings, for instance, push buttons might be preferred for their durability and ability to withstand frequent use.
Understanding the connection between “Control Types: Methods for operating the dimmer, such as rotary knob or push button” and “LED Dimmer Switch Wiring Diagrams” is essential for selecting the most appropriate control interface for the intended application. By carefully considering the user requirements, environment, and aesthetic preferences, electrical professionals and DIY enthusiasts can design and install lighting systems that offer optimal control and user satisfaction.
Compatibility with LED Types
Within the intricate realm of “Led Dimmer Switch Wiring Diagram,” “Compatibility with LED Types: Ensuring compatibility between dimmer switches and different LED technologies” stands as a critical aspect, influencing the successful operation and performance of LED lighting systems. Understanding the compatibility requirements between dimmer switches and various LED types is paramount for achieving seamless integration and optimal lighting control.
- Dimming Method: Dimmable LED fixtures employ specific dimming methods, such as TRIAC or PWM, which must be compatible with the dimmer switch. Mismatched dimming methods can result in flickering, uneven dimming, or premature LED failure.
- Load Type: LED dimmer switches are designed to handle specific load types, such as resistive or inductive loads. Ensuring compatibility between the dimmer switch and the LED fixture’s load type is essential for proper dimming operation.
- Wattage and Current: The dimmer switch’s wattage and current capacity must exceed the total wattage and current draw of the connected LED fixtures. Insufficient capacity can lead to overheating, reduced lifespan, or failure of the dimmer switch.
- LED Driver Compatibility: In some cases, LED fixtures require compatible LED drivers to function correctly with dimmer switches. Selecting the appropriate LED driver ensures proper dimming performance and protection of the LED fixture.
By carefully considering the compatibility between dimmer switches and different LED types, electrical professionals and DIY enthusiasts can design and install lighting systems that operate seamlessly, provide precise lighting control, and enhance the overall user experience. Adhering to these compatibility guidelines ensures optimal performance, longevity, and satisfaction from LED lighting installations.
Safety Features
Within the context of “Led Dimmer Switch Wiring Diagram,” “Safety Features: Protection against electrical hazards, overheating, and short circuits” stands as a critical component, ensuring the safe and reliable operation of LED lighting systems. These features play a pivotal role in preventing electrical accidents, protecting against damage to equipment, and safeguarding the well-being of users.
Electrical hazards, such as shock or electrocution, can arise from improper wiring or faulty components. Overheating, if left unchecked, can lead to fires or equipment damage. Short circuits, caused by a direct connection between live wires, can result in sudden power surges and potential electrical fires. Dimmer switches incorporate safety features to mitigate these risks and ensure the safe operation of LED lighting systems.
Real-life examples of safety features in LED dimmer switch wiring diagrams include thermal overload protection, which safeguards against excessive heat buildup, and short circuit protection, which interrupts the flow of electricity in the event of a short circuit. These features work in conjunction with proper wiring practices to minimize the risk of accidents and ensure the longevity of the lighting system.
Understanding the connection between “Safety Features: Protection against electrical hazards, overheating, and short circuits” and “Led Dimmer Switch Wiring Diagram” empowers individuals to design and install lighting systems that adhere to electrical codes and safety standards. By incorporating these safety features into the wiring diagram, electrical professionals and DIY enthusiasts can create lighting systems that provide peace of mind, reduce the risk of electrical hazards, and ensure the safe and reliable operation of LED lighting.
Troubleshooting
Within the context of “Led Dimmer Switch Wiring Diagram,” “Troubleshooting: Identifying and resolving common wiring issues” emerges as a critical component, ensuring the successful installation and operation of LED lighting systems. Wiring issues, if left unresolved, can lead to a range of problems, from flickering lights to complete system failure. Understanding how to troubleshoot and resolve these issues is paramount for electrical professionals and DIY enthusiasts alike.
Common wiring issues in LED dimmer switch circuits include incorrect wire connections, loose terminals, and incompatible dimmer switches and LED fixtures. These issues can manifest in various ways, such as flickering lights, uneven dimming, or no response from the dimmer switch. To effectively troubleshoot these issues, it is essential to have a thorough understanding of the LED dimmer switch wiring diagram and the proper wiring procedures.
Real-life examples of troubleshooting wiring issues in LED dimmer switch circuits include:
- Identifying a loose connection in the wiring between the dimmer switch and the LED fixture, which can cause intermittent flickering or dimming problems.
- Determining that the dimmer switch is not compatible with the type of LED fixture installed, resulting in flickering or uneven dimming.
- Discovering that the wiring gauge used is too small for the current draw of the LED fixture, leading to overheating and potential fire hazards.
By understanding the connection between “Troubleshooting: Identifying and resolving common wiring issues” and “Led Dimmer Switch Wiring Diagram,” individuals can systematically approach wiring problems, identify the root cause, and implement effective solutions. This understanding empowers them to maintain and repair LED lighting systems safely and efficiently, ensuring optimal performance and longevity.
Code Compliance
Within the intricate realm of “Led Dimmer Switch Wiring Diagram,” “Code Compliance: Adherence to electrical codes and regulations” stands as a cornerstone, guiding the safe andinstallation and operation of LED lighting systems. Electrical codes and regulations embody a comprehensive set of guidelines and standards established to ensure the safety and integrity of electrical systems, safeguarding users from potential hazards and ensuring long-term reliability.
- Electrical Safety: Adhering to electrical codes ensures that wiring, components, and installation practices meet established safety standards, minimizing the risk of electrical shock, fire, and other hazards.
- Compatibility and Performance: Compliance with regulations guarantees compatibility between dimmer switches, LED fixtures, and other components, ensuring optimal performance, dimming functionality, and longevity.
- Insurance and Liability: Wiring diagrams that comply with codes and regulations are crucial for insurance purposes, as they demonstrate adherence to safety standards and reduce the risk of liability in the event of accidents or malfunctions.
- Inspection and Approval: In many jurisdictions, electrical installations, including dimmer switch circuits, require inspection and approval by qualified authorities. Compliance with codes and regulations facilitates this process, ensuring that the system meets safety and quality standards.
By meticulously incorporating “Code Compliance: Adherence to electrical codes and regulations” into “Led Dimmer Switch Wiring Diagram,” electrical professionals and DIY enthusiasts alike can create and maintain safe, reliable, and code-compliant lighting systems. This not only enhances the functionality and longevity of the system but also provides peace of mind and protection against potential hazards. Understanding and adhering to these codes and regulations empowers individuals to contribute to the safety and well-being of their communities while upholding the integrity of electrical systems.


Related Posts

