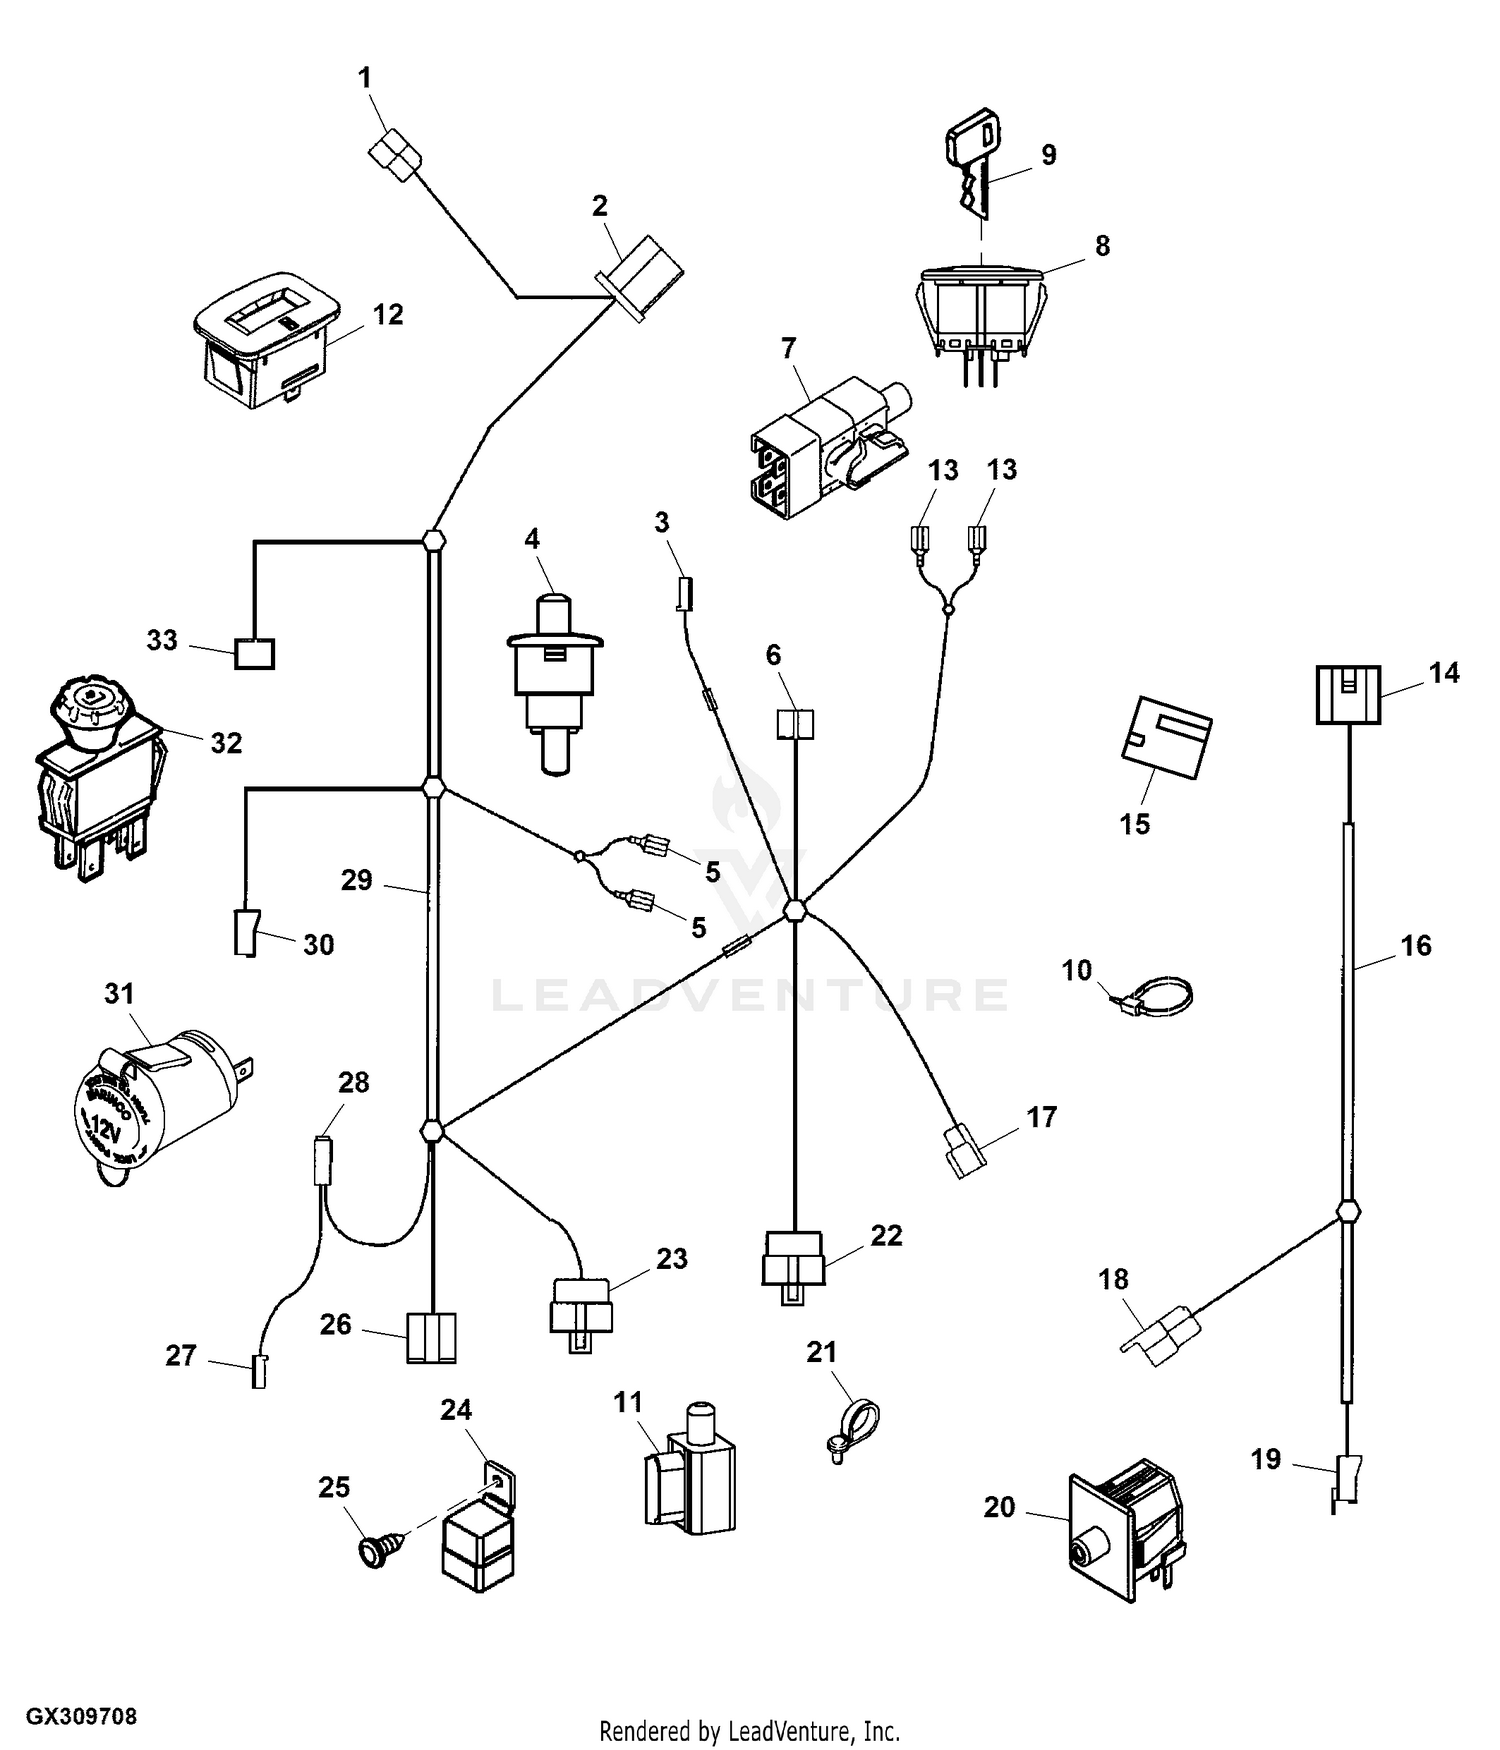
L120 John Deere Wiring Diagram is a detailed schematic representation of the electrical system in a John Deere L120 tractor. It illustrates the components, connections, and pathways of the electrical circuitry within the machine.
The wiring diagram is crucial for troubleshooting electrical issues, performing repairs, and understanding the tractor’s electrical system. It provides a visual guide to trace the flow of electricity, identify faulty components, and ensure proper connections.
Key historical developments include the transition from paper-based diagrams to digital formats, enabling easier access, editing, and sharing of wiring information.
In-depth exploration of this wiring diagram will provide a comprehensive understanding of the L120’s electrical system, enhancing troubleshooting capabilities, ensuring accurate repairs, and maximizing the tractor’s performance.
Understanding the essential aspects of an L120 John Deere Wiring Diagram is paramount for effective troubleshooting, repairs, and overall system comprehension. As a noun, it represents a blueprint of the tractor’s electrical circuitry, providing insights into component connectivity and functionality.
- Component Identification: Diagrams pinpoint the location and function of electrical components, enabling technicians to quickly identify and resolve issues.
- Circuit Tracing: Diagrams allow tracing electrical circuits, providing a visual guide to follow current flow and pinpoint faults.
- Connector Identification: Diagrams indicate connector types and locations, facilitating proper mating and avoiding misconnections.
- Wire Color Coding: Diagrams use color-coded wires, aiding in wire identification and reducing troubleshooting time.
- Grounding Points: Diagrams show grounding points, ensuring proper electrical system operation and preventing malfunctions.
- Fuse and Relay Locations: Diagrams indicate fuse and relay locations, allowing for quick replacement when necessary.
- Diagnostic Codes: Some diagrams include diagnostic codes, helping technicians decipher error messages and identify underlying issues.
- System Integration: Diagrams illustrate how the electrical system interacts with other tractor systems, providing a holistic view.
- Safety Precautions: Diagrams often include safety warnings and precautions, guiding technicians on proper handling and maintenance.
- Customization Support: Diagrams can assist in customizing electrical systems to meet specific requirements, enhancing functionality and performance.
These aspects collectively empower technicians and enthusiasts to maintain, troubleshoot, and optimize the electrical systems of L120 John Deere tractors, ensuring reliable operation and minimizing downtime.
Component Identification
The L120 John Deere Wiring Diagram plays a crucial role in facilitating component identification. It provides a visual representation of the electrical system, enabling technicians to locate specific components quickly and accurately. By understanding the location and function of each component, technicians can efficiently diagnose and resolve electrical issues.
For instance, if a technician encounters an electrical problem, the wiring diagram guides them to the precise location of the affected component. This eliminates guesswork and reduces troubleshooting time, ensuring efficient repairs and minimizing downtime.
Furthermore, component identification is vital for proactive maintenance. By understanding the location and function of each component, technicians can perform regular inspections, identify potential issues early on, and take preventive measures to prevent costly breakdowns.
In summary, the L120 John Deere Wiring Diagram empowers technicians to identify and resolve electrical issues effectively, reducing downtime, and ensuring optimal tractor performance. It serves as an invaluable tool for both troubleshooting and proactive maintenance.
Circuit Tracing
Within the comprehensive L120 John Deere Wiring Diagram, circuit tracing stands as an indispensable aspect for effective electrical troubleshooting and maintenance. This functionality empowers technicians to visually follow the flow of electricity through the tractor’s electrical circuits, enabling them to pinpoint faults and restore proper operation.
- Component-Level Diagnosis: Diagrams facilitate tracing circuits to specific components, allowing technicians to identify faulty parts and replace them efficiently.
- Signal Path Analysis: Circuit tracing helps analyze signal paths, ensuring that electrical signals are transmitted correctly between components.
- Grounding Verification: Diagrams aid in verifying proper grounding, which is crucial for electrical system stability and preventing malfunctions.
- Voltage Drop Troubleshooting: Circuit tracing enables technicians to measure voltage drops along circuits, identifying potential issues with wiring or connections.
By enabling circuit tracing, the L120 John Deere Wiring Diagram empowers technicians to diagnose and resolve electrical problems accurately and efficiently. It serves as a roadmap for navigating the tractor’s electrical system, minimizing downtime and ensuring optimal performance.
Connector Identification
Within the comprehensive L120 John Deere Wiring Diagram, connector identification plays a pivotal role in ensuring reliable electrical connections and preventing system malfunctions. Diagrams provide precise information on connector types and locations, empowering technicians to mate connectors correctly and avoid misconnections.
- Connector Type Identification: Diagrams specify the types of connectors used, such as Deutsch connectors, Molex connectors, or Amphenol connectors, ensuring proper mating and preventing damage.
- Connector Location Identification: Diagrams indicate the exact location of each connector, enabling technicians to quickly find and connect them, reducing troubleshooting time and minimizing errors.
- Pin-Out Identification: For complex connectors, diagrams provide pin-out information, specifying the function of each pin and ensuring correct wire connections.
- Connector Orientation: Diagrams often include information on connector orientation, preventing incorrect mating and potential short circuits.
Accurate connector identification is crucial for maintaining a robust electrical system in the L120 John Deere tractor. Proper mating ensures reliable signal and power transmission, preventing intermittent faults and system failures. By avoiding misconnections, technicians can minimize electrical issues, extend component lifespan, and enhance overall tractor performance.
Wire Color Coding
Within the realm of the L120 John Deere Wiring Diagram, wire color coding stands as a critical component, streamlining wire identification and expediting troubleshooting processes. By employing a standardized color scheme for different wires, the diagram provides a visual cue that enables technicians to quickly trace circuits, identify connections, and pinpoint faults.
Imagine a scenario where an electrical issue arises within the L120 tractor. Without color-coded wires, technicians would face a daunting task of deciphering a maze of wires, relying solely on trial and error to locate the affected circuit. However, with the guidance of the color-coded diagram, they can swiftly identify the specific wire associated with the malfunctioning component, reducing troubleshooting time and minimizing system downtime.
The practical applications of wire color coding extend beyond troubleshooting. During maintenance and repairs, technicians can easily identify and replace faulty wires, ensuring proper electrical connections and preventing future issues. Furthermore, color coding facilitates the addition of new electrical components or accessories, as technicians can readily identify the appropriate wires for integration.
In summary, wire color coding within the L120 John Deere Wiring Diagram plays a vital role in enhancing the efficiency and accuracy of electrical troubleshooting, maintenance, and repairs. By providing a visual guide to wire identification, it empowers technicians to quickly locate and resolve electrical issues, minimizing downtime and ensuring optimal tractor performance.
Grounding Points
Within the labyrinthine network of the L120 John Deere Wiring Diagram, grounding points emerge as unsung heroes, playing a pivotal role in maintaining electrical equilibrium and preventing system failures. These designated points provide a crucial connection to the earth, allowing excess electrical current to safely dissipate, safeguarding components from damage and ensuring stable system operation.
Imagine navigating a complex electrical circuit without a proper grounding system. Electrical charges would accumulate, creating imbalances and potentially leading to catastrophic malfunctions. Grounding points act as safety valves, diverting this excess energy harmlessly into the earth, preventing voltage spikes and ensuring the smooth flow of electricity throughout the tractor’s electrical system.
The L120 John Deere Wiring Diagram meticulously illustrates the location of each grounding point, empowering technicians and enthusiasts alike to establish proper connections and maintain optimal electrical performance. By adhering to these designated grounding points, electrical circuits can operate within their intended parameters, minimizing the risk of component damage and system failures.
In practical terms, grounding points are essential for preventing electrical shocks, protecting sensitive electronic components, and ensuring the reliable operation of electrical devices. Without proper grounding, electrical systems become susceptible to a myriad of issues, including erratic behavior, data loss, and even fires.
In summary, grounding points, as depicted in the L120 John Deere Wiring Diagram, serve as the cornerstone of a stable and reliable electrical system. Understanding their critical role and adhering to proper grounding practices are essential for maintaining optimal tractor performance and ensuring the safety of both the machine and its operators.
Fuse and Relay Locations
Within the intricate network of the L120 John Deere Wiring Diagram, fuse and relay locations occupy a critical position, ensuring the smooth operation and protection of the tractor’s electrical system. These diagrams provide a comprehensive overview of where fuses and relays are situated, enabling technicians to swiftly identify, access, and replace these vital components when necessary.
- Fault Isolation and Protection: Fuses and relays act as safeguards, protecting electrical circuits from excessive current flow. By indicating their locations, the diagram empowers technicians to isolate faults quickly, preventing damage to sensitive electronic components and minimizing downtime.
- Convenient Replacement: With precise relay and fuse locations at their fingertips, technicians can swiftly swap out faulty components, restoring electrical functionality and minimizing interruptions to the tractor’s operation.
- Enhanced Safety: Proper fuse and relay placement is crucial for electrical safety. The diagram guides technicians in adhering to recommended locations, ensuring optimal protection against electrical fires and shocks.
- Simplified Maintenance: Routine maintenance tasks, such as fuse and relay inspections and replacements, become effortless with the aid of the diagram. Technicians can easily locate these components, ensuring the tractor’s electrical system remains in peak condition.
In summary, the L120 John Deere Wiring Diagram’s detailed representation of fuse and relay locations serves as an invaluable tool for troubleshooting, maintenance, and ensuring the longevity of the tractor’s electrical system. By providing precise component locations, the diagram empowers technicians to resolve electrical issues efficiently, minimize downtime, and maintain optimal tractor performance.
Diagnostic Codes
Within the L120 John Deere Wiring Diagram, diagnostic codes play a crucial role in troubleshooting and maintaining the tractor’s electrical system. These codes provide technicians with valuable insights into error messages, enabling them to pinpoint underlying issues and resolve them efficiently.
When an electrical fault occurs, the tractor’s electronic control unit (ECU) generates a diagnostic code. This code is stored in the ECU’s memory and can be retrieved using a diagnostic tool. The L120 John Deere Wiring Diagram includes a table of diagnostic codes and their corresponding descriptions, allowing technicians to decode the error messages and identify the root cause of the issue.
For instance, if the tractor displays a diagnostic code indicating “Engine Overheating,” the wiring diagram guides the technician to the section of the diagram that shows the engine cooling system. The technician can then trace the electrical circuits related to the cooling system, memeriksa for loose connections, faulty sensors, or other issues that may be causing the overheating condition.
The availability of diagnostic codes in the L120 John Deere Wiring Diagram streamlines the troubleshooting process, reducing downtime and increasing the efficiency of repairs. By providing technicians with a structured approach to diagnosing electrical faults, the wiring diagram empowers them to resolve issues accurately and restore optimal tractor performance.
System Integration
Within the realm of the L120 John Deere Wiring Diagram, system integration emerges as a pivotal aspect, providing a comprehensive understanding of the intricate interplay between the electrical system and other vital tractor systems.
The L120 John Deere Wiring Diagram transcends mere wire connections by illustrating how the electrical system seamlessly integrates with components such as the engine control module, hydraulics, and operator controls. This holistic perspective empowers technicians to grasp the tractor’s overall functionality and diagnose issues with unmatched precision.
For instance, consider a scenario where the tractor experiences an unexpected engine shutdown. By examining the wiring diagram, a technician can trace the electrical circuits connected to the engine control module, enabling them to identify potential faults in sensors, wiring, or the module itself. This comprehensive view eliminates guesswork and streamlines troubleshooting, minimizing downtime and maximizing operational efficiency.
Furthermore, the L120 John Deere Wiring Diagram serves as an invaluable tool for system upgrades and modifications. By understanding the electrical system’s integration with other tractor components, technicians can confidently implement changes, ensuring compatibility and maintaining optimal performance.
In summary, the L120 John Deere Wiring Diagram’s emphasis on system integration empowers technicians with a holistic understanding of the tractor’s electrical system. This knowledge enables them to resolve complex issues efficiently, optimize performance, and adapt to evolving technological advancements.
Safety Precautions
Within the context of the L120 John Deere Wiring Diagram, safety precautions stand as a critical component, providing indispensable guidance to technicians on proper handling and maintenance procedures. These precautions are meticulously incorporated into the diagram to ensure the safety of both the technician and the tractor during electrical work.
The L120 John Deere Wiring Diagram serves as a comprehensive guide, outlining potential hazards and the necessary steps to mitigate risks. By adhering to these precautions, technicians can minimize the likelihood of electrical shocks, short circuits, and other hazardous situations.
For instance, the diagram may include warnings against working on live electrical circuits, emphasizing the importance of isolating the power source before performing any maintenance or repairs. It may also provide specific instructions on the use of personal protective equipment, such as insulated gloves and safety glasses, to safeguard against electrical hazards.
Furthermore, the diagram may include precautions related to the handling and storage of electrical components. Proper storage techniques can prevent damage to sensitive components and ensure their longevity.
In summary, the inclusion of safety precautions in the L120 John Deere Wiring Diagram is essential for ensuring the well-being of technicians and the safe operation of the tractor. These precautions provide valuable guidance on proper handling and maintenance procedures, empowering technicians to work confidently and effectively with the tractor’s electrical system.
Customization Support
Within the comprehensive scope of the L120 John Deere Wiring Diagram, customization support emerges as a valuable aspect, empowering users to tailor the electrical system to their unique needs and enhance the tractor’s functionality and performance.
- Component Selection: Diagrams provide a comprehensive overview of the electrical system’s components, enabling users to identify and select the appropriate parts for their specific requirements. This flexibility allows for the integration of additional features, upgrades, or modifications to suit individual preferences and applications.
- Circuit Modifications: Diagrams serve as a roadmap for modifying electrical circuits, allowing users to customize the system’s behavior and functionality. By understanding the circuit connections and component interactions, users can make informed changes to optimize performance, improve efficiency, or add new features.
- Real-Life Examples: Customization support empowers users to address specific challenges or enhance the tractor’s capabilities. For instance, a farmer may modify the wiring diagram to install a specialized sensor for crop monitoring or integrate a GPS system for precision farming applications.
- Performance Optimization: With the ability to customize the electrical system, users can fine-tune the tractor’s performance to match their operating conditions. By adjusting circuit parameters, selecting efficient components, and optimizing wire routing, users can maximize power output, improve fuel efficiency, and enhance overall productivity.
In summary, the customization support provided by the L120 John Deere Wiring Diagram empowers users to adapt the electrical system to their specific requirements, enhancing functionality, improving performance, and unlocking the full potential of the tractor.


Related Posts


