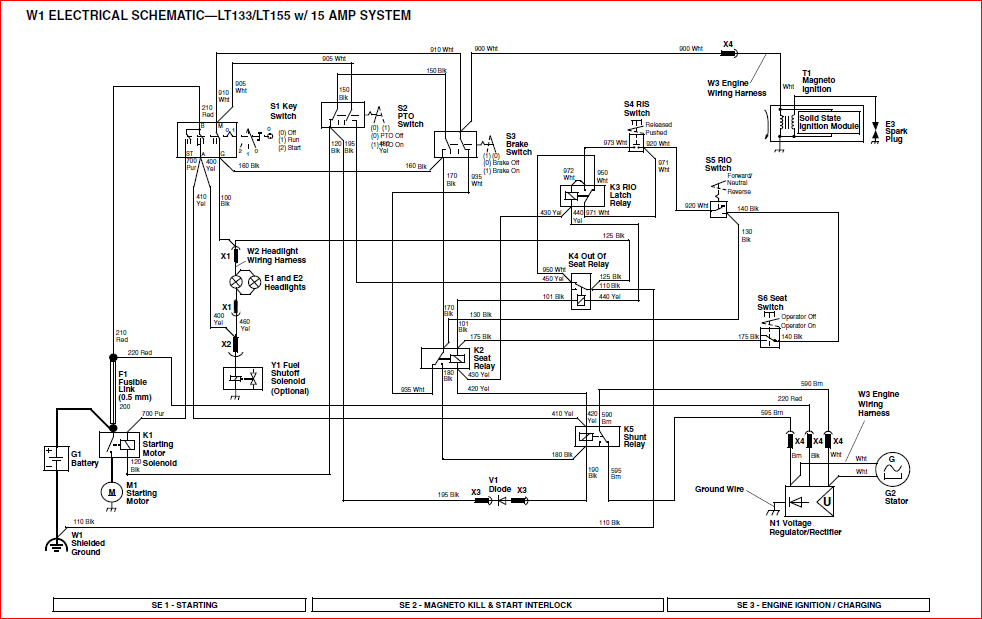
A John Deere Starter Solenoid Wiring Diagram illustrates the electrical connections between the battery, starter solenoid, starter motor, and other components in a John Deere engine. It provides a visual representation of the wiring system, making it easier to troubleshoot and repair electrical problems. For instance, if the starter motor is not engaging, the wiring diagram can help identify if the issue lies in the solenoid, wiring, or other components.
Understanding the wiring diagram is crucial for maintaining and repairing John Deere equipment, as it ensures proper electrical function. It helps technicians diagnose and resolve issues quickly, minimizing downtime and maximizing productivity. The development of computerized wiring diagrams has significantly improved accuracy and accessibility, making them indispensable tools for both professional and hobbyist mechanics.
This article delves into the components, function, and troubleshooting techniques related to John Deere Starter Solenoid Wiring Diagrams. By exploring these topics, readers will gain a comprehensive understanding of electrical systems in John Deere engines, empowering them to make informed decisions regarding maintenance and repairs.
Understanding the essential aspects of John Deere Starter Solenoid Wiring Diagrams is paramount for effective maintenance, troubleshooting, and repair of John Deere engines. These diagrams provide a comprehensive overview of the electrical connections, enabling technicians to quickly identify and resolve issues.
- Components: Starter solenoid, starter motor, battery, ignition switch
- Function: Provides electrical pathway for starting the engine
- Troubleshooting: Isolating electrical faults, identifying faulty components
- Repair: Replacing damaged wires, solenoids, or starter motors
- Maintenance: Inspecting connections, cleaning terminals, ensuring proper grounding
- Safety: Understanding electrical hazards, following proper procedures
- Performance: Optimizing engine starting efficiency, reducing downtime
- Reliability: Ensuring consistent engine starting, preventing breakdowns
- Compatibility: Matching wiring diagrams to specific John Deere engine models
- Availability: Accessing diagrams through manuals, online resources, or technical support
These aspects are interconnected, forming a comprehensive framework for understanding and managing John Deere Starter Solenoid Wiring Diagrams. By delving into each aspect, technicians can develop a deep understanding of electrical systems, empowering them to maintain and repair John Deere engines with confidence and efficiency.
Components
In the context of a John Deere Starter Solenoid Wiring Diagram, the starter solenoid, starter motor, battery, and ignition switch are critical components that work together to initiate the starting process of a John Deere engine. The starter solenoid receives an electrical signal from the ignition switch, which triggers the solenoid to engage the starter motor. The starter motor then draws electrical current from the battery to rotate the engine’s flywheel, starting the engine’s combustion process.
A John Deere Starter Solenoid Wiring Diagram provides a detailed visual representation of the electrical connections between these components, as well as other elements such as relays, fuses, and ground points. Understanding the relationship between these components and the wiring diagram is essential for troubleshooting and repairing electrical issues related to the starting system.
For instance, if the starter motor is not engaging when the ignition switch is turned, a technician can refer to the wiring diagram to check the electrical connections between the ignition switch, starter solenoid, and starter motor. By systematically eliminating potential causes, the technician can pinpoint the source of the problem and make the necessary repairs.
Overall, the understanding of the components, their functions, and their interconnections within a John Deere Starter Solenoid Wiring Diagram empowers technicians and users to maintain and troubleshoot John Deere engines effectively, ensuring optimal performance and minimizing downtime.
Function
Within the context of a John Deere Starter Solenoid Wiring Diagram, the primary function of the electrical pathway is to facilitate the starting of the engine. This pathway involves the coordinated interaction of several components, each playing a specific role in initiating the engine’s combustion process.
-
Battery:
The battery stores electrical energy, providing the power necessary to start the engine. It supplies voltage to the starter solenoid, which in turn engages the starter motor.
-
Starter Solenoid:
The starter solenoid receives an electrical signal from the ignition switch. Upon receiving this signal, the solenoid engages the starter motor, creating a mechanical connection between the starter motor and the engine’s flywheel.
-
Starter Motor:
The starter motor is an electric motor that converts electrical energy into mechanical energy. When engaged by the starter solenoid, the starter motor rotates the engine’s flywheel, initiating the combustion process.
-
Ignition Switch:
The ignition switch is responsible for completing the electrical circuit, allowing current to flow from the battery to the starter solenoid and starter motor. Turning the ignition key activates the starter solenoid, initiating the starting process.
Understanding the function of the electrical pathway in providing a starting mechanism for the engine is crucial in troubleshooting and repairing related electrical issues. By analyzing the wiring diagram and comprehending the electrical connections between these components, technicians can effectively diagnose and resolve problems, ensuring optimal engine performance.
Troubleshooting
When it comes to John Deere Starter Solenoid Wiring Diagrams, the aspect of troubleshooting electrical faults and identifying faulty components holds paramount importance. With a thorough understanding of the underlying electrical system, technicians can effectively pinpoint and resolve issues, ensuring optimal engine performance and minimizing downtime.
- Electrical Continuity Testing: Involves using a multimeter to check for electrical flow through components and wiring, identifying breaks or high resistance.
- Component Inspection: Visually inspecting starter solenoid, starter motor, and other components for damage, corrosion, or loose connections.
- Voltage and Signal Analysis: Using a multimeter or oscilloscope to measure voltage and signal patterns at various points in the circuit, comparing them to specified values.
- Ground Fault Tracing: Verifying proper grounding connections, ensuring a complete circuit and eliminating potential voltage leaks.
By systematically applying these troubleshooting techniques and interpreting the results in the context of a John Deere Starter Solenoid Wiring Diagram, technicians can isolate electrical faults and identify faulty components with precision. This knowledge empowers them to make informed repair decisions, replace defective parts, and restore the electrical system to optimal functionality.
Repair
Within the context of John Deere Starter Solenoid Wiring Diagrams, the aspect of repair, particularly replacing damaged wires, solenoids, or starter motors, holds significant importance. These components play crucial roles in the electrical system responsible for starting a John Deere engine, and their failure or malfunction can lead to various issues.
The John Deere Starter Solenoid Wiring Diagram provides a comprehensive visual representation of the electrical connections between these components and other elements of the starting system. Understanding this diagram is essential for troubleshooting and repairing electrical faults. By analyzing the wiring diagram, technicians can identify the location of damaged wires, solenoids, or starter motors and determine the appropriate course of action for repair or replacement.
For instance, if the starter motor fails to engage when the ignition switch is turned, the technician can refer to the wiring diagram to trace the electrical connections from the battery to the starter motor. By systematically checking for continuity and voltage, the technician can isolate the faulty component and determine whether the wires, solenoid, or starter motor needs to be replaced. Real-life examples of such repairs include replacing corroded battery cables, faulty starter solenoids, or worn-out starter motors, ensuring that the electrical system functions as intended.
Comprehending the connection between repair and John Deere Starter Solenoid Wiring Diagrams is critical for effective maintenance and troubleshooting. By utilizing the diagram to guide repair decisions, technicians can accurately identify and replace damaged components, restoring the starting system to optimal functionality and ensuring reliable engine performance.
Maintenance
John Deere Starter Solenoid Wiring Diagrams serve as valuable tools in maintaining the electrical system responsible for starting John Deere engines. Regular maintenance practices, such as inspecting connections, cleaning terminals, and ensuring proper grounding, are crucial for optimal performance and longevity. These practices prevent corrosion, improve electrical flow, and reduce the risk of electrical faults.
- Inspecting Battery Terminals: Regularly inspect battery terminals for corrosion or loose connections. Clean terminals using a battery terminal cleaner or brush to remove corrosion and ensure a secure connection.
- Cleaning Solenoid Terminals: The starter solenoid terminals should also be inspected for corrosion or loose connections. Clean the terminals using a contact cleaner or sandpaper to remove any debris or oxidation, ensuring proper electrical contact.
- Grounding Points: Ensure that all grounding points are clean and free of corrosion. Grounding points provide a path for electrical current to return to the battery, and poor grounding can lead to electrical issues.
- Wiring Harness Inspection: Inspect the wiring harness for any signs of damage or wear. Replace any damaged or frayed wires to prevent electrical shorts or interruptions.
Performing these maintenance tasks proactively helps prevent electrical problems, extends the lifespan of components, and ensures the reliable operation of the engine starting system. By understanding the importance of inspecting connections, cleaning terminals, and ensuring proper grounding in relation to John Deere Starter Solenoid Wiring Diagrams, owners and technicians can maintain their John Deere equipment at peak performance.
Safety
When it comes to John Deere Starter Solenoid Wiring Diagrams, understanding electrical hazards and adhering to proper procedures are of paramount importance. Electricity poses inherent risks, and working with electrical systems requires a comprehensive knowledge of safety protocols to prevent accidents, injuries, or damage to equipment. The John Deere Starter Solenoid Wiring Diagram serves as a valuable tool in promoting safety by providing a visual representation of the electrical connections, allowing for proper identification and handling of electrical components.
One of the primary safety considerations involves isolating the electrical system before performing any maintenance or repairs. This involves disconnecting the battery to eliminate any potential electrical current flow. The wiring diagram aids in this process by clearly indicating the location and function of components, enabling technicians to isolate the affected area safely and efficiently. By following the diagram’s guidance, the risk of electrical shock or short circuits can be significantly reduced.
Furthermore, the John Deere Starter Solenoid Wiring Diagram highlights proper grounding techniques, which are essential for ensuring the safe operation of the electrical system. Improper grounding can lead to electrical faults, equipment damage, and even personal injury. The diagram provides a clear understanding of grounding points and their connections, allowing technicians to verify and maintain proper grounding, minimizing the risk of electrical hazards.
Understanding electrical hazards and following proper procedures are indispensable aspects of utilizing John Deere Starter Solenoid Wiring Diagrams effectively. By incorporating safety measures into the wiring diagram, John Deere empowers technicians and users to perform maintenance and repairs with confidence, reducing the likelihood of accidents and ensuring the safe and reliable operation of John Deere equipment.
Performance
In the context of John Deere Starter Solenoid Wiring Diagrams, the aspect of “Performance: Optimizing engine starting efficiency, reducing downtime” holds significant importance. The John Deere Starter Solenoid Wiring Diagram serves as a roadmap for maintaining and troubleshooting the electrical system responsible for starting John Deere engines. By understanding and utilizing the wiring diagram, technicians can optimize engine starting efficiency and minimize downtime in several ways:
Firstly, the wiring diagram provides insights into the electrical connections and components involved in the starting process. This knowledge enables technicians to identify and address potential issues before they result in engine starting problems. For instance, by analyzing the wiring diagram, a technician can determine the correct size and type of battery required for a particular engine model. Using an underpowered battery can result in slow or failed engine starts, leading to unnecessary downtime. The wiring diagram ensures that the proper battery is installed, optimizing starting efficiency and reducing the risk of downtime due to battery-related issues.
Secondly, the John Deere Starter Solenoid Wiring Diagram aids in troubleshooting electrical faults that may arise during the starting process. When an engine fails to start, the wiring diagram guides the technician in systematically checking the electrical components and connections. By following the diagram, the technician can quickly isolate the faulty component, whether it’s a faulty starter solenoid, a loose connection, or a damaged wire. This targeted troubleshooting approach minimizes downtime by enabling the technician to identify and repair the issue efficiently, getting the engine back up and running in a timely manner.
In conclusion, the John Deere Starter Solenoid Wiring Diagram plays a critical role in optimizing engine starting efficiency and reducing downtime. By providing a comprehensive visual representation of the electrical system, the wiring diagram empowers technicians to maintain, troubleshoot, and repair electrical faults effectively. Understanding and utilizing the wiring diagram ensures that John Deere engines start reliably, minimizing downtime and maximizing productivity.
Reliability
Within the realm of John Deere Starter Solenoid Wiring Diagrams, the aspect of reliability holds paramount importance in ensuring consistent engine starting and preventing breakdowns. The John Deere Starter Solenoid Wiring Diagram serves as a crucial tool in achieving this reliability by providing a comprehensive visual representation of the electrical connections responsible for starting John Deere engines.
The electrical system plays a vital role in the starting process of an engine. A well-maintained and properly functioning electrical system ensures that the starter solenoid receives the necessary electrical current to engage the starter motor, which in turn initiates the combustion process. By understanding the wiring diagram and adhering to proper maintenance practices, technicians can proactively identify and address potential issues that could lead to starting problems or breakdowns.
Real-life examples of reliability in the context of John Deere Starter Solenoid Wiring Diagrams include:
- Identifying and replacing aging or damaged wiring harnesses, which can prevent electrical shorts or interruptions that could hinder engine starting.
- Ensuring proper grounding connections to minimize voltage leaks and maintain a stable electrical circuit, reducing the risk of starting system malfunctions.
- Regularly inspecting and cleaning battery terminals to prevent corrosion buildup, ensuring a secure electrical connection and optimal current flow for starting.
Understanding the John Deere Starter Solenoid Wiring Diagram and its implications for reliability empowers technicians and users to maintain John Deere equipment at peak performance. By proactively addressing potential electrical issues, they can minimize the likelihood of breakdowns, reduce downtime, and ensure the consistent and reliable operation of John Deere engines.
Compatibility
Within the realm of technical documentation for John Deere equipment, compatibility plays a pivotal role in ensuring the proper functioning and reliable operation of John Deere Starter Solenoid Wiring Diagrams. Compatibility refers to the matching of specific wiring diagrams to the corresponding John Deere engine models they are designed for. This precise alignment is crucial for several reasons:
Firstly, John Deere engines vary in their electrical system configurations, including the number and arrangement of components such as starter solenoids, starter motors, and batteries. Using a wiring diagram that is not compatible with a particular engine model can lead to incorrect connections, electrical faults, and potential damage to the engine or its components. By matching the wiring diagram to the specific engine model, technicians can ensure that the electrical system is wired correctly, minimizing the risk of electrical issues and ensuring optimal engine performance.
Real-life examples of the importance of compatibility include:
- Using a wiring diagram for a 4-cylinder John Deere engine on a 6-cylinder engine can result in incorrect connections to the starter solenoid, leading to starting problems or electrical damage.
- Matching the wiring diagram to the engine model ensures that the correct type of starter solenoid is used, which is crucial for providing the necessary electrical current to engage the starter motor.
Understanding the connection between compatibility and John Deere Starter Solenoid Wiring Diagrams is essential for technicians, engineers, and anyone involved in the maintenance and repair of John Deere equipment. By ensuring compatibility, they can prevent electrical issues, minimize downtime, and maintain the reliable operation of John Deere engines.
Availability
The availability of John Deere Starter Solenoid Wiring Diagrams through various channels, including manuals, online resources, and technical support, plays a critical role in the maintenance and repair of John Deere equipment. These diagrams provide essential visual representations of the electrical connections within the starting system, enabling technicians and users to troubleshoot, diagnose, and resolve issues efficiently.
Accessing wiring diagrams through manuals, online resources, or technical support empowers individuals with the knowledge and guidance necessary to perform electrical repairs and maintenance tasks with confidence. By having the correct wiring diagram at their disposal, they can identify and locate specific components, trace electrical circuits, and understand the functional relationships between different parts of the starting system. This reduces the risk of misdiagnosis, incorrect repairs, and potential damage to the engine or its components.
For instance, if a technician encounters a starting issue with a John Deere engine, they can refer to the wiring diagram to identify the specific starter solenoid used in that particular engine model. The diagram provides information about the solenoid’s location, electrical connections, and compatibility with other components. Armed with this knowledge, the technician can quickly determine if the solenoid is faulty and requires replacement or if the issue lies elsewhere in the starting system.
In conclusion, the availability of John Deere Starter Solenoid Wiring Diagrams through manuals, online resources, or technical support is essential for effective maintenance and repair of John Deere equipment. These diagrams provide a valuable tool for troubleshooting, diagnosing, and resolving electrical issues, empowering technicians and users with the knowledge and guidance they need to keep their equipment operating at peak performance.


Related Posts


