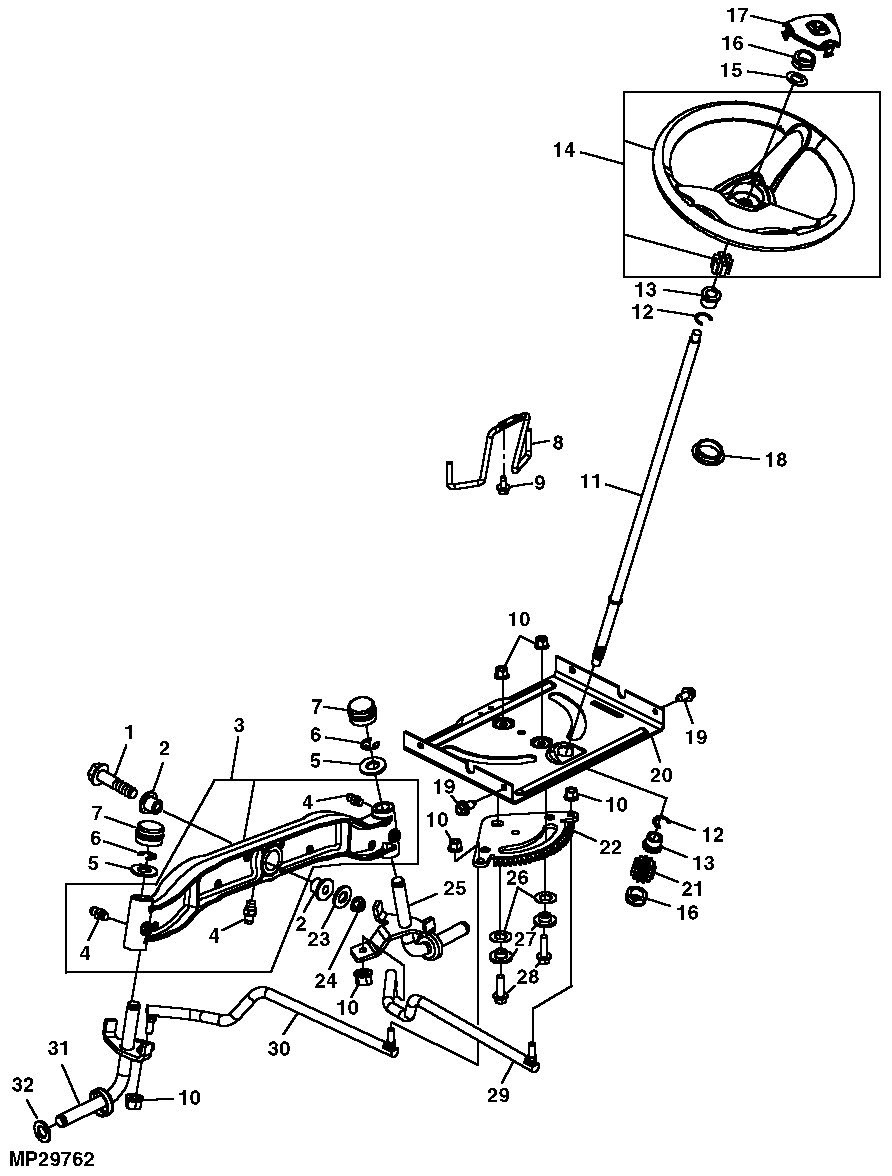
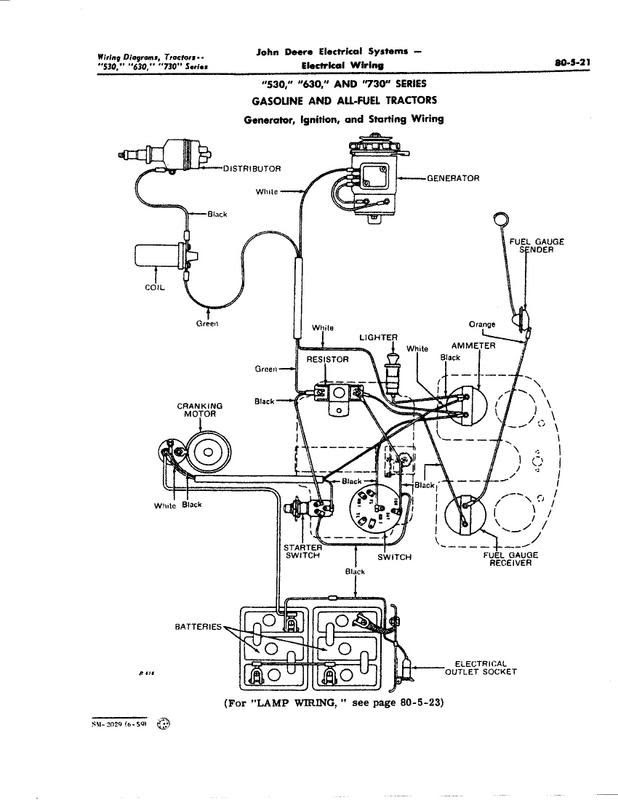
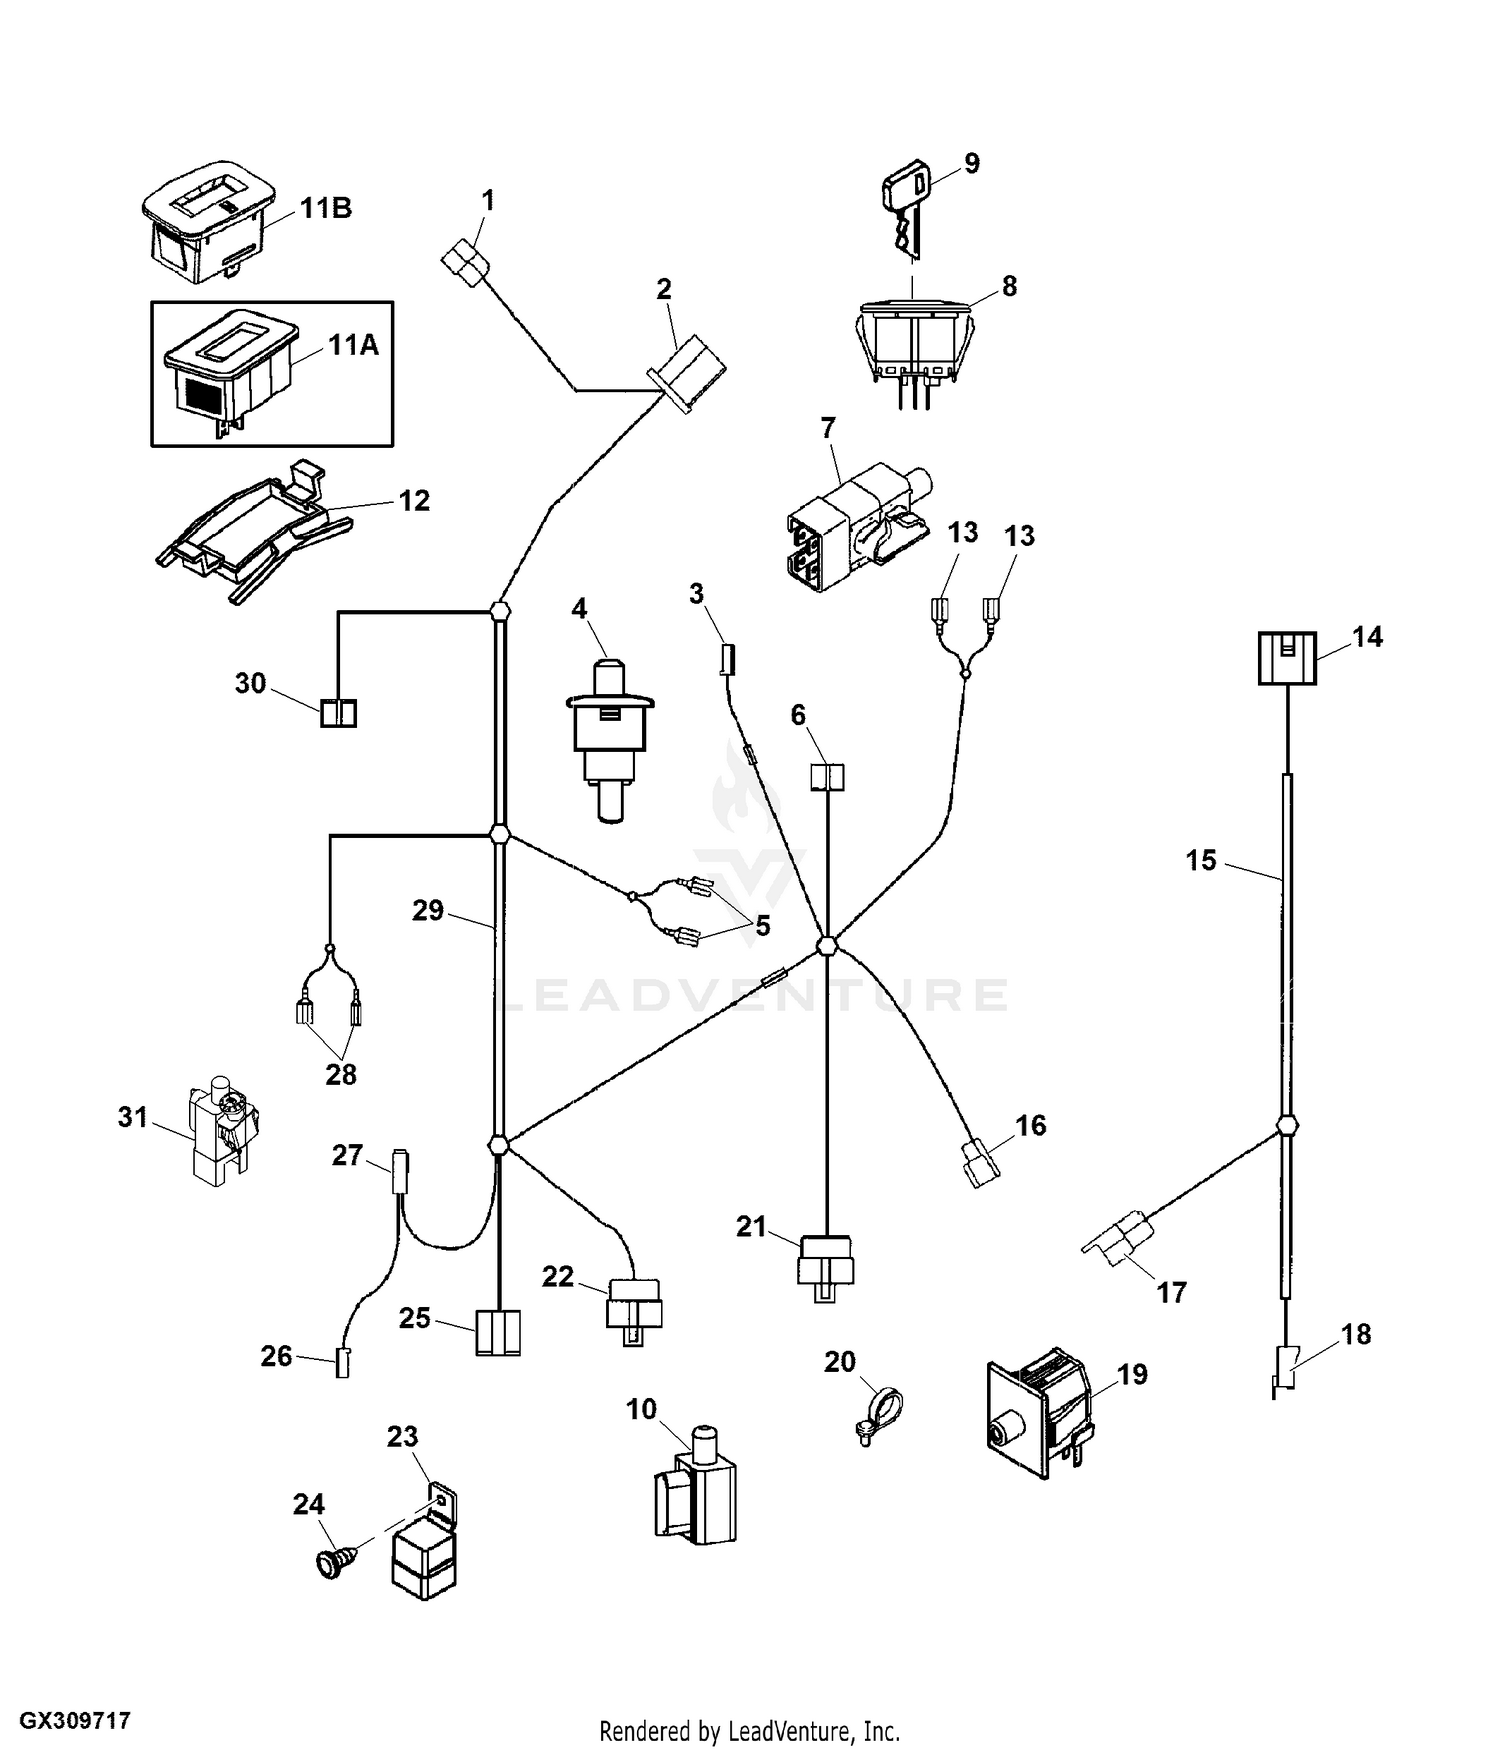
A John Deere L110 Wiring Diagram provides a comprehensive blueprint of the electrical system in a John Deere L110 riding lawn mower. It illustrates the connections between components such as the battery, starter, ignition switch, and headlights, enabling technicians to troubleshoot electrical issues and perform repairs.
Wiring diagrams are crucial for understanding and servicing the electrical systems of complex machines. By referring to the diagram, technicians can quickly identify the location and function of each electrical component, trace wire paths, and determine potential sources of problems. The diagram helps ensure accurate repairs and prevents costly mistakes.
Historically, wiring diagrams were hand-drawn by skilled engineers. Today, they are usually created using specialized software, providing a level of accuracy and detail that was not previously possible. The advent of computer-aided design tools has revolutionized the creation and distribution of wiring diagrams, making them more accessible and reliable.
The John Deere L110 Wiring Diagram is a crucial document that provides a detailed overview of the electrical system in a John Deere L110 riding lawn mower. Understanding the key aspects of this diagram is essential for servicing and repairing the electrical system, ensuring the mower operates safely and efficiently.
- Components: The diagram identifies all the electrical components in the system, including the battery, starter, ignition switch, and headlights.
- Connections: It shows how the components are connected to each other, providing a clear understanding of the electrical pathways.
- Wire colors: The diagram uses color-coded wires to represent different circuits, making it easy to trace and identify wires.
- Grounding points: It indicates the grounding points in the system, which are essential for electrical safety.
- Fuse locations: The diagram shows the location of fuses in the system, which protect components from electrical overloads.
- Troubleshooting guide: Some diagrams include a troubleshooting guide that provides step-by-step instructions for diagnosing and repairing electrical problems.
- Safety precautions: The diagram may include safety precautions to remind technicians of the potential hazards associated with working on electrical systems.
- Model-specific: The diagram is specific to the John Deere L110 riding lawn mower, ensuring accuracy and relevance for technicians working on this particular model.
- ISO symbols: The diagram uses standardized ISO symbols to represent electrical components, making it easy for technicians from different backgrounds to understand.
- Accuracy: A well-drawn wiring diagram is highly accurate, ensuring that technicians can rely on it for troubleshooting and repair work.
These key aspects of the John Deere L110 Wiring Diagram provide technicians with a comprehensive understanding of the electrical system, enabling them to diagnose and repair problems quickly and efficiently. The diagram serves as an essential tool for maintaining the safety and performance of the riding lawn mower.
Components
Understanding the components of a John Deere L110 riding lawn mower’s electrical system is crucial for diagnosing and repairing electrical problems. The wiring diagram provides a comprehensive overview of all the electrical components in the system, including the battery, starter, ignition switch, and headlights. This information is essential for technicians to correctly identify and troubleshoot electrical issues, ensuring the safe and efficient operation of the riding lawn mower.
- Battery: The battery provides the electrical power for the entire system. It is responsible for starting the engine and powering all the electrical components.
- Starter: The starter is an electric motor that cranks the engine to start it. It draws a large amount of current from the battery.
- Ignition switch: The ignition switch controls the flow of electricity to the starter and the ignition system. It is usually located on the dashboard or steering wheel.
- Headlights: The headlights provide illumination for night-time operation. They are powered by the battery and are controlled by a switch on the dashboard.
These are just a few of the many electrical components that are identified in the John Deere L110 Wiring Diagram. By understanding the function and location of each component, technicians can quickly diagnose and repair electrical problems, ensuring the riding lawn mower operates safely and efficiently.
Connections
The connections between components in a John Deere L110 Wiring Diagram are critical for the proper functioning of the electrical system. Without a clear understanding of these connections, it would be impossible to diagnose and repair electrical problems, ensuring the safe and efficient operation of the riding lawn mower.
The wiring diagram provides a detailed overview of all the electrical connections in the system, including the battery, starter, ignition switch, and headlights. This information is essential for technicians to correctly identify and troubleshoot electrical issues. For example, if the headlights are not working, the technician can use the wiring diagram to trace the electrical pathway from the headlights to the battery, checking for any breaks or loose connections along the way.
Understanding the connections between components is also essential for modifying the electrical system. For example, if the owner wants to install additional accessories, such as a light bar or a stereo system, the technician can use the wiring diagram to determine the best way to connect these accessories to the existing electrical system.
Overall, the connections between components in a John Deere L110 Wiring Diagram are a critical aspect of the electrical system. By understanding these connections, technicians can quickly diagnose and repair electrical problems, as well as modify the electrical system to meet the specific needs of the owner.
Wire colors
In the context of a John Deere L110 Wiring Diagram, the use of color-coded wires plays a critical role in simplifying the identification and tracing of electrical circuits. This aspect of the diagram offers numerous benefits to technicians and enhances the overall effectiveness of the electrical system.
- Standardized Colors: The wiring diagram adheres to industry-standard color codes, ensuring consistency and familiarity for technicians. Each color is assigned to a specific type of circuit, such as power, ground, or signal.
- Simplified Troubleshooting: The color-coding system allows technicians to quickly identify and isolate circuits. By following the colored wires, they can pinpoint the source of electrical issues more efficiently.
- Reduced Errors: The visual cues provided by color-coding wires minimize the chances of errors during installation or repairs. Technicians can easily match the wire colors to the corresponding terminals, reducing the risk of incorrect connections.
- Easier Modifications: When modifying the electrical system, such as adding accessories or replacing components, the color-coded wires simplify the process. Technicians can quickly identify the correct wires to connect to, ensuring a seamless integration of new electrical devices.
Overall, the color-coding of wires in the John Deere L110 Wiring Diagram is an invaluable asset for technicians. It streamlines troubleshooting, reduces errors, and facilitates modifications, ultimately contributing to the efficient and reliable operation of the riding lawn mower’s electrical system.
Grounding points
Grounding points are crucial components of the John Deere L110 Wiring Diagram, serving as the foundation for a safe and functional electrical system in the riding lawn mower. The diagram clearly indicates the location of grounding points throughout the system, enabling technicians to ensure proper grounding and prevent electrical hazards.
- Safety Assurance: Grounding points provide a safe path for electrical current to return to the source, preventing voltage buildup and potential shocks or damage to electrical components.
- Electrical Stability: Proper grounding creates a stable electrical environment, minimizing voltage fluctuations and ensuring consistent performance of electronic devices.
- Reduced Interference: Grounding points help reduce electromagnetic interference, which can disrupt the operation of sensitive electronic systems in the riding lawn mower.
- Compliance with Standards: Adhering to indicated grounding points ensures compliance with electrical safety standards, reducing the risk of accidents and liabilities.
In conclusion, grounding points are an integral part of the John Deere L110 Wiring Diagram, ensuring the safety and reliability of the electrical system. By understanding the importance of grounding points and following the diagram’s specifications, technicians can effectively troubleshoot, repair, and modify the electrical system, guaranteeing optimal performance and longevity of the riding lawn mower.
Fuse locations
In the context of the John Deere L110 Wiring Diagram, fuse locations play a critical role in ensuring the safety and reliability of the electrical system. Fuses act as protective devices, safeguarding electrical components from damage caused by excessive current flow. By understanding the location of fuses and their function, technicians can effectively troubleshoot and repair electrical issues, preventing costly breakdowns and ensuring optimal performance of the riding lawn mower.
- Protection against Overloads: Fuses are designed to interrupt the electrical circuit when the current exceeds a predetermined safe level. This prevents excessive current from flowing through sensitive electrical components, protecting them from damage.
- Easy Troubleshooting: The wiring diagram clearly indicates the location of fuses, allowing technicians to quickly identify and replace blown fuses. This simplifies troubleshooting and reduces downtime, ensuring the electrical system is restored to proper working order.
- Compliance with Safety Standards: Proper fuse placement and selection adhere to electrical safety standards, preventing electrical fires and other hazards. The wiring diagram ensures that fuses are installed in accordance with these standards.
- System Reliability: By protecting components from electrical overloads, fuses contribute to the overall reliability of the electrical system. This reduces the risk of component failures and ensures the riding lawn mower operates safely and efficiently.
In conclusion, fuse locations are a crucial aspect of the John Deere L110 Wiring Diagram. Understanding the location and function of fuses enables technicians to effectively maintain and repair the electrical system, ensuring the safety, reliability, and optimal performance of the riding lawn mower.
Troubleshooting guide
Within the context of the John Deere L110 Wiring Diagram, the troubleshooting guide, when included, serves as an invaluable asset for technicians tasked with maintaining and repairing the electrical system of the riding lawn mower. The guide provides a structured approach to diagnosing and resolving electrical issues, enabling efficient troubleshooting and minimizing downtime.
The cause-and-effect relationship between the troubleshooting guide and the John Deere L110 Wiring Diagram is evident in how the guide complements the wiring diagram’s technical information. By offering step-by-step instructions, the guide translates the complex electrical schematics into actionable steps, guiding technicians through the process of identifying and rectifying electrical problems.
Real-life examples of the troubleshooting guide in action include situations where the riding lawn mower experiences electrical malfunctions, such as a non-functioning starter or intermittent headlight operation. By referring to the wiring diagram and following the troubleshooting guide, technicians can systematically check electrical connections, test components, and isolate the root cause of the issue, leading to effective repairs.
The practical significance of understanding the connection between the troubleshooting guide and the John Deere L110 Wiring Diagram lies in its contribution to the overall efficiency and accuracy of electrical repairs. By utilizing the troubleshooting guide, technicians can methodically approach electrical problems, reducing the time and effort required for diagnosis and repair. This understanding empowers technicians to maintain the electrical system of the riding lawn mower at optimal performance levels, ensuring its safe and reliable operation.
In conclusion, the troubleshooting guide included in some John Deere L110 Wiring Diagrams is a critical component for effective electrical troubleshooting and repair. Its step-by-step instructions provide a clear path for technicians to navigate electrical issues, minimize downtime, and maintain the riding lawn mower’s electrical system in peak condition.
Safety precautions
In the context of a John Deere L110 Wiring Diagram, safety precautions serve as critical reminders for technicians to prioritize their safety when working on electrical systems. These precautions aim to minimize the risk of electrical accidents and ensure the well-being of those performing maintenance or repairs.
The connection between safety precautions and the John Deere L110 Wiring Diagram is evident in how the diagram provides a comprehensive overview of the electrical system, including potential hazards and recommended safety measures. The diagram acts as a visual guide, highlighting areas where caution is necessary and reminding technicians of proper handling techniques.
Real-life examples of safety precautions within the John Deere L110 Wiring Diagram include warnings about avoiding contact with live wires, using insulated tools, and wearing appropriate protective gear. By adhering to these precautions, technicians can effectively prevent electrical shocks, burns, or other injuries.
The practical significance of understanding the safety precautions in the John Deere L110 Wiring Diagram lies in the prevention of electrical accidents and the promotion of a safe working environment. By following these precautions, technicians can minimize the risks associated with electrical work, ensuring their safety and the integrity of the electrical system.
In conclusion, the safety precautions included in the John Deere L110 Wiring Diagram are essential for ensuring the safety of technicians working on the electrical system. These precautions provide clear guidance on potential hazards and recommended safety measures, helping to prevent electrical accidents and promoting a safe working environment.
Model-specific
The “Model-specific” aspect of the John Deere L110 Wiring Diagram is of paramount importance as it ensures the accuracy and relevance of the diagram for technicians working on this particular model. The diagram is tailored specifically to the John Deere L110 riding lawn mower, taking into account its unique electrical system design and configuration.
The connection between the model-specific nature of the diagram and its effectiveness lies in the precision it provides. Unlike generic wiring diagrams that attempt to cover multiple models or variations, the John Deere L110 Wiring Diagram is customized to match the exact specifications of the L110 model. This eliminates the risk of confusion or misinterpretation, ensuring that technicians can rely on the diagram for accurate troubleshooting and repairs.
Real-life examples of the model-specific nature of the John Deere L110 Wiring Diagram include its ability to provide precise guidance on component locations, wire routing, and electrical connections. By referring to the model-specific diagram, technicians can quickly identify and access the necessary components, reducing diagnostic time and minimizing the risk of errors.
The practical significance of understanding the model-specific nature of the John Deere L110 Wiring Diagram lies in its contribution to efficient and effective electrical system maintenance and repair. The accuracy and relevance of the diagram empower technicians to confidently diagnose and resolve electrical issues, ensuring the optimal performance and longevity of the John Deere L110 riding lawn mower.
In summary, the model-specific nature of the John Deere L110 Wiring Diagram is a critical component that ensures its accuracy and relevance for technicians working on this particular model. By providing a precise representation of the electrical system, the diagram enables efficient troubleshooting, accurate repairs, and optimal performance of the riding lawn mower.
ISO symbols
Within the context of the John Deere L110 Wiring Diagram, the utilization of standardized ISO symbols plays a pivotal role in facilitating comprehension and effective communication among technicians, regardless of their diverse backgrounds and language barriers.
- Universal Language: ISO symbols serve as a universal language for electrical diagrams, enabling technicians from different cultures and linguistic backgrounds to interpret and understand the diagram’s contents seamlessly.
- Simplified Interpretation: The use of standardized symbols simplifies the interpretation of complex electrical systems, allowing technicians to quickly identify and understand the function of each component without the need for extensive knowledge of electrical theory.
- Consistent Representation: ISO symbols ensure consistency in the representation of electrical components across different diagrams and manufacturers. This consistency minimizes confusion and errors, allowing technicians to easily transfer their knowledge and skills between different projects.
- Enhanced Collaboration: Standardized ISO symbols promote collaboration among technicians working on multi-national projects or within diverse teams. It eliminates the need for language-specific translations, fostering effective communication and ensuring that all team members are on the same page.
In conclusion, the incorporation of standardized ISO symbols in the John Deere L110 Wiring Diagram enhances its accessibility and utility for technicians from diverse backgrounds. By providing a common visual language, ISO symbols facilitate efficient troubleshooting, accurate repairs, and effective collaboration, ultimately contributing to the optimal performance and longevity of the riding lawn mower.
Accuracy
In the context of the John Deere L110 Wiring Diagram, the aspect of Accuracy holds paramount importance, as it forms the foundation for reliable troubleshooting and effective repairs. A meticulously crafted wiring diagram guarantees precision and dependability, enabling technicians to navigate the electrical system with confidence.
- Precise Component Identification: An accurate wiring diagram provides a precise representation of each electrical component, ensuring that technicians can correctly identify and locate them within the system. This precise identification is crucial for accurate troubleshooting and targeted repairs.
- Accurate Wire Routing: The wiring diagram accurately depicts the routing of electrical wires throughout the system. This detailed representation enables technicians to trace wires efficiently, identify potential breaks or damage, and ensure proper connections during repairs.
- Correct Circuit Representation: The diagram accurately represents the electrical circuits within the system, including their connections, branches, and protective devices. This accurate representation allows technicians to understand the flow of electricity, identify potential faults, and make informed decisions during troubleshooting and repairs.
- Up-to-date Information: A well-drawn wiring diagram is regularly updated to reflect any modifications or revisions made to the electrical system. This up-to-date information ensures that technicians have access to the most current and accurate schematics, minimizing the risk of errors and ensuring the effectiveness of repairs.
Overall, the accuracy of the John Deere L110 Wiring Diagram is a cornerstone of its effectiveness, enabling technicians to perform troubleshooting and repairs with confidence and precision. This accuracy ensures that the electrical system operates at its optimal performance, maximizing the efficiency and longevity of the riding lawn mower.


Related Posts


