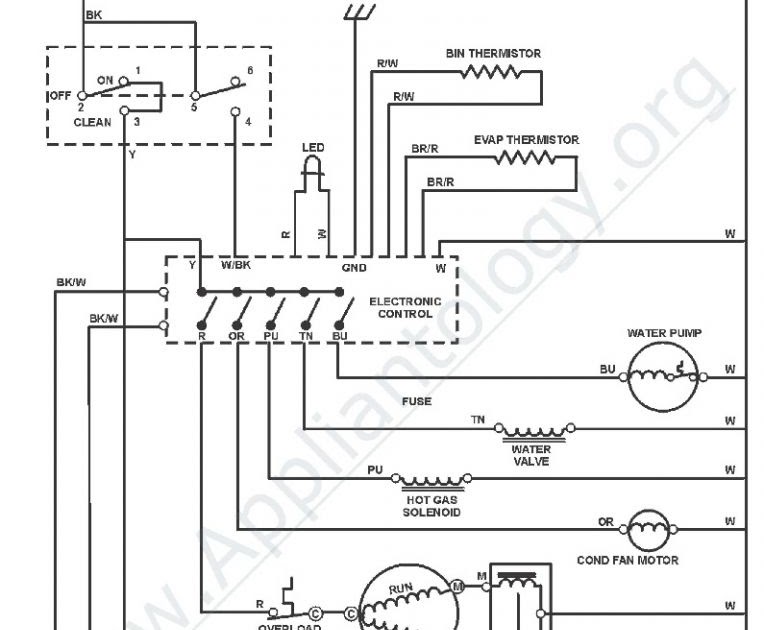
Ice Maker Wiring Diagram is an essential component in ice-making machines, used to establish electrical connections between different components, ensuring proper functioning. It provides a visual representation of the circuit, guiding the wiring and safeguarding against errors.
Ice Maker Wiring Diagrams are highly relevant in commercial and residential settings. They ensure the safe installation and operation of ice makers, preventing electrical hazards, minimizing downtime, and maximizing efficiency. One significant historical development was the standardization of wiring color codes, facilitating easier identification and simplifying the installation process.
This article will delve deeper into the intricacies of Ice Maker Wiring Diagrams, exploring their construction, common components, and critical safety considerations. We will examine the diverse applications of these diagrams, highlighting their practical significance in various refrigeration systems.
Ice Maker Wiring Diagrams are fundamental to the safe and efficient operation of ice-making machines. Understanding their key aspects is essential for proper installation, troubleshooting, and maintenance.
- Electrical Connections: The primary function of an Ice Maker Wiring Diagram is to establish electrical connections between different components, ensuring the proper flow of electricity.
- Circuit Visualization: It provides a visual representation of the circuit, making it easier to understand the electrical connections and troubleshoot any issues.
- Component Identification: The diagram helps identify the different components of the ice maker, such as the compressor, condenser, and evaporator.
- Safety: By adhering to the wiring diagram, technicians can ensure that the ice maker is wired correctly, minimizing electrical hazards.
- Maintenance: The diagram serves as a valuable reference for maintenance and repair, allowing technicians to quickly identify and fix any problems.
- Efficiency: A properly wired ice maker operates more efficiently, consuming less energy and producing more ice.
- Standardization: Wiring diagrams follow standardized color codes and symbols, ensuring consistency and ease of use across different manufacturers.
- Troubleshooting: The diagram aids in troubleshooting electrical faults, allowing technicians to quickly pinpoint the source of the issue.
- Compliance: Adhering to the wiring diagram ensures compliance with electrical codes and safety regulations.
These aspects collectively contribute to the effective design, installation, and maintenance of ice makers, ensuring optimal performance and longevity.
Electrical Connections
Electrical connections are the lifeblood of an ice maker, allowing electricity to flow seamlessly between various components and ensuring optimal performance. An Ice Maker Wiring Diagram serves as a roadmap for these connections, guiding technicians in establishing a safe and efficient electrical system.
- Power Supply: The wiring diagram specifies the type and voltage of the power supply required for the ice maker. It ensures that the machine receives the correct amount of electricity to operate effectively without overloading or underpowering.
- Compressor: The compressor is the heart of the ice maker, responsible for circulating refrigerant throughout the system. The wiring diagram provides instructions on connecting the compressor to the power supply and other components, ensuring proper operation and refrigerant flow.
- Condenser and Evaporator: The condenser and evaporator are heat exchangers that facilitate the refrigerant’s phase changes. The wiring diagram outlines the electrical connections between these components and the compressor, enabling efficient heat transfer and ice production.
- Control Board: The control board serves as the brain of the ice maker, monitoring and regulating its operation. The wiring diagram specifies the connections between the control board and other components, allowing it to receive sensor inputs, process data, and send commands to ensure optimal ice production.
These electrical connections are vital for the proper functioning of an ice maker. By adhering to the wiring diagram, technicians can ensure that all components are correctly connected, minimizing the risk of electrical hazards, maximizing efficiency, and extending the lifespan of the machine.
Circuit Visualization
Circuit visualization is a crucial component of an Ice Maker Wiring Diagram. It enables technicians to comprehend the intricate electrical connections within the ice maker, facilitating troubleshooting and maintenance.
The visual representation provided by the wiring diagram allows technicians to:
- Identify the electrical pathways: Trace the flow of electricity through the various components, making it easier to pinpoint potential issues.
- Understand the component interactions: Visualize how different components interact electrically, facilitating a comprehensive understanding of the system.
- Diagnose faults: Quickly identify open circuits, short circuits, or faulty connections by comparing the actual circuit behavior to the diagram.
In practice, circuit visualization plays a vital role in:
- Installation: Ensuring proper electrical connections during the initial setup of the ice maker, preventing errors and malfunctions.
- Maintenance: Facilitating regular inspections and preventive maintenance, minimizing downtime and extending the lifespan of the machine.
- Troubleshooting: Expediting the diagnosis and repair of electrical issues, reducing repair time and costs.
In conclusion, circuit visualization is an essential aspect of Ice Maker Wiring Diagrams, empowering technicians with a clear understanding of the electrical connections and enabling efficient troubleshooting and maintenance. It promotes safety, reliability, and optimal performance of ice-making machines.
Component Identification
Component identification is a fundamental aspect of Ice Maker Wiring Diagrams, enabling technicians to locate and recognize the various components within the system. This knowledge is crucial for proper installation, maintenance, and repair.
- Electrical Components: Wiring diagrams clearly label electrical components such as compressors, control boards, and thermistors. Identifying these components allows technicians to establish proper electrical connections, ensuring the safe and efficient operation of the ice maker.
- Mechanical Components: The diagram also identifies mechanical components like the condenser, evaporator, and ice bin. Understanding the location and function of these components is essential for troubleshooting mechanical issues, such as ice production problems or water leaks.
- Refrigerant Flow: Wiring diagrams often indicate the refrigerant flow path through the system. This information helps technicians visualize the refrigerant circulation and identify potential blockages or leaks, ensuring optimal cooling performance.
- Safety Features: Component identification also includes safety features like overload protectors and high-pressure switches. By locating these components, technicians can ensure proper installation and functionality, preventing electrical hazards and protecting the ice maker from damage.
In summary, component identification on Ice Maker Wiring Diagrams serves as a valuable reference for technicians, assisting them in understanding the system’s components, their functions, and their interconnections. This knowledge empowers technicians to perform accurate installations, conduct effective maintenance, and diagnose and resolve issues promptly, ensuring the reliable and efficient operation of the ice maker
Safety
In the context of Ice Maker Wiring Diagrams, safety is paramount. Wiring diagrams provide crucial guidance for technicians, enabling them to wire ice makers correctly and minimize electrical hazards that could lead to accidents, injuries, or damage to equipment.
- Proper Grounding: Wiring diagrams specify the proper grounding techniques to ensure that electrical currents are safely discharged into the ground, preventing electrical shocks and protecting the ice maker from damage due to electrical surges.
- Overload Protection: Diagrams indicate the use of fuses or circuit breakers to protect the ice maker from electrical overloads. These devices interrupt the electrical circuit when excessive current flows, safeguarding components from overheating and potential fires.
- Polarity Compliance: Wiring diagrams ensure that electrical connections adhere to the correct polarity, preventing damage to components and ensuring optimal performance. Reversing polarity can lead to malfunctions, reduced efficiency, or even electrical hazards.
- Component Compatibility: Diagrams specify the compatibility of electrical components, such as the voltage and amperage ratings of compressors and motors. Matching components correctly prevents overloading, overheating, and potential electrical fires.
By following the guidelines provided in Ice Maker Wiring Diagrams, technicians can ensure the safe and reliable operation of ice makers, minimizing the risks associated with electrical hazards. These diagrams serve as essential tools for maintaining electrical safety, preventing accidents, and extending the lifespan of ice-making equipment.
Maintenance
Within the context of Ice Maker Wiring Diagrams, maintenance plays a crucial role in ensuring the longevity and reliability of ice makers. Wiring diagrams serve as invaluable references for maintenance and repair tasks, empowering technicians to efficiently identify and resolve issues.
- Troubleshooting: Wiring diagrams provide a comprehensive overview of the electrical connections within an ice maker, enabling technicians to quickly trace and troubleshoot electrical faults. By comparing the actual circuit behavior to the diagram, they can pinpoint open circuits, short circuits, or faulty connections.
- Component Replacement: Wiring diagrams assist in identifying and locating specific components within the ice maker. When a component fails or malfunctions, technicians can use the diagram to determine the correct replacement part and its proper installation procedure.
- Routine Maintenance: Wiring diagrams facilitate regular maintenance tasks such as cleaning, lubrication, and voltage checks. By following the diagram’s instructions, technicians can ensure that all electrical connections are secure, preventing potential issues and extending the lifespan of the ice maker.
- Safety: Maintenance and repair procedures involving electrical systems require utmost caution. Wiring diagrams provide clear instructions on proper grounding techniques, polarity compliance, and component compatibility. Adhering to these guidelines minimizes the risk of electrical hazards, ensuring the safety of technicians and the integrity of the ice maker.
In summary, Ice Maker Wiring Diagrams serve as indispensable tools for maintenance and repair, empowering technicians with the knowledge and guidance to effectively identify, troubleshoot, and resolve issues. By leveraging these diagrams, technicians can maintain optimal performance, minimize downtime, and prolong the lifespan of ice makers.
Efficiency
Within the context of Ice Maker Wiring Diagrams, efficiency plays a vital role in optimizing the performance of ice makers. A properly wired ice maker ensures optimal energy consumption and ice production, leading to cost savings, reduced environmental impact, and increased customer satisfaction.
- Optimized Power Consumption: When an ice maker is wired correctly, it operates at its intended voltage and amperage, minimizing energy wastage. This reduces electricity consumption, lowering operating costs and contributing to energy conservation efforts.
- Reduced Component Strain: Improper wiring can lead to excessive current draw, causing components to overheat and fail prematurely. Correct wiring ensures that components receive the appropriate amount of power, extending their lifespan and reducing the need for costly repairs.
- Enhanced Cooling Performance: Efficient wiring ensures that the compressor, condenser, and evaporator work seamlessly together, facilitating optimal refrigerant flow and heat exchange. This results in faster ice production, improved cooling performance, and consistently high-quality ice.
- Environmental Sustainability: Energy-efficient ice makers contribute to environmental sustainability by minimizing greenhouse gas emissions associated with electricity generation. By reducing energy consumption, ice maker wiring diagrams play a role in promoting sustainable practices and mitigating climate change.
In conclusion, Ice Maker Wiring Diagrams are crucial for achieving efficiency in ice makers. By ensuring proper wiring, technicians can optimize energy consumption, reduce component strain, enhance cooling performance, and contribute to environmental sustainability. Adhering to these diagrams is essential for maximizing the performance, longevity, and cost-effectiveness of ice-making equipment.
Standardization
In the realm of Ice Maker Wiring Diagrams, standardization plays a vital role in ensuring consistency, simplifying installation, and facilitating troubleshooting. Wiring diagrams adhere to established color codes and symbols, creating a universal language that transcends manufacturer differences and enhances the overall usability of ice makers.
- Color Codification: Wiring diagrams utilize specific color codes for different types of wires, such as black for phase, white for neutral, and green for ground. This color standardization ensures quick and accurate identification, minimizing the risk of misconnections and electrical hazards.
- Symbolic Representation: Standardized symbols are employed to represent various components within the ice maker’s electrical system. These symbols, such as circles for compressors and triangles for transformers, provide a universal visual language, enabling technicians to understand the circuit’s functionality regardless of their familiarity with a particular manufacturer’s design.
- Simplified Troubleshooting: Standardization enhances troubleshooting efficiency by providing a common reference point for technicians. When an issue arises, technicians can consult the standardized wiring diagram to quickly identify potential problem areas and devise appropriate solutions.
- Reduced Training Time: Standardized wiring diagrams reduce the training time required for new technicians. By adhering to established conventions, manufacturers ensure that technicians can quickly comprehend and interpret wiring diagrams, minimizing the need for extensive on-the-job training.
In conclusion, the standardization of Ice Maker Wiring Diagrams through color codes and symbols promotes consistency, simplifies installation, enhances troubleshooting capabilities, and reduces training time. This standardization fosters a cohesive approach to ice maker design, installation, and maintenance, ultimately contributing to the reliable and efficient operation of these appliances.
Troubleshooting
Within the context of Ice Maker Wiring Diagrams, troubleshooting plays a central role in maintaining the optimal performance and longevity of ice makers. The diagram serves as an invaluable tool, enabling technicians to efficiently identify and resolve electrical faults, minimizing downtime and ensuring a consistent supply of ice.
- Fault Identification: Wiring diagrams provide a comprehensive overview of the electrical connections within an ice maker. When a fault occurs, technicians can use the diagram to trace the circuit and identify the specific component or connection that is causing the issue.
- Component Isolation: By analyzing the wiring diagram, technicians can isolate the faulty component and disconnect it from the circuit. This allows them to test the component separately and determine if it needs to be replaced or repaired.
- Circuit Continuity: Wiring diagrams help technicians check the continuity of electrical circuits. Using a multimeter, they can verify if current is flowing through each segment of the circuit, identifying any breaks or interruptions that may be causing the fault.
- Power Supply Verification: Troubleshooting electrical faults often involves checking the power supply to the ice maker. Wiring diagrams indicate the voltage and amperage requirements of the appliance, enabling technicians to ensure that the power supply is adequate and stable.
The ability to effectively troubleshoot electrical faults is crucial for maintaining the functionality of ice makers. Ice Maker Wiring Diagrams empower technicians with a detailed understanding of the electrical system, allowing them to quickly pinpoint the source of the issue and implement appropriate solutions. By leveraging these diagrams, technicians can minimize repair time, prevent costly breakdowns, and ensure the reliable operation of ice-making equipment.
Compliance
Within the context of Ice Maker Wiring Diagrams, compliance with electrical codes and safety regulations is of paramount importance. Adhering to the wiring diagram is a critical component of ensuring that ice makers are installed and operated in a safe and code-compliant manner.
Electrical codes and safety regulations are established to minimize the risk of electrical hazards, fires, and accidents. These codes specify the safe installation, maintenance, and operation of electrical equipment, including ice makers. Wiring diagrams provide detailed instructions on how to wire ice makers in accordance with these codes and regulations.
Real-life examples of compliance with electrical codes and safety regulations in Ice Maker Wiring Diagrams include:
- Proper grounding techniques to prevent electrical shocks and protect against electrical surges.
- Overload protection devices to prevent electrical overloads and potential fires.
- Polarity compliance to ensure that electrical connections are made correctly, preventing damage to components and ensuring optimal performance.
Practical applications of this understanding include:
- Safe installation of ice makers by qualified electricians.
- Regular maintenance and inspections to ensure ongoing compliance with electrical codes.
- Reduced risk of electrical accidents and injuries.
In conclusion, compliance with electrical codes and safety regulations through Ice Maker Wiring Diagrams is essential for ensuring the safe and reliable operation of ice makers. Adhering to these diagrams minimizes the risk of electrical hazards, protects users and property, and ensures that ice makers meet the required safety standards.


![[DIAGRAM] Frigidaire Refrigerator Ice Maker Wiring Diagrams MYDIAGRAM](https://i0.wp.com/c.searspartsdirect.com/lis_png/PLDM/10034779-00001.png?w=665&ssl=1)

Related Posts


