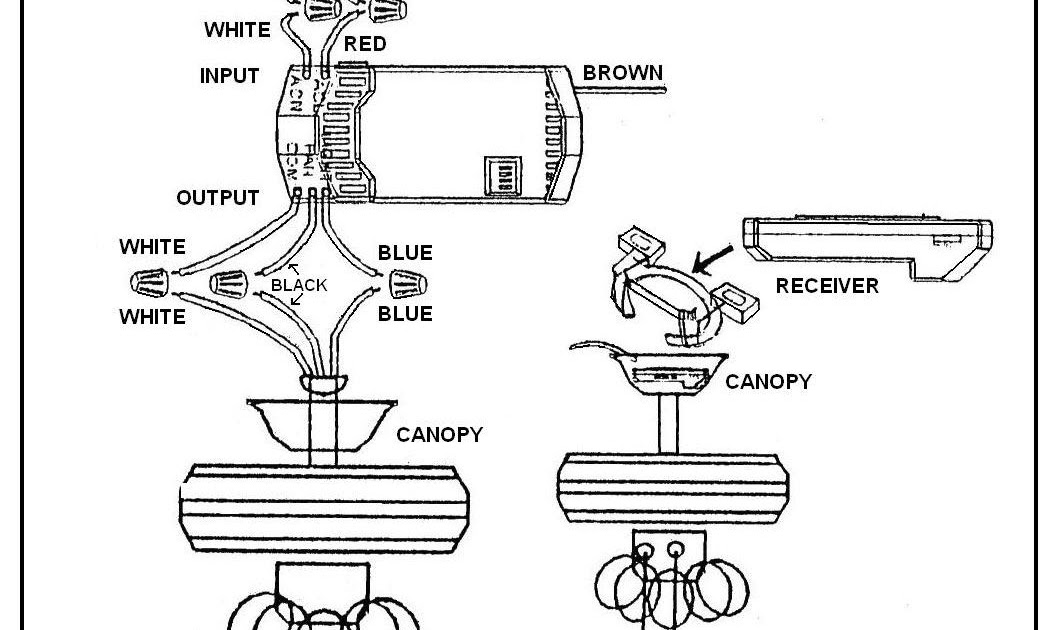
A Hunter Fan Wiring Diagram is a visual guide that illustrates the electrical connections required for the proper installation and operation of a Hunter ceiling fan. For instance, a diagram for the popular Hunter Fan model 59203 provides a detailed layout of the wiring connections for the fan’s power supply, light kit, and remote control receiver.
Wiring diagrams are crucial for ensuring the safe and efficient installation of ceiling fans. They help electricians understand the correct wiring configurations, reducing the risk of electrical hazards such as short circuits or fires. Moreover, they simplify the troubleshooting process, enabling technicians to quickly identify and resolve any electrical issues.
A significant historical development in the field of ceiling fan wiring occurred in the 1980s with the introduction of remote control fans. This innovation eliminated the need for manual operation and allowed users to control their fans from a distance. As a result, wiring diagrams became more complex to accommodate the additional electrical components and wireless communication systems.
In this article, we will delve into the intricacies of Hunter Fan Wiring Diagrams, exploring their components, types, and the specific wiring configurations required for different fan models. We will also provide practical tips and troubleshooting advice to assist electricians and homeowners in achieving safe and successful fan installations.
Hunter Fan Wiring Diagrams are essential for ensuring the safe and efficient installation of Hunter ceiling fans. They provide a visual guide to the electrical connections required for the proper operation of the fan’s motor, light kit, and remote control receiver.
- Components: Wiring diagrams identify the electrical components of the fan, including the motor, capacitor, light switch, and remote control receiver.
- Wiring: Diagrams illustrate the correct wire connections between the fan’s components, including the power supply, ground wire, and neutral wire.
- Types: There are different types of wiring diagrams for Hunter fans, depending on the model and features of the fan.
- Installation: Wiring diagrams guide electricians through the step-by-step process of installing the fan, including mounting the fan, connecting the wires, and securing the fan blades.
- Troubleshooting: Diagrams can be used to troubleshoot electrical problems with the fan, such as identifying loose connections or faulty components.
- Safety: Wiring diagrams help ensure that the fan is installed safely and in accordance with electrical codes.
- Efficiency: Proper wiring ensures that the fan operates efficiently, maximizing airflow and minimizing energy consumption.
- Convenience: Wiring diagrams make it easier for homeowners and electricians to install and maintain Hunter ceiling fans.
- Warranty: Following the wiring diagram correctly is essential for maintaining the fan’s warranty.
In conclusion, Hunter Fan Wiring Diagrams are indispensable tools for understanding the electrical connections and operation of Hunter ceiling fans. They provide detailed instructions for installation, troubleshooting, and maintenance, ensuring the safe, efficient, and convenient use of these popular fans.
Components
Wiring diagrams are critical for understanding the electrical connections and operation of Hunter ceiling fans. They provide detailed instructions on how to identify and connect the various electrical components of the fan, including the motor, capacitor, light switch, and remote control receiver. This information is essential for ensuring the safe and efficient installation and operation of the fan.
For example, the wiring diagram for the Hunter Fan model 59203 illustrates the correct wiring connections for the fan’s motor, light kit, and remote control receiver. The diagram shows how to connect the power supply wires to the fan’s motor, how to connect the light kit wires to the fan’s light switch, and how to connect the remote control receiver wires to the fan’s motor and light switch. By following the wiring diagram carefully, electricians can ensure that the fan is installed correctly and operates safely.
Understanding the components of a Hunter Fan Wiring Diagram is also important for troubleshooting electrical problems with the fan. If the fan is not working properly, electricians can use the wiring diagram to identify the faulty component and make the necessary repairs. For example, if the fan is not turning on, the electrician can use the wiring diagram to check the connections to the motor and capacitor. If the light kit is not working, the electrician can use the wiring diagram to check the connections to the light switch and light kit.
In conclusion, Hunter Fan Wiring Diagrams are essential for understanding the electrical connections and operation of Hunter ceiling fans. They provide detailed instructions on how to identify and connect the various electrical components of the fan, which is critical for ensuring the safe and efficient installation and operation of the fan. Wiring diagrams are also important for troubleshooting electrical problems with the fan.
Wiring
Wiring diagrams for Hunter ceiling fans provide detailed instructions on how to connect the fan’s electrical components, including the power supply, ground wire, and neutral wire. Proper wiring is essential for the safe and efficient operation of the fan.
- Power Supply: The power supply wires connect the fan to the electrical circuit. The black wire is the hot wire, the white wire is the neutral wire, and the green or bare copper wire is the ground wire.
- Ground Wire: The ground wire provides a path for electrical current to flow safely to the ground in the event of a fault. It is important to connect the ground wire to the green or bare copper wire in the electrical circuit.
- Neutral Wire: The neutral wire completes the electrical circuit by providing a path for electrical current to flow back to the power source. It is important to connect the neutral wire to the white wire in the electrical circuit.
- Wire Nuts: Wire nuts are used to connect the wires together. It is important to use the correct size wire nuts for the gauge of wire being used.
Properly wiring a Hunter ceiling fan is essential for the safe and efficient operation of the fan. By following the wiring diagram carefully, electricians can ensure that the fan is connected correctly and operates safely.
Types
Within the comprehensive realm of “Hunter Fan Wiring Diagram,” the aspect of “Types” holds significant importance. Different models and features of Hunter fans necessitate specific wiring configurations, reflected in distinct types of wiring diagrams. These diagrams serve as essential guides for electricians and homeowners alike, ensuring proper installation, operation, and troubleshooting of Hunter ceiling fans.
- Model-Specific Diagrams: Hunter fans come in a wide range of models, each with its unique electrical configuration. Wiring diagrams tailored to specific models provide precise instructions for connecting electrical components, ensuring compatibility and optimal performance.
- Feature-Specific Diagrams: Hunter fans offer various features, such as remote control operation, light kits, and reversible airflow. Wiring diagrams that address these features guide users in integrating additional electrical components, maximizing the fan’s functionality.
- Standard Diagrams: For common Hunter fan models and basic installations, standard wiring diagrams provide general instructions that can be applied across multiple models. These diagrams simplify the wiring process for electricians familiar with Hunter fan installations.
- Troubleshooting Diagrams: Troubleshooting wiring diagrams assist in identifying and resolving electrical issues with Hunter fans. They provide step-by-step instructions for diagnosing common problems, enabling users to restore the fan’s operation efficiently.
In summary, the “Types” of wiring diagrams for Hunter fans encompass model-specific, feature-specific, standard, and troubleshooting diagrams. These cater to the diverse electrical configurations and requirements of different Hunter fan models and features. Understanding the appropriate wiring diagram for a particular fan is crucial for ensuring safe, efficient, and trouble-free operation.
Installation
Within the comprehensive realm of “Hunter Fan Wiring Diagram,” the aspect of “Installation” assumes paramount importance. Wiring diagrams serve as essential guides for electricians, providing step-by-step instructions for installing Hunter ceiling fans, ensuring proper mounting, electrical connections, and secure assembly of fan components. This ensures the safe, efficient, and trouble-free operation of the fan.
-
Mounting the Fan:
Wiring diagrams detail the steps involved in securely mounting the fan to the ceiling, including the selection of appropriate mounting hardware and the proper placement of the mounting bracket. This ensures the fan isattached and can safely support its weight and the forces generated during operation.
-
Connecting the Wires:
Wiring diagrams provide clear instructions for connecting the fan’s electrical wires to the power supply and any additional components, such as light kits or remote controls. Proper wire connections are crucial for the safe and efficient operation of the fan, preventing electrical hazards and ensuring optimal performance.
-
Securing the Fan Blades:
Wiring diagrams include instructions for securely attaching the fan blades to the fan body. Proper blade installation ensures the fan operates smoothly, without wobbling or vibration, and achieves optimal airflow. Balanced and securely fastened fan blades are essential for the fan’s efficient operation and overall safety.
-
Additional Considerations:
In addition to the core steps of mounting, wiring, and securing the fan, wiring diagrams may also provide guidance on additional considerations, such as leveling the fan, adjusting the fan’s height, and installing any decorative elements. These details contribute to the overall aesthetic appeal and functionality of the fan installation.
In summary, the “Installation” aspect of “Hunter Fan Wiring Diagram” encompasses a range of detailed instructions for the proper mounting, electrical connections, and secure assembly of Hunter ceiling fans. By following these diagrams, electricians can ensure the safe, efficient, and trouble-free operation of these fans, providing optimal airflow and enhancing the comfort and ambiance of indoor spaces.
Troubleshooting
Troubleshooting diagrams are invaluable tools for diagnosing and resolving electrical issues with Hunter ceiling fans. They provide a visual representation of the fan’s electrical connections, enabling electricians and homeowners to trace the flow of electricity and identify any points of failure or malfunction.
One of the most common electrical problems with ceiling fans is loose connections. Over time, the vibrations of the fan can cause wire connections to loosen, leading to intermittent operation, flickering lights, or even electrical sparking. Troubleshooting diagrams help identify these loose connections by providing a clear visual guide to the proper wiring configuration. By comparing the diagram to the actual wiring, electricians can quickly locate and tighten any loose connections, restoring the fan’s proper operation.
Troubleshooting diagrams are also useful for identifying faulty components. If a fan is not working correctly, the diagram can be used to isolate the faulty component by systematically testing each component’s electrical connections. For example, if the fan is not spinning, the diagram can be used to test the power supply, motor, and capacitor. By identifying the faulty component, electricians can quickly replace it, restoring the fan’s functionality.
In summary, troubleshooting diagrams are a critical component of Hunter Fan Wiring Diagrams as they provide a visual guide for diagnosing and resolving electrical problems with Hunter ceiling fans. By enabling electricians to quickly identify loose connections or faulty components, troubleshooting diagrams help ensure the safe and efficient operation of Hunter ceiling fans, ensuring optimal airflow and comfort in indoor spaces.
Safety
Hunter Fan Wiring Diagrams play a critical role in ensuring the safe installation and operation of Hunter ceiling fans. By providing detailed instructions for wiring the fan’s electrical components, these diagrams help prevent electrical hazards, protect against fire risks, and ensure compliance with electrical codes.
-
Preventing Electrical Hazards:
Wiring diagrams help prevent electrical hazards by guiding electricians in connecting the fan’s electrical components correctly. Improper wiring can lead to loose connections, overheating, and electrical arcing, all of which pose significant safety risks. By following the diagram’s instructions, electricians can ensure that the fan is wired safely, minimizing the risk of electrical shocks, fires, and other accidents.
-
Protecting Against Fire Risks:
Wiring diagrams help protect against fire risks by ensuring that the fan’s electrical components are installed in accordance with building codes and electrical standards. These codes and standards are designed to prevent electrical fires by specifying the proper wire sizes, circuit protection devices, and installation methods. By following the diagram’s instructions, electricians can ensure that the fan is installed safely, reducing the risk of electrical fires and protecting the home and its occupants.
-
Ensuring Compliance with Electrical Codes:
Wiring diagrams help ensure compliance with electrical codes by providing instructions that meet or exceed the requirements of local and national electrical codes. These codes are in place to ensure the safety of electrical installations and protect people and property from electrical hazards. By following the diagram’s instructions, electricians can ensure that the fan is installed in accordance with these codes, giving homeowners peace of mind knowing that their fan is installed safely and legally.
-
Facilitating Troubleshooting and Repair:
Wiring diagrams also facilitate troubleshooting and repair by providing a visual representation of the fan’s electrical connections. In the event of a problem with the fan, the diagram can be used to trace the electrical connections and identify the source of the issue. This can help electricians quickly diagnose and repair the problem, minimizing downtime and ensuring the safe and efficient operation of the fan.
In conclusion, Hunter Fan Wiring Diagrams are essential for ensuring the safe installation and operation of Hunter ceiling fans. By providing detailed instructions for wiring the fan’s electrical components, these diagrams help prevent electrical hazards, protect against fire risks, ensure compliance with electrical codes, and facilitate troubleshooting and repair. Homeowners and electricians alike can rely on these diagrams to ensure that their Hunter ceiling fans are installed safely and operate reliably for years to come.
Efficiency
Proper wiring is a critical component of Hunter Fan Wiring Diagrams because it ensures that the fan operates efficiently, maximizing airflow while minimizing energy consumption. When a fan is wired correctly, it can move air more effectively, creating a more comfortable environment and reducing the amount of energy required to cool or heat a space.
For example, a Hunter ceiling fan with a properly wired motor will use less energy to produce the same amount of airflow as a fan with an improperly wired motor. This is because a properly wired motor will not have to work as hard to overcome resistance in the electrical circuit. As a result, the fan will be more efficient and will use less energy.
In addition to saving energy, proper wiring can also help to extend the life of a Hunter ceiling fan. When a fan is wired incorrectly, it can put unnecessary stress on the motor and other components, which can lead to premature failure. By following the wiring diagram carefully, electricians can ensure that the fan is wired correctly and will operate efficiently for many years to come.
Overall, proper wiring is essential for ensuring the efficiency and longevity of Hunter ceiling fans. Hunter Fan Wiring Diagrams provide detailed instructions on how to wire the fan correctly, ensuring that it operates at peak performance and uses energy efficiently.
Convenience
Wiring diagrams for Hunter ceiling fans are essential for ensuring a smooth and efficient installation and maintenance process. They provide clear and detailed instructions that guide both homeowners and electricians through the various steps involved, making the process more convenient and accessible.
-
Simplified Installation:
With the help of wiring diagrams, even first-time installers can easily understand the electrical connections required for the fan. The diagrams provide step-by-step guidance, eliminating guesswork and reducing the risk of errors.
-
Time-Saving Maintenance:
When it comes to maintenance, wiring diagrams serve as quick troubleshooting guides. They help identify potential issues by providing a visual representation of the fan’s electrical system, enabling faster and more efficient repairs.
-
Enhanced Safety:
Accurate wiring is crucial for the safe operation of ceiling fans. Wiring diagrams ensure that all electrical connections are made correctly, minimizing the risk of electrical hazards such as short circuits or overheating.
-
DIY-Friendly:
Wiring diagrams empower homeowners to take on basic fan installation and maintenance tasks themselves. With clear instructions and visual aids, they can save on electrician costs while gaining a sense of accomplishment.
In conclusion, Hunter Fan Wiring Diagrams play a vital role in enhancing the convenience of ceiling fan installation and maintenance. They provide simplified instructions, save time and effort during maintenance, enhance safety, and empower homeowners to take on DIY projects. By providing clear visual guides, wiring diagrams make it easier for both homeowners and electricians to ensure the proper functioning and longevity of Hunter ceiling fans.
Warranty
Within the comprehensive realm of “Hunter Fan Wiring Diagram,” the aspect of “Warranty” holds significant importance. Adhering to the prescribed wiring instructions is paramount for preserving the fan’s warranty, safeguarding customers’ investments and ensuring the fan’s optimal performance throughout its lifespan.
-
Preservation of Warranty Coverage:
Wiring diagrams provide precise instructions for electrical connections, ensuring that the fan is installed and operated in accordance with the manufacturer’s specifications. By following these instructions, homeowners can maintain the validity of their warranty, ensuring coverage for any defects or malfunctions that may arise due to improper wiring.
-
Exclusion of Improper Wiring:
Warranties typically exclude coverage for damages or malfunctions resulting from incorrect wiring. Wiring diagrams serve as a reference guide, helping homeowners avoid improper connections that could void their warranty. By adhering to the diagram’s instructions, homeowners can demonstrate that the fan was installed and wired correctly, strengthening their claim for warranty coverage.
-
Facilitating Troubleshooting:
Wiring diagrams aid in troubleshooting electrical issues, enabling homeowners to identify and resolve minor problems without voiding their warranty. By understanding the proper wiring configuration, homeowners can perform basic troubleshooting steps, such as checking connections or replacing fuses, without compromising the fan’s warranty.
-
Ensuring Safe Operation:
Correct wiring is essential for the safe operation of Hunter ceiling fans. Wiring diagrams provide clear instructions for grounding and polarity, minimizing the risk of electrical hazards. By following these instructions, homeowners can ensure that their fans operate safely, reducing the likelihood of accidents or damage that could void their warranty.
In conclusion, “Warranty: Following the wiring diagram correctly is essential for maintaining the fan’s warranty” emphasizes the importance of adhering to Hunter Fan Wiring Diagrams to preserve warranty coverage, prevent improper wiring-related exclusions, facilitate troubleshooting, and ensure safe fan operation. By understanding these facets, homeowners can safeguard their investments, enjoy peace of mind, and maximize the lifespan and performance of their Hunter ceiling fans.


Related Posts


