How to Install a Ceiling Fan with Existing Wiring is a process of adding a ceiling fan to a room that already has electrical wiring installed for lighting.
Installing a ceiling fan with existing wiring has many benefits: it can reduce energy consumption, improve air circulation, and add light and style to a room.
Historically, ceiling fans were invented in the late 19th century and first used in industrial settings to improve ventilation and reduce heat.
This article will provide a step-by-step guide on how to install a ceiling fan with existing wiring, including choosing the right fan, preparing the wiring, mounting the fan, and connecting the wires.
When installing a ceiling fan with existing wiring, it is important to consider several key aspects to ensure a safe and successful installation. These aspects cover various dimensions of the process, including electrical safety, fan selection, mounting considerations, and wiring connections.
- Electrical Safety
- Fan Selection
- Mounting Considerations
- Wiring Connections
- Tools and Materials
- Safety Precautions
- Troubleshooting Tips
- Building Codes
- Maintenance and Care
- Energy Efficiency
Understanding these aspects is crucial for a proper installation. Electrical safety involves ensuring that the wiring is compatible with the fan and that all connections are secure. Fan selection requires considering factors such as room size, fan style, and blade span. Mounting considerations include choosing the right location for the fan and ensuring that the ceiling can support its weight. Wiring connections must be made correctly to prevent electrical hazards and ensure proper fan operation. Additionally, having the right tools and materials, following safety precautions, and being aware of troubleshooting tips can help ensure a successful installation.
Electrical Safety
Electrical safety is of paramount importance when installing a ceiling fan with existing wiring. Failing to adhere to proper safety guidelines can lead to electrical hazards, fires, or injuries. To ensure a safe installation, several key aspects of electrical safety must be considered.
- Circuit Capacity: Before installing a ceiling fan, it’s crucial to verify that the existing electrical circuit can handle the additional load. Exceeding the circuit’s capacity can lead to overheating, electrical fires, or tripped circuit breakers.
- Wiring Compatibility: The existing wiring must be compatible with the ceiling fan’s electrical requirements. Mismatched wiring can cause damage to the fan, electrical components, or even the entire electrical system.
- Grounding: Proper grounding is essential for electrical safety. The ceiling fan must be properly grounded to prevent electrical shocks and ensure the safe operation of the fan.
- Secure Connections: All electrical connections must be secure and made according to electrical codes. Loose or faulty connections can lead to arcing, overheating, or electrical fires.
By following these electrical safety guidelines and ensuring that all connections are made correctly, you can minimize the risk of electrical hazards and ensure the safe and proper operation of your ceiling fan.
Fan Selection
Fan selection is a critical component of “How To Install A Ceiling Fan With Existing Wiring” because it directly impacts the installation process and the overall performance and functionality of the ceiling fan. The type of fan chosen will determine the wiring requirements, mounting hardware needed, and the steps involved in the installation.
For example, if you choose a ceiling fan with a light kit, you will need to ensure that the existing wiring includes a neutral wire for the light. Additionally, the weight of the fan will determine the type of mounting bracket and screws required for a secure installation. Understanding the specifications and requirements of the chosen fan will help you prepare the wiring and mounting system appropriately.
Practical applications of this understanding include choosing a fan with a reversible motor for better air circulation in both summer and winter, selecting a fan with a remote control for convenient operation, or opting for a fan with energy-efficient features to reduce energy consumption. By considering the relationship between fan selection and the installation process, you can make informed decisions that will result in a successful and satisfactory ceiling fan installation.
Mounting Considerations
Mounting considerations play a critical role in “How to Install a Ceiling Fan With Existing Wiring” as they directly impact the fan’s stability, safety, and overall functionality. It involves carefully assessing the ceiling structure, selecting the appropriate mounting hardware, and ensuring a secure installation.
- Ceiling Structure: The type of ceiling, whether drywall, plaster, or concrete, will determine the type of mounting bracket and screws required for a secure installation. Assessing the ceiling’s condition and identifying any potential obstacles is crucial for successful mounting.
- Mounting Bracket: Choosing the correct mounting bracket is essential. Different fan models require specific brackets compatible with their weight and design. Selecting a bracket with the appropriate load capacity and screw pattern is necessary for proper mounting.
- Joist Location: Locating the ceiling joists is crucial for providing a solid support for the fan. Using a stud finder or examining the ceiling for joist patterns can help identify their exact locations. Mounting the fan directly into joists ensures maximum stability and prevents potential wobbling.
- Safety Precautions: When mounting the fan, safety precautions should be prioritized. Turning off the electricity at the main breaker, wearing gloves, and using a sturdy ladder or scaffolding to reach the ceiling are essential for a safe installation.
By carefully considering these mounting considerations and following proper installation procedures, you can ensure that your ceiling fan is mounted securely, operates smoothly, and provides long-lasting performance.
Wiring Connections
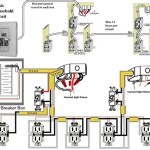
Wiring connections are a crucial aspect of “How to Install a Ceiling Fan with Existing Wiring.” They involve connecting the electrical wires from the ceiling to the fan’s motor, light kit (if applicable), and remote control receiver (if included).
- Matching Wire Colors: Electrical wires are typically color-coded for easy identification. Matching the colors of the wires from the ceiling to the corresponding wires on the fan ensures proper connections.
- Grounding Wire: The green or bare copper wire is the grounding wire. It must be connected to the grounding screw on the mounting bracket and to the ground wire on the fan.
- Neutral Wire: The white wire is the neutral wire. It is connected to the white wire on the fan and to the neutral wire in the ceiling.
- Power Wires: The black and red wires are the power wires. They are connected to the black and red wires on the fan and to the power wires in the ceiling.
Correct wiring connections ensure that the ceiling fan operates safely and efficiently. Incorrect connections can lead to electrical hazards, such as overheating or electrical fires. It’s essential to follow the manufacturer’s instructions and relevant electrical codes when making wiring connections.
Tools and Materials
In the context of “How to Install a Ceiling Fan with Existing Wiring,” the selection of appropriate tools and materials is crucial for a safe and successful installation. These elements encompass not only the physical tools used but also the components and resources required throughout the process.
- Essential Tools: Basic hand tools like screwdrivers, pliers, a wire stripper, and a voltage tester are indispensable for assembling the fan, connecting wires, and ensuring electrical safety.
- Mounting Hardware: The type of mounting hardware required depends on the ceiling structure. It typically includes a mounting bracket, screws, and possibly bolts or toggle bolts for drywall or plaster ceilings.
- Electrical Components: Depending on the fan model, additional electrical components may be needed, such as a capacitor or a remote control receiver. These components facilitate the operation and functionality of the fan.
- Safety Gear: Safety glasses, gloves, and a sturdy ladder or scaffolding are essential for minimizing risks during installation. They protect against potential hazards like falling debris or electrical shocks.
Having the right tools and materials not only streamlines the installation process but also ensures the stability, performance, and longevity of the ceiling fan. Adequate preparation and attention to these aspects contribute to a successful and safe installation.
Safety Precautions
When installing a ceiling fan with existing wiring, safety precautions are of paramount importance. Failing to adhere to proper safety guidelines can lead to electrical hazards, injuries, or even fatalities. Safety precautions form an integral part of the installation process, serving as a critical component to ensure the well-being of individuals and the integrity of the electrical system.
One of the most crucial safety precautions involves ensuring that the electrical circuit can handle the additional load of the ceiling fan. Overloading a circuit can lead to overheating, electrical fires, or tripped circuit breakers. Before installation, it is essential to verify the circuit’s capacity and ensure it meets the fan’s electrical requirements.
Another important safety precaution is to properly ground the ceiling fan. Grounding provides a safe path for electrical current to flow in the event of a fault, preventing electrical shocks and protecting against electrical fires. The ceiling fan must be securely connected to the grounding wire in the electrical box.
Furthermore, it is essential to follow proper wiring practices and ensure all electrical connections are secure. Loose or faulty connections can lead to arcing, overheating, or electrical fires. Electrical wires should be properly stripped, twisted together, and secured with wire nuts or other approved connectors. Additionally, all connections should be checked for tightness to prevent any potential issues.
By understanding and adhering to these safety precautions, individuals can minimize the risks associated with installing a ceiling fan with existing wiring. Prioritizing safety throughout the installation process ensures a successful and hazard-free outcome.
Troubleshooting Tips
When installing a ceiling fan with existing wiring, troubleshooting tips play a crucial role in addressing potential issues and ensuring a successful installation. These tips cover various aspects, providing guidance on identifying and resolving common problems that may arise during the process.
-
Loose Connections:
Loose connections in the electrical wiring can lead to flickering lights, humming noises, or complete fan failure. Check all connections, including those in the ceiling electrical box, fan canopy, and switch, to ensure they are secure.
-
Faulty Wiring:
Damaged or incorrect wiring can cause electrical hazards and prevent the fan from functioning properly. Inspect the wires for any cuts, breaks, or loose insulation. If faulty wiring is detected, it should be repaired or replaced by a qualified electrician.
-
Overloaded Circuit:
Installing a ceiling fan on an overloaded circuit can cause the circuit breaker to trip or the fuse to blow. Verify the circuit’s capacity and ensure it can handle the additional load of the fan before proceeding with the installation.
-
Incorrect Fan Assembly:
Improperly assembling the fan components can lead to wobbling, noise, or even safety hazards. Follow the manufacturer’s instructions carefully during assembly, ensuring that all parts are securely fastened and aligned correctly.
Understanding these troubleshooting tips and applying them during the installation process can help prevent potential issues, ensure the safe and proper operation of the ceiling fan, and extend its lifespan. It is essential to address any problems promptly and seek professional assistance from a qualified electrician if necessary.
Building Codes
Building codes are a crucial aspect of “How to Install a Ceiling Fan with Existing Wiring” as they set forth specific requirements and guidelines to ensure the safety and proper installation of electrical fixtures and components. Understanding and adhering to building codes is essential for a successful and compliant installation.
-
Electrical Permits:
Many localities require electrical permits before installing a ceiling fan, especially if it involves modifications to the electrical system. Obtaining a permit ensures that the installation meets local electrical codes and safety standards.
-
Wiring Requirements:
Building codes specify the type of wiring, wire gauge, and connection methods that must be used for ceiling fan installations. These requirements aim to prevent electrical hazards, such as overheating or fires.
-
Mounting Standards:
Codes outline the requirements for mounting a ceiling fan, including the type of mounting bracket, screws, and support structure. These standards ensure that the fan is securely installed and can withstand its weight and any potential vibrations.
-
Safety Features:
Building codes may mandate the inclusion of safety features, such as ground fault circuit interrupters (GFCIs) or safety cables, to protect against electrical shocks and prevent the fan from falling.
Complying with building codes not only ensures the safety and reliability of the ceiling fan installation but also helps maintain the integrity of the electrical system and the overall safety of the building. Ignoring building codes can lead to electrical hazards, code violations, and potential legal liabilities.
Maintenance and Care
Once the installation of a ceiling fan with existing wiring is complete, ongoing maintenance and care are essential to ensure its optimal performance and longevity. Proper maintenance not only enhances the fan’s functionality but also contributes to the overall safety and aesthetics of the space.
-
Cleaning:
Regular cleaning of the fan blades, motor housing, and light fixtures removes dust and debris accumulation, improving the fan’s efficiency and preventing noise. Cleaning should be done with a soft cloth and mild cleaning solutions to avoid damage. -
Lubrication:
Moving parts within the fan, such as bearings and motors, may require periodic lubrication to minimize friction and prevent premature wear. Using a manufacturer-recommended lubricant ensures smooth operation and extends the fan’s lifespan. -
Blade Balancing:
Over time, the fan blades may become unbalanced due to factors like dust accumulation or minor impacts. This can cause the fan to wobble and create noise. Periodic balancing using a balancing kit ensures smooth and quiet operation. -
Electrical Safety Checks:
Regularly checking the electrical connections, wires, and switches is crucial for safety. Loose connections or damaged wires can pose electrical hazards. Tightening loose connections and replacing faulty components ensure continued safe operation.
By adhering to these maintenance and care practices, homeowners can preserve the functionality, safety, and aesthetic appeal of their ceiling fans, ensuring years of reliable and enjoyable use.
Energy Efficiency
In the context of “How to Install a Ceiling Fan with Existing Wiring,” energy efficiency plays a significant role in reducing energy consumption and promoting sustainable practices. Ceiling fans provide an energy-efficient alternative to air conditioning, circulating air within a room without the need for refrigerant or excessive energy usage.
Installing an energy-efficient ceiling fan can have several notable benefits. Energy-efficient models typically consume less electricity, resulting in lower utility bills and a reduced carbon footprint. Additionally, the increased air circulation created by the fan can enhance thermal comfort, potentially allowing for a higher thermostat setting during summer months, which further contributes to energy savings.
Practical applications of energy efficiency in “How to Install a Ceiling Fan with Existing Wiring” include choosing fans with ENERGY STAR certification, which indicates that they meet specific energy-saving criteria. Another energy-efficient practice is using fans with DC motors, which are more efficient than traditional AC motors. Furthermore, installing a ceiling fan in a room with good natural ventilation can minimize the need for additional cooling or heating, optimizing energy usage.
In summary, considering energy efficiency when installing a ceiling fan with existing wiring offers multiple benefits, including reduced energy consumption, lower operating costs, and a contribution to environmental sustainability. By incorporating energy-efficient practices into the installation process, individuals can create more sustainable and comfortable living spaces.


Related Posts


