How To Fix Brake Light Wiring refers to the process of repairing or replacing faulty wiring that prevents brake lights from functioning properly.
Brake light wiring is crucial for vehicle safety, as it ensures that the lights illuminate when the brake pedal is pressed, alerting other drivers. When wiring malfunctions, the lights may not turn on or may remain on continuously, creating a hazardous situation.
Historically, brake light wiring used simple switches and incandescent bulbs. However, modern vehicles employ more complex electronic systems and LED lights. This advancement has improved brake light efficiency and response time but also introduced new potential failure points in the wiring.
The remainder of this article will provide detailed instructions on troubleshooting and repairing brake light wiring, including common causes of failure, diagnostic steps, and safety precautions.
Understanding the essential aspects of “How To Fix Brake Light Wiring” is crucial for ensuring the safety and proper functioning of your vehicle’s brake lights. These aspects encompass both the theoretical knowledge and practical skills required to diagnose and repair wiring faults.
- Tools and Materials: Having the right tools and materials, such as a multimeter, electrical tape, and wire connectors, is essential for effective brake light wiring repair.
- Safety Precautions: Working on electrical systems requires , including disconnecting the battery and wearing appropriate safety gear.
- Wiring Diagram: A wiring diagram specific to your vehicle’s make and model is invaluable for identifying the correct wires and connections.
- Electrical Testing: Using a multimeter to test for continuity, voltage, and ground faults can help pinpoint the exact location of the wiring issue.
- Fuse and Relay Inspection: Checking fuses and relays associated with the brake lights can reveal blown or faulty components that need replacement.
- Switch Diagnosis: The brake light switch, which activates the lights when the pedal is pressed, may need to be tested or replaced if wiring issues persist.
- Ground Connections: Poor ground connections can disrupt the electrical circuit and cause brake light malfunctions. Inspect and clean grounding points as necessary.
- Wire Repair: Damaged or corroded wires may require repair or replacement. Use heat shrink tubing or solder connections to ensure secure and durable repairs.
- Final Testing: After completing repairs, thoroughly test the brake lights to ensure they are functioning correctly before reconnecting the battery.
These nine key aspects provide a comprehensive overview of the essential knowledge and skills required for effective brake light wiring repair. By understanding and addressing these aspects, individuals can ensure the safety and reliability of their vehicle’s brake lighting system.
Tools and Materials
When it comes to repairing brake light wiring, having the right tools and materials is not just a convenienceit’s a necessity. The effectiveness of the repair process hinges on the availability and proper use of essential tools and materials, ensuring the safety and functionality of the vehicle’s brake lighting system.
Electrical repairs require specialized tools like multimeters to measure voltage, current, and resistance. These measurements help identify faulty components and pinpoint the exact location of wiring issues. Electrical tape and wire connectors play a crucial role in insulating and securing wire connections, preventing short circuits and ensuring proper electrical flow.
For instance, if a brake light is not illuminating, a multimeter can be used to test the voltage at the brake light socket. If there is no voltage present, the issue could be a faulty wire connection or a problem with the brake light switch. Electrical tape can then be used to insulate exposed wires, and wire connectors can be used to securely join wires together, restoring the electrical circuit and resolving the brake light issue.
Understanding the importance of having the right tools and materials empowers individuals to approach brake light wiring repairs with confidence. By having the necessary equipment, they can effectively diagnose and resolve electrical faults, ensuring the safety of their vehicle and others on the road.
Safety Precautions
When embarking on brake light wiring repairs, adhering to safety precautions is paramount to safeguard personal well-being and prevent further damage to the vehicle’s electrical system. Disconnecting the battery and donning appropriate safety gear form the cornerstone of these precautions, ensuring a controlled and protected work environment.
Disconnecting the battery eliminates the risk of electrical shock, which can occur when working on live electrical components. By isolating the electrical system, individuals can safely handle wires and electrical connections without the fear of accidental contact with energized circuits. Furthermore, wearing appropriate safety gear, such as insulated gloves and safety glasses, provides additional protection against electrical hazards.
For instance, when replacing a faulty brake light switch, disconnecting the battery is a crucial step before handling any electrical connections. This ensures that there is no electrical current flowing through the switch, preventing the risk of shock or damage to the new switch during installation. Additionally, wearing insulated gloves protects the hands from potential electrical contact while working around exposed wires.
Understanding the connection between safety precautions and brake light wiring repair empowers individuals to approach the task with confidence and competence. By prioritizing safety, they can effectively diagnose and resolve electrical faults, ensuring not only the functionality of their brake lights but also their own well-being and the integrity of the vehicle’s electrical system.
Wiring Diagram
Within the context of “How to Fix Brake Light Wiring,” a wiring diagram stands as an indispensable tool, providing a detailed roadmap of the vehicle’s electrical system. It empowers individuals to pinpoint the correct wires and connections, ensuring precise and effective repairs.
The absence of a wiring diagram can lead to a haphazard approach, increasing the likelihood of misidentifying wires and potentially causing further electrical issues. Conversely, having the correct wiring diagram enables targeted troubleshooting, allowing individuals to trace the brake light circuit and identify the exact location of the fault.
For instance, if the left brake light is not functioning, the wiring diagram will guide the individual to the specific wires responsible for powering that light. By following the diagram, they can then inspect the wires for damage, loose connections, or corrosion, and make the necessary repairs.
Furthermore, a wiring diagram provides valuable insights into the overall electrical system, allowing individuals to understand how different components are interconnected. This knowledge aids in diagnosing complex electrical faults and preventing future issues by identifying potential weak points in the system.
In summary, a wiring diagram is a critical component of “How to Fix Brake Light Wiring,” providing a clear understanding of the electrical system and enabling precise repairs. By utilizing the correct wiring diagram, individuals can confidently troubleshoot and resolve brake light issues, ensuring the safety and functionality of their vehicle’s lighting system.
Electrical Testing
Within the context of “How to Fix Brake Light Wiring,” electrical testing using a multimeter is a crucial diagnostic step that empowers individuals to identify and resolve wiring faults with precision. By measuring continuity, voltage, and ground connections, this testing approach enables targeted troubleshooting, minimizing guesswork and ensuring efficient repairs.
- Continuity Testing: Using the multimeter’s continuity setting, individuals can check for complete electrical pathways within the wiring. This test helps identify breaks, shorts, or loose connections that may disrupt the flow of electricity to the brake lights.
- Voltage Testing: Measuring voltage levels at various points in the brake light circuit can reveal voltage drops or interruptions. This information aids in pinpointing the location of faulty components, such as switches, relays, or wiring damage.
- Ground Fault Testing: Ground faults occur when an electrical current escapes to the vehicle’s chassis instead of completing the circuit through the intended path. Using the multimeter’s resistance setting, individuals can test for proper grounding and identify any points where the electrical current is leaking.
- Component Testing: Electrical testing also extends to individual components within the brake light circuit. By disconnecting components and testing them separately, individuals can isolate faulty switches, bulbs, or wiring harnesses, allowing for targeted repairs.
By incorporating electrical testing into their troubleshooting process, individuals gain a deeper understanding of the electrical system and can make informed decisions regarding the repair or replacement of faulty components. This approach not only restores the functionality of the brake lights but also enhances the overall safety and reliability of the vehicle’s electrical system.
Fuse and Relay Inspection
Fuse and relay inspection is an integral aspect of “How to Fix Brake Light Wiring,” enabling individuals to pinpoint and resolve electrical faults within the brake light circuit. By visually inspecting fuses and testing relays, potential issues can be identified, ensuring the proper functioning of the brake lights and enhancing overall vehicle safety.
- Fuse Inspection: Fuses act as protective devices within the electrical system, safeguarding components from damage caused by excessive current flow. Inspecting fuses for blown or damaged elements can reveal potential electrical faults within the brake light circuit.
- Relay Testing: Relays are electromagnetic switches that control the flow of electricity to various electrical circuits, including the brake lights. Testing relays for proper operation ensures that the brake lights receive the necessary power when the brake pedal is depressed.
- Circuit Protection: Fuses and relays play a crucial role in protecting the brake light circuit from damage caused by electrical surges or short circuits. By identifying and replacing blown fuses or faulty relays, individuals can prevent further damage to the electrical system and ensure the reliable operation of the brake lights.
- Electrical Troubleshooting: Fuse and relay inspection aids in electrical troubleshooting by providing insights into the functionality of the brake light circuit. By identifying faulty components, individuals can narrow down the potential causes of brake light malfunctions and implement targeted repairs.
Fuse and relay inspection is a straightforward yet effective diagnostic step in “How to Fix Brake Light Wiring.” By incorporating this inspection into their troubleshooting process, individuals can enhance the safety and reliability of their vehicle’s brake lighting system.
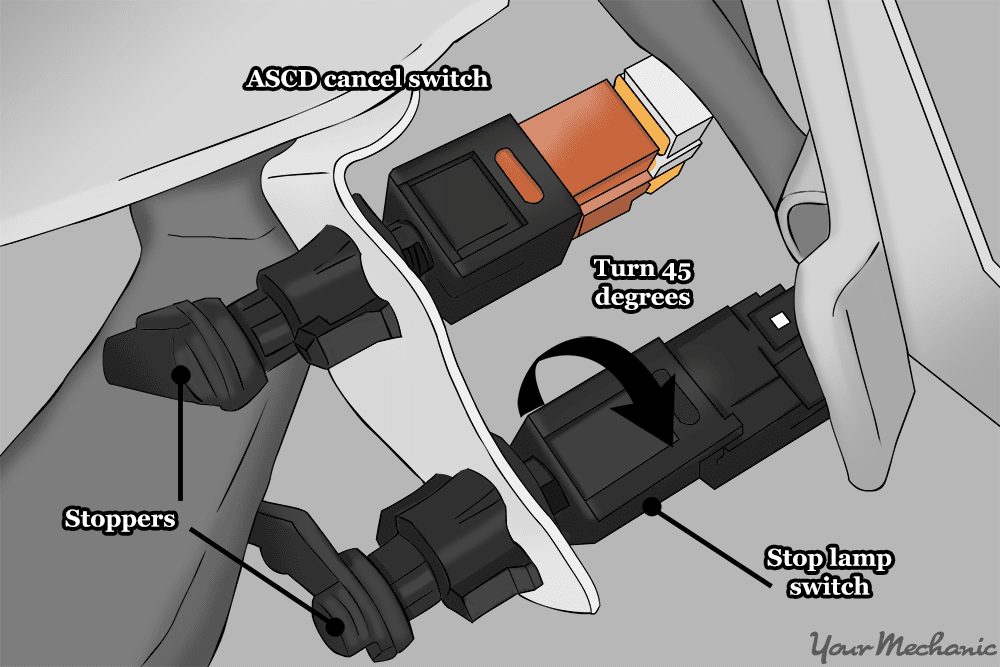
Switch Diagnosis
Within the context of “How To Fix Brake Light Wiring,” switch diagnosis holds critical importance as a means of identifying and resolving electrical faults that may hinder the proper functioning of brake lights. The brake light switch, acting as a pivotal component, completes the electrical circuit when the brake pedal is depressed, triggering the illumination of brake lights to signal the vehicle’s deceleration.
In situations where persistent wiring issues affect brake lights, switch diagnosis becomes an indispensable step in the troubleshooting process. A faulty brake light switch can disrupt the electrical pathway, preventing the brake lights from activating despite intact wiring. Therefore, testing or replacing the brake light switch is crucial to eliminate this potential cause of brake light malfunctions.
Real-life examples underscore the significance of switch diagnosis within “How To Fix Brake Light Wiring.” For instance, consider a scenario where a vehicle’s brake lights remain inoperative despite thorough inspection and repair of wiring connections. By performing switch diagnosis, the technician uncovers a faulty brake light switch that impedes the completion of the electrical circuit. Replacing the switch resolves the issue, restoring the functionality of the brake lights.
Understanding the connection between switch diagnosis and brake light wiring repair empowers individuals to approach electrical faults with a comprehensive and effective strategy. By recognizing the role of the brake light switch and incorporating switch diagnosis into their troubleshooting routine, they can accurately pinpoint the root cause of brake light malfunctions, ensuring the safety and reliability of their vehicle’s lighting system.
Ground Connections
Understanding the significance of ground connections is crucial within the context of “How To Fix Brake Light Wiring.” Ground connections provide a pathway for electrical current to complete its circuit, ensuring the proper functioning of various electrical components, including brake lights. Poor or faulty ground connections can disrupt this pathway, leading to brake light malfunctions and compromising vehicle safety.
- Loose Ground Wires: Loose or disconnected ground wires are a common cause of brake light issues. Inspect and tighten all ground connections, paying attention to the points where the wires connect to the vehicle’s chassis or other grounding points.
- Corrosion: Corrosion can build up on grounding points over time, creating resistance and disrupting electrical flow. Clean all grounding points using a wire brush or sandpaper to ensure good electrical contact.
- Multiple Ground Points: In some cases, multiple electrical components may share a single grounding point. If one component develops a fault, it can affect the grounding of other components, including the brake lights.
- Ground Loops: Ground loops occur when there are multiple paths for electrical current to return to the battery. This can create voltage differences and interfere with the proper functioning of electrical components, including brake lights.
By addressing ground connections as part of “How To Fix Brake Light Wiring,” individuals can effectively diagnose and resolve electrical faults, ensuring the reliability and safety of their vehicle’s brake lighting system.
Wire Repair
Within the context of “How To Fix Brake Light Wiring,” wire repair stands as a crucial step in restoring the functionality and safety of a vehicle’s brake lighting system. Damaged or corroded wires disrupt the electrical circuit, preventing brake lights from illuminating properly and compromising the ability to signal deceleration to other drivers.
Identifying damaged or corroded wires requires a thorough inspection of the brake light wiring harness. Common causes of wire damage include abrasion, exposure to the elements, and rodent chewing. Once damaged wires are identified, they must be repaired or replaced to restore electrical continuity.
When repairing damaged wires, it is essential to employ proper techniques to ensure secure and durable connections. Heat shrink tubing or solder connections are recommended for this purpose, as they provide a reliable and long-lasting solution. Heat shrink tubing insulates and protects the wire connection, while solder creates a permanent bond between the wires.
Neglecting wire repair can lead to intermittent or complete failure of brake lights, posing a significant safety hazard. By understanding the importance of wire repair and implementing proper techniques, individuals can effectively address electrical faults within the brake light wiring system, ensuring the safety and reliability of their vehicle’s lighting system.
Final Testing
Within the context of “How To Fix Brake Light Wiring,” final testing holds paramount importance in guaranteeing the effectiveness and safety of brake light repairs. Overlooking this crucial step can lead to recurring issues or, worse, compromised vehicle safety. Final testing involves a comprehensive assessment of the repaired brake lights to confirm their proper functioning before reconnecting the battery and returning the vehicle to operation.
- Functional Verification: Engage the brake pedal and observe if all brake lights illuminate simultaneously. Ensure that the lights are visible from the appropriate angles and distances, meeting regulatory standards.
- Circuit Continuity: Using a multimeter, verify the continuity of the brake light circuit. This ensures that electricity is flowing properly through the repaired wires, switches, and bulbs.
- Switch Operation: Test the brake light switch by manually actuating it. The brake lights should illuminate when the switch is depressed and turn off when released.
- Real-World Simulation: Take the vehicle for a brief test drive to simulate real-world conditions. Apply the brakes multiple times and observe the brake lights’ functionality while the vehicle is in motion.
Thorough final testing provides assurance that the brake light wiring repairs have been executed successfully, ensuring the safety and reliability of the vehicle’s lighting system. Neglecting this step can compromise the effectiveness of the repairs, potentially leading to hazardous situations on the road.


Related Posts


