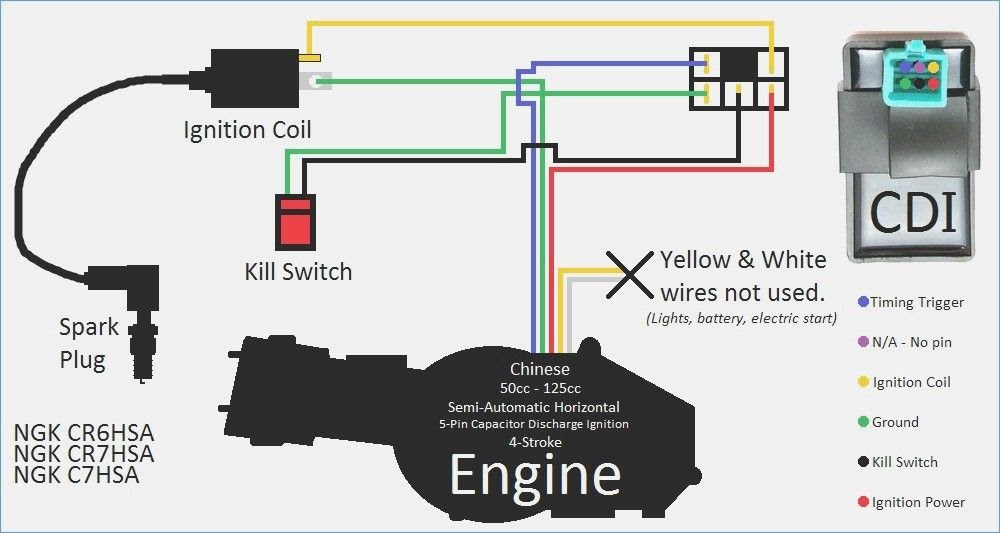
A GY6 wiring diagram is a visual representation of the electrical connections within a GY6 engine, a type of single-cylinder, four-stroke engine commonly used in scooters and other small vehicles. It illustrates the flow of electricity from the battery, through various components, and back to the battery, providing a comprehensive overview of the engine’s electrical system.
The wiring diagram is of crucial importance as it enables technicians to troubleshoot electrical issues, identify and repair faulty connections, and modify or upgrade the electrical system. Historically, wiring diagrams have evolved to incorporate color-coding and standardized symbols, greatly simplifying the process of interpreting and working with them.
This article delves into the complexities of GY6 wiring diagrams, providing a detailed guide to their components, functions, and practical applications. By understanding the intricacies of these diagrams, readers gain the knowledge necessary to maintain and optimize the electrical systems of their GY6-powered vehicles.
A comprehensive understanding of the essential aspects of GY6 wiring diagrams is crucial for maintaining and troubleshooting the electrical systems of GY6-powered vehicles. These diagrams provide a visual representation of the electrical connections within the engine, making it possible to identify and repair faults, modify circuits, and optimize performance.
- Components: Battery, ignition coil, CDI unit, voltage regulator, starter solenoid
- Connections: Wires, terminals, connectors, fuses
- Color Coding: Standardized colors for different types of wires
- Symbols: Graphical representations of electrical components
- Circuit Paths: The flow of electricity through the various components
- Troubleshooting: Identifying and repairing electrical faults
- Modifications: Adding or changing electrical components
- Maintenance: Checking and cleaning electrical connections
- Safety: Precautions to avoid electrical hazards
By understanding these key aspects, individuals can gain a deeper insight into the functioning of GY6 electrical systems. This knowledge empowers them to diagnose and resolve electrical issues, customize their vehicles, and ensure the optimal performance and longevity of their GY6-powered machines.
Components
Within the context of a GY6 wiring diagram, these components play critical roles in the electrical system of the engine. The battery serves as the primary source of electrical power, providing energy to the ignition coil, CDI unit, voltage regulator, and starter solenoid. The ignition coil generates a high-voltage spark that ignites the air-fuel mixture within the engine’s combustion chamber. The CDI unit (Capacitor Discharge Ignition) controls the timing and duration of the spark, ensuring optimal engine performance. The voltage regulator maintains a stable voltage level throughout the electrical system, protecting sensitive components from damage. Finally, the starter solenoid engages the starter motor, which cranks the engine to initiate combustion. These components are interconnected within the GY6 wiring diagram, forming a complex network of electrical pathways.
Understanding the relationship between these components and the GY6 wiring diagram is essential for troubleshooting electrical issues and performing maintenance on GY6-powered vehicles. By tracing the flow of electricity through the diagram, technicians can identify faulty connections, diagnose component failures, and make necessary repairs or modifications. For instance, if the engine fails to start, the wiring diagram can guide the technician in checking the battery voltage, ignition coil output, and starter solenoid connections.
Furthermore, this understanding enables enthusiasts to customize and optimize the electrical systems of their vehicles. By modifying the GY6 wiring diagram, it is possible to add accessories such as lighting, charging ports, or performance upgrades. However, it is crucial to possess a thorough understanding of the electrical system and to consult with experienced professionals before attempting any modifications.
In summary, the components of battery, ignition coil, CDI unit, voltage regulator, and starter solenoid are fundamental to the functioning of a GY6 engine’s electrical system. The GY6 wiring diagram provides a visual representation of the connections between these components, enabling technicians and enthusiasts to diagnose, repair, and modify the electrical system effectively.
Connections
Within the context of a GY6 wiring diagram, connections play a critical role in the proper functioning of the electrical system. Wires, terminals, connectors, and fuses work together to establish electrical pathways, allowing the flow of electricity between different components. Without these connections, the engine would not be able to operate, as electricity would not be able to reach the necessary components.
The GY6 wiring diagram serves as a roadmap for these connections, providing a visual representation of how each component is connected to the others. The diagram indicates the type of wire to be used for each connection, the location of terminals and connectors, and the placement of fuses. By following the wiring diagram, technicians can ensure that all connections are made correctly, minimizing the risk of electrical faults or damage to components.
Real-life examples of these connections within a GY6 wiring diagram include the wires that connect the battery to the ignition coil, the terminals that connect the CDI unit to the wiring harness, the connectors that join multiple wires together, and the fuses that protect sensitive components from electrical overloads. Understanding the purpose and function of these connections is essential for troubleshooting electrical issues and performing maintenance on GY6-powered vehicles. By tracing the flow of electricity through the wiring diagram, technicians can identify faulty connections, diagnose component failures, and make necessary repairs or modifications.
In summary, connections are a critical component of GY6 wiring diagrams, providing the physical pathways for the flow of electricity. By understanding the relationship between connections and wiring diagrams, individuals can gain a deeper insight into the functioning of GY6 electrical systems. This knowledge empowers them to diagnose and resolve electrical issues, customize their vehicles, and ensure the optimal performance and longevity of their GY6-powered machines.
Color Coding
In the context of GY6 wiring diagrams, color coding plays a vital role in organizing and simplifying the complex network of electrical connections. Standardized colors are assigned to different types of wires, enabling technicians to easily identify and trace the flow of electricity throughout the system.
- Component Identification: Each color is associated with a specific component or type of signal, making it easy to identify the purpose of each wire. For example, red wires typically indicate positive power connections, while black wires are commonly used for negative or ground connections.
- Circuit Tracing: Color coding simplifies the process of tracing electrical circuits, troubleshooting faults, and performing repairs. By following the color-coded wires, technicians can quickly identify the path of electricity through various components and pinpoint the source of any issues.
- International Standards: GY6 wiring diagrams adhere to international color-coding standards, ensuring consistency and ease of understanding across different regions. This standardization facilitates the exchange of technical information and troubleshooting procedures between professionals.
- Safety and Efficiency: Color coding enhances safety and efficiency in electrical maintenance and repair. By following the color-coded wires, technicians can minimize the risk of accidental short circuits or incorrect connections, which could lead to damage to components or even personal injury.
In summary, color coding is an integral part of GY6 wiring diagrams, providing a structured and standardized approach to electrical connections. It enables technicians to efficiently identify components, trace circuits, troubleshoot faults, and ensure the proper functioning of the electrical system. Adherence to these color-coding conventions enhances safety, simplifies maintenance, and facilitates communication among professionals.
Symbols
In the context of GY6 wiring diagrams, symbols serve as a critical component, providing a graphical representation of electrical components and their connections. These symbols form a visual language that enables technicians to understand the functionality and layout of the electrical system without the need for extensive textual descriptions.
The use of standardized symbols in GY6 wiring diagrams ensures consistency and clarity in electrical schematics. Each symbol represents a specific component, such as a battery, resistor, capacitor, or switch. This universal language allows technicians from different backgrounds and regions to interpret and work with wiring diagrams effectively, facilitating troubleshooting, repairs, and modifications.
Real-life examples of electrical symbols within GY6 wiring diagrams include the rectangular symbol with two terminals representing a battery, the zig-zag symbol for a resistor, the parallel lines for a capacitor, and the circle with a line for a switch. These symbols are arranged in a logical manner, depicting the flow of electricity through the circuit. By understanding the symbols and their relationships, technicians can quickly identify and locate specific components, trace signal paths, and diagnose faults.
The practical applications of understanding electrical symbols in GY6 wiring diagrams extend beyond troubleshooting and repairs. Technicians can utilize this knowledge to modify and enhance the electrical system, adding accessories or optimizing performance. By referring to the wiring diagram, they can determine the appropriate connections and power requirements for new components, ensuring a safe and functional installation.
Circuit Paths
Within the context of GY6 wiring diagrams, circuit paths play a critical role in understanding the flow of electricity through the various components of the electrical system. These paths provide a roadmap for the movement of electrical energy, enabling technicians to troubleshoot faults, modify circuits, and optimize performance.
Circuit paths are represented in GY6 wiring diagrams using a combination of symbols and lines. The symbols denote the different components, such as batteries, resistors, capacitors, and switches, while the lines indicate the connections between them. By following these paths, technicians can trace the flow of electricity and identify the specific components that are involved in each circuit.
Real-life examples of circuit paths within GY6 wiring diagrams include the path from the battery to the ignition coil, through the CDI unit, and to the spark plug. Another example is the path from the voltage regulator to the various electrical consumers, such as the lighting system and fuel injection system. Understanding these circuit paths is essential for diagnosing and repairing electrical faults. By tracing the path of electricity, technicians can identify the point at which the fault occurs and make the necessary repairs.
Furthermore, understanding circuit paths enables technicians to modify and enhance the electrical system. By adding or removing components, or by changing the connections between components, technicians can customize the system to meet specific requirements. For instance, they may add an accessory such as a USB charging port or install a performance upgrade such as a higher-output ignition coil.
In summary, circuit paths are a critical component of GY6 wiring diagrams, providing a visual representation of the flow of electricity through the electrical system. Understanding these circuit paths is essential for troubleshooting faults, modifying circuits, and optimizing performance. By tracing the flow of electricity through the wiring diagram, technicians gain a deeper insight into the functioning of the electrical system and can make informed decisions regarding maintenance and repair.
Troubleshooting
In the context of GY6 wiring diagrams, troubleshooting is a crucial aspect that empowers technicians with the ability to identify and repair electrical faults. By utilizing the wiring diagram as a guide, technicians can systematically diagnose issues and restore the electrical system to optimal functioning.
- Identifying Faulty Components: The wiring diagram provides a visual representation of the electrical system, enabling technicians to trace the flow of electricity and identify faulty components. Real-life examples include a malfunctioning ignition coil, a broken wire, or a loose connection.
- Testing and Verification: Using a multimeter or other diagnostic tools, technicians can test the functionality of individual components and verify their electrical values. This process helps pinpoint the exact source of the fault and ensures accurate repairs.
- Repair and Replacement: Once the faulty component has been identified, technicians can proceed with repairs or replacements. This may involve soldering broken wires, replacing damaged components, or adjusting connections to restore proper electrical flow.
- Overall System Check: After repairs or replacements have been made, a comprehensive system check is essential to ensure that the electrical system is functioning correctly as a whole. This includes testing the starting system, lighting system, and other electrical components to verify their proper operation.
Troubleshooting electrical faults using GY6 wiring diagrams requires a combination of technical knowledge, analytical skills, and practical experience. By understanding the circuit paths, component interconnections, and electrical principles, technicians can effectively diagnose and repair electrical issues, ensuring the reliability and performance of GY6-powered vehicles.
Modifications
In the context of “Gy6 Wiring Diagram”, modifications involving the addition or alteration of electrical components play a significant role in customizing and enhancing the performance of GY6-powered vehicles. These modifications empower enthusiasts and technicians to tailor the electrical system to specific requirements, ranging from aesthetic upgrades to performance optimizations.
- Accessory Integration: Adding electrical accessories such as charging ports, heated grips, or additional lighting systems requires careful integration into the existing wiring harness. Modifications involve identifying suitable power sources, determining appropriate wire gauges, and ensuring proper connections to maintain system stability.
- Performance Upgrades: Enhancing engine performance can involve modifications to the ignition system, fuel injection system, or exhaust system. These modifications may include installing high-output ignition coils, upgrading fuel injectors, or adding performance-oriented exhaust components. Understanding the wiring diagram is crucial for integrating these upgrades seamlessly.
- Custom Lighting: Modifying the lighting system for aesthetic or functional purposes involves adding or replacing lighting components such as headlights, taillights, or turn signals. Wiring diagrams guide the selection of appropriate bulbs, wiring, and switches to ensure proper illumination and electrical compatibility.
- Electrical System Optimization: Modifications aimed at optimizing the electrical system may include upgrading the charging system with a higher-output alternator or adding a voltage regulator to stabilize electrical output. These modifications require careful consideration of the existing wiring harness and component compatibility to prevent overloads or damage.
Understanding Gy6 Wiring Diagrams is essential for undertaking electrical modifications safely and effectively. By tracing circuit paths, identifying component interconnections, and comprehending electrical principles, enthusiasts and technicians can make informed decisions regarding the addition or alteration of electrical components. These modifications can unlock a wide range of possibilities for customization, performance enhancement, and improved functionality of GY6-powered vehicles.
Maintenance
In the context of “Gy6 Wiring Diagram,” maintenance involving the checking and cleaning of electrical connections plays a critical role in ensuring the reliable operation and longevity of the electrical system. Electrical connections, being the points where current flows between components, are susceptible to corrosion, oxidation, and loosening over time. These factors can lead to increased resistance, voltage drops, and ultimately electrical faults.
The “Gy6 Wiring Diagram” serves as a valuable guide for maintenance procedures, providing a visual representation of the electrical system and the location of all electrical connections. By referring to the wiring diagram, technicians and enthusiasts can systematically inspect and clean each connection, ensuring optimal electrical flow. Real-life examples of maintenance tasks within the “Gy6 Wiring Diagram” include checking the tightness of battery terminals, cleaning the contacts of relays and switches, and inspecting wire harnesses for any signs of damage or corrosion.
The practical applications of understanding the connection between “Maintenance: Checking and cleaning electrical connections” and “Gy6 Wiring Diagram” are numerous. Regular maintenance helps prevent electrical faults, reduces the risk of electrical fires, and extends the lifespan of electrical components. By following the wiring diagram and adhering to proper maintenance procedures, individuals can ensure that their GY6-powered vehicles operate safely and efficiently.
In summary, “Maintenance: Checking and cleaning electrical connections” is an essential aspect of “Gy6 Wiring Diagram.” By understanding the importance of maintaining clean and tight electrical connections, and by utilizing the wiring diagram as a guide, individuals can effectively maintain and troubleshoot the electrical systems of their GY6-powered vehicles, ensuring optimal performance and reliability.
Safety
The intricate realm of electrical systems demands the utmost attention to safety. The “Gy6 Wiring Diagram” serves as a crucial guide in this regard, providing a comprehensive blueprint of the electrical circuitry, enabling technicians and enthusiasts to identify potential hazards and implement appropriate precautions.
Electrical hazards arise from various sources, including exposed wires, faulty connections, and improper grounding. These hazards can lead to electrical shocks, fires, and damage to electrical components. The “Gy6 Wiring Diagram” empowers individuals to mitigate these risks by visually presenting the electrical system’s layout and component interconnections. By studying the diagram, users can identify areas where wires may be exposed or connections may be loose, allowing them to take proactive measures to address these issues.
Real-life examples of safety precautions within the “Gy6 Wiring Diagram” include proper insulation of electrical wires, the use of circuit breakers and fuses to prevent overloads, and the implementation of grounding systems to protect against electrical shocks. Understanding the purpose and location of these safety features is essential for effective electrical maintenance and troubleshooting.
The practical applications of this understanding extend to various aspects of electrical system management. By adhering to the safety guidelines outlined in the “Gy6 Wiring Diagram,” individuals can minimize the risk of electrical accidents, ensure the longevity of electrical components, and maintain a safe and reliable electrical environment. In summary, the connection between “Safety: Precautions to avoid electrical hazards” and “Gy6 Wiring Diagram” is paramount, as the diagram provides a roadmap for identifying and mitigating electrical hazards, empowering users to work safely and effectively with electrical systems.


![[DIAGRAM] Hensim Atv Wiring Diagram 150cc Gy6 Engine](https://i0.wp.com/mopedwizard.www1.50megs.com/schematics/ncwiring.jpg?w=665&ssl=1)


Related Posts


