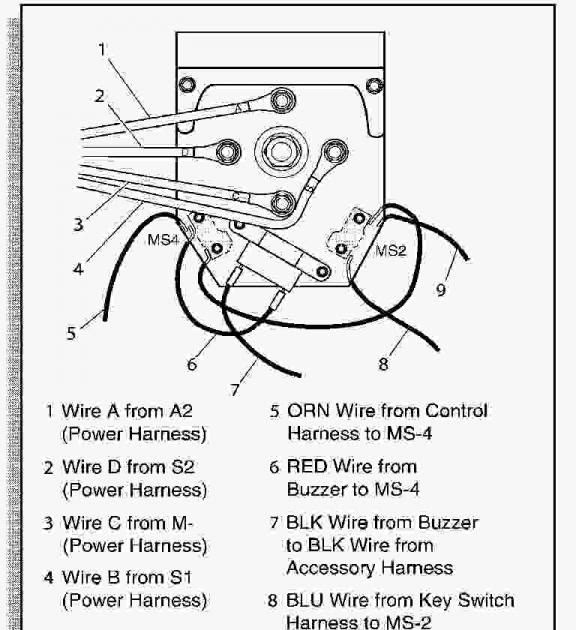
An Ezgo forward reverse switch wiring diagram is a schematic representation of the electrical connections between the forward/reverse switch and other components in an Ezgo golf cart. It provides a visual guide for installing and troubleshooting the wiring system, ensuring the proper functioning of the forward and reverse gears.
The wiring diagram is crucial for maintaining the cart’s mobility and preventing electrical issues. By understanding the connections, technicians can efficiently diagnose and repair any faults that may arise, minimizing downtime and ensuring a smooth operation of the golf cart.
Historically, wiring diagrams have evolved from simple sketches to sophisticated computer-aided designs. This evolution has improved accuracy, clarity, and ease of use, making it easier for technicians to comprehend and troubleshoot complex electrical systems.
The Ezgo forward reverse switch wiring diagram plays a crucial role in the proper functioning and maintenance of Ezgo golf carts. Understanding its key aspects is essential for technicians and users alike, ensuring the smooth operation of the cart and timely troubleshooting of any electrical issues. Here are ten key aspects to consider:
- Wiring connections: The diagram outlines the electrical connections between the forward/reverse switch and other components like the batteries, motor, and controller.
- Switch functionality: The diagram explains how the switch operates, allowing the user to select forward or reverse gear.
- Circuit protection: The diagram includes information about fuses or circuit breakers that protect the wiring system from overloads.
- Troubleshooting guide: The diagram serves as a troubleshooting guide, helping technicians identify and fix electrical faults.
- Compatibility: The diagram ensures that the switch is compatible with the specific Ezgo golf cart model.
- Safety precautions: The diagram highlights safety precautions to follow when working with the electrical system.
- Maintenance schedule: The diagram may include a maintenance schedule for the switch and wiring system.
- Technical specifications: The diagram provides technical specifications of the switch, such as its voltage and amperage ratings.
- Installation instructions: The diagram may include step-by-step instructions for installing the switch and wiring system.
- Warranty information: The diagram may include warranty information for the switch and wiring system.
These aspects, when deeply understood, empower technicians with the knowledge to maintain and repair Ezgo golf carts efficiently. The wiring diagram serves as a valuable tool for troubleshooting, ensuring the safety and reliability of the vehicle.
Wiring connections
The wiring connections are a critical component of the Ezgo Forward Reverse Switch Wiring Diagram. They provide the electrical pathways for the switch to control the direction of the golf cart. Without proper wiring connections, the switch would not be able to function, and the golf cart would not be able to move.
Real-life examples of wiring connections within an Ezgo Forward Reverse Switch Wiring Diagram include the connections between the switch and the batteries, the motor, and the controller. These connections are typically made with wires, terminals, and connectors.
Understanding the wiring connections within an Ezgo Forward Reverse Switch Wiring Diagram is essential for troubleshooting and repairing golf carts. By understanding how the connections are made, technicians can quickly identify and fix any problems that may arise.
In summary, the wiring connections in an Ezgo Forward Reverse Switch Wiring Diagram are essential for the proper functioning of the golf cart. By understanding these connections, technicians can maintain and repair golf carts more efficiently.
Switch functionality
Within the context of an Ezgo Forward Reverse Switch Wiring Diagram, switch functionality holds paramount importance, as it dictates the operational behavior and control of the golf cart’s movement. The diagram provides a detailed illustration of how the switch operates, empowering users to select forward or reverse gear seamlessly.
- Mechanism of Operation: The diagram elucidates the internal mechanism of the switch, explaining how electrical signals are processed to engage either forward or reverse gear. This understanding aids in troubleshooting and maintenance.
- Circuit Configuration: The diagram depicts the circuit configuration associated with the switch, showcasing the arrangement of wires, terminals, and other electrical components. This knowledge is crucial for ensuring proper installation and preventing electrical faults.
- Safety Features: The diagram may incorporate safety features implemented within the switch, such as interlocks or protective mechanisms, which prevent accidental gear engagement or safeguard against electrical hazards.
- Compatibility Considerations: The diagram highlights compatibility aspects of the switch, indicating its suitability for specific Ezgo golf cart models. This information ensures that the switch is appropriately matched to the electrical system of the cart.
In summary, switch functionality, as outlined in the Ezgo Forward Reverse Switch Wiring Diagram, is a critical aspect that governs the operational efficiency and safety of the golf cart. By comprehending the intricate details of the switch’s operation, users can maintain and troubleshoot the electrical system effectively, ensuring a smooth and reliable driving experience.
Circuit protection
Within the realm of Ezgo Forward Reverse Switch Wiring Diagrams, circuit protection plays a pivotal role in safeguarding the electrical system from hazardous overloads. This aspect of the diagram provides crucial information regarding fuses or circuit breakers, essential components that prevent damage to the wiring and ensure uninterrupted operation of the golf cart.
- Fuse Protection: Fuses are sacrificial devices designed to break the circuit and protect the wiring from excessive current flow. When an overload occurs, the fuse melts, interrupting the power supply and preventing damage to sensitive electrical components.
- Circuit Breaker Protection: Circuit breakers act as reusable protective switches, which trip and cut off the power when an overload is detected. Unlike fuses, circuit breakers can be reset, allowing for quick restoration of power after the fault has been addressed.
- Wire Gauge and Ampacity: The diagram specifies the appropriate wire gauge and ampacity (current-carrying capacity) for the wiring system. This information ensures that the wires are capable of handling the electrical load without overheating or causing a fire hazard.
- Grounding: The diagram may include grounding instructions, which are essential for providing a safe path for any stray electrical currents to flow back to the source, preventing electrical shocks and damage to the equipment.
Understanding circuit protection within the context of Ezgo Forward Reverse Switch Wiring Diagrams is crucial for the safety and reliability of the golf cart. By incorporating these protective measures, the electrical system is shielded from potential damage caused by overloads, ensuring a longer lifespan and preventing costly repairs.
Troubleshooting guide
Within the context of Ezgo Forward Reverse Switch Wiring Diagrams, the troubleshooting guide stands as an invaluable tool, empowering technicians with the knowledge to diagnose and resolve electrical faults efficiently. This aspect of the diagram provides step-by-step instructions, component testing procedures, and diagnostic charts to assist in identifying and rectifying issues.
- Fault Identification: The troubleshooting guide provides a systematic approach to identifying the root cause of electrical faults. By following the outlined steps and performing specific tests, technicians can pinpoint the faulty component or connection.
- Component Testing: The diagram includes instructions for testing individual components, such as switches, relays, and wiring harnesses. These tests help isolate the faulty component and determine if it needs replacement or repair.
- Diagnostic Charts: Diagnostic charts are often incorporated into the troubleshooting guide, providing a quick reference for common symptoms and their corresponding solutions. This simplifies the troubleshooting process, especially for less experienced technicians.
- Real-Life Examples: The troubleshooting guide may include real-life examples of common electrical faults and their solutions. These examples provide practical insights and help technicians relate the theoretical concepts to actual scenarios.
The troubleshooting guide serves as a valuable asset for technicians, enabling them to diagnose and fix electrical faults in Ezgo golf carts quickly and accurately. By providing clear instructions and diagnostic tools, the troubleshooting guide minimizes downtime and ensures the smooth operation of the golf cart.
Compatibility
Within the context of Ezgo Forward Reverse Switch Wiring Diagrams, compatibility plays a pivotal role in ensuring the seamless integration and proper functioning of the switch within the golf cart’s electrical system. The diagram serves as a guide to verify that the selected switch is compatible with the specific Ezgo golf cart model, preventing potential issues and ensuring optimal performance.
- Electrical Specifications: The diagram outlines the electrical specifications of the switch, such as voltage and amperage ratings, ensuring compatibility with the golf cart’s electrical system. Mismatched specifications can lead to damage to the switch or other electrical components.
- Physical Dimensions: The diagram provides the physical dimensions of the switch, including its mounting points and dimensions, ensuring that it fits properly within the designated space in the golf cart. Improper fit can result in installation difficulties or impaired functionality.
- Connector Compatibility: The diagram specifies the type of connectors used by the switch, ensuring compatibility with the existing wiring harness of the golf cart. Incompatible connectors can prevent proper electrical connections and disrupt the operation of the switch.
- Functional Compatibility: The diagram verifies that the switch is designed to perform the specific functions required by the golf cart model. This includes compatibility with the forward/reverse mechanism, safety features, and any additional functionalities.
Ensuring compatibility between the forward/reverse switch and the specific Ezgo golf cart model is crucial for the safe and reliable operation of the golf cart. By utilizing the information provided in the Ezgo Forward Reverse Switch Wiring Diagram, technicians and users can select the appropriate switch, ensuring a seamless installation and optimal performance.
Safety precautions
Within the context of Ezgo Forward Reverse Switch Wiring Diagrams, safety precautions hold paramount importance, as they provide essential guidelines for technicians and users to work with the electrical system safely and minimize the risk of accidents or injuries. The diagram serves as a valuable reference, outlining specific precautions to follow during installation, maintenance, and troubleshooting procedures.
- Hazard Identification: The diagram highlights potential hazards associated with working on the electrical system, such as exposed wires, energized components, and high voltages. This awareness helps technicians identify and mitigate risks before starting any work.
- Protective Equipment: The diagram emphasizes the importance of wearing appropriate personal protective equipment (PPE), including insulated gloves, safety glasses, and non-conductive footwear. PPE helps protect against electrical shocks and other hazards.
- Proper Tools and Techniques: The diagram stresses the use of proper tools and techniques to avoid damage to components or injury to personnel. This includes using insulated tools, following proper torque specifications, and avoiding shortcuts.
- Isolation and Lockout: The diagram instructs technicians to isolate the electrical system before working on it, by disconnecting the battery or using lockout/tagout procedures. This prevents accidental energization and ensures a safe working environment.
Adhering to the safety precautions outlined in the Ezgo Forward Reverse Switch Wiring Diagram is crucial for ensuring the safety of individuals working on the golf cart’s electrical system. By following these guidelines, technicians and users can minimize the risk of electrical hazards, prevent accidents, and maintain a safe working environment.
Maintenance schedule
Within the context of Ezgo Forward Reverse Switch Wiring Diagrams, the maintenance schedule provides crucial information to ensure the longevity and optimal performance of the switch and wiring system. This aspect of the diagram outlines the recommended maintenance intervals, inspection procedures, and replacement guidelines to keep the electrical system in good condition.
The maintenance schedule is an essential component of the Ezgo Forward Reverse Switch Wiring Diagram for several reasons:
- Preventive Maintenance: By following the maintenance schedule, technicians can proactively identify and address potential issues before they become major problems. This helps prevent unexpected breakdowns and costly repairs.
- Safety: Regular maintenance helps ensure the electrical system is safe to use, minimizing the risk of electrical hazards, such as fires or shocks.
- Extended Lifespan: Proper maintenance helps extend the lifespan of the switch and wiring system, reducing the need for frequent replacements and saving on maintenance costs.
Real-life examples of maintenance schedules within Ezgo Forward Reverse Switch Wiring Diagrams include:
- Inspection Intervals: The diagram may specify regular intervals for inspecting the switch and wiring system for signs of wear, loose connections, or damage.
- Cleaning Procedures: The diagram may provide instructions on how to clean the switch and wiring system to remove dirt, debris, or corrosion that could impair its functionality.
- Replacement Guidelines: The diagram may include guidelines on when to replace the switch or wiring components based on their age, usage, or condition.
Understanding the maintenance schedule within the Ezgo Forward Reverse Switch Wiring Diagram is crucial for technicians and users alike. By adhering to the recommended maintenance procedures, they can ensure the continued reliability and safety of the golf cart’s electrical system, avoiding costly repairs and maintaining optimal performance.
Technical specifications
Within the realm of Ezgo Forward Reverse Switch Wiring Diagrams, technical specifications hold paramount importance, as they provide essential details about the switch’s electrical characteristics, enabling informed decision-making and ensuring compatibility within the golf cart’s electrical system. The diagram serves as a comprehensive reference, outlining critical parameters to consider when selecting and installing the forward/reverse switch.
The voltage and amperage ratings specified in the technical specifications are crucial factors to consider for several reasons:
- Electrical Compatibility: The voltage and amperage ratings must align with the electrical system of the golf cart. Mismatched ratings can lead to damage to the switch, other electrical components, or even the golf cart itself.
- Performance Optimization: Choosing a switch with appropriate voltage and amperage ratings ensures optimal performance and efficiency of the electrical system. Insufficient ratings can result in premature failure or reduced functionality, while excessive ratings may be unnecessary and increase cost.
- Safety Considerations: Adhering to the specified voltage and amperage ratings is vital for safety. Overloading the switch beyond its rated capacity can create overheating, electrical arcing, or even fire hazards.
Real-life examples of technical specifications within Ezgo Forward Reverse Switch Wiring Diagrams include:
- Voltage Rating: The diagram may specify a voltage rating of 12V or 24V, indicating the maximum voltage the switch can handle without damage.
- Amperage Rating: The diagram may specify an amperage rating of 20A or 30A, indicating the maximum current the switch can carry without overheating or failure.
Understanding the technical specifications provided in the Ezgo Forward Reverse Switch Wiring Diagram is crucial for technicians and users alike. By carefully considering the voltage and amperage ratings, they can select the most suitable switch for their specific golf cart model, ensuring compatibility, optimal performance, and safe operation.
Installation instructions
Within the context of Ezgo Forward Reverse Switch Wiring Diagrams, installation instructions serve as a crucial guide for technicians and users to correctly and safely install the forward/reverse switch and its associated wiring system. These instructions provide detailed, step-by-step procedures to ensure proper integration with the golf cart’s electrical system, ensuring optimal performance and longevity.
- Preparatory Steps: The diagram may include preparatory steps, such as gathering necessary tools and materials, preparing the golf cart, and isolating the electrical system before commencing the installation process.
- Switch Installation: The instructions guide the installer through the process of mounting the forward/reverse switch in its designated location, ensuring proper alignment and secure fastening. This may involve drilling holes, securing the switch with bolts or screws, and making the necessary electrical connections.
- Wiring Harness Installation: The diagram provides instructions for installing the wiring harness, which connects the switch to the golf cart’s electrical system. This involves routing the wires, connecting them to the appropriate terminals on the switch and other components, and securing the harness to prevent damage or loose connections.
- Testing and Troubleshooting: The instructions may include steps for testing the installed switch and wiring system to ensure proper functionality. This involves verifying the switch’s operation in both forward and reverse gears, checking for any loose connections or shorts, and making necessary adjustments or repairs.
Understanding and following the installation instructions within the Ezgo Forward Reverse Switch Wiring Diagram is paramount for successful switch installation and reliable golf cart operation. By adhering to these instructions, technicians and users can ensure a safe and efficient installation, minimizing the risk of electrical issues or malfunctions.
Warranty information
Within the context of Ezgo Forward Reverse Switch Wiring Diagrams, warranty information serves as a critical component that outlines the terms and conditions under which the switch and wiring system are covered against defects or malfunctions. This information provides valuable insights into the manufacturer’s commitment to the quality and reliability of their products.
The inclusion of warranty information within the wiring diagram has several key implications:
- Customer Protection: The warranty provides customers with peace of mind, assuring them that they are protected against any manufacturing defects or premature failures. It establishes a level of trust and confidence in the product.
- Quality Assurance: The warranty serves as a testament to the manufacturer’s confidence in the quality and durability of their products. It indicates that the switch and wiring system have undergone rigorous testing and meet specific performance standards.
- Repair and Replacement Coverage: The warranty outlines the manufacturer’s obligations regarding repairs or replacements in the event of a covered failure. It specifies the duration of the warranty period, the scope of coverage, and any exclusions or limitations.
Real-life examples of warranty information within Ezgo Forward Reverse Switch Wiring Diagrams include:
- Warranty Period: The diagram may specify a warranty period of 12 months or 24 months, indicating the duration of coverage against defects.
- Coverage Details: The diagram may provide specific details about the components covered under the warranty, such as the forward/reverse switch, wiring harness, and connectors.
- Limitations and Exclusions: The diagram may outline any limitations or exclusions to the warranty, such as coverage restrictions for damage caused by misuse or improper installation.
Understanding the warranty information provided in the Ezgo Forward Reverse Switch Wiring Diagram is essential for both technicians and users. By carefully reviewing the terms and conditions of the warranty, they can make informed decisions about the product, ensuring their rights as consumers are protected, and building trust in the manufacturer’s commitment to customer satisfaction.


Related Posts


