An Electra Glide Harley Davidson Radio Wiring Diagram is a detailed visual representation of the electrical connections within the radio system of an Electra Glide Harley Davidson motorcycle. It provides a step-by-step guide for installing, troubleshooting, and repairing the radio wiring, ensuring proper functioning and preventing electrical issues.
This diagram holds great significance as it enables users to understand the complex wiring system of their radio, allowing them to make informed decisions during installation or maintenance. It helps reduce the chances of electrical mishaps, ensuring the safety of both the rider and the motorcycle. Furthermore, the diagram serves as a valuable reference for technicians during repairs, saving time and effort.
The development of the Electra Glide Harley Davidson Radio Wiring Diagram marked a pivotal moment in the evolution of motorcycle technology. Before its introduction, radio installations in motorcycles were often haphazard and unreliable. The diagram brought standardization and ease of installation, making it possible for a wider range of riders to enjoy the convenience and entertainment of a motorcycle radio system.
As we delve deeper into this article, we will explore the specific components, connections, and troubleshooting techniques associated with the Electra Glide Harley Davidson Radio Wiring Diagram. By understanding its intricacies, readers will gain the knowledge and confidence to maintain and enhance the audio experience on their Electra Glide Harley Davidson motorcycles.
Understanding the essential aspects of an Electra Glide Harley Davidson Radio Wiring Diagram is crucial for ensuring the proper functioning and maintenance of the radio system in these motorcycles. These aspects encompass various dimensions related to the diagram’s structure, purpose, and implications.
- Accuracy: The diagram must accurately represent the electrical connections within the radio system to provide reliable guidance for installation and troubleshooting.
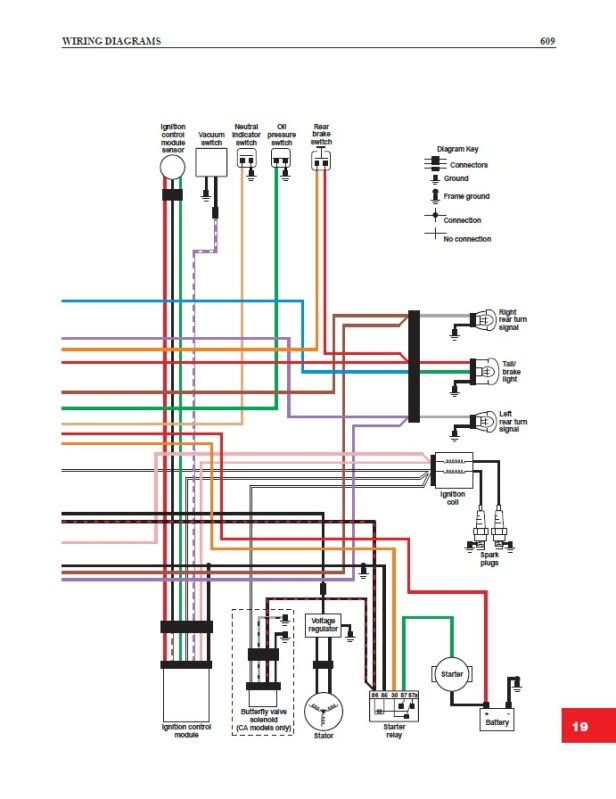
- Comprehensiveness: It should include all necessary details, such as wire colors, connector types, and grounding points, to ensure a complete understanding of the wiring system.
- Clarity: The diagram should be easy to read and interpret, with clear symbols and well-organized layout, enabling users to quickly locate and understand the desired information.
- Compatibility: It must be specific to the particular Electra Glide Harley Davidson model and radio system being installed or serviced to ensure accurate connections.
- Troubleshooting Guide: The diagram often includes a troubleshooting guide that helps users identify and resolve common electrical issues, reducing repair time and costs.
- Safety Precautions: It should emphasize the importance of following proper safety procedures when working with electrical systems, including the use of appropriate tools and protective gear.
- Customization: The diagram can serve as a basis for customizing the radio system, allowing users to add additional components or modify the wiring for specific needs.
- Historical Significance: The Electra Glide Harley Davidson Radio Wiring Diagram has played a significant role in the evolution of motorcycle technology, enabling riders to enjoy the convenience and entertainment of a motorcycle radio system.
These aspects are interconnected and contribute to the overall effectiveness of the Electra Glide Harley Davidson Radio Wiring Diagram. By considering these aspects, users can ensure that the radio system is properly installed, maintained, and customized to meet their specific requirements.
Accuracy
Accuracy is of paramount importance in an Electra Glide Harley Davidson Radio Wiring Diagram. An accurate diagram ensures that the electrical connections are correctly represented, providing reliable guidance for installation and troubleshooting. Without accuracy, the diagram could lead to incorrect wiring, which can cause electrical issues, damage to the radio system, or even safety hazards.
For instance, if the diagram incorrectly shows the connection between the power wire and the ground wire, it could result in a short circuit, potentially damaging the radio or other electrical components. Similarly, if the diagram inaccurately represents the connection between the antenna wire and the radio, it could lead to poor radio reception or complete failure of the audio system.
Therefore, it is crucial that the Electra Glide Harley Davidson Radio Wiring Diagram is accurate and up-to-date. This ensures that users can rely on the diagram for proper installation, maintenance, and troubleshooting of their motorcycle’s radio system. By understanding the critical connection between accuracy and reliability, users can make informed decisions when working with the wiring diagram, ensuring the safety and optimal performance of their Electra Glide Harley Davidson’s radio system.
Comprehensiveness
Comprehensiveness is a critical component of an Electra Glide Harley Davidson Radio Wiring Diagram. A comprehensive diagram includes all necessary details, such as wire colors, connector types, and grounding points, to ensure a complete understanding of the wiring system. Without comprehensive information, users may face difficulties during installation, troubleshooting, or customization of the radio system.
For instance, if the diagram lacks information about wire colors, users may struggle to identify and connect the correct wires, leading to incorrect wiring and potential electrical issues. Similarly, if connector types are not specified, users may use incompatible connectors, resulting in poor connections or even damage to the radio or other components.
A comprehensive Electra Glide Harley Davidson Radio Wiring Diagram provides a clear and detailed roadmap for working with the radio system. It empowers users to make informed decisions, reducing the risk of errors and ensuring the proper functioning of the audio system. By providing all necessary details, the diagram enhances the user’s understanding of the wiring system, enabling them to confidently perform installation, maintenance, and customization tasks.
In summary, comprehensiveness is essential for an Electra Glide Harley Davidson Radio Wiring Diagram as it ensures that users have access to all the necessary information to work with the radio system effectively. A comprehensive diagram promotes accuracy, simplifies troubleshooting, and facilitates customization, ultimately contributing to the optimal performance and enjoyment of the motorcycle’s audio system.
Clarity
In the context of Electra Glide Harley Davidson Radio Wiring Diagrams, clarity is paramount. A clear diagram enhances the user experience, simplifies installation and troubleshooting, and ensures the efficient functioning of the radio system. Clarity encompasses several key facets:
- Symbol Standardization: The diagram employs universally recognized symbols for electrical components, wires, and connectors. This standardization eliminates confusion and ensures consistent interpretation, regardless of the user’s background or experience level.
- Logical Layout: The diagram follows a logical layout, with components arranged in a manner that reflects their physical placement within the radio system. This intuitive organization enables users to easily trace connections and identify specific components.
- Color-Coded Wires: Wires are color-coded to facilitate quick identification and matching. This color-coding corresponds to industry standards, ensuring consistency and reducing the risk of incorrect connections.
- Detailed Annotations: The diagram includes detailed annotations and labels that provide additional information about components, connections, and potential troubleshooting points. These annotations enhance understanding and guide users through the installation and maintenance process.
By incorporating these elements of clarity, Electra Glide Harley Davidson Radio Wiring Diagrams empower users to confidently work with the radio system. The clear and well-organized layout enables users to quickly locate and understand the desired information, reducing installation time, minimizing troubleshooting efforts, and ensuring the optimal performance of the audio system.
Compatibility
In the realm of Electra Glide Harley Davidson Radio Wiring Diagrams, the aspect of “Compatibility: It must be specific to the particular Electra Glide Harley Davidson model and radio system being installed or serviced to ensure accurate connections” holds paramount importance. Compatibility ensures that the diagram aligns precisely with the specific electrical architecture and components of the intended motorcycle and radio system, facilitating accurate connections and optimal performance.
- Specific Model Compatibility: Each Electra Glide Harley Davidson model may have unique electrical configurations and wiring requirements. A compatible diagram caters to these specificities, ensuring that connections align with the motorcycle’s electrical system, preventing potential damage or malfunctions.
- Radio System Compatibility: Different radio systems, whetheror aftermarket, may have varying wiring configurations. A compatible diagram provides the necessary guidance for integrating the specific radio system into the motorcycle’s electrical system, ensuring proper functionality and seamless audio integration.
- Year-Specific Considerations: Electra Glide Harley Davidson models produced in different years may have subtle variations in their electrical systems. A compatible diagram takes into account these year-specific differences, ensuring accurate connections and compatibility with the specific motorcycle’s wiring.
- Customization and Modifications: For enthusiasts who customize their Electra Glide Harley Davidson motorcycles with aftermarket components or accessories, a compatible diagram serves as a valuable resource. It helps determine the appropriate wiring modifications and integrations, ensuring that the customized system functions optimally.
By adhering to the compatibility aspect, Electra Glide Harley Davidson Radio Wiring Diagrams empower users to confidently undertake electrical installations and modifications, ensuring that their audio systems perform flawlessly and remain in harmony with the motorcycle’s electrical architecture. Compatibility serves as the cornerstone of successful radio system integration, ensuring a seamless and enjoyable audio experience on the open road.
Troubleshooting Guide
Within the context of “Electra Glide Harley Davidson Radio Wiring Diagram”, the “Troubleshooting Guide” aspect assumes great significance. It provides users with a valuable tool for diagnosing and resolving common electrical issues, minimizing repair time and associated costs. This troubleshooting guide typically encompasses several key components:
- Common Problems and Solutions: The troubleshooting guide often lists common problems that users may encounter with their Electra Glide Harley Davidson radio system, along with step-by-step instructions on how to resolve these issues. These problems may range from minor issues, such as a blown fuse, to more complex problems, such as a faulty wiring connection.
- Diagnostic Techniques: The guide may include diagnostic techniques to help users pinpoint the source of electrical problems. These techniques may involve using a multimeter to test for continuity or voltage, or following specific procedures to isolate the affected component.
- Wiring Diagrams and Schematics: The troubleshooting guide may incorporate simplified wiring diagrams or schematics that provide a visual representation of the radio system’s electrical connections. These diagrams can assist users in tracing wires, identifying components, and understanding the overall layout of the system.
By incorporating a comprehensive troubleshooting guide, Electra Glide Harley Davidson Radio Wiring Diagrams empower users to take a proactive approach to electrical problem-solving. This self-sufficiency not only saves time and money on repairs but also enhances the overall riding experience by minimizing audio system downtime. Whether it’s a minor electrical glitch or a more complex issue, the troubleshooting guide equips users with the knowledge and confidence to diagnose and resolve problems efficiently, ensuring a smooth and enjoyable audio experience on the open road.
Safety Precautions
When working with electrical systems, including those in Electra Glide Harley Davidson motorcycles, adhering to proper safety precautions is of paramount importance. Electra Glide Harley Davidson Radio Wiring Diagrams play a critical role in ensuring safety by providing clear instructions and guidance on the correct installation and handling of electrical components.
Electrical systems, if not handled properly, can pose significant risks, ranging from minor shocks to severe injuries or even electrocution. Safety precautions outlined in the wiring diagram serve as a crucial safeguard, guiding users through the safe handling of electrical connections, component replacement, and troubleshooting.
For instance, the diagram may specify the use of insulated tools, such as pliers with rubberized handles, to prevent electrical shock. It may also emphasize the need for proper grounding and the use of appropriate fuses to protect against electrical overloads. Additionally, the diagram may provide warnings about potential hazards, such as exposed wires or high-voltage components, to alert users to take extra precautions.
By incorporating safety precautions, Electra Glide Harley Davidson Radio Wiring Diagrams empower users to work on their electrical systems with confidence, minimizing the risk of accidents. These precautions not only protect the user’s safety but also prevent damage to the motorcycle’s electrical components, ensuring the longevity and optimal performance of the audio system.
In conclusion, “Safety Precautions: It should emphasize the importance of following proper safety procedures when working with electrical systems, including the use of appropriate tools and protective gear.” is a critical component of Electra Glide Harley Davidson Radio Wiring Diagrams. By providing clear instructions and warnings, these diagrams guide users in the safe handling of electrical systems, minimizing risks and ensuring the safety of both the user and the motorcycle.
Customization
The ability to customize the radio system is a critical component of the Electra Glide Harley Davidson Radio Wiring Diagram as it empowers users to tailor their audio experience to their specific preferences and requirements. The diagram provides a detailed roadmap of the electrical connections within the radio system, enabling users to make informed decisions about adding additional components or modifying the wiring to achieve their desired outcome.
For instance, a user may want to install a more powerful amplifier to enhance the audio output of the system. By referring to the wiring diagram, they can identify the appropriate connection points and determine the necessary modifications to accommodate the new component. Similarly, if a user desires a more personalized look, they can use the diagram to guide them in changing the color of the or adding custom speakers.
The practical significance of this customization capability extends beyond personal preferences. It allows users to adapt the radio system to suit specific riding conditions or functional requirements. For example, riders who frequently travel long distances may choose to install a weather-resistant radio unit and modify the wiring to ensure uninterrupted audio performance in adverse conditions.
In summary, the customization aspect of the Electra Glide Harley Davidson Radio Wiring Diagram empowers users to create a truly personalized and functional audio system that meets their unique needs. By providing a clear understanding of the electrical connections, the diagram serves as a valuable tool for enthusiasts who seek to enhance their riding experience through customized audio solutions.
Historical Significance
Within the broader context of Electra Glide Harley Davidson Radio Wiring Diagrams, their historical significance cannot be overstated. These diagrams have played a pivotal role in the evolution of motorcycle technology, transforming the riding experience for countless enthusiasts.
- Standardization and Accessibility: Prior to the introduction of standardized wiring diagrams, the installation and maintenance of motorcycle radio systems were often haphazard and unreliable. The Electra Glide Harley Davidson Radio Wiring Diagram brought forth a new era of standardization, providing a clear and concise roadmap for enthusiasts to follow. This standardization made it possible for a wider range of riders to enjoy the convenience and entertainment of a motorcycle radio system, regardless of their technical expertise.
- Enhanced Safety and Reliability: Before the advent of comprehensive wiring diagrams, electrical issues in motorcycle radio systems were often difficult to diagnose and resolve, potentially leading to safety hazards. The Electra Glide Harley Davidson Radio Wiring Diagram provided a structured approach to troubleshooting, enabling riders to identify and fix electrical problems efficiently, reducing the risk of accidents and ensuring a more reliable audio experience.
- Customization and Innovation: The availability of detailed wiring diagrams empowered riders and aftermarket manufacturers to customize their motorcycle radio systems to suit their specific needs and preferences. These diagrams served as a foundation for innovation, fostering a community of enthusiasts who shared ideas and developed creative solutions to enhance the audio capabilities of their motorcycles.
- Preservation of Motorcycle Heritage: Electra Glide Harley Davidson Radio Wiring Diagrams have played a significant role in preserving the heritage of these iconic motorcycles. By providing accurate documentation of the electrical systems, these diagrams have enabled enthusiasts to restore and maintain their Electra Glide Harleys to their original specifications, ensuring that future generations can appreciate the rich history of these machines.
In conclusion, the historical significance of Electra Glide Harley Davidson Radio Wiring Diagrams lies in their role as catalysts for standardization, enablers of enhanced safety and reliability, facilitators of customization and innovation, and guardians of motorcycle heritage. These diagrams have indelibly shaped the evolution of motorcycle technology, leaving a lasting legacy that continues to benefit riders and enthusiasts to this day.

![[DIAGRAM] Harley Street Glide Radio Wiring Diagram](https://i0.wp.com/i.pinimg.com/originals/0c/3e/e3/0c3ee34f952cebddeb1b6c2c16b2f969.jpg?w=665&ssl=1)


Related Posts


