Doorbell wiring diagrams provide a visual representation of the electrical connections required for the proper functioning of a doorbell system. These diagrams illustrate the wiring connections between the transformer, doorbell switch, and chime, enabling the flow of electricity to activate the chime when the doorbell button is pressed.
Understanding doorbell wiring diagrams is crucial for electrical professionals, homeowners, and DIY enthusiasts alike. They ensure the safe and efficient installation of doorbell systems, preventing electrical hazards and ensuring reliable operation. Historically, the advent of wireless doorbells has simplified wiring, reducing the complexity of installation and maintenance.
This article delves into the intricacies of doorbell wiring diagrams, exploring the different types, components, and wiring configurations used in various doorbell systems. We will also provide practical tips and troubleshooting techniques to assist you in installing and maintaining your doorbell system effectively.
Doorbell wiring diagrams play a pivotal role in the installation, maintenance, and troubleshooting of doorbell systems, ensuring their safe and efficient operation. Understanding the various aspects of these diagrams is crucial for electrical professionals and DIY enthusiasts alike.
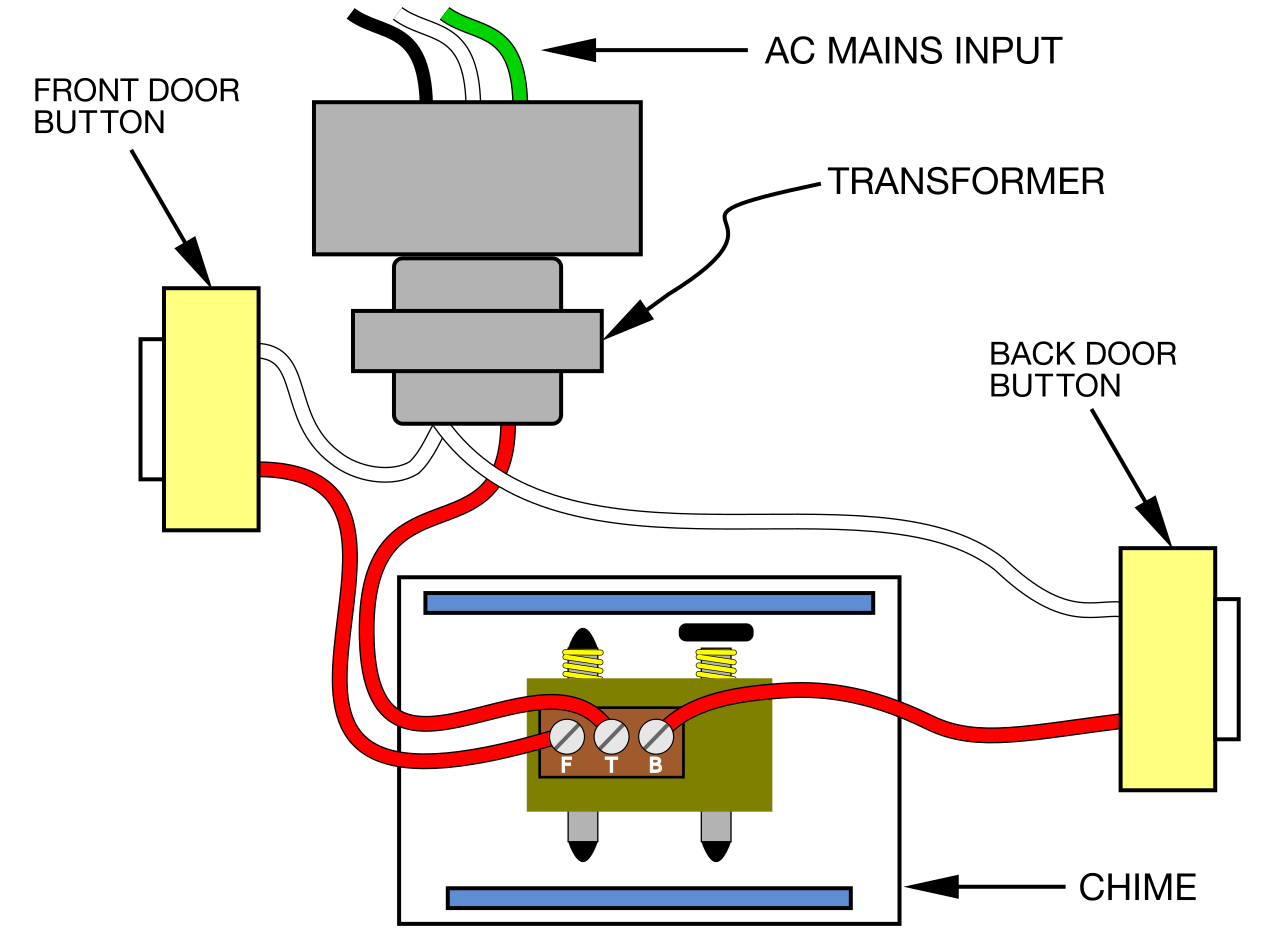
- Components: Illustrate the essential components of a doorbell system, including the transformer, doorbell switch, chime, and wiring.
- Connections: Show the electrical connections between the components, ensuring the proper flow of electricity.
- Layout: Depict the physical arrangement of the components, aiding in the installation and maintenance process.
- Types: Explain the different types of doorbell wiring diagrams used for various doorbell systems, such as wired, wireless, and video doorbells.
- Troubleshooting: Provide guidance on identifying and resolving common issues with doorbell systems using wiring diagrams.
- Safety: Emphasize the importance of following wiring diagrams correctly to prevent electrical hazards and ensure safe operation.
- Codes and Standards: Highlight the adherence to electrical codes and standards when installing and maintaining doorbell systems based on wiring diagrams.
- Tools and Materials: List the essential tools and materials required for working with doorbell wiring diagrams, such as screwdrivers, pliers, and electrical tape.
These key aspects provide a comprehensive understanding of doorbell wiring diagrams, empowering individuals to confidently install, maintain, and troubleshoot their doorbell systems. By comprehending the components, connections, and layout, they can ensure the reliable and efficient operation of their doorbells, enhancing the safety and convenience of their homes.
Components
Within the context of “Doorbell Wiring Diagrams,” understanding the essential components of a doorbell system is paramount. Wiring diagrams rely on accurate representations of these components to ensure proper installation and functionality.
-
Transformer:
Steps down the household voltage to a lower voltage suitable for the doorbell system, typically 12-24 volts. This safety measure prevents electrical hazards and protects the doorbell components. -
Doorbell Switch:
Initiates the doorbell circuit when pressed. The switch is usually located outside the building, allowing visitors to announce their arrival. It can be momentary (only completing the circuit while pressed) or maintained (keeping the circuit closed until manually opened). -
Chime:
Produces the audible signal when the doorbell switch is pressed. Chimes can be mechanical (using a bell or gong) or electronic (generating sound through a speaker). They come in various melodies and volumes to suit personal preferences. -
Wiring:
Connects the transformer, doorbell switch, and chime, completing the electrical circuit. The wiring must be properly sized and insulated to carry the electrical current safely and efficiently.
These components work in conjunction to create a functional doorbell system. By understanding their roles and interconnections through wiring diagrams, individuals can ensure the proper installation, maintenance, and troubleshooting of their doorbells, enhancing the safety and convenience of their homes.
Connections
Within the context of “Doorbell Wiring Diagrams,” understanding the electrical connections between components is crucial for ensuring the proper flow of electricity and the reliable operation of the doorbell system. Wiring diagrams accurately depict these connections, enabling effective installation, maintenance, and troubleshooting.
-
Power Source Connection:
Illustrates how the transformer connects to the household power source. This connection provides the necessary voltage to power the doorbell system, typically 12-24 volts. -
Doorbell Switch Connection:
Shows the electrical connection between the doorbell switch and the transformer. When the switch is pressed, it completes the circuit, allowing current to flow and activate the chime. -
Chime Connection:
Depicts the wiring between the transformer and the chime. This connection carries the electrical current from the transformer to the chime, triggering the audible signal. -
Ground Connection:
Indicates the connection between the doorbell system and the electrical ground. This connection provides a safe path for excess electrical current, preventing electrical shocks and hazards.
These connections form the backbone of a functional doorbell system. By comprehending the proper wiring of these connections through wiring diagrams, individuals can ensure the safe and efficient operation of their doorbells, enhancing the security and convenience of their homes.
Layout
Within the context of “Doorbell Wiring Diagrams,” understanding the physical arrangement of components is crucial for efficient installation and maintenance. Wiring diagrams accurately depict the layout, guiding individuals in positioning components for optimal functionality and ease of access.
-
Component Placement:
Wiring diagrams indicate the designated locations for the transformer, doorbell switch, and chime, ensuring proper spacing and accessibility. This facilitates efficient installation and prevents overcrowding or interference with other electrical systems. -
Wire Routing:
Diagrams illustrate the optimal paths for wiring, minimizing clutter and maximizing safety. By following the designated routes, individuals can avoid potential hazards, such as exposed wires or interference with structural elements. -
Accessibility for Maintenance:
Wiring diagrams consider future maintenance needs by depicting components in a manner that allows for easy access. This foresight simplifies troubleshooting, repairs, or replacements, reducing downtime and ensuring the longevity of the doorbell system. -
Compliance with Codes:
Wiring diagrams adhere to electrical codes and standards, ensuring compliance with safety regulations. By following the layout specified in the diagrams, individuals can avoid code violations and potential hazards, ensuring the safe and reliable operation of the doorbell system.
Comprehending the layout aspect of doorbell wiring diagrams empowers individuals to install and maintain their doorbell systems effectively. By understanding the physical arrangement of components, wire routing, and accessibility considerations, they can ensure the optimal functionality, safety, and longevity of their doorbells, enhancing the security and convenience of their homes.
Types
Within the realm of “Doorbell Wiring Diagrams,” understanding the different types of diagrams used for wired, wireless, and video doorbells is essential. Each type presents unique considerations and implications, influencing the installation, maintenance, and functionality of the doorbell system.
-
Wired Doorbells:
Emphasize the use of physical wires to connect components, providing a reliable and stable connection. Discuss the need for proper wiring techniques and adherence to electrical codes for safety and optimal performance. -
Wireless Doorbells:
Highlight the absence of physical wires, utilizing radio frequencies or Wi-Fi for communication. Explain the advantages of easy installation and flexibility, but also touch upon potential interference and range limitations. -
Video Doorbells:
Introduce the integration of a camera into the doorbell system, allowing users to see and communicate with visitors remotely. Discuss the additional wiring requirements for power and video transmission, along with the benefits of enhanced security and convenience. -
Smart Doorbells:
Explore the integration of smart technology, enabling features such as motion detection, facial recognition, and mobile app connectivity. Explain the more complex wiring and configuration requirements, but also emphasize the advanced functionality and convenience offered.
Comprehending the different types of doorbell wiring diagrams empowers individuals to select the most appropriate system for their needs and preferences. By understanding the implications of wired, wireless, video, and smart doorbell systems, they can make informed decisions, ensuring the optimal installation, maintenance, and functionality of their doorbell systems, enhancing the security and convenience of their homes.
Troubleshooting
Within the realm of “Doorbell Wiring Diagrams,” troubleshooting plays a critical role in ensuring the optimal functionality and reliability of doorbell systems. Wiring diagrams serve as invaluable tools for identifying and resolving common issues, empowering individuals to maintain and repair their doorbells effectively.
Troubleshooting techniques rely heavily on the accurate interpretation of wiring diagrams. By understanding the electrical connections and component layout depicted in the diagrams, individuals can systematically diagnose and address problems such as:
- No power to the doorbell: Wiring diagrams help trace the power source connection, ensuring proper voltage and continuity throughout the circuit.
- Faulty doorbell switch: Diagrams guide the testing and replacement of the doorbell switch, identifying any issues with its electrical contacts or wiring.
- Chime not sounding: Wiring diagrams assist in isolating the chime itself or potential issues with its wiring connections.
- Intermittent operation: Diagrams enable the identification of loose connections, faulty components, or signal interference that may cause intermittent doorbell operation.
The practical applications of troubleshooting using wiring diagrams extend beyond DIY repairs. For electrical professionals, wiring diagrams are essential for diagnosing and resolving complex doorbell system issues, ensuring the safety and efficiency of the installation. Furthermore, manufacturers often provide troubleshooting guides that complement wiring diagrams, offering step-by-step instructions for specific doorbell models.
In conclusion, the connection between “Troubleshooting: Provide guidance on identifying and resolving common issues with doorbell systems using wiring diagrams” and “Doorbell Wiring Diagrams” is inseparable. Wiring diagrams empower individuals to troubleshoot and repair doorbell systems effectively, enhancing the safety, reliability, and functionality of these essential home security devices.
Safety
In the context of “Doorbell Wiring Diagrams,” safety takes paramount importance. Wiring diagrams serve as essential tools for ensuring the safe installation and operation of doorbell systems, preventing electrical hazards and protecting individuals from harm. Adhering to these diagrams is not merely a recommendation but a crucial aspect of responsible electrical practices.
Electrical hazards associated with doorbell systems can arise from various factors, including incorrect wiring, loose connections, and faulty components. Misinterpretation or disregard of wiring diagrams can lead to electrical fires, shocks, and other dangerous situations. By following the diagrams meticulously, individuals can ensure that electrical connections are made correctly, minimizing the risk of accidents.
Real-life examples underscore the importance of safety in doorbell wiring. Faulty wiring has been known to cause doorbell transformers to overheat, posing a fire hazard. Improper grounding can result in electrical shocks when touching the doorbell button or chime. These incidents highlight the potential consequences of neglecting wiring diagrams and emphasize the need for careful attention to detail during installation and maintenance.
The practical applications of understanding the connection between safety and wiring diagrams extend to both DIY enthusiasts and electrical professionals. Homeowners can confidently install and maintain their doorbell systems by following the provided diagrams, ensuring their safety and the proper functioning of the doorbell. Electricians rely on wiring diagrams to diagnose and resolve issues efficiently, minimizing downtime and ensuring the safety of their clients.
In conclusion, the emphasis on safety in doorbell wiring diagrams cannot be overstated. Wiring diagrams are indispensable tools for preventing electrical hazards and ensuring the safe operation of doorbell systems. By understanding and adhering to these diagrams, individuals can create and maintain secure electrical environments in their homes, enhancing the reliability and longevity of their doorbell systems.
Codes and Standards
Within the realm of “Doorbell Wiring Diagrams,” adherence to electrical codes and standards is paramount for ensuring the safety and reliability of doorbell systems. Wiring diagrams serve as visual guides for installers and maintenance personnel, helping them comply with these regulations and avoid potential hazards.
-
National Electrical Code (NEC):
The NEC outlines specific requirements for the installation and maintenance of electrical systems, including doorbells. It provides guidelines for wire sizing, component selection, and grounding, ensuring the safe operation of the system.
-
Local Building Codes:
Local building codes may impose additional regulations on doorbell systems, such as requiring permits for installation or specifying the placement of the doorbell chime. These codes vary by municipality and must be consulted to ensure compliance.
-
Manufacturer’s Instructions:
Doorbell manufacturers provide detailed instructions for installing and maintaining their products. These instructions often include wiring diagrams that comply with electrical codes and standards. Following the manufacturer’s instructions ensures the proper and safe operation of the doorbell system.
-
Inspection and Testing:
Upon completion of the installation or maintenance work, it is crucial to have the doorbell system inspected and tested by a qualified electrician. This ensures that the system meets electrical codes and standards, minimizing the risk of electrical accidents.
Adhering to codes and standards in doorbell wiring diagrams is not only a legal obligation but also a matter of safety and reliability. By following these guidelines, individuals can ensure that their doorbell systems operate efficiently, minimizing the risk of electrical hazards and providing peace of mind.
Tools and Materials
In the realm of “Doorbell Wiring Diagrams,” having the appropriate tools and materials is essential for effective installation, maintenance, and troubleshooting. Wiring diagrams provide a roadmap for electrical connections, but without the necessary tools, it is impossible to execute the work accurately and safely.
A basic toolkit for working with doorbell wiring diagrams includes screwdrivers (Phillips and flathead), pliers (needle-nose and lineman’s), electrical tape, a voltage tester, and wire strippers. Each tool serves a specific purpose. Screwdrivers tighten and loosen screws that secure electrical components, while pliers grip and bend wires. Electrical tape insulates and protects wire connections, preventing short circuits and ensuring safe operation. A voltage tester verifies that wires are not live before handling, minimizing the risk of electrical shocks.
The importance of having the right tools and materials cannot be overstated. Without screwdrivers, it would be impossible to connect wires to terminals or mount components securely. Pliers are essential for shaping wires and making tight connections. Electrical tape provides insulation and prevents accidental contact with live wires. Using the proper tools ensures a safe and reliable electrical installation.
For example, consider a scenario where a homeowner attempts to install a doorbell without the proper screwdriver. They may strip the screw heads or fail to tighten the connections adequately, leading to loose wires and potential electrical hazards. Similarly, using pliers that are too large or lack the appropriate gripping surfaces can damage wires, creating a risk of shorts or open circuits.
In conclusion, the connection between “Tools and Materials: List the essential tools and materials required for working with doorbell wiring diagrams, such as screwdrivers, pliers, and electrical tape.” and “Doorbell Wiring Diagrams” is inseparable. The appropriate tools and materials are critical components of successful doorbell installations and maintenance. By understanding and utilizing these tools correctly, individuals can ensure the safety, reliability, and longevity of their doorbell systems.


Related Posts


