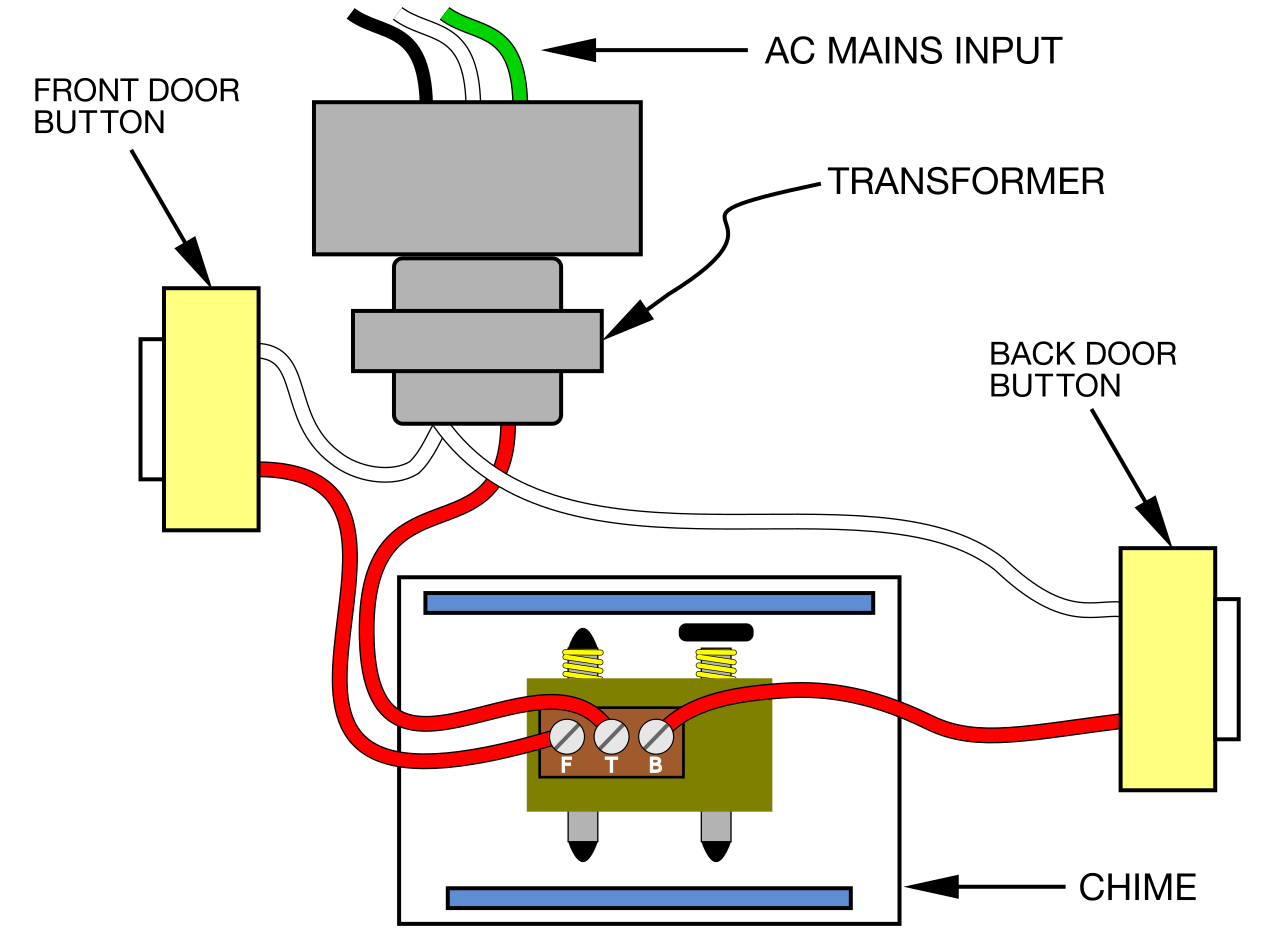
A “Door Bell Wiring Diagram” graphically illustrates how to wire a doorbell system, connecting the doorbell switch, transformer, chime, and power source. For instance, a typical doorbell wiring diagram shows the switch wired in parallel with the chime, with the transformer supplying power to both.
These diagrams are essential for electricians and DIY enthusiasts, ensuring proper installation, functionality, and safety. They prevent electrical hazards, optimize system performance, and simplify troubleshooting. A crucial historical development was the introduction of wireless doorbells, eliminating the need for wiring and making doorbell installation more accessible.
This article will delve into the components, types, and best practices of door bell wiring diagrams, providing comprehensive guidance for both professionals and homeowners.
A “Door Bell Wiring Diagram” is a crucial guide, providing a visual representation of the electrical connections for a doorbell system. Understanding the essential aspects of these diagrams is paramount for proper installation, functionality, and safety.
- Components: Switch, transformer, chime, wiring
- Types: Wired, wireless, smart
- Safety: Electrical code compliance, insulation
- Tools: Screwdriver, wire cutters, electrical tape
- Installation: Doorbell switch placement, wire routing
- Troubleshooting: Identifying faults, testing connections
- Security: Preventing tampering, choosing appropriate chime
- Aesthetics: Matching doorbell design to home dcor
- Convenience: Wireless doorbells, smart home integration
- Energy Efficiency: Low-power transformers, motion-activated doorbells
These aspects are interconnected, influencing the overall effectiveness and user experience of a doorbell system. For instance, the type of doorbell (wired vs. wireless) affects the installation process and maintenance requirements. Proper component selection and wiring ensure safety and longevity, while considering aesthetics enhances the home’s curb appeal. Understanding these aspects empowers homeowners and electricians to make informed decisions, ensuring the optimal performance and reliability of their doorbell systems.
Components
In the context of a door bell wiring diagram, the componentsswitch, transformer, chime, and wiringplay critical roles in enabling the system to function effectively. The switch initiates the electrical circuit when pressed, triggering the doorbell chime to produce sound.
The transformer steps down the voltage from the main power supply to a level suitable for the doorbell circuit, typically 12-24 volts. This is essential for safety, as higher voltages could pose a shock hazard. The chime converts the electrical signal into audible sound, alerting occupants to the presence of a visitor.
Proper wiring is crucial for completing the electrical circuit and ensuring reliable operation. The wiring must be of appropriate gauge and insulation to handle the electrical current and prevent short circuits. Real-life examples include:
The switch is typically a momentary push-button, installed near the entrance door.The transformer is usually mounted in a weatherproof enclosure near the doorbell chime.The chime is often located inside the home, producing a variety of sounds to differentiate it from other household noises.The wiring connects all these components, typically using low-voltage wires.
Understanding the relationship between these components and the door bell wiring diagram is essential for proper installation, maintenance, and troubleshooting. By ensuring that each component is correctly selected, wired, and maintained, homeowners and electricians can ensure the optimal performance and reliability of their doorbell systems.
Types
Doorbell wiring diagrams vary depending on the type of doorbell system: wired, wireless, or smart.
Wired doorbells require physical wires to connect the doorbell switch, transformer, chime, and power source. These diagrams provide detailed instructions on wire routing, switch placement, and component connections. Understanding these diagrams is crucial for proper installation and maintenance.
Wireless doorbells eliminate the need for wiring by using radio signals to communicate between the doorbell switch and chime. Their wiring diagrams focus on the placement of the switch and chime, as well as any additional components like receivers or repeaters. They are typically simpler to install and more flexible in terms of placement.
Smart doorbells incorporate advanced features like video cameras, motion sensors, and Wi-Fi connectivity. Their wiring diagrams are more complex, involving the integration of these additional components. Understanding these diagrams is essential for ensuring proper functionality and security.
In summary, the type of doorbell system directly influences the door bell wiring diagram. Wired systems require detailed instructions for physical wire connections, while wireless and smart systems focus on component placement and integration. Understanding these diagrams is critical for successful installation, maintenance, and troubleshooting of doorbell systems.
Safety
In the context of door bell wiring diagrams, safety is of paramount importance. Electrical code compliance and proper insulation are critical components, ensuring the safe and reliable operation of doorbell systems. Electrical codes establish minimum safety standards for electrical installations, including doorbell systems. These codes specify requirements for wire gauge, insulation, and component ratings to prevent electrical hazards such as shocks, fires, and short circuits.
Proper insulation is another crucial safety aspect addressed in door bell wiring diagrams. Electrical wires and components must be properly insulated to prevent current leakage and protect users from electrical shock. Insulation materials like rubber, plastic, or PVC are commonly used in doorbell systems to ensure safe handling and prevent accidental contact with live wires.
Real-life examples of safety considerations in door bell wiring diagrams include:
- Specifying the appropriate wire gauge to handle the electrical current required by the doorbell system.
- Indicating the use of insulated wire connectors to prevent arcing and short circuits.
- Including instructions for proper grounding of the doorbell system to dissipate any electrical faults.
Understanding the connection between safety, electrical code compliance, insulation, and door bell wiring diagrams is essential for both homeowners and electricians. By adhering to safety standards and using proper insulation, individuals can minimize electrical hazards, ensure the longevity of their doorbell systems, and protect themselves and their property.
Tools
In the context of door bell wiring diagrams, the toolsscrewdriver, wire cutters, and electrical tapeplay a critical role in the successful installation, maintenance, and troubleshooting of doorbell systems. These tools are essential components that enable the proper execution of the wiring diagram’s instructions.
The screwdriver is used to tighten and loosen screws that secure the doorbell switch, chime, and transformer. It is also used to connect and disconnect wires at terminals. Wire cutters are used to cut wires to the appropriate length and strip the insulation to expose the copper conductor. Electrical tape is used to insulate and protect wire connections, preventing short circuits and electrical hazards.
Real-life examples of the importance of these tools in door bell wiring diagrams include:
- The diagram may specify the type of screwdriver required for a specific screw, such as a Phillips head or flathead screwdriver.
- The diagram may indicate the appropriate gauge of wire to use, and the wire cutters are used to cut the wire to the correct length.
- The diagram may include instructions for wrapping electrical tape around wire connections to ensure a secure and insulated connection.
Understanding the connection between these tools and door bell wiring diagrams allows individuals to approach doorbell system installations and repairs with confidence and competence. By having the right tools and knowledge of their usage, homeowners and electricians can ensure the safe and effective operation of their doorbell systems.
Installation
In the context of “Door Bell Wiring Diagram,” the aspect of “Installation: Doorbell switch placement, wire routing” holds significant importance. It encompasses the strategic placement of the doorbell switch and the careful routing of wires to ensure optimal functionality, safety, and aesthetics.
-
Switch Placement
The doorbell switch should be positioned at an accessible height, typically around 36-48 inches from the ground. It should be placed near the main entrance or other points of entry for convenient use. Proper placement also includes considering the handedness of users and any potential obstructions. -
Wire Selection
The choice of wire depends on factors such as the distance between components, voltage requirements, and the number of chimes. Diagrams specify the appropriate wire gauge and insulation to ensure safe and efficient current flow. -
Wire Routing
Wires should be routed neatly and securely to prevent tangling, damage, or interference with other electrical systems. Diagrams provide guidance on concealing wires within walls, using conduits or molding, and avoiding sharp bends or potential pinch points. -
Transformer Location
The transformer, which converts the main power supply to a lower voltage for the doorbell circuit, should be installed in a dry and accessible location. Diagrams indicate the proper placement and wiring connections to ensure safe operation and easy maintenance.
Overall, understanding the principles of “Installation: Doorbell switch placement, wire routing” as outlined in “Door Bell Wiring Diagram” empowers individuals to execute precise and safe doorbell system installations. By carefully considering these aspects, homeowners and electricians can ensure the doorbell system functions flawlessly, enhancing security, convenience, and the overall user experience.
Troubleshooting
Within the context of “Door Bell Wiring Diagram,” the aspect of “Troubleshooting: Identifying faults, testing connections” holds significant importance. It encompasses the systematic identification and resolution of issues that may arise within the doorbell system, ensuring its optimal functionality and user experience. Understanding the cause-and-effect relationship between this aspect and the overall “Door Bell Wiring Diagram” is crucial for effective troubleshooting and maintenance.
“Troubleshooting: Identifying faults, testing connections” is an essential component of “Door Bell Wiring Diagram” as it empowers individuals to diagnose and rectify problems that may arise during installation, operation, or over time. By providing a structured approach to problem-solving, the diagram guides users through the process of identifying potential faults, testing connections, and implementing appropriate corrective measures. This not only ensures the doorbell system’s reliability but also enhances safety by minimizing electrical hazards and preventing component damage.
Real-life examples of “Troubleshooting: Identifying faults, testing connections” within “Door Bell Wiring Diagram” include:
- No power to the doorbell: The diagram can help identify if the issue lies with the power source, wiring connections, or faulty components.
- Intermittent doorbell operation: By testing connections and checking for loose wires or damaged components, the diagram assists in pinpointing the cause of the intermittent behavior.
- Incorrect chime sound: The diagram can guide users in identifying if the issue stems from the chime unit, wiring, or transformer, enabling targeted troubleshooting.
Practical applications of understanding this connection include:
- DIY troubleshooting: Homeowners can use the diagram to diagnose and fix minor doorbell issues without the need for professional assistance.
- Timely repairs: Early identification and resolution of faults prevent minor issues from escalating into more significant problems, ensuring the longevity of the doorbell system.
- Enhanced safety: By addressing electrical faults promptly, individuals can minimize the risk of electrical hazards, such as shocks or fires.
In summary, “Troubleshooting: Identifying faults, testing connections” is an integral part of “Door Bell Wiring Diagram,” providing a systematic approach to problem-solving and ensuring the optimal performance and safety of the doorbell system. By understanding this connection, individuals can effectively troubleshoot and maintain their doorbell systems, contributing to a comfortable and secure living environment.
Security
Within the context of “Door Bell Wiring Diagram,” the aspect of “Security: Preventing tampering, choosing appropriate chime” holds significant importance. It encompasses measures to protect the doorbell system from unauthorized access and potential threats while also considering the security implications of the chime selection. Understanding this aspect is crucial for ensuring the safety and privacy of individuals and preventing malicious activities.
-
Tamper-Resistant Components
Doorbell wiring diagrams often specify the use of tamper-resistant components, such as security screws or vandal-proof covers, to prevent unauthorized access to the doorbell system. These measures deter potential intruders from disassembling or manipulating the doorbell, reducing the risk of security breaches or damage.
-
Concealed Wiring
Wiring diagrams may recommend concealing doorbell wires within walls or using conduits to protect them from exposure. This prevents individuals from easily cutting or damaging the wires, ensuring the continued functionality of the doorbell system and minimizing potential security risks.
-
Chime Selection
The choice of chime can also impact security. Diagrams may suggest using chimes with distinct or loud sounds to alert occupants of a visitor’s presence, deterring potential intruders who may attempt to remain unnoticed. Additionally, chimes with multiple tones or melodies can help differentiate between genuine visitors and false alarms.
-
Placement Considerations
The wiring diagram may provide guidance on optimal chime placement to ensure effective sound distribution throughout the house. This helps ensure that occupants can hear the doorbell from various locations, reducing the risk of missed visitors or potential security threats going unnoticed.
These facets of “Security: Preventing tampering, choosing appropriate chime” in “Door Bell Wiring Diagram” collectively contribute to a secure and reliable doorbell system. By implementing these measures, homeowners and electricians can safeguard against unauthorized access, enhance the overall security of their property, and create a more secure living environment.
Aesthetics
In the context of “Door Bell Wiring Diagram,” the aspect of “Aesthetics: Matching doorbell design to home dcor” holds significance in enhancing the visual appeal and overall user experience of the doorbell system. It involves selecting a doorbell design that complements the architectural style and color scheme of the home, creating a harmonious and aesthetically pleasing entrance.
Doorbell wiring diagrams often include recommendations for doorbell designs that suit different home styles. For example, a traditional home may be paired with a classic doorbell featuring intricate detailing, while a modern home may opt for a sleek and minimalist design. Matching the doorbell design to the home dcor not only elevates the curb appeal but also contributes to the overall ambiance and character of the property.
Practical applications of this understanding include increased homeowner satisfaction and a positive first impression for visitors. A well-chosen doorbell design can enhance the overall aesthetic of the home, making it more inviting and welcoming. Additionally, it can complement the architectural features of the property, creating a cohesive and visually appealing exterior.
In summary, “Aesthetics: Matching doorbell design to home dcor” is an important consideration within “Door Bell Wiring Diagram,” as it contributes to the visual harmony and curb appeal of the property. By understanding this connection, homeowners and electricians can select doorbell designs that complement the home’s architectural style and color scheme, enhancing the overall user experience and creating a more aesthetically pleasing entrance.
Convenience
In the realm of “Door Bell Wiring Diagram,” “Convenience: Wireless doorbells, smart home integration” emerges as a transformative aspect, offering enhanced ease of use, flexibility, and connectivity. Wireless doorbells eliminate the need for complex wiring, making installation a breeze, especially for renters or individuals who prefer a less invasive approach. They provide the freedom to place the doorbell anywhere without the constraints of wire routing, allowing for optimal positioning based on convenience and functionality.
Smart home integration further elevates convenience by connecting the doorbell to a wider ecosystem of smart devices. Through Wi-Fi or Bluetooth connectivity, homeowners can receive notifications on their smartphones or tablets when the doorbell is pressed, even when they’re away from home. This real-time monitoring enhances security and allows for remote access, enabling users to answer the door remotely or monitor their property from anywhere with an internet connection.
Incorporating “Convenience: Wireless doorbells, smart home integration” into “Door Bell Wiring Diagram” empowers individuals to create a more user-friendly and technologically advanced doorbell system. By understanding this connection, homeowners and electricians can make informed decisions when designing and installing doorbell systems, prioritizing convenience and embracing the benefits of wireless technology and smart home integration.
The practical applications of this understanding extend to various scenarios. For instance, in multi-story homes, wireless doorbells eliminate the need for running wires through multiple floors, simplifying installation and reducing potential damage to walls or ceilings. Moreover, smart home integration enables seamless integration with other smart devices, allowing homeowners to create automated routines, such as turning on lights or playing a welcome message when the doorbell is pressed.
In summary, “Convenience: Wireless doorbells, smart home integration” plays a pivotal role in “Door Bell Wiring Diagram” by providing ease of installation, flexibility in placement, and the ability to connect to a smart home ecosystem. Understanding this connection empowers individuals to design and install doorbell systems that align with their needs for convenience, security, and technological advancements.
Energy Efficiency
In the context of “Door Bell Wiring Diagram,” “Energy Efficiency: Low-power transformers, motion-activated doorbells” emerges as a crucial aspect, offering practical and environmentally conscious solutions for designing and installing doorbell systems. By incorporating energy-efficient components and features, individuals can minimize energy consumption, reduce their carbon footprint, and save on energy bills without compromising functionality or convenience.
-
Low-power transformers
Conventional doorbell transformers consume a constant amount of energy, even when the doorbell is not in use. Low-power transformers, on the other hand, use advanced technology to reduce energy consumption by up to 80%, making them a more sustainable choice for doorbell systems.
-
Motion-activated doorbells
Motion-activated doorbells only activate when they detect motion, eliminating the need for the doorbell to be pressed. By minimizing unnecessary activation, these doorbells conserve energy and extend battery life, making them ideal for homes that receive frequent visitors or for use as security devices.
-
Smart chimes
Smart chimes incorporate energy-saving features such as adjustable volume and sleep mode, reducing energy consumption when the doorbell is not in use. Some smart chimes also utilize energy-efficient wireless communication protocols, further minimizing their environmental impact.
-
Solar-powered doorbells
Solar-powered doorbells harness energy from the sun to power the doorbell system, eliminating the need for batteries or electrical wiring. These doorbells are a sustainable and cost-effective solution, particularly for homes in sunny regions or for outdoor applications.
Incorporating “Energy Efficiency: Low-power transformers, motion-activated doorbells” into “Door Bell Wiring Diagram” empowers individuals to create doorbell systems that not only enhance convenience and security but also contribute to environmental sustainability. Understanding the connection between energy efficiency and doorbell wiring diagrams enables homeowners and electricians to make informed decisions, reducing energy consumption, saving money, and creating a more eco-friendly living environment.


Related Posts


