A “Dimmer Switch Wiring 2 Way” is an electrical setup that allows for the control of lighting from two different locations. In a home setting, for example, this configuration can be used to operate a ceiling light from both the entrance and exit points of a room.
The primary benefit of this wiring system is that it provides added convenience and flexibility. It eliminates the need to walk across the room to adjust lighting, which can be especially useful in larger spaces or for individuals with mobility limitations. Historically, the development of dimmer switches has been attributed to Thomas Edison’s experiments with incandescent lighting in the late 1800s.
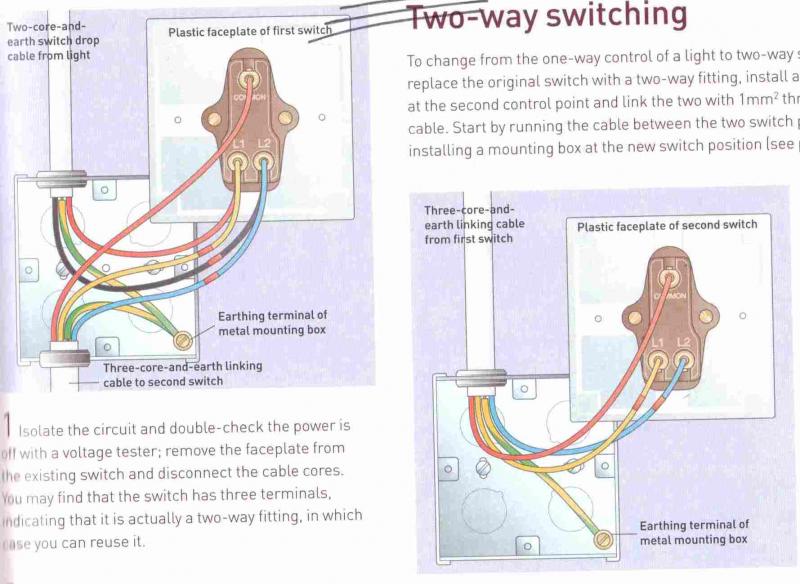
This article will delve into the technical aspects of Dimmer Switch Wiring 2 Way, including wiring diagrams, component selection, and installation guidelines. We will also explore advanced features and considerations for specific lighting applications.
Understanding the essential aspects of “Dimmer Switch Wiring 2 Way” is crucial for a comprehensive grasp of the topic. These aspects encompass various dimensions, ranging from electrical properties to installation considerations.
- Wiring Diagrams
- Component Selection
- Installation Guidelines
- Electrical Safety
- Lighting Control Types
- Advanced Features
- Troubleshooting
- Code Compliance
- Compatibility
- Cost Considerations
These aspects are interconnected and influence the overall functionality, efficiency, and safety of the wiring system. For instance, proper wiring diagrams ensure a seamless electrical connection, while appropriate component selection guarantees compatibility and durability. Understanding these aspects empowers individuals to make informed decisions during installation, maintenance, and troubleshooting.
Wiring Diagrams
When it comes to “Dimmer Switch Wiring 2 Way,” accurate wiring diagrams are paramount. They serve as a roadmap for the entire electrical setup, ensuring a smooth flow of electricity and optimal performance of the lighting system. Without proper diagrams, installers risk misconnections, electrical hazards, and potential damage to components.
-
Circuit Layout
The circuit layout depicts the overall electrical pathway, showing the connection of power sources, switches, dimmers, and lighting fixtures. It guides the placement and wiring of each component, ensuring a logical and efficient flow of electricity.
-
Component Specifications
Wiring diagrams specify the exact components required for the system, including switch types, dimmer ratings, and wire gauges. This information ensures compatibility and proper functioning of all elements within the circuit.
-
Wiring Methodology
The diagrams illustrate the correct wiring techniques, including wire colors, terminal connections, and grounding requirements. This ensures proper polarity, avoids short circuits, and maintains electrical safety.
-
Troubleshooting Guide
Some wiring diagrams include troubleshooting guides that provide a systematic approach to identifying and resolving common electrical issues. This can save time and effort during installation and maintenance.
In summary, wiring diagrams are indispensable for successful “Dimmer Switch Wiring 2 Way” installations. They provide a clear visual representation of the electrical circuit, ensuring proper component selection, wiring methodology, and troubleshooting capabilities. By adhering to these diagrams, electricians can ensure the safe, efficient, and reliable operation of the lighting system.
Component Selection
In the context of “Dimmer Switch Wiring 2 Way,” component selection plays a critical role in ensuring the system’s functionality, safety, and longevity. The compatibility, ratings, and quality of the components directly impact the overall performance of the wiring system.
One key aspect of component selection is choosing the appropriate dimmer switch. Dimmers come in various types, such as rotary, slide, and touch, each with its own advantages and limitations. The choice of dimmer type depends on factors like the lighting load, desired dimming range, and aesthetic preferences.
Another crucial consideration is the selection of electrical wires. The wire gauge, insulation type, and length must be carefully chosen to handle the electrical current and voltage involved. Improper wire selection can lead to overheating, voltage drop, or even electrical fires.
Real-life examples of component selection in “Dimmer Switch Wiring 2 Way” include choosing a dimmer switch rated for the total wattage of the connected lighting fixtures and selecting electrical wires with sufficient ampacity to carry the electrical load without overheating.
Understanding the connection between component selection and “Dimmer Switch Wiring 2 Way” is essential for ensuring the reliable and safe operation of the lighting system. Proper component selection helps prevent electrical hazards, optimizes lighting performance, and prolongs the lifespan of the system.
Installation Guidelines
In the context of “Dimmer Switch Wiring 2 Way,” installation guidelines play a pivotal role in ensuring the safe, efficient, and code-compliant operation of the lighting system. These guidelines provide detailed instructions on every aspect of the installation process, from selecting appropriate components to connecting wires and mounting devices.
Following installation guidelines is critical for several reasons. First, they help to prevent electrical hazards such as short circuits, overloads, and electrical fires. By adhering to the guidelines, installers can ensure that all electrical connections are made correctly and that the system is properly grounded.
Second, installation guidelines help to ensure optimal performance of the lighting system. Proper installation techniques minimize voltage drop, flicker, and other issues that can affect the quality of lighting. This results in a more comfortable and visually appealing environment.
Real-life examples of installation guidelines in “Dimmer Switch Wiring 2 Way” include instructions on how to:
- Select the correct dimmer switch for the lighting load
- Determine the appropriate wire gauge for the electrical circuit
- Connect the wires to the dimmer switch and lighting fixtures
- Mount the dimmer switch and lighting fixtures securely
- Test the system for proper operation
Understanding the connection between “Installation Guidelines” and “Dimmer Switch Wiring 2 Way” is essential for ensuring the safety, performance, and longevity of the lighting system. By following the guidelines carefully, installers can avoid costly mistakes, electrical hazards, and suboptimal lighting conditions.
Electrical Safety
In the context of “Dimmer Switch Wiring 2 Way,” electrical safety is of paramount importance. Improper wiring or installation can lead to electrical hazards such as shocks, fires, and damage to equipment. Understanding the connection between electrical safety and dimmer switch wiring is crucial for ensuring the safe and reliable operation of the lighting system.
One of the primary causes of electrical hazards in dimmer switch wiring is incorrect component selection. Using dimmer switches that are not rated for the electrical load can lead to overheating and potential fire hazards. Additionally, using wires that are too small for the current draw can result in voltage drop, flickering, and overheating.
Real-life examples of electrical safety hazards in dimmer switch wiring include:
- Using a dimmer switch with a wattage rating lower than the total wattage of the connected light fixtures.
- Using wires that are not rated for the current draw of the lighting load.
- Improperly connecting wires to the dimmer switch or lighting fixtures.
Understanding the connection between electrical safety and dimmer switch wiring is essential for preventing these hazards. By adhering to electrical safety guidelines, installers can ensure that the lighting system is installed and maintained in a safe and code-compliant manner. This includes selecting appropriate components, following proper wiring techniques, and regularly inspecting the system for any signs of damage or wear.
In summary, electrical safety is a critical component of dimmer switch wiring 2 way. By understanding the cause-and-effect relationship between electrical safety and wiring practices, installers can minimize the risk of electrical hazards and ensure the safe and reliable operation of the lighting system.
Lighting Control Types
Within the realm of “Dimmer Switch Wiring 2 Way,” understanding the various lighting control types is essential for optimizing the functionality and ambiance of any lighting system. These control types offer diverse approaches to managing light intensity, color, and other parameters, tailoring the lighting to specific needs and preferences.
-
Manual Dimmers
Manual dimmers provide a hands-on approach to lighting control, allowing users to adjust the light level manually using a knob, slider, or rotary switch. They offer a simple and intuitive method of controlling light intensity.
-
Remote Dimmers
Remote dimmers offer wireless control over lighting, allowing users to adjust light levels from a distance using a remote control or smartphone app. This provides added convenience and flexibility, especially in hard-to-reach or multi-zone lighting setups.
-
Smart Dimmers
Smart dimmers integrate advanced features such as scheduling, scene setting, and voice control. They can be programmed to adjust lighting based on time of day, presence detection, or other triggers, creating automated and personalized lighting experiences.
-
Touch Dimmers
Touch dimmers provide a sleek and modern approach to lighting control, allowing users to adjust light levels with a simple touch. They are often used in high-end residential and commercial settings, offering a touch-sensitive and intuitive user interface.
Each lighting control type holds unique advantages and implications for “Dimmer Switch Wiring 2 Way.” Manual dimmers offer simplicity and cost-effectiveness, while remote dimmers provide convenience and flexibility. Smart dimmers unlock advanced features and automation capabilities, and touch dimmers offer a sophisticated and intuitive user experience. Understanding these control types empowers individuals to make informed decisions when designing and installing “Dimmer Switch Wiring 2 Way” systems, ensuring optimal lighting control and enhanced user satisfaction.
Advanced Features
Advanced features play a pivotal role in “Dimmer Switch Wiring 2 Way” systems, unlocking new possibilities for lighting control and enhancing the user experience. These features extend beyond basic dimming functionality, offering sophisticated capabilities that cater to diverse lighting needs and preferences.
One of the key benefits of advanced features is their ability to create dynamic and personalized lighting environments. For instance, programmable timers allow users to set specific lighting schedules, ensuring that lights turn on or dim at desired times, even when they are away from home. This not only adds convenience but also enhances security by giving the illusion of occupancy.
Another notable feature is scene setting, which enables users to save and recall customized lighting configurations with a single touch. This allows for instant mood changes or tailored lighting for specific activities, such as reading, entertaining, or relaxing. Scene setting is particularly useful in multi-zone lighting systems, where different areas of a room or home can be controlled independently.
Advanced features also contribute to energy efficiency. Occupancy sensors can detect when a room is unoccupied and automatically dim or turn off the lights, reducing energy consumption. Similarly, daylight harvesting systems adjust the artificial light output based on the amount of natural light available, further minimizing energy usage.
Understanding the connection between advanced features and “Dimmer Switch Wiring 2 Way” is crucial for harnessing the full potential of such systems. These features transform lighting from a purely functional element to a dynamic and responsive component of the living environment, offering enhanced convenience, personalization, security, and energy efficiency.
Troubleshooting
In the realm of “Dimmer Switch Wiring 2 Way,” troubleshooting is a crucial aspect for maintaining optimal system performance and resolving any issues that may arise. It involves a systematic approach to identifying and rectifying faults within the wiring, components, or installation.
-
Loose Connections
Loose connections can occur at various points in the wiring, such as at the dimmer switch, lighting fixtures, or electrical box. These loose connections can lead to intermittent lighting, flickering, or complete loss of power. Tightening all connections securely is essential to ensure proper electrical contact.
-
Faulty Dimmer Switch
A faulty dimmer switch can be a common source of problems in “Dimmer Switch Wiring 2 Way” systems. Signs of a faulty dimmer switch may include erratic dimming behavior, buzzing or humming noises, or a burning smell. Replacing the dimmer switch with a compatible model is necessary to restore proper functionality.
-
Overloaded Circuit
Overloading a circuit can occur when too many electrical devices or lights are connected to a single circuit. This can cause the circuit breaker to trip or the fuse to blow, resulting in a loss of power to the “Dimmer Switch Wiring 2 Way” system. Balancing the electrical load by distributing devices across multiple circuits is crucial to prevent overloading.
-
Incorrect Wiring
Incorrect wiring, such as reversed polarity or improper wire connections, can lead to various issues in “Dimmer Switch Wiring 2 Way” systems. This can result in flickering lights, uneven dimming, or even electrical hazards. Verifying the wiring connections and ensuring they adhere to electrical codes is essential for safe and reliable operation.
Understanding the potential causes of problems and implementing effective troubleshooting techniques is vital for maintaining a functional “Dimmer Switch Wiring 2 Way” system. By addressing loose connections, replacing faulty components, balancing electrical loads, and verifying wiring accuracy, individuals can ensure optimal performance and prevent any major electrical issues.
Code Compliance
In the context of “Dimmer Switch Wiring 2 Way,” code compliance holds paramount importance, ensuring the safe, reliable, and efficient operation of the lighting system. Electrical codes, established by regulatory bodies, provide a comprehensive set of rules and regulations governing the installation and maintenance of electrical systems, including dimmer switch wiring.
Adhering to code compliance in “Dimmer Switch Wiring 2 Way” is crucial for several reasons. First and foremost, it helps to prevent electrical hazards such as electrical shocks, fires, and damage to equipment. Code-compliant wiring practices minimize the risk of these hazards by ensuring that electrical components are properly installed, connected, and grounded.
Real-life examples of code compliance in “Dimmer Switch Wiring 2 Way” include using electrical wires with appropriate insulation and ampacity ratings, installing dimmer switches in suitable electrical boxes, and ensuring proper grounding of all electrical components. By following these code requirements, electricians can ensure that the dimmer switch wiring is safe and up to standard.
Understanding the connection between code compliance and “Dimmer Switch Wiring 2 Way” is essential for both electrical professionals and homeowners. By adhering to electrical codes, electricians can deliver high-quality and safe electrical installations, while homeowners can have peace of mind knowing that their lighting systems are installed and maintained according to industry best practices. Ultimately, code compliance is a cornerstone of responsible and professional electrical work, contributing to the safety and reliability of electrical systems in residential, commercial, and industrial settings.
Compatibility
Within the realm of “Dimmer Switch Wiring 2 Way,” compatibility plays a pivotal role in ensuring seamless integration and optimal performance of the lighting system. It encompasses various aspects, including component compatibility, load compatibility, voltage compatibility, and system compatibility.
-
Component Compatibility
Ensuring compatibility between dimmer switches, lighting fixtures, and other components is crucial. Incompatible components may lead to improper dimming, flickering, or even damage to the system.
-
Load Compatibility
The dimmer switch must be compatible with the total wattage or amperage of the connected lighting load. Exceeding the load rating can result in overheating, premature failure, or electrical hazards.
-
Voltage Compatibility
The dimmer switch must be compatible with the voltage of the electrical system. Using a dimmer switch rated for a different voltage can lead to improper operation or damage to the system.
-
System Compatibility
In smart home systems, compatibility with other devices and protocols is essential for seamless integration and control. Ensuring compatibility with home automation systems allows for centralized control and automation of lighting.
Understanding compatibility in “Dimmer Switch Wiring 2 Way” is crucial for selecting the right components, ensuring reliable operation, and avoiding potential hazards. By considering these compatibility factors, electricians and homeowners can achieve optimal performance and longevity of their lighting systems.
Cost Considerations
In the context of “Dimmer Switch Wiring 2 Way,” cost considerations play a significant role in determining the overall budget and feasibility of the project. These considerations encompass various aspects, including the cost of materials, labor, and any additional features or upgrades.
-
Materials
The cost of materials includes the dimmer switches, electrical wires, connectors, and other necessary components. The quality and type of materials used can impact the overall cost, with higher-grade materials typically costing more.
-
Labor
The cost of labor involves the electrician’s time and expertise required for the installation. Factors such as the complexity of the wiring, the location and accessibility of the switches, and any additional troubleshooting can affect the labor costs.
-
Features
Additional features, such as remote control dimmers, smart dimmers with scheduling capabilities, or touch dimmers, can add to the overall cost of the system. These features offer convenience and enhanced functionality, but they come at a premium.
-
Upgrades
If the existing electrical system requires upgrades to support the dimmer switch installation, such as upgrading the electrical panel or installing new circuits, these upgrades can significantly increase the overall cost of the project.
Understanding the cost considerations associated with “Dimmer Switch Wiring 2 Way” is crucial for making informed decisions and planning the project accordingly. Weighing the cost of materials, labor, features, and potential upgrades against the desired functionality and budget constraints is essential for a successful and cost-effective installation.


Related Posts


