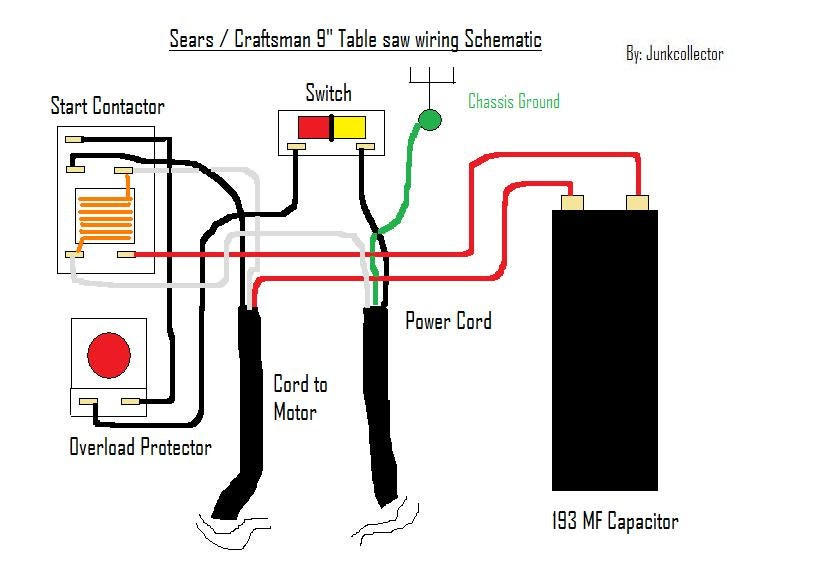
A Craftsman Table Saw Switch Wiring Diagram is a technical drawing that specifies the electrical connections required to install and operate a Craftsman table saw. It outlines the proper wiring arrangement for the power supply, switch, and all internal components, ensuring the safe and efficient operation of the table saw.
This diagram is crucial for both professional electricians and DIY enthusiasts who wish to correctly install and maintain their Craftsman table saws. By following the outlined wiring instructions, one can avoid electrical hazards, ensure optimal performance, and prevent damage to the equipment. Understanding the wiring diagram also enables troubleshooting and repairs if any electrical issues arise.
The introduction of table saws revolutionized woodworking and carpentry, allowing precise cuts and increased efficiency. Craftsman, a renowned brand in power tools, has consistently developed cutting-edge table saws, and their wiring diagrams are integral to the safe and successful operation of these machines.
A Craftsman Table Saw Switch Wiring Diagram is a crucial component for the safe and effective operation of a Craftsman table saw. Understanding the essential aspects of this diagram empowers individuals to correctly install, maintain, and troubleshoot their table saws, ensuring optimal performance and longevity.
- Electrical Safety: The diagram ensures proper wiring connections, preventing electrical hazards and potential accidents.
- Performance Optimization: It outlines the correct switch wiring configuration for the specific table saw model, maximizing its cutting efficiency and accuracy.
- Installation Guidance: The diagram provides step-by-step instructions for installing the switch, simplifying the process and reducing the risk of errors.
- Maintenance and Repair: It serves as a reference guide for troubleshooting electrical issues and performing maintenance tasks, extending the lifespan of the table saw.
- Compliance with Standards: The diagram adheres to industry standards and electrical codes, ensuring compliance with safety regulations.
- Compatibility: It specifies the compatible switch models for each Craftsman table saw, preventing incorrect installations and potential damage.
- User Safety: By following the wiring diagram, users can ensure that the table saw operates as intended, minimizing the risk of injuries.
- Customization: The diagram allows for customization of switch wiring based on specific requirements, enhancing the table saw’s functionality and versatility.
In conclusion, the key aspects of a Craftsman Table Saw Switch Wiring Diagram encompass electrical safety, performance optimization, installation guidance, maintenance and repair, compliance with standards, compatibility, user safety, and customization. Understanding and utilizing this diagram is essential for maximizing the benefits and ensuring the safe and efficient operation of Craftsman table saws.
Electrical Safety
Within the context of a Craftsman Table Saw Switch Wiring Diagram, “Electrical Safety: The diagram ensures proper wiring connections, preventing electrical hazards and potential accidents” plays a pivotal role. Adhering to the outlined wiring instructions is crucial to avoid electrical hazards and accidents, ensuring the safe operation and longevity of the table saw.
- Correct Wiring Sequence: The diagram specifies the precise order in which wires should be connected to the switch and other components. This prevents incorrect connections, short circuits, and potential fires.
- Grounding: Proper grounding is essential for electrical safety. The diagram ensures that the table saw is correctly grounded, providing a safe path for excess electricity to dissipate, minimizing the risk of electrical shock.
- Circuit Protection: The diagram often includes instructions on installing circuit protection devices, such as fuses or circuit breakers. These devices protect the table saw from electrical overloads and short circuits, preventing damage to the equipment and potential fires.
- Wire Gauge and Insulation: The diagram specifies the appropriate wire gauge and insulation for different connections. Using wires with the correct specifications ensures that they can handle the electrical load without overheating or causing insulation breakdown, reducing the risk of electrical fires.
By understanding and following the electrical safety guidelines outlined in the Craftsman Table Saw Switch Wiring Diagram, users can significantly reduce the risk of electrical hazards and potential accidents, ensuring a safe and enjoyable woodworking experience.
Performance Optimization
Within the context of the Craftsman Table Saw Switch Wiring Diagram, “Performance Optimization: It outlines the correct switch wiring configuration for the specific table saw model, maximizing its cutting efficiency and accuracy” holds significant importance. The switch wiring configuration plays a crucial role in ensuring optimal performance of the table saw, allowing for precise and efficient cuts.
The correct switch wiring configuration ensures that the motor receives the appropriate voltage and power, enabling it to operate at its optimal speed and torque. This directly affects the cutting efficiency and accuracy of the table saw. A properly wired switch ensures that the motor starts and stops smoothly, preventing damage to the saw blade and workpiece.
Furthermore, the switch wiring configuration can impact the table saw’s safety features. Some Craftsman table saws are equipped with safety switches that prevent accidental startups or require two-handed operation. The wiring diagram provides instructions on how to correctly wire these safety switches, ensuring that they function as intended and enhance user safety.
In summary, the “Performance Optimization” aspect of the Craftsman Table Saw Switch Wiring Diagram is critical for maximizing the cutting efficiency, accuracy, and safety of the table saw. By understanding the importance of correct switch wiring, users can optimize the performance of their table saws and achieve professional-quality results.
Installation Guidance
Within the context of the Craftsman Table Saw Switch Wiring Diagram, “Installation Guidance: The diagram provides step-by-step instructions for installing the switch, simplifying the process and reducing the risk of errors” plays a pivotal role in ensuring the proper installation of the table saw switch. A well-installed switch is crucial for safe and efficient operation of the saw.
- Clear and Concise Instructions: The diagram provides clear and concise instructions for installing the switch, making it easy for users to follow even if they have limited electrical experience.
- Identification of Components: The diagram clearly identifies all the necessary components for the switch installation, ensuring that users have everything they need before starting the process.
- Step-by-Step Process: The diagram presents the installation process in a step-by-step manner, breaking down complex tasks into smaller, manageable steps.
- Safety Precautions: The diagram emphasizes safety precautions throughout the installation process, reminding users to wear appropriate safety gear and disconnect the power source before beginning work.
By providing comprehensive installation guidance, the Craftsman Table Saw Switch Wiring Diagram empowers users to correctly install the switch, reducing the risk of errors and potential hazards. This ensures that the table saw operates safely and efficiently, allowing users to focus on their woodworking projects without worrying about switch-related issues.
Maintenance and Repair
The “Maintenance and Repair” aspect of the Craftsman Table Saw Switch Wiring Diagram holds great significance in ensuring the longevity and optimal performance of the table saw. This section of the diagram provides valuable guidance for troubleshooting electrical issues and performing maintenance tasks, empowering users to keep their saws in top condition.
The wiring diagram serves as a reference guide for diagnosing and resolving common electrical problems. Whether it’s a faulty switch, loose connection, or motor issue, the diagram provides step-by-step troubleshooting procedures. By following these instructions, users can identify the root cause of the problem and make the necessary repairs, minimizing downtime and extending the lifespan of the table saw.
Furthermore, the “Maintenance and Repair” section includes instructions for routine maintenance tasks, such as cleaning the switch contacts, lubricating moving parts, and inspecting the wiring for damage. Regular maintenance helps prevent minor issues from escalating into major problems, ensuring the continued smooth and efficient operation of the table saw.
In summary, the “Maintenance and Repair” aspect of the Craftsman Table Saw Switch Wiring Diagram is crucial for maximizing the lifespan and performance of the table saw. By providing clear guidance on troubleshooting electrical issues and performing maintenance tasks, the diagram empowers users to maintain their saws in optimal condition, ensuring years of reliable operation.
Compliance with Standards
The “Compliance with Standards” aspect of the Craftsman Table Saw Switch Wiring Diagram is of utmost importance, ensuring that the table saw meets or exceeds established industry standards and electrical codes, thereby promoting safety and reliability.
The wiring diagram strictly adheres to these standards and codes, dictating the proper electrical connections, wire specifications, and switch configurations. This adherence ensures that the table saw operates safely, minimizing the risk of electrical hazards, such as shock, short circuits, and fires.
Real-life examples of compliance with standards include:
- The use of color-coded wires, as per electrical codes, to differentiate between live, neutral, and ground connections.
- The specification of wire gauge and insulation that meet or exceed industry standards, ensuring safe current-carrying capacity and insulation against electrical hazards.
- The inclusion of grounding instructions, which are crucial for preventing electrical shock and ensuring the proper functioning of safety features.
Understanding the significance of compliance with standards in the Craftsman Table Saw Switch Wiring Diagram empowers users to make informed decisions regarding the installation and maintenance of their table saws. It enables them to identify potential safety hazards, adhere to electrical codes, and operate their saws in a safe and responsible manner.
Furthermore, compliance with standards contributes to the broader goal of workplace safety and accident prevention. By following standardized wiring practices, manufacturers and users can minimize electrical-related accidents and injuries, fostering a safer working environment.
Compatibility
Within the context of “Craftsman Table Saw Switch Wiring Diagram”, the aspect of “Compatibility” plays a pivotal role in ensuring the safe and efficient operation of Craftsman table saws. The wiring diagram outlines the specific switch models that are compatible with each table saw model, preventing incorrect installations and potential damage.
- Matching Electrical Specifications: The wiring diagram specifies compatible switches that match the electrical specifications of each table saw model. This ensures that the switch can handle the electrical load of the motor and other components, preventing overheating, damage to the switch, and potential electrical hazards.
- Physical Compatibility: The diagram also ensures that the specified switches are physically compatible with the table saw’s design. This includes matching the switch mounting dimensions, shape, and other physical characteristics, allowing for proper installation and operation.
- Safety Features: Some Craftsman table saws incorporate safety features, such as blade guards or anti-kickback mechanisms, that require specific switch configurations. The wiring diagram ensures compatibility with these safety features, ensuring the continued operation and effectiveness of these safety mechanisms.
- Warranty and Support: Using compatible switches as specified in the wiring diagram ensures that the table saw operates as intended and maintains its warranty coverage. Incompatible switches may void the warranty and limit access to technical support and spare parts.
Understanding the importance of compatibility in the “Craftsman Table Saw Switch Wiring Diagram” empowers users to select and install the correct switches for their table saws. This ensures safe and reliable operation, maximizes the table saw’s performance, and maintains its warranty coverage.
User Safety
In the context of “Craftsman Table Saw Switch Wiring Diagram”, “User Safety: By following the wiring diagram, users can ensure that the table saw operates as intended, minimizing the risk of injuries” holds paramount importance. The wiring diagram outlines crucial steps and precautions that directly impact the safe operation of the table saw, safeguarding users from potential hazards and injuries.
-
Proper Grounding:
The wiring diagram ensures proper grounding of the table saw, which is essential for preventing electrical shock. By following the diagram’s instructions, users can establish a secure path for excess electricity to dissipate, minimizing the risk of electrical accidents and injuries.
-
Switch Guard:
Some Craftsman table saws incorporate a switch guard that prevents accidental activation. The wiring diagram provides guidance on installing and using this safety feature, reducing the likelihood of unintended startups and potential injuries.
-
Emergency Stop Switch:
The wiring diagram includes instructions for installing an emergency stop switch that allows users to quickly power down the table saw in case of an emergency. This feature is crucial for preventing severe injuries in situations where immediate action is required.
-
Blade Guard and Riving Knife:
The wiring diagram may include instructions for installing a blade guard and riving knife, which are safety features designed to prevent contact with the spinning blade. By following these instructions, users can enhance their protection against lacerations and other serious injuries.
Understanding and adhering to the safety guidelines outlined in the “Craftsman Table Saw Switch Wiring Diagram” empowers users to operate their table saws with confidence, knowing that they have taken the necessary steps to minimize the risk of injuries. By prioritizing user safety, the wiring diagram plays a vital role in creating a safer woodworking environment.
Customization
Within the context of “Craftsman Table Saw Switch Wiring Diagram”, “Customization: The diagram allows for customization of switch wiring based on specific requirements, enhancing the table saw’s functionality and versatility” plays a significant role in empowering users to tailor their table saws to meet their specific needs and preferences. The wiring diagram provides guidance on how to customize the switch wiring to accommodate various scenarios and applications.
-
Accessory Integration:
The wiring diagram may include instructions on how to wire additional accessories, such as dust collection systems, laser guides, or featherboards, to enhance the table saw’s functionality and precision.
-
Safety Enhancements:
Some users may opt to install additional safety features, such as foot-operated switches or remote controls, to improve their safety and comfort while operating the table saw.
-
Custom Jigs and Fixtures:
Advanced users may customize the switch wiring to accommodate specialized jigs and fixtures that enable them to perform specific woodworking tasks more efficiently and accurately.
-
Compatibility with Different Motors:
The wiring diagram may provide instructions on how to wire the switch for use with different motor types or configurations, allowing users to upgrade or replace the motor to meet their specific power and performance requirements.
The ability to customize the switch wiring based on specific requirements enhances the table saw’s versatility and allows users to optimize its performance for a wide range of woodworking tasks. This customization capability empowers users to create a table saw that meets their unique needs and preferences, maximizing its efficiency, safety, and overall functionality.


Related Posts


