Wiring A Single Pole Light Switch refers to the process of connecting electrical wires to a switch that independently controls a single light fixture.
In a room with one light fixture, a single-pole switch is typically used to turn the light on or off at the entrance.
Wiring a single-pole light switch is a fundamental electrical task that ensures proper functioning of lighting systems. It provides convenience, safety, and energy efficiency.
The invention of the single-pole switch in the early 1900s revolutionized home lighting, providing a simple and reliable method of controlling electrical lights.
This article will explore the step-by-step process of wiring a single-pole light switch, including safety precautions, wire identification, and connection techniques.
Understanding the essential aspects of “Wiring A Single Pole Light Switch” is crucial for safe and effective electrical installations. These aspects encompass various dimensions, ranging from safety precautions to connection techniques.
- Safety
- Materials
- Tools
- Wiring Diagram
- Wire Stripping
- Terminal Connections
- Switch Box
- Testing
Wiring a single-pole light switch requires careful attention to these aspects. Safety should be prioritized, ensuring proper grounding and circuit protection. Selecting the right materials and tools for the job is essential, as is following the wiring diagram accurately. Proper wire stripping and secure terminal connections are crucial for reliable electrical connections. The switch box should be securely mounted and the switch installed correctly. Finally, testing the switch and circuit is essential to ensure proper functionality and safety.
Safety
Ensuring safety is of paramount importance when wiring a single-pole light switch. Neglecting safety precautions can lead to electrical hazards, fires, and severe injuries.
-
Electrical Shock
Contact with live electrical wires can cause a dangerous shock or electrocution. Always turn off the power at the circuit breaker before working on any electrical wiring. -
Short Circuit
Accidental contact between hot and neutral wires can create a short circuit, causing overheating, damage to electrical components, and potential fires. -
Grounding
Proper grounding provides a safe path for excess electrical current to flow in case of a fault, protecting against electrical shocks and fires. Ensure the switch box is properly grounded. -
Overloading
Connecting too many fixtures or devices to a single switch can overload the circuit, causing overheating, wiring damage, and increased fire risk. Adhere to the recommended wattage limits for the switch and circuit.
By prioritizing these safety aspects, you can mitigate risks, ensure the longevity of your electrical system, and create a safe environment for your home or workplace.
Materials
Materials play a critical role in the effective wiring of a single-pole light switch, ensuring safety, functionality, and longevity of the electrical system. These range from essential components to protective elements, each contributing to the overall success of the installation.
-
Electrical Wires
Electrical wires, typically made of copper or aluminum, provide the conductive path for electricity to flow from the power source to the light fixture. Their thickness (gauge) and insulation determine their current-carrying capacity and safety.
-
Switch Box
The switch box houses the switch and provides a secure enclosure for the electrical connections. It is usually made of metal or plastic and must be properly grounded for safety.
-
Switch
The switch itself is the main component that controls the flow of electricity to the light fixture. It can be a simple on/off switch or a more complex dimmer or timer switch.
-
Wire Connectors
Wire connectors, such as wire nuts or crimp connectors, are used to join and secure electrical wires together, ensuring proper electrical contact and preventing loose connections.
Choosing the right materials for each component is essential to ensure the safety and reliability of the electrical system. Adhering to electrical codes and standards is paramount to avoid potential hazards and ensure the longevity of the installation.
Tools
Tools are essential companions in the task of “Wiring A Single Pole Light Switch”. They encompass a range of implements, each with a specific function, contributing to the effective completion of the job.
-
Wire Strippers
Wire strippers are indispensable tools for removing the insulation from electrical wires. Precise and safe stripping is crucial for proper electrical connections and overall circuit integrity.
-
Screwdriver
Screwdrivers, both flathead and Phillips, are used to tighten and loosen screws that secure the switch, faceplate, and wire connectors. Their appropriate selection and use ensure secure connections and proper switch operation.
-
Voltage Tester
A voltage tester is a safety device used to detect the presence of electricity in wires, ensuring that the circuit is de-energized before handling wires. It helps prevent electrical shocks and potential hazards.
-
Pliers
Pliers, such as lineman’s pliers or needle-nose pliers, assist in bending and shaping wires, holding small components, and tightening wire connectors. Their versatile functionality aids in precise and efficient wiring.
The availability and proper usage of these tools are essential for safe and successful “Wiring Of A Single Pole Light Switch”. Equipping oneself with the right tools not only simplifies the task but also enhances safety and the overall quality of the electrical installation.
Wiring Diagram
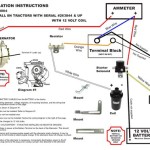
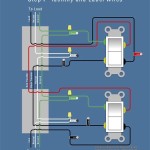
In the context of “Wiring A Single Pole Light Switch”, a wiring diagram acts as a blueprint, visually depicting the electrical connections and components involved. It provides a clear and standardized representation of the electrical system, guiding the wiring process and ensuring the proper functioning of the switch and light fixture.
-
Circuit Layout
The wiring diagram illustrates the flow of electricity from the power source, through the switch, and to the light fixture. It shows the connections between these components and the path that electricity takes to power the light.
-
Wire Types
The diagram specifies the types of wires used, such as Romex or THHN, and their respective gauges (thickness). This information is crucial for ensuring proper current-carrying capacity and safety.
-
Terminal Connections
The wiring diagram indicates how the wires should be connected to the terminals on the switch and light fixture. It shows the correct polarity (positive and negative connections) and ensures that the switch controls the power to the light fixture effectively.
-
Grounding
The diagram also includes grounding connections, which are essential for safety. It shows how the switch box and light fixture should be grounded to protect against electrical shocks and ensure proper circuit operation.
Understanding and following a wiring diagram is paramount for successful “Wiring Of A Single Pole Light Switch”. It minimizes errors, ensures adherence to electrical codes, and promotes a safe and functional electrical installation.
Wire Stripping
In the realm of “Wiring A Single Pole Light Switch”, “Wire Stripping” emerges as a fundamental and indispensable task. Stripping electrical wires, the process of removing the insulating layer to expose the conductive metal beneath, forms the cornerstone of successful electrical connections.
Its significance lies in enabling proper electrical contact between wires and terminals. Without proper stripping, connections become loose, increase resistance, and pose safety hazards due to potential arcing and overheating. Moreover, stripped wires allow for secure connections using wire connectors, ensuring a reliable flow of electricity.
Within the context of “Wiring A Single Pole Light Switch”, “Wire Stripping” is a critical component that directly impacts the functionality and safety of the electrical system. For instance, when connecting the switch to the power source and light fixture, correctly stripped wires ensure proper polarity and prevent short circuits. Additionally, proper stripping is crucial for grounding the switch box, which is essential for protection against electrical shocks.
Understanding the connection between “Wire Stripping” and “Wiring A Single Pole Light Switch” is not only informative but also practically applicable. By adhering to recommended stripping lengths and techniques, electricians can ensure safe and efficient electrical installations. This understanding empowers homeowners and DIY enthusiasts to tackle electrical projects with confidence, knowing that proper “Wire Stripping” lays the foundation for successful “Wiring Of A Single Pole Light Switch”.
Terminal Connections
Terminal connections are a critical aspect of “Wiring A Single Pole Light Switch”. They provide a secure and reliable electrical connection between the switch and the wires. Loose or improperly secured terminal connections can lead to arcing, overheating, and potential electrical hazards.
When wiring a single pole light switch, it’s crucial to ensure that all terminal connections are tight and secure. This can be achieved by using a screwdriver to tighten the terminal screws. It’s also important to use the correct size wire nuts for the gauge of wire being used. Undersized wire nuts can result in loose connections, while oversized wire nuts can make it difficult to properly tighten the connection.
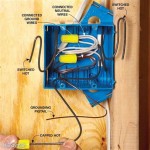
In a typical single pole light switch wiring scenario, the black wire from the power source is connected to the brass colored terminal on the switch. The white wire from the power source is connected to the silver colored terminal on the switch. The bare copper wire or green insulated wire is connected to the green colored terminal on the switch. These connections allow the switch to control the flow of electricity to the light fixture.
Understanding the relationship between “Terminal Connections” and “Wiring A Single Pole Light Switch” is essential for ensuring the safe and proper functioning of the electrical system. By adhering to proper wiring techniques and using the correct materials, electricians and homeowners can ensure that their electrical installations are safe and reliable.
Switch Box
In the context of “Wiring A Single Pole Light Switch,” the switch box plays a critical role in providing a safe and secure enclosure for the electrical connections. It houses the switch and provides a mounting point for the faceplate. Without a switch box, the electrical connections would be exposed, posing a safety hazard and potentially causing electrical fires.
The switch box is typically made of metal or plastic and is designed to meet specific electrical codes and standards. It provides a grounded connection to the electrical system, ensuring that any fault currents are safely diverted away from the switch and surrounding materials. The switch box also protects the switch from dust, moisture, and physical damage, extending its lifespan and ensuring reliable operation.
In real-life applications, the switch box is an indispensable component of “Wiring A Single Pole Light Switch.” Electricians use switch boxes to ensure that electrical connections are made safely and in accordance with electrical codes. Homeowners and DIY enthusiasts also rely on switch boxes to replace or install new light switches, ensuring the safety and functionality of their electrical systems.
Understanding the connection between “Switch Box” and “Wiring A Single Pole Light Switch” is essential for anyone working with electrical systems. It highlights the importance of using the correct materials and following proper wiring techniques to ensure the safety and reliability of electrical installations.
Testing
In the context of “Wiring A Single Pole Light Switch,” “Testing” stands as a crucial step, ensuring the safety, functionality, and reliability of the electrical installation. It involves a series of checks and measurements to verify proper connections, circuit operation, and compliance with electrical codes.
-
Visual Inspection
A thorough visual inspection is the first step in “Testing.” It involves examining the switch, wiring, and connections for any visible defects, damage, or loose connections. This inspection helps identify potential issues that could affect the switch’s performance or safety.
-
Continuity Testing
Continuity testing uses a multimeter to check for complete electrical circuits. It ensures that electricity can flow properly from the power source, through the switch, and to the light fixture. This test helps identify any breaks or faults in the wiring or connections.
-
Polarity Testing
Polarity testing verifies that the electrical connections are made correctly, with the live wire connected to the brass terminal and the neutral wire connected to the silver terminal on the switch. Incorrect polarity can lead to electrical hazards and improper switch operation.
-
Grounding Verification
Grounding verification ensures that the switch box and light fixture are properly grounded. This test checks for a continuous path to ground, which is essential for safety, as it provides a safe path for fault currents to flow, reducing the risk of electrical shocks.
By performing these tests, electricians and homeowners can ensure that their “Wiring Of A Single Pole Light Switch” is safe, functional, and meets electrical codes. These tests help identify potential issues before they become hazards, extending the lifespan of the electrical system and providing peace of mind.


Related Posts


