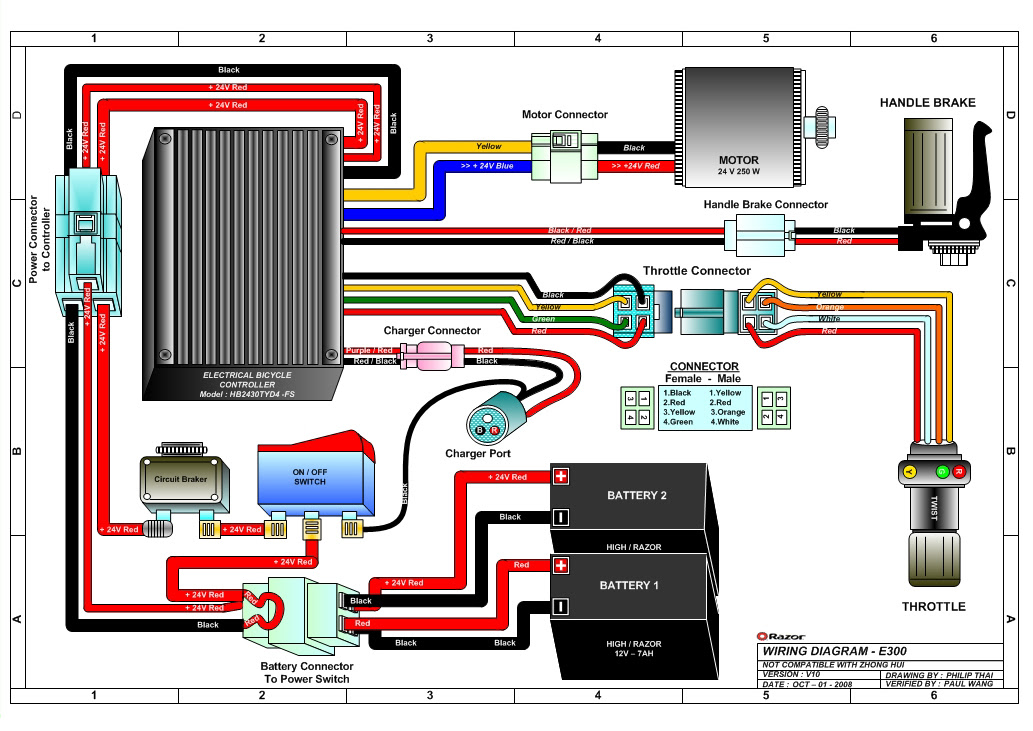
A Wiring Diagram for a Razor Scooter is a detailed plan that illustrates the electrical connections between the components of the scooter. It serves as a guide for assembling, troubleshooting, and repairing the scooter’s electrical system.
The wiring diagram is crucial for ensuring the proper functioning and safety of the scooter. It helps identify the correct wires to connect, their polarity, and the location of electrical components. Additionally, the diagram provides valuable insights into the electrical system’s design, allowing for modifications and upgrades.
In essence, the Wiring Diagram for a Razor Scooter is a blueprint for the scooter’s electrical system, enabling users to understand, maintain, and customize their ride safely and efficiently. The focus of this article will delve deeper into the intricacies of the wiring diagram, exploring its components, applications, and significance in the operation and maintenance of Razor Scooters.
The Wiring Diagram for a Razor Scooter is a crucial aspect of the scooter’s design, assembly, and maintenance. Understanding its key aspects is essential for ensuring the safe and efficient operation of the scooter.
- Components: The wiring diagram identifies all the electrical components of the scooter, including the battery, motor, controller, and switches.
- Connections: It illustrates the electrical connections between the components, showing which wires connect to each other and where.
- Polarity: The diagram indicates the polarity of the connections, ensuring that positive and negative terminals are connected correctly.
- Troubleshooting: The wiring diagram assists in troubleshooting electrical issues by providing a visual representation of the system.
- Repair: It guides repairs by showing how to replace or fix damaged wires and components.
- Modifications: The diagram can be used to plan and execute modifications to the electrical system, such as adding accessories or upgrading components.
- Safety: By ensuring proper electrical connections, the wiring diagram contributes to the overall safety of the scooter.
- Customization: It allows users to customize the scooter’s electrical system to meet their specific needs and preferences.
- Maintenance: The wiring diagram provides a reference for regular maintenance tasks, such as checking connections and replacing batteries.
These aspects are interconnected and essential for the proper functioning of the Wiring Diagram for a Razor Scooter. Together, they provide a comprehensive understanding of the scooter’s electrical system, enabling users to assemble, troubleshoot, repair, and modify their scooters safely and effectively.
Components
The electrical components of a Razor Scooter are interconnected and interdependent, working together to power and control the scooter’s operation. The wiring diagram serves as a roadmap for these components, providing a clear understanding of their relationships and functions within the scooter’s electrical system.
The battery is the power source for the scooter, supplying electricity to the motor and other electrical components. The motor converts electrical energy into mechanical energy, driving the scooter’s wheels. The controller regulates the flow of electricity from the battery to the motor, controlling the scooter’s speed and acceleration. Switches, such as the throttle and brake switches, provide user input to the controller, allowing the rider to operate the scooter.
Without a comprehensive wiring diagram that accurately identifies and maps these components, the electrical system of a Razor Scooter would be chaotic and potentially hazardous. The diagram ensures that each component is properly connected, with the correct polarity and voltage, enabling the scooter to function as intended.
Real-life examples of the importance of the wiring diagram include:
- Troubleshooting: When a Razor Scooter experiences electrical issues, the wiring diagram helps identify the faulty component or connection, allowing for quick and efficient repairs.
- Customization: The wiring diagram enables users to modify and customize their scooters’ electrical systems, such as adding accessories or upgrading components.
- Safety: A properly executed wiring diagram ensures that all electrical connections are secure and meet safety standards, preventing electrical hazards.
Understanding the relationship between the components of a Razor Scooter’s electrical system and their representation in the wiring diagram is crucial for safe and effective operation, maintenance, and customization of the scooter. It empowers users to troubleshoot issues, make informed modifications, and ensure the overall reliability and performance of their scooters.
Connections
Within the context of a Wiring Diagram for a Razor Scooter, the illustration of electrical connections between components is a critical aspect that defines the functionality and safety of the scooter. These connections establish the electrical pathways that allow power to flow from the battery to the motor, controller, and other components, enabling the scooter to operate as intended.
Without a clear understanding of which wires connect to each other and where, assembling and troubleshooting the scooter’s electrical system would be extremely challenging. The wiring diagram serves as a visual guide, ensuring that each component is connected correctly, with the proper polarity and voltage. This not only ensures the scooter’s functionality but also prevents electrical hazards and damage to components.
Real-life examples of the importance of understanding electrical connections in a Razor Scooter’s wiring diagram include:
- Troubleshooting: When a scooter experiences electrical issues, such as a malfunctioning motor or unresponsive controls, the wiring diagram helps identify the faulty connection or component. This enables quick and efficient repairs, minimizing downtime and frustration.
- Customization: The wiring diagram allows users to modify and customize their scooters’ electrical systems. For example, they can add accessories like lights or a horn by following the diagram to identify the appropriate connection points.
- Safety: Proper electrical connections are crucial for the safe operation of a Razor Scooter. The wiring diagram ensures that all connections meet safety standards, preventing electrical fires, shocks, or other hazards.
Understanding the connections between components in a Razor Scooter’s wiring diagram is essential for ensuring the scooter’s reliability, performance, and safety. By providing a clear visual representation of the electrical system, the wiring diagram empowers users to assemble, troubleshoot, and modify their scooters with confidence.
Polarity
Within the context of a Wiring Diagram for a Razor Scooter, polarity plays a critical role in ensuring the safe and proper functioning of the electrical system. Polarity refers to the correct alignment of positive and negative terminals during electrical connections, and the wiring diagram provides clear guidance on this aspect.
- Battery Connections: The wiring diagram specifies the correct polarity for connecting the battery to the scooter’s electrical system. Reversing the polarity can damage the battery and other components, highlighting the importance of following the diagram’s instructions.
- Motor Connections: The diagram also indicates the polarity of the motor connections, ensuring that the motor rotates in the intended direction. Incorrect polarity can cause the motor to run backward or not at all.
- Controller Connections: The wiring diagram provides guidance on the polarity of connections to the controller, which is responsible for regulating the flow of electricity to the motor. Incorrect polarity can disrupt the controller’s operation and affect the scooter’s performance.
- Safety Implications: Maintaining correct polarity throughout the electrical system is crucial for safety. Reversing polarity can create short circuits, damage components, and even pose a fire hazard. The wiring diagram helps prevent these risks by providing clear instructions on polarity.
Understanding the importance of polarity and following the guidelines provided in the Wiring Diagram for a Razor Scooter is essential for ensuring the scooter’s reliable and safe operation. By adhering to the correct polarity during electrical connections, users can prevent damage to components, avoid safety hazards, and enjoy a smooth and enjoyable riding experience.
Troubleshooting
Within the context of a Wiring Diagram for a Razor Scooter, troubleshooting electrical issues is a crucial aspect that ensures the scooter’s reliability and safety. The wiring diagram serves as an invaluable tool for identifying and resolving electrical faults, thanks to its visual representation of the system.
The ability to troubleshoot electrical issues using the wiring diagram stems from the fact that it provides a comprehensive overview of the system’s components and their interconnections. This visual representation allows users to trace the flow of electricity through the system, identify potential breaks or faults, and pinpoint the source of the problem.
Real-life examples of troubleshooting electrical issues using the wiring diagram include:
- Loose Connections: If a Razor Scooter experiences intermittent electrical problems, the wiring diagram can help identify loose connections by showing the physical layout of components and their connections.
- Faulty Components: When a specific component, such as the motor or controller, malfunctions, the wiring diagram can assist in identifying the faulty component by tracing the electrical connections to and from it.
- Short Circuits: The wiring diagram can help identify short circuits by showing the paths of electrical connections. If two wires come into unintended contact, the diagram can help locate the point of contact and resolve the short circuit.
Understanding how to troubleshoot electrical issues using the Wiring Diagram for a Razor Scooter empowers users to maintain and repair their scooters confidently. By providing a visual representation of the system, the wiring diagram simplifies the troubleshooting process, reduces repair time, and enhances the overall safety and reliability of the scooter.
Repair
Within the context of a Wiring Diagram for a Razor Scooter, the aspect of Repair plays a pivotal role in maintaining the scooter’s functionality and safety. The wiring diagram serves as a comprehensive guide for identifying, replacing, and fixing damaged wires and components, enabling users to restore their scooters to optimal operating condition.
- Identifying Faulty Components: The wiring diagram provides a visual representation of the scooter’s electrical system, making it easier to identify faulty components. By tracing the connections and testing the components according to the diagram, users can pinpoint the source of electrical issues.
- Replacing Damaged Wires: The wiring diagram illustrates the location and routing of electrical wires throughout the scooter. This information is crucial when replacing damaged wires, as it ensures that the new wires are installed correctly and safely.
- Fixing Loose Connections: Loose connections can lead to intermittent electrical problems or even complete failure of the scooter. The wiring diagram helps identify loose connections by showing the exact location of each connection point.
- Troubleshooting Complex Issues: The wiring diagram provides a framework for troubleshooting complex electrical issues. By analyzing the diagram, users can trace the flow of electricity through the system and identify potential points of failure or malfunction.
In conclusion, the Repair aspect of the Wiring Diagram for a Razor Scooter empowers users to maintain and repair their scooters efficiently and safely. By providing a detailed visual representation of the electrical system, the wiring diagram enables users to identify faulty components, replace damaged wires, fix loose connections, and troubleshoot complex issues, ultimately ensuring the scooter’s reliability and longevity.
Modifications
Within the context of a Wiring Diagram for a Razor Scooter, the Modifications aspect empowers users to customize and enhance their scooters’ electrical systems. The wiring diagram serves as a blueprint for planning and executing modifications, allowing users to add accessories or upgrade components to suit their specific needs and preferences.
The importance of the Wiring Diagram for Razor Scooter Modifications lies in its ability to provide a clear visual representation of the electrical system. This representation enables users to:
- Identify potential modification points: The wiring diagram shows the location and function of each component in the electrical system, making it easier to identify suitable points for modifications.
- Plan modifications safely: By understanding the existing electrical connections, users can plan modifications without compromising the scooter’s safety or performance.
- Execute modifications accurately: The wiring diagram provides a step-by-step guide for making modifications, ensuring that all connections are made correctly.
Real-life examples of Wiring Diagram-guided Modifications for Razor Scooters include:
- Adding a headlight for improved visibility during night rides.
- Installing a horn or bell to enhance safety by alerting pedestrians and other riders.
- Upgrading the battery to extend the scooter’s range and runtime.
- Modifying the motor controller to adjust the scooter’s speed and acceleration.
Understanding the Modifications aspect of the Wiring Diagram for a Razor Scooter empowers users to personalize their scooters, improve their functionality, and enhance their riding experience. By providing a clear and comprehensive visual representation of the electrical system, the wiring diagram becomes an indispensable tool for enthusiasts seeking to customize and modify their Razor Scooters.
Safety
In the context of a Wiring Diagram for a Razor Scooter, safety is paramount. The wiring diagram plays a critical role in ensuring the scooter’s safe operation by providing a roadmap for proper electrical connections.
Electrical connections, if not made correctly, can lead to various safety hazards. Loose connections can cause arcing and overheating, potentially leading to fires. Incorrect polarity can damage components and cause electrical shocks. The wiring diagram helps prevent these hazards by providing clear instructions on how to connect the scooter’s electrical components safely and securely.
Real-life examples of the safety implications of proper electrical connections in a Razor Scooter include:
- A loose connection in the battery terminals can lead to arcing and overheating, posing a fire hazard.
- Reversing the polarity of the motor connections can damage the motor and potentially cause an electrical shock.
- Incorrect wiring of the controller can disrupt the scooter’s operation and lead to accidents.
Understanding the importance of safety in the context of a Wiring Diagram for a Razor Scooter empowers users to assemble, maintain, and modify their scooters with confidence. By following the wiring diagram’s instructions and ensuring proper electrical connections, users can minimize safety risks and enjoy a safe and enjoyable riding experience.
Customization
In the context of a Wiring Diagram for a Razor Scooter, the customization aspect empowers users to modify and personalize their scooters’ electrical systems to suit their individual preferences and requirements.
The wiring diagram plays a crucial role in enabling customization by providing a detailed visual representation of the electrical system. It serves as a roadmap for users to identify potential modification points, plan changes safely, and execute them accurately. Without a comprehensive wiring diagram, customizing the scooter’s electrical system would be a challenging and potentially hazardous task.
Real-life examples of customization made possible by the Wiring Diagram for a Razor Scooter include:
- Enhancing visibility during night rides by adding a headlight.
- Improving safety by installing a horn or bell.
- Extending the scooter’s range and runtime by upgrading the battery.
- Adjusting the scooter’s speed and acceleration by modifying the motor controller.
Understanding the connection between customization and the Wiring Diagram for a Razor Scooter is essential for users who seek to personalize and enhance their scooters’ performance. By leveraging the wiring diagram, users can make informed modifications that align with their specific needs and preferences, ultimately creating a unique and tailored riding experience.
Maintenance
Within the context of “Wiring Diagram for a Razor Scooter,” the maintenance aspect plays a vital role in ensuring the scooter’s longevity and optimal performance. The wiring diagram serves as a valuable reference guide for regular maintenance tasks, empowering users to keep their scooters in good working condition.
-
Checking Connections:
The wiring diagram provides a visual representation of all electrical connections within the scooter. This enables users to regularly inspect these connections for any signs of loose wires, corrosion, or damage. By promptly addressing loose connections, users can prevent electrical faults, intermittent operation, and even potential safety hazards.
-
Replacing Batteries:
The wiring diagram also includes information on the scooter’s battery, including its type, voltage, and capacity. This information is essential when replacing the battery, as it ensures that the new battery is compatible with the scooter’s electrical system. The wiring diagram also provides guidance on safely disconnecting and reconnecting the battery.
-
Troubleshooting Minor Issues:
Minor electrical issues, such as flickering lights or intermittent motor operation, can often be resolved through simple maintenance tasks. The wiring diagram helps users identify the potential source of these issues by providing a clear understanding of the electrical system’s components and their interconnections.
-
Extending Scooter’s Lifespan:
Regular maintenance, guided by the wiring diagram, contributes to extending the lifespan of the Razor Scooter. By proactively checking connections, replacing batteries, and addressing minor issues, users can prevent premature wear and tear, ensuring that their scooters continue to provide a smooth and enjoyable riding experience.
In conclusion, the maintenance aspect of the Wiring Diagram for a Razor Scooter is an indispensable tool for users who value the longevity, safety, and performance of their scooters. By providing a comprehensive visual representation of the electrical system and detailed instructions for regular maintenance tasks, the wiring diagram empowers users to maintain their scooters with confidence, ensuring a reliable and enjoyable riding experience.
![[DIAGRAM] Razor E300s Seated Electric Scooter Wiring Diagrams](https://i0.wp.com/www.electricscooterparts.com/wiringdiagrams/razor-powerrider-360-wiring-diagram.jpg?w=665&ssl=1)


Related Posts


