A “36 Volt Ez Go Golf Cart Battery Wiring Diagram” is an essential blueprint outlining the electrical connections of a golf cart’s batteries. For instance, a wiring diagram for an EZGO TXT golf cart would illustrate how to correctly wire the six 6-volt batteries to achieve an overall voltage of 36 volts.
This diagram is crucial as it provides step-by-step instructions to ensure proper battery connections, reducing the risk of electrical issues or damage to the golf cart. Its benefits include improved safety, enhanced performance, and reduced maintenance costs. Historically, the development of golf cart battery wiring diagrams paralleled technological advancements in electrical systems and battery capacities.
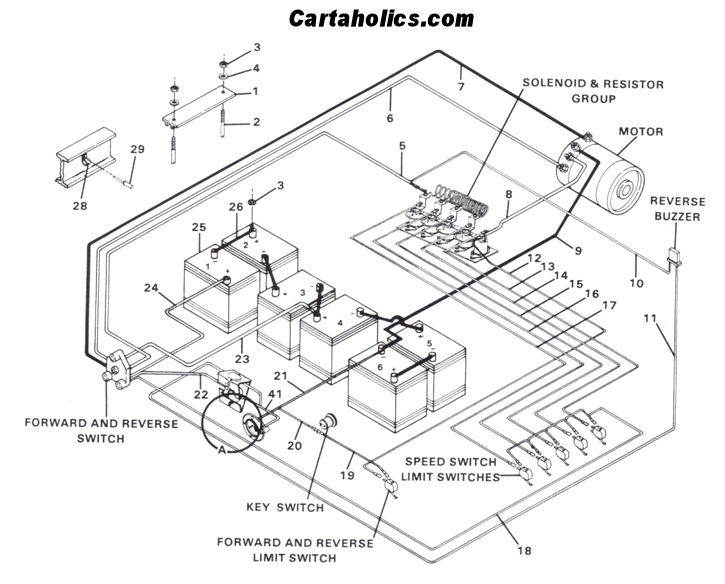
Delving into the nuances of battery wiring diagrams, this article will explore the various components, wiring configurations, and troubleshooting techniques to optimize golf cart performance and longevity.
Understanding the essential aspects of a 36 Volt Ez Go Golf Cart Battery Wiring Diagram is crucial for maintaining optimal performance, safety, and longevity of the golf cart. These aspects encompass various dimensions, including:
- Battery Configuration
- Voltage
- Connections
- Wiring Gauge
- Amperage
- Fuses
- Grounding
- Maintenance
Each aspect plays a vital role in ensuring the efficient functioning of the electrical system. Proper battery configuration and voltage are essential for delivering the required power to the golf cart’s motor. Secure connections, appropriate wiring gauge, and amperage capacity minimize energy loss and prevent overheating. Fuses protect the system from electrical overloads, while proper grounding provides a safe path for excess current. Regular maintenance, including periodic inspections and cleaning of connections, extends the lifespan of the battery and wiring system.
Battery Configuration
Battery configuration is a critical aspect of a 36 Volt Ez Go Golf Cart Battery Wiring Diagram, determining the arrangement and connection of batteries to achieve the desired voltage and capacity for the golf cart’s electrical system.
-
Battery Type
Golf carts typically use deep-cycle batteries, which are designed to provide sustained power over an extended period. These batteries can be flooded lead-acid, sealed lead-acid (SLA), or lithium-ion, each with its own characteristics and implications for the wiring diagram. -
Voltage
A 36 Volt Ez Go Golf Cart Battery Wiring Diagram specifies the connection of six 6-volt batteries in series to achieve a total voltage of 36 volts. This voltage is optimal for powering the golf cart’s motor and accessories. -
Capacity
The capacity of the battery pack, measured in amp-hours (Ah), determines the amount of power the golf cart can store. A higher capacity battery pack will provide longer run times before recharging is necessary. -
Connection
The batteries in a 36 Volt Ez Go Golf Cart Battery Wiring Diagram are connected in series, with the positive terminal of one battery connected to the negative terminal of the next. This configuration ensures that the voltage of each battery is added together to achieve the desired total voltage.
Understanding battery configuration is essential for properly wiring a golf cart’s electrical system. Incorrect configuration can lead to damage to the batteries or the golf cart itself. By following the manufacturer’s specified wiring diagram, golf cart owners can ensure that their batteries are configured correctly for optimal performance and longevity.
Voltage
Voltage, a fundamental aspect of “36 Volt Ez Go Golf Cart Battery Wiring Diagram,” plays a critical role in determining the electrical performance and efficiency of the golf cart. It refers to the electrical potential difference between two points in a circuit, driving the flow of current.
-
Battery Voltage
Each 6-volt battery in a 36-volt EZGO golf cart contributes to the overall voltage of the system. Understanding battery voltage is crucial for ensuring proper charging and maintaining optimal performance. -
Motor Voltage
The golf cart motor is designed to operate at a specific voltage, typically 36 volts. Matching the battery pack voltage to the motor voltage ensures efficient power delivery, maximizing torque and speed. -
Voltage Drop
As current flows through the wiring and components of the golf cart, there is a gradual decrease in voltage known as voltage drop. Minimizing voltage drop is essential for maintaining consistent power throughout the system. -
Voltage Regulation
Voltage regulators are used to maintain a stable voltage level in the golf cart’s electrical system, preventing damage to sensitive components and ensuring reliable operation.
Understanding voltage and its various facets is crucial for comprehending “36 Volt Ez Go Golf Cart Battery Wiring Diagram.” Proper wiring and maintenance practices, such as using appropriate gauge wires and ensuring clean connections, help maintain optimal voltage levels, maximizing golf cart performance and longevity.
Connections
In the context of a “36 Volt Ez Go Golf Cart Battery Wiring Diagram,” connections play a pivotal role in ensuring the efficient and safe operation of the golf cart’s electrical system. These connections include the electrical pathways between batteries, from the batteries to the motor, and throughout the various components of the golf cart.
Secure and properly sized connections are critical for minimizing voltage drop and preventing excessive heat buildup, which can lead to decreased performance and potential damage to components. Loose or corroded connections can cause intermittent operation, reduced power output, and premature battery failure.
Real-life examples of connections within a “36 Volt Ez Go Golf Cart Battery Wiring Diagram” include the battery terminals, where the batteries are connected in series to achieve the desired voltage; the connection between the battery pack and the motor, which transmits power to drive the golf cart; and the connections to accessories such as headlights, taillights, and the charging receptacle.
Understanding the importance of connections in a “36 Volt Ez Go Golf Cart Battery Wiring Diagram” enables golf cart owners and technicians to properly install, maintain, and troubleshoot the electrical system. Regular inspection and cleaning of connections, as well as ensuring tight and secure connections, can help prevent problems and extend the lifespan of the golf cart.
Wiring Gauge
In the context of a “36 Volt Ez Go Golf Cart Battery Wiring Diagram,” wiring gauge refers to the thickness or diameter of the electrical wires used in the golf cart’s electrical system. Selecting the appropriate wiring gauge is crucial for ensuring efficient power transmission, minimizing voltage drop, and preventing overheating and potential damage to components.
-
Current Capacity
The wiring gauge must be able to handle the amount of current that will be flowing through the wires. Using a wire gauge that is too small can lead to overheating and potential fire hazards.
-
Voltage Drop
As current flows through a wire, there is a voltage drop due to the resistance of the wire. Using a larger wire gauge can minimize voltage drop and ensure that the voltage at the end of the wire is close to the voltage at the beginning of the wire.
-
Heat Dissipation
When current flows through a wire, it generates heat. The larger the wire gauge, the more surface area there is to dissipate heat, which helps to prevent the wire from overheating.
-
Wire Length
The length of the wire also affects the voltage drop. A longer wire will have a greater voltage drop than a shorter wire of the same gauge. Therefore, it is important to use a larger wire gauge for longer wires.
Understanding the importance of wiring gauge and selecting the appropriate gauge for each application is essential for ensuring the safe and efficient operation of a 36 Volt Ez Go Golf Cart Battery Wiring Diagram. Proper wiring gauge selection can help to prevent problems such as voltage drop, overheating, and premature component failure.
Amperage
In the context of a “36 Volt Ez Go Golf Cart Battery Wiring Diagram,” amperage refers to the rate of electron flow through an electrical circuit, measured in amperes (A). Understanding amperage is crucial for ensuring the proper functioning and efficiency of the golf cart’s electrical system.
-
Battery Capacity
The amperage-hour (Ah) rating of a battery indicates its capacity to deliver current over time. It determines how long the battery can power the golf cart before needing to be recharged.
-
Motor Amperage Draw
The motor’s amperage draw refers to the amount of current it requires to operate. It is influenced by factors such as motor size, load, and speed.
-
Wire Gauge
The wire gauge used in the wiring diagram must be appropriate for the amperage draw of the circuit. Using a wire gauge that is too small can lead to overheating and potential fire hazards.
-
Fuse and Circuit Breaker Ratings
Fuses and circuit breakers are used to protect the electrical system from overcurrent conditions. Their amperage ratings should be carefully selected to ensure that they trip before the wires or components overheat.
Understanding amperage and its various aspects is essential for designing and maintaining a safe and efficient “36 Volt Ez Go Golf Cart Battery Wiring Diagram.” Proper consideration of amperage ratings and current flow helps prevent damage to components, ensures optimal performance, and extends the lifespan of the golf cart’s electrical system.
Fuses
In the context of a “36 Volt Ez Go Golf Cart Battery Wiring Diagram,” fuses play a critical role in protecting the electrical system from damage caused by overcurrent conditions. A fuse is a sacrificial device that interrupts the flow of current when it exceeds a predetermined level, preventing overheating and potential fire hazards.
Fuses are a vital component of “36 Volt Ez Go Golf Cart Battery Wiring Diagram” for several reasons. Firstly, they protect the battery pack from damage caused by overcurrent conditions. When the current draw exceeds the capacity of the batteries, a fuse will blow, disconnecting the battery pack from the circuit. This prevents the batteries from overheating and potentially exploding.
Secondly, fuses protect the golf cart’s motor and other electrical components from damage. If a component draws too much current, a fuse will blow, preventing the component from overheating and failing. This can save the golf cart owner from costly repairs.
Real-life examples of fuses within “36 Volt Ez Go Golf Cart Battery Wiring Diagram” include the main fuse, which protects the entire electrical system, and the individual fuses that protect each component, such as the motor, controller, and lights. Understanding the function and importance of fuses is essential for maintaining a safe and reliable golf cart electrical system.
In conclusion, fuses are a critical component of “36 Volt Ez Go Golf Cart Battery Wiring Diagram” because they protect the electrical system from damage caused by overcurrent conditions. By preventing overheating and potential fire hazards, fuses help to ensure the safety and longevity of the golf cart.
Grounding
In the context of a “36 Volt Ez Go Golf Cart Battery Wiring Diagram,” grounding refers to the intentional connection of an electrical circuit to the ground, which is typically the earth or a conductive surface that acts as a reference point for electrical potential. Grounding plays a critical role in ensuring the safe and proper functioning of the electrical system.
A “36 Volt Ez Go Golf Cart Battery Wiring Diagram” typically includes a dedicated grounding wire that connects the negative terminal of the battery pack to the golf cart’s frame. This connection provides a low-resistance path for electrical current to flow back to the battery, completing the circuit. Without proper grounding, electrical current can take unintended paths, leading to malfunctions, damage to components, or even electrical shock.
Real-life examples of grounding within a “36 Volt Ez Go Golf Cart Battery Wiring Diagram” include the connection of the battery pack’s negative terminal to the golf cart’s frame, as well as the grounding of the motor, controller, and other electrical components to the frame. These connections ensure that all components share a common reference point for electrical potential, preventing voltage imbalances and potential hazards.
Understanding the importance of grounding in a “36 Volt Ez Go Golf Cart Battery Wiring Diagram” is crucial for ensuring the safety and reliability of the golf cart. Proper grounding practices help to prevent electrical faults, protect components from damage, and provide a safe path for electrical current to flow. By adhering to proper grounding techniques, golf cart owners and technicians can maintain a well-functioning electrical system and extend the lifespan of the golf cart.
Maintenance
Maintenance is an essential aspect of ensuring the safety, reliability, and longevity of a 36 Volt Ez Go Golf Cart Battery Wiring Diagram. Regular maintenance practices help prevent potential problems, extend the lifespan of components, and optimize the overall performance of the golf cart’s electrical system.
-
Battery Inspection and Cleaning
Regularly inspecting and cleaning the golf cart’s batteries is crucial for maintaining optimal performance. Clean the battery terminals and connections to prevent corrosion and ensure good electrical contact. Check the battery water levels (if applicable) and add distilled water as needed to prevent damage to the batteries.
-
Wiring Inspection and Repair
Inspect the wiring harness for any signs of damage, such as frayed or broken wires. Loose or damaged wires can lead to voltage drop, overheating, and potential electrical fires. Repair or replace any damaged wires promptly to ensure the safe and efficient operation of the electrical system.
-
Fuse and Circuit Breaker Inspection
Fuses and circuit breakers protect the electrical system from overcurrent conditions. Inspect the fuses and circuit breakers regularly to ensure they are functioning properly. Replace any blown fuses or tripped circuit breakers to prevent damage to the electrical components.
-
Grounding Inspection and Maintenance
Proper grounding is essential for the safe operation of the golf cart’s electrical system. Inspect the grounding connections to ensure they are tight and secure. Clean any corrosion from the grounding points to maintain a good electrical connection.
By adhering to proper maintenance practices, golf cart owners can ensure the continued reliability and safety of their 36 Volt Ez Go Golf Cart Battery Wiring Diagram. Regular maintenance helps prevent costly repairs, extends the lifespan of the electrical components, and optimizes the overall performance of the golf cart.


Related Posts


