Wiring a Double Switch is an electrical procedure that allows for the independent control of two separate light fixtures or outlets from a single location. An example would be a hallway where two light fixtures are wired to a double switch at the end of the corridor.
This technique has significant relevance in electrical work as it provides greater flexibility and convenience in lighting and appliance control. One distinct benefit is the ability to switch between separate fixtures without the need for multiple switches or complicated wiring schemes. Historically, the invention of the modern double switch in the early 20th century revolutionized residential and commercial lighting systems.
This article delves into the specific steps involved in wiring a double switch, addressing both basic and advanced techniques. By covering common wiring methods, troubleshooting approaches, and safety considerations, we aim to provide a comprehensive guide for electricians and DIY enthusiasts alike.
Wiring a double switch involves several essential aspects that are crucial for a safe and functional electrical installation. These aspects encompass various dimensions, taking into account the components, techniques, and considerations involved in this electrical procedure.
- Switch Selection: Choosing the right type of switch for the intended application.
- Circuit Breaker: Determining the appropriate circuit breaker rating for the load.
- Wire Gauge: Selecting the correct wire size based on the current draw.
- Wiring Diagram: Following a clear and accurate wiring diagram.
- Electrical Box: Installing the switch in a suitable electrical box.
- Grounding: Ensuring proper grounding for safety.
- Screw Terminals: Tightening screw terminals securely.
- Faceplate: Installing a faceplate to cover the switch and provide a finished look.
- Testing: Using a multimeter to verify proper switch functionality.
- Safety Precautions: Adhering to electrical safety guidelines while working with electricity.
These aspects are interconnected and play a vital role in the success of wiring a double switch. Proper switch selection ensures compatibility with the electrical load. Circuit breaker rating and wire gauge are crucial for preventing electrical hazards. A wiring diagram guides the entire installation process, while proper grounding protects against electrical shocks. Tightening screw terminals securely prevents loose connections and potential arcing. A faceplate provides both aesthetic appeal and protection from accidental contact with live wires. Testing verifies the functionality and safety of the installation. Finally, adhering to safety precautions minimizes the risk of electrical accidents.
Switch Selection
When wiring a double switch, selecting the appropriate switch is crucial for both functionality and safety. It involves considering various factors such as the type of load, desired switch operation, and environmental conditions.
- Amperage Rating: The switch must be rated to handle the amperage draw of the connected load. Exceeding the amperage rating can lead to overheating and electrical hazards.
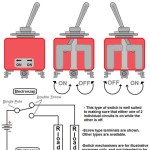
- Switch Type: Double switches come in different types, including single-pole, double-pole, and three-way switches. The switch type must match the intended application and wiring configuration.
- Switch Mechanism: Switches can have different mechanisms, such as toggle, rocker, or push-button. The choice depends on personal preference and the intended use.
- Environmental Factors: For outdoor applications or areas with moisture, weatherproof switches with appropriate IP ratings should be used to prevent electrical accidents.
By carefully considering these factors and selecting the right switch for the intended application, electricians and DIY enthusiasts can ensure a safe and functional double switch installation.
Circuit Breaker
When wiring a double switch, selecting the appropriate circuit breaker rating for the load is a crucial aspect that ensures the safety and reliability of the electrical system. A circuit breaker acts as a protective device, safeguarding the circuit from excessive current flow that could lead to electrical fires or damage to appliances. Understanding the components and implications of circuit breaker selection is essential for proper wiring practices.
- Load Calculation: Determining the total amperage draw of all devices connected to the circuit is the starting point for selecting the correct circuit breaker rating. This involves adding up the individual amperage ratings of each device or appliance.
- Circuit Breaker Amperage Rating: Circuit breakers are rated for specific amperage capacities. The selected circuit breaker must have an amperage rating equal to or greater than the calculated load amperage.
- Circuit Breaker Type: Circuit breakers come in different types, including standard, GFCI (Ground Fault Circuit Interrupter), and AFCI (Arc Fault Circuit Interrupter). The type of circuit breaker required depends on the specific application and electrical code requirements.
- Future Expansion: Considering potential future additions or changes to the circuit is also important. Selecting a circuit breaker with a slightly higher amperage rating than the current load allows for future expansion without the need for immediate rewiring.
By carefully considering these factors and selecting the appropriate circuit breaker rating for the load, electricians and DIY enthusiasts can ensure a safe and code-compliant electrical installation. Oversizing the circuit breaker can lead to potential fire hazards, while undersizing can result in nuisance tripping and disruption of power. Choosing the correct circuit breaker rating is a critical aspect of wiring a double switch and contributes to the overall safety and functionality of the electrical system.
Wire Gauge
When wiring a double switch, selecting the correct wire gauge is essential for ensuring the safe and efficient operation of the circuit. The wire gauge, which refers to the thickness of the wire, directly impacts its current-carrying capacity. Understanding the relationship between wire gauge and current draw is crucial for proper wiring practices.
The current draw of a circuit is the amount of electrical current flowing through it. The wire gauge must be appropriately sized to handle the expected current draw without overheating or causing voltage drop. Using a wire gauge that is too thin for the current draw can lead to overheating, insulation damage, and potential fire hazards. Conversely, using a wire gauge that is too thick is wasteful and unnecessary.
Real-life examples of wire gauge selection in double switch wiring include:
- For a double switch controlling two light fixtures, each rated at 60 watts, the total current draw is 120 watts. Using the National Electrical Code (NEC) tables, a 14 AWG wire is appropriate for this application.
- In a commercial setting, a double switch may be used to control a ceiling fan and a light fixture. The ceiling fan draws 1.5 amps, while the light fixture draws 0.5 amps. The total current draw is 2 amps, which calls for a 12 AWG wire according to the NEC guidelines.
Understanding the connection between wire gauge and current draw is not only critical for safety but also for energy efficiency. Properly sized wires minimize energy loss due to resistance, leading to lower electricity bills and reduced environmental impact.
Wiring Diagram
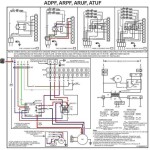
When it comes to wiring a double switch, following a clear and accurate wiring diagram is of utmost importance. It serves as a roadmap for the entire installation process, ensuring that all components are connected correctly and safely. Without a proper wiring diagram, the risk of errors and potential electrical hazards increases significantly.
- Circuit Components: A wiring diagram clearly outlines the electrical components involved in the double switch circuit, including switches, wires, outlets, and any additional devices. It specifies the type, quantity, and connections of each component, providing a comprehensive view of the circuit.
- Wire Connections: The diagram details the specific connections between wires and terminals. It indicates the type of wire (e.g., solid or stranded), wire gauge, and color coding. This information ensures that wires are connected to the correct terminals and in the proper sequence, preventing short circuits and other electrical issues.
- Real-Life Example: Consider a double switch controlling two ceiling lights. The wiring diagram would show the connection of the black (hot) wire to the common terminal on the switch, the white (neutral) wire to the neutral terminal, and the red and blue wires (controlled) to the remaining terminals. This diagram guides the electrician in making the necessary connections accurately.
- Safety Implications: Adhering to a clear wiring diagram minimizes the risk of electrical accidents and ensures the safe operation of the double switch. Errors in wiring can lead to overheating, electrical fires, or shocks. A well-documented diagram reduces the chances of such hazards by providing a clear and accurate plan for the installation.
In conclusion, following a clear and accurate wiring diagram is a critical aspect of wiring a double switch. It provides a comprehensive guide to the circuit components, wire connections, and safety considerations involved in the installation process. By understanding the elements outlined in the diagram and adhering to its instructions, electricians and DIY enthusiasts can ensure a safe, functional, and code-compliant electrical installation.
Electrical Box
In the context of wiring a double switch, the electrical box plays a crucial role in ensuring a safe and functional installation. The electrical box houses the switch, providing a secure enclosure for the electrical connections and protecting the switch from external elements.
Installing the switch in a suitable electrical box is a critical component of wiring a double switch due to several reasons. First and foremost, it ensures proper support and alignment of the switch. A suitable electrical box is designed to fit the specific switch model and provides a secure mounting surface. This prevents the switch from becoming loose or misaligned, which could compromise its functionality and safety.
Furthermore, the electrical box serves as a protective barrier against electrical hazards. It insulates the electrical connections from contact with combustible materials, such as wood or insulation, reducing the risk of electrical fires. The box also provides a convenient access point for future maintenance or repairs, allowing electricians to easily troubleshoot and address any issues without damaging the surrounding walls or fixtures.
Real-life examples within “Wiring Double Switch” further illustrate the importance of using a suitable electrical box. In residential settings, double switches are commonly installed in electrical boxes mounted within walls. These boxes provide a secure and concealed enclosure for the switch, while allowing for easy access through faceplates that match the interior dcor.
Understanding the connection between “Electrical Box: Installing the switch in a suitable electrical box.” and “Wiring Double Switch” is essential for both safety and functionality. By selecting and installing the appropriate electrical box, electricians and DIY enthusiasts can ensure a secure, code-compliant, and aesthetically pleasing double switch installation.
Grounding
In the context of wiring a double switch, grounding plays a pivotal role in ensuring the safety and proper functioning of the electrical system. Grounding provides a low-resistance path for electrical current to flow back to the electrical panel, protecting against electrical shocks and preventing damage to equipment.
Grounding is a critical component of wiring a double switch as it helps to mitigate the risk of electrical accidents. Without proper grounding, an electrical fault or short circuit can cause the metal switch plate or other exposed components to become energized, posing a serious shock hazard. Grounding provides a safe pathway for the excess current to dissipate, preventing dangerous voltage buildup.
Real-life examples of proper grounding within “Wiring Double Switch” can be observed in residential and commercial buildings. In homes, double switches are commonly installed in grounded electrical boxes, which are connected to the grounding system of the building. This ensures that any fault current is safely directed to the ground, preventing the risk of electrical shocks.
Understanding the connection between “Grounding: Ensuring proper grounding for safety.” and “Wiring Double Switch” is essential for electricians and DIY enthusiasts. Proper grounding practices not only enhance safety but also comply with electrical codes and standards. By implementing proper grounding techniques, individuals can help prevent electrical accidents, protect equipment, and ensure the reliable operation of their electrical systems.
Screw Terminals
When it comes to wiring a double switch, proper tightening of screw terminals is a crucial aspect that directly influences the safety and reliability of the electrical system. Loose or improperly tightened screw terminals can lead to a myriad of electrical issues, ranging from flickering lights to overheating and potential fire hazards.
- Electrical Conductivity: Tightening screw terminals securely ensures optimal electrical conductivity between the wire and the switch. Loose connections can increase resistance, leading to voltage drop and power loss.
- Preventing Arcing: Loose screw terminals can cause arcing, which occurs when the electrical current jumps across the gap between the wire and the terminal. Arcing can damage the switch components and insulation, posing a fire hazard.
- Mechanical Stability: Properly tightened screw terminals provide mechanical stability to the wire connections, preventing the wires from pulling out or becoming loose due to vibrations or movement.
- Grounding: In the case of grounded switches, proper screw terminal tightening is essential for maintaining a secure connection to the grounding wire. This ensures that fault currents are safely directed to the ground, preventing electrical shocks.
By understanding the critical components and implications of “Screw Terminals: Tightening screw terminals securely” in the context of “Wiring Double Switch,” electricians and DIY enthusiasts can ensure safe and reliable electrical installations. Proper tightening techniques, combined with using the correct tools and following electrical codes, help prevent electrical hazards, improve circuit performance, and enhance the longevity of the electrical system.
Faceplate
When examining the connection between “Faceplate: Installing a faceplate to cover the switch and provide a finished look.” and “Wiring Double Switch,” one discovers that the faceplate plays a crucial role in completing the installation process. It serves both functional and aesthetic purposes, enhancing the safety and overall quality of the electrical work.
Primarily, the faceplate’s role is to provide insulation and protection for the switch’s internal components. It acts as a barrier against accidental contact with live electrical parts, reducing the risk of electrical shocks, particularly in areas where children or pets may be present. Additionally, the faceplate shields the switch from dust, moisture, and other environmental factors that could potentially damage the delicate mechanisms within.
Furthermore, the faceplate contributes to the overall aesthetics of the room. Available in various materials, colors, and designs, faceplates can complement the interior decor and enhance the visual appeal of the space. They provide a clean and polished finish, concealing any imperfections or rough edges around the switch box.
In summary, understanding the connection between “Faceplate: Installing a faceplate to cover the switch and provide a finished look.” and “Wiring Double Switch” is essential for ensuring a safe, functional, and aesthetically pleasing electrical installation. The faceplate serves as a protective covering, preventing accidental contact with live components and safeguarding the switch from environmental hazards. It also contributes to the overall appearance of the room by providing a polished and cohesive finish.
Testing
In the context of “Wiring Double Switch,” testing plays a vital role in ensuring the safety and reliability of the electrical installation. Using a multimeter to verify proper switch functionality involves a series of steps and considerations.
-
Continuity Test:
Using the multimeter’s continuity setting, electricians can check for a complete circuit between the switch terminals and the connected wires. This test ensures that the switch is making and breaking contact properly.
-
Voltage Measurement:
With the switch in the “on” position, the multimeter can measure the voltage across the switch terminals. This verifies that the switch is allowing current to flow and that the voltage is within the expected range.
-
Polarity Check:
In the case of polarized switches, a multimeter can be used to determine the correct orientation of the wires. Correct polarity ensures proper switch operation and prevents potential electrical hazards.
-
Ground Fault Detection:
For switches connected to grounded circuits, a multimeter can be used to check for proper grounding. This ensures that excess current is safely directed to the ground, enhancing safety.
By performing these tests, electricians can identify any issues with the switch or wiring, ensuring that the double switch operates safely and efficiently. Testing is an essential step in the “Wiring Double Switch” process, contributing to the overall quality and longevity of the electrical installation.
Safety Precautions
When undertaking “Wiring Double Switch” tasks, adhering to established electrical safety guidelines is of paramount importance. By prioritizing these precautions, individuals can mitigate the risks associated with working with electricity, ensuring a safe and successful installation.
-
Hazard Identification:
Recognizing potential electrical hazards is crucial. This includes identifying live wires, understanding electrical codes, and assessing the work environment for potential risks.
-
Protective Gear:
Utilizing appropriate personal protective equipment (PPE) such as insulated gloves, safety glasses, and non-conductive footwear is essential to minimize the risk of electrical shock and injury.
-
Circuit Isolation:
Before commencing any electrical work, isolating the circuit by turning off the power at the main breaker panel is imperative. This eliminates the possibility of accidental energization during installation.
-
Proper Grounding:
Ensuring proper grounding of the electrical system is vital for safety. This involves connecting the green or bare copper wire to the grounding terminal on the switch and the electrical panel, providing a safe path for excess current to dissipate.
By adhering to these safety precautions, electricians and DIY enthusiasts can significantly reduce the likelihood of electrical accidents, protect themselves and others from harm, and ensure the proper functioning of their electrical systems.


Related Posts


