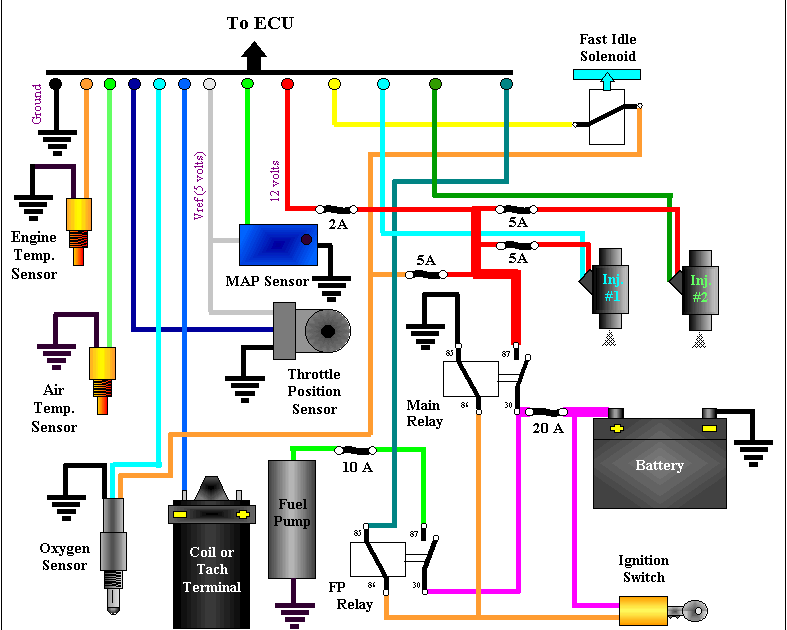
A simple wiring diagram for Harley refers to a simplified representation of the electrical system of a Harley-Davidson motorcycle, showing the connections between components. For instance, a wiring diagram may depict the connections between the battery, ignition switch, spark plugs, and lights.
Wiring diagrams are essential for troubleshooting electrical problems, as they provide a visual guide to the system’s connections. They also aid in modifications and repairs, enabling users to understand the flow of electricity and identify potential issues. A key historical development in motorcycle wiring diagrams is the adoption of color-coding for wires, simplifying the identification of connections and reducing the likelihood of errors.
This article will delve into the intricacies of simple wiring diagrams for Harley-Davidson motorcycles, exploring their components, interpretation, and practical applications.
Simple wiring diagrams for Harley-Davidson motorcycles play a crucial role in understanding, maintaining, and modifying their electrical systems. These diagrams provide simplified visual representations of the connections between electrical components, enabling users to trace the flow of electricity and identify potential issues.
- Components: Battery, ignition switch, spark plugs, lights
- Troubleshooting: Guide to identifying electrical problems
- Modifications: Planning and execution of electrical system changes
- Repairs: Identifying and fixing electrical faults
- Color-coding: Simplified wire identification
- Symbols: Standardized representation of electrical components
- Circuit tracing: Following the path of electricity through the system
- Voltage and amperage: Understanding electrical power flow
These aspects are interconnected and essential for comprehending the operation and maintenance of a Harley-Davidson motorcycle’s electrical system. For instance, understanding the components and their connections through a wiring diagram helps in troubleshooting electrical problems by identifying potential points of failure. Similarly, the use of color-coding and symbols simplifies the process of circuit tracing and modifications, making it easier to work on the electrical system.
Components
Within the context of a simple wiring diagram for Harley, the components battery, ignition switch, spark plugs, and lights play crucial roles in the electrical system. Each of these components serves a specific function, and understanding their connections and interactions is essential for troubleshooting, modifications, and repairs.
-
Battery:
The battery is the central energy source for the electrical system, providing power to all components. It stores electrical energy and supplies it when needed. In a simple wiring diagram, the battery is typically represented by a rectangle with positive and negative terminals.
-
Ignition switch:
The ignition switch controls the flow of electricity from the battery to the rest of the electrical system. It is typically represented by a circle or square with two or more terminals. When the ignition switch is turned on, it completes the circuit, allowing electricity to flow.
-
Spark plugs:
Spark plugs generate the spark that ignites the air-fuel mixture in the engine’s cylinders. They are represented by a small circle with a central terminal. The spark plugs are connected to the ignition coil, which provides the high voltage necessary for spark generation.
-
Lights:
The lights provide illumination for the rider and other road users. They are represented by a circle or rectangle with a filament or LED symbol inside. The lights are connected to the battery through a switch, which controls their operation.
These components are interconnected through wires, and their proper functioning ensures the reliable operation of the motorcycle’s electrical system. By understanding the role and connections of each component, individuals can effectively troubleshoot problems, make modifications, and perform repairs on their Harley-Davidson motorcycles.
Troubleshooting
Troubleshooting electrical problems requires a systematic approach to identify the source of the issue. A simple wiring diagram for Harley provides a visual representation of the electrical system, enabling individuals to trace the flow of electricity and identify potential points of failure. By understanding the connections between components and the role they play in the overall system, troubleshooting becomes more efficient and effective.
A simple wiring diagram serves as a valuable guide during the troubleshooting process, allowing users to pinpoint the exact location of a problem. For instance, if a headlight is not functioning, the wiring diagram can help identify the circuit responsible for powering the headlight and guide the user in checking for loose connections, blown fuses, or faulty switches. By following the connections shown in the diagram, users can isolate the issue and determine the most likely cause of the problem.
Practical applications of this understanding include the ability to diagnose and repair common electrical problems, such as flickering lights, non-functioning turn signals, or battery drain. With the help of a simple wiring diagram, individuals can trace the electrical circuits, identify potential problems, and take appropriate corrective actions. This knowledge empowers riders to maintain their motorcycles and address electrical issues without relying solely on professional assistance.
In summary, a simple wiring diagram for Harley is an essential tool for troubleshooting electrical problems. It provides a visual representation of the electrical system, enabling users to trace the flow of electricity and identify potential points of failure. By understanding the connections between components and the role they play in the overall system, troubleshooting becomes more efficient and effective, empowering individuals to maintain and repair their motorcycles with greater confidence.
Modifications
Modifications to a Harley-Davidson’s electrical system often involve alterations to the wiring, necessitating a thorough understanding of the system’s layout and connections. This is where a simple wiring diagram for Harley becomes invaluable. It provides a visual representation of the electrical components and their interconnections, serving as a roadmap for planning and executing modifications.
The wiring diagram not only helps identify the specific wires and components affected by the modification but also allows users to anticipate potential impacts on other parts of the system. For instance, adding auxiliary lights may require tapping into the existing lighting circuit. The wiring diagram enables users to determine the appropriate connection points and ensure that the modification does not overload the circuit or interfere with the operation of other lights.
Furthermore, a simple wiring diagram aids in troubleshooting any issues that may arise during or after the modification. By tracing the connections and identifying potential points of failure, users can quickly pinpoint the source of a problem and take corrective actions. This can save time and effort compared to blindly experimenting with different connections.
In summary, a simple wiring diagram for Harley is a critical component of planning and executing electrical system modifications. It provides a comprehensive view of the system’s connections, enabling users to make informed decisions, anticipate potential impacts, and troubleshoot any issues that may arise. This understanding empowers riders to customize and enhance their motorcycles’ electrical systems with greater confidence and precision.
Repairs
Within the context of “Simple Wiring Diagrams for Harley,” repairs refer to the process of identifying and fixing electrical faults in the motorcycle’s electrical system. These faults can manifest in various forms, ranging from minor issues to more complex problems affecting the overall functionality and safety of the motorcycle.
-
Identifying Faulty Components:
A simple wiring diagram aids in identifying faulty components by providing a visual representation of the electrical system’s connections. By comparing the expected behavior with the actual performance, users can pinpoint the specific component causing the fault.
-
Tracing Electrical Circuits:
The wiring diagram enables users to trace electrical circuits, helping them understand the flow of electricity throughout the system. This knowledge is crucial for isolating the affected circuit and identifying the root cause of the fault.
-
Testing and Troubleshooting:
Once the faulty component or circuit is identified, the wiring diagram guides users through the process of testing and troubleshooting. By following the connections and understanding the system’s behavior, they can efficiently diagnose and repair the fault.
-
Safe Repair Practices:
The wiring diagram provides insights into the proper repair procedures, ensuring safety during the repair process. It helps users identify potential hazards, such as high-voltage components or sensitive electronic modules, and guides them in taking appropriate precautions.
Understanding the connections and components of the electrical system through a simple wiring diagram empowers individuals to perform repairs with greater confidence and accuracy. It reduces the risk of further damage to the electrical system and ensures the reliable and safe operation of the motorcycle.
Color-coding
Within the context of “Simple Wiring Diagram for Harley,” color-coding plays a crucial role in simplifying wire identification, making it easier to understand and work with the motorcycle’s electrical system. Color-coding establishes a consistent scheme where specific colors are assigned to different types of wires, enabling users to quickly identify their purpose and functionality.
This color-coding system is a critical component of simple wiring diagrams for Harley, as it provides a visual cue that guides users through the complex network of electrical connections. Each wire’s color corresponds to its function, such as power, ground, or specific electrical components. This simplifies the process of tracing circuits, troubleshooting problems, and making modifications to the electrical system.
For example, in a simple wiring diagram for Harley, red wires are typically used to indicate power, black wires for ground, and blue wires for lighting circuits. By adhering to this color-coding scheme, users can easily identify the purpose of each wire without having to memorize complex wire labels or trace connections through the entire diagram. This reduces the risk of errors and makes it easier to work on the electrical system.
The practical applications of understanding color-coding in simple wiring diagrams for Harley extend to various aspects of electrical system maintenance and modification. When troubleshooting electrical problems, color-coding allows users to quickly isolate the affected circuit by identifying the corresponding colored wire. Additionally, when making modifications or adding accessories, color-coding helps users determine the appropriate wires to tap into for power or other connections, ensuring compatibility and preventing damage to the electrical system.
In summary, color-coding in simple wiring diagrams for Harley simplifies wire identification, making it easier to understand, troubleshoot, and modify the motorcycle’s electrical system. By assigning specific colors to different types of wires, color-coding provides a visual cue that guides users through the complex network of electrical connections, enhancing the overall usability and safety of the wiring diagram.
Symbols
Within the context of “Simple Wiring Diagram For Harley,” symbols play a pivotal role in standardizing the representation of electrical components, making it easier to understand and communicate complex electrical systems. These symbols provide a common visual language that simplifies the interpretation of wiring diagrams, enabling users to quickly identify and comprehend the functionality of each component.
Symbols are critical components of simple wiring diagrams for Harley as they convey essential information about the electrical system in a concise and efficient manner. They eliminate the need for lengthy text descriptions or complex schematics, making it easier for users to grasp the overall structure and operation of the system. For instance, a simple wiring diagram for Harley may use a standardized symbol to represent a battery, which instantly communicates its function as the power source for the electrical system.
Real-life examples of symbols in simple wiring diagrams for Harley include the use of a circle to represent a light bulb, a triangle for a resistor, and a wavy line for a capacitor. These symbols have been widely adopted within the electrical industry and are recognized by professionals and enthusiasts alike. By adhering to standardized symbols, simple wiring diagrams for Harley ensure consistency and clarity, facilitating effective communication and collaboration among individuals working on the electrical system.
The practical applications of understanding symbols in simple wiring diagrams for Harley extend to various aspects of electrical system maintenance and modification. When troubleshooting electrical problems, symbols allow users to quickly identify the affected component and its function, enabling them to focus their efforts on the specific area of the system that requires attention. Additionally, when making modifications or adding accessories, symbols help users determine the appropriate components to connect to, ensuring compatibility and preventing damage to the electrical system.
In summary, symbols play a critical role in simple wiring diagrams for Harley by providing a standardized representation of electrical components. These symbols simplify the interpretation of wiring diagrams, making it easier to understand and communicate complex electrical systems. Real-life examples of symbols include the use of a circle to represent a light bulb and a triangle for a resistor. Understanding these symbols is essential for effectively troubleshooting electrical problems, making modifications, and ensuring the safe and reliable operation of the motorcycle’s electrical system.
Circuit tracing
Understanding circuit tracing is a fundamental aspect of comprehending simple wiring diagrams for Harley. Circuit tracing involves following the path of electricity through the system, enabling users to identify the connections between components and understand the flow of current. This knowledge is essential for troubleshooting electrical problems, making modifications, and ensuring the safe operation of the motorcycle’s electrical system.
Simple wiring diagrams for Harley provide a visual representation of the electrical system, making circuit tracing more accessible. The diagrams use symbols to represent components and color-coding to distinguish different types of wires. By following the connections shown in the diagram, users can trace the path of electricity from the battery to the various components and back to the ground. This process helps identify potential points of failure, such as loose connections, damaged wires, or faulty components.
Real-life examples of circuit tracing within simple wiring diagrams for Harley include identifying the circuit responsible for a non-functioning headlight or turn signal. By tracing the connections from the component to the power source, users can pinpoint the exact location of the problem and take appropriate corrective actions. Additionally, circuit tracing is crucial when adding accessories or modifying the electrical system. By following the path of electricity, users can determine the most suitable connection points and ensure that the modifications do not overload the system or cause any electrical issues.
In summary, circuit tracing is a critical component of understanding simple wiring diagrams for Harley. It empowers users to troubleshoot electrical problems, make modifications, and ensure the safe operation of the motorcycle’s electrical system. By following the path of electricity through the system, users can identify potential issues, locate faulty components, and make informed decisions regarding electrical system maintenance and modifications.
Voltage and amperage
In the realm of electrical systems, voltage and amperage play crucial roles in ensuring the proper functioning of various components. Understanding these concepts is paramount for comprehending simple wiring diagrams for Harley and effectively maintaining and modifying the motorcycle’s electrical system.
-
Voltage: The driving force
Voltage, measured in volts, represents the electrical potential difference between two points in a circuit. It provides the driving force that pushes electrons through the system, enabling the flow of electricity. In simple wiring diagrams, voltage is often indicated by the battery symbol and labeled with a specific voltage value.
-
Amperage: The current flow
Amperage, measured in amps, represents the rate of electron flow through a circuit. It indicates the amount of electrical current passing through a conductor. In simple wiring diagrams, amperage is often indicated by the symbol “A” or the term “current” and is labeled with a specific amperage value.
-
Resistance: The opposing force
Resistance, measured in ohms, represents the opposition to the flow of electricity in a circuit. It determines how easily electrons can flow through a conductor. In simple wiring diagrams, resistance is often indicated by the symbol “” or the term “resistor” and is labeled with a specific resistance value.
-
Power: The product of voltage and amperage
Power, measured in watts, represents the rate at which electrical energy is transferred or consumed in a circuit. It is calculated by multiplying voltage and amperage. In simple wiring diagrams, power is often indicated by the symbol “P” or the term “power” and is labeled with a specific power value.
Understanding the interplay between voltage, amperage, and resistance is crucial for troubleshooting electrical problems and making modifications to the electrical system. By analyzing the voltage and amperage values indicated in a simple wiring diagram, users can identify potential issues, such as voltage drops or excessive current draw, and take appropriate corrective actions to ensure the safe and reliable operation of the motorcycle’s electrical system.


Related Posts


