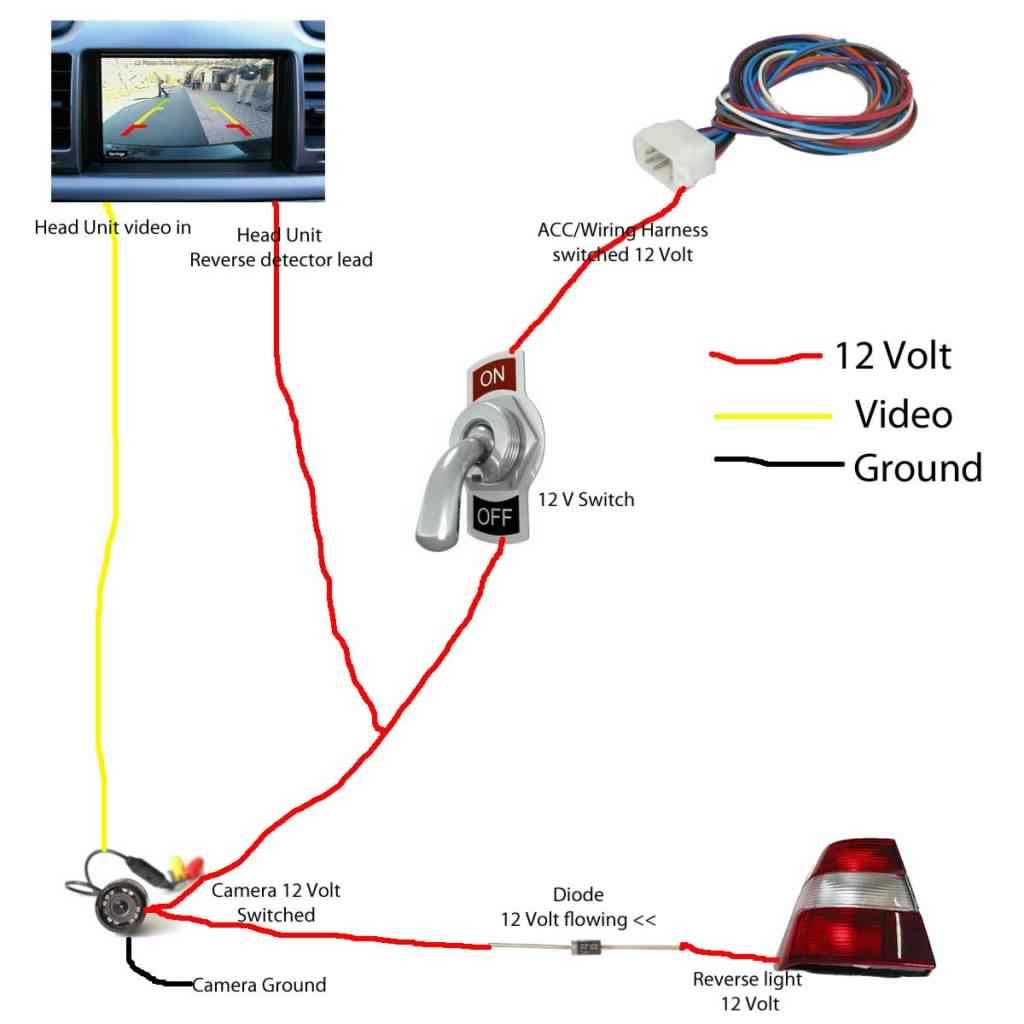
Wiring Diagram Backup Camera Wiring Schematic defines the layout and connections of wires within a backup camera system. It serves as a comprehensive visual guide during installation, providing precise instructions for connecting components such as the camera, monitor, and power source. For instance, a typical backup camera wiring schematic may illustrate the connection between the camera’s video output wire to the monitor’s video input port.
These schematics are crucial for ensuring proper functionality of the backup camera system. They enable seamless communication between components, prevent potential failures, and minimize troubleshooting time. The development of standardized wiring schemes has simplified installation and maintenance, making backup cameras widely accessible for enhancing vehicle safety.
This article delves into the details of wiring diagram backup camera wiring schematics, exploring their intricacies, benefits, and applications. It will provide insights into selecting the appropriate schematic for specific vehicle models, understanding wire types and connections, and troubleshooting common installation issues.
Wiring diagrams for backup camera wiring schematics are essential for understanding the electrical connections and functionality of the system. These diagrams provide a visual representation of the components, their interconnections, and the flow of electrical signals.
- Components: Camera, monitor, power source, wiring harness
- Connections: Wire types, connectors, terminals
- Power: Voltage, amperage, polarity
- Signal: Video, audio, control
- Grounding: Importance, locations
- Troubleshooting: Common issues, diagnostic steps
- Safety: Precautions, potential hazards
- Customization: Adapting to specific vehicle models
- Integration: Compatibility with other systems
Understanding these aspects enables proper installation, maintenance, and troubleshooting of backup camera systems. The diagrams serve as a reference guide for technicians and DIY enthusiasts alike, ensuring the system operates reliably and effectively in enhancing vehicle safety.
Components
In the context of a backup camera wiring schematic, the components – camera, monitor, power source, and wiring harness – play critical roles in establishing functional connections within the system. The wiring schematic serves as a blueprint, guiding the assembly and integration of these components to achieve the desired functionality.
The camera captures the rearward field of view and converts it into an electrical signal. This signal is then transmitted through the wiring harness to the monitor, which displays the video feed for the driver’s reference. The power source provides the necessary electrical power to operate the camera and monitor. Each component must be compatible with the others in terms of voltage, amperage, and signal format to ensure proper operation.
Understanding the relationship between these components and the wiring schematic is essential for successful installation and troubleshooting. For instance, if the camera is not receiving power, the wiring schematic can help identify potential issues in the power supply or wiring connections. Similarly, if the monitor is not displaying the video feed, the schematic can assist in isolating the problem to the camera, wiring harness, or monitor itself.
In summary, the components – camera, monitor, power source, and wiring harness – are fundamental elements of a backup camera wiring schematic. Their proper connection and integration, as defined by the schematic, are crucial for the reliable operation of the backup camera system, enhancing vehicle safety and convenience.
Connections
Within the context of a Wiring Diagram Backup Camera Wiring Schematic, the significance of connections, encompassing wire types, connectors, and terminals, cannot be overstated. These elements serve as the foundation for establishing functional electrical pathways between the various components of the backup camera system. Understanding their relationship is paramount for successful installation, maintenance, and troubleshooting.
The selection of appropriate wire types is crucial for ensuring reliable signal transmission. Different wire types vary in terms of conductor material, gauge, and shielding, each suited for specific applications. For instance, thicker gauge wires are preferred for power connections, while shielded wires are employed to minimize electromagnetic interference in video signal transmission. Connectors, on the other hand, provide a secure and convenient means of connecting wires to components. They come in various types, such as crimp connectors, solder connectors, and quick-disconnect connectors, each offering unique advantages depending on the specific application.
Terminals, often overlooked but equally important, serve as the endpoints of wires, providing the physical interface for connecting to components. They are typically made of conductive materials like copper or brass and can vary in shape and size to accommodate different connection methods. Proper crimping or soldering of terminals to wires ensures a secure and low-resistance connection, minimizing signal loss and potential failures.
In practical applications, the understanding of connections between wire types, connectors, and terminals empowers technicians and DIY enthusiasts to assemble and maintain backup camera systems with confidence. By following the guidelines outlined in the wiring diagram, they can select the appropriate components, establish reliable connections, and troubleshoot issues effectively. This knowledge contributes to the overall safety and functionality of the backup camera system, enhancing the driver’s ability to maneuver and park safely.
In summary, connections, encompassing wire types, connectors, and terminals, are indispensable components of Wiring Diagram Backup Camera Wiring Schematics. Their proper selection, installation, and maintenance are essential for establishing reliable electrical pathways within the backup camera system. Understanding these connections empowers individuals to effectively implement and maintain these systems, contributing to improved vehicle safety and convenience.
Power
In the context of Wiring Diagram Backup Camera Wiring Schematics, the relationship between “Power: Voltage, amperage, polarity” and the overall functionality of the system is of paramount importance. Understanding this relationship enables proper installation, maintenance, and troubleshooting of backup camera systems, ensuring reliable operation and enhanced vehicle safety.
Voltage, amperage, and polarity are fundamental electrical characteristics that define the power requirements and flow within the backup camera system. Voltage refers to the electrical potential difference between two points, measured in volts (V). Amperage, also known as current, measures the flow of electrical charge, measured in amperes (A). Polarity refers to the direction of current flow, typically denoted as positive (+) and negative (-).
Backup cameras and their components, such as the camera, monitor, and power source, are designed to operate within specific voltage and amperage ranges. The wiring schematic provides precise guidelines for connecting these components, ensuring that they receive the appropriate power. Incorrect voltage or amperage can damage components or lead to system malfunctions. Polarity is equally important, as reversing the polarity can result in improper operation or even damage to the system.
Real-life examples of “Power: Voltage, amperage, polarity” within “Wiring Diagram Backup Camera Wiring Schematic” can be found in the specifications of the components themselves. For instance, a backup camera may require a power supply of 12 volts DC (direct current) at 1 ampere, with the positive terminal connected to the red wire and the negative terminal connected to the black wire. By adhering to these specifications, the backup camera receives the necessary power to operate correctly.
The practical significance of understanding “Power: Voltage, amperage, polarity” lies in the ability to troubleshoot and resolve issues within the backup camera system. If the camera is not functioning, checking the voltage, amperage, and polarity at various points in the circuit can help identify potential problems. This understanding empowers individuals to diagnose and repair faults, ensuring the system’s continued operation and enhancing vehicle safety.
In conclusion, “Power: Voltage, amperage, polarity” is a critical component of “Wiring Diagram Backup Camera Wiring Schematic.” By understanding the relationship between these electrical characteristics and the system’s functionality, individuals can effectively install, maintain, and troubleshoot backup camera systems, contributing to improved vehicle safety and convenience.
Signal
Within the realm of “Wiring Diagram Backup Camera Wiring Schematic”, the aspect of “Signal: Video, audio, control” plays a pivotal role in understanding the intricate connections and functionality of backup camera systems. Understanding this aspect enables proper installation, maintenance, and troubleshooting, ultimately enhancing vehicle safety and convenience.
- Video Signal: The video signal is the core of any backup camera system, carrying the visual information captured by the camera to the monitor. This signal is typically transmitted using a composite video cable, which consists of a single wire carrying the video signal along with synchronization pulses.
- Audio Signal: Some backup camera systems also incorporate an audio signal, which transmits sound captured by a microphone near the camera to the monitor. This audio signal allows the driver to hear any audible cues or warnings from the rear of the vehicle.
- Control Signal: The control signal is used to manage the operation of the backup camera system. It may include commands to switch between different camera views, adjust the brightness or contrast of the image, or activate specific features such as gridlines or parking assistance.
- Power Signal: While not strictly a “signal” in the traditional sense, the power signal is crucial for operating the backup camera and monitor. It provides the necessary electrical power to these components, allowing them to function correctly.
Understanding the “Signal: Video, audio, control” aspect of “Wiring Diagram Backup Camera Wiring Schematic” empowers individuals to effectively install, maintain, and troubleshoot these systems. By ensuring that the proper signals are transmitted between components and that the power supply is adequate, individuals can contribute to the reliable operation of backup camera systems, enhancing vehicle safety and providing peace of mind while reversing or maneuvering in tight spaces.
Grounding
Within the context of “Wiring Diagram Backup Camera Wiring Schematic”, the significance of “Grounding: Importance, locations” cannot be overstated. Grounding serves as the foundation for establishing a stable electrical reference point within the backup camera system, ensuring proper functionality and preventing electrical hazards.
Grounding involves connecting the negative terminal of the power source or a designated grounding point on the vehicle’s chassis to the metal frame or body of the backup camera and monitor. This connection provides a low-resistance path for electrical current to flow, creating a common reference point for all electrical components in the system. Without proper grounding, electrical current may seek alternative paths, leading to malfunctions, damage to components, or even electrical fires.
In practical terms, the “Wiring Diagram Backup Camera Wiring Schematic” will typically specify the grounding locations for the camera, monitor, and any additional components. These grounding points are usually indicated by symbols or labels such as “GND” or “Ground.” By following the schematic and connecting the ground wires accordingly, individuals can ensure that the backup camera system is properly grounded, minimizing the risk of electrical issues and maximizing its reliability and safety.
Understanding the importance of “Grounding: Importance, locations” and its connection to “Wiring Diagram Backup Camera Wiring Schematic” empowers individuals to install, maintain, and troubleshoot backup camera systems effectively. By adhering to the grounding guidelines provided in the wiring schematic, they can contribute to the safe and reliable operation of the system, enhancing vehicle safety and convenience.
Troubleshooting
Within the context of “Wiring Diagram Backup Camera Wiring Schematic”, the connection between “Troubleshooting: Common issues, diagnostic steps” and the schematic itself is critical for ensuring the proper installation, maintenance, and repair of backup camera systems. Troubleshooting involves identifying and resolving issues that may arise during the installation or operation of the system, and the wiring diagram provides a visual representation of the system’s electrical connections, making it an invaluable tool for diagnostic purposes.
The wiring diagram serves as a guide for tracing electrical circuits, identifying potential problem areas, and understanding the relationships between different components. By comparing the actual system to the schematic, technicians can identify discrepancies, loose connections, or damaged wires that may be causing issues with the backup camera’s functionality. The diagnostic steps outlined in the schematic provide a structured approach to troubleshooting, guiding technicians through a series of checks and tests to isolate the root cause of the problem.
For example, if the backup camera is not displaying an image on the monitor, the wiring diagram can help identify potential issues such as a faulty connection between the camera and the monitor, a break in the video cable, or a problem with the power supply. By following the diagnostic steps, technicians can systematically eliminate possible causes and narrow down the issue, allowing for efficient and effective repairs.
Understanding the connection between “Troubleshooting: Common issues, diagnostic steps” and “Wiring Diagram Backup Camera Wiring Schematic” empowers individuals to approach troubleshooting tasks with confidence and accuracy. By utilizing the schematic as a reference and following the diagnostic steps outlined within it, individuals can effectively identify and resolve issues with backup camera systems, ensuring their reliable operation and enhancing vehicle safety.
Safety
In the realm of “Wiring Diagram Backup Camera Wiring Schematic,” the aspect of “Safety: Precautions, potential hazards” holds paramount importance. Understanding and adhering to these precautions are crucial to prevent electrical mishaps, ensure proper system functionality, and safeguard individuals during installation, maintenance, and troubleshooting tasks.
- Electrical Hazards: Backup camera systems operate on electrical power, posing potential risks such as electrical shock, short circuits, and fires. Precautions include using insulated tools, avoiding contact with live wires, and following proper grounding procedures as outlined in the wiring diagram.
- Improper Installation: Incorrect wiring, loose connections, or inadequate grounding can lead to system malfunctions, reduced image quality, or even damage to components. Following the wiring diagram meticulously and ensuring secure connections are vital for safe and reliable operation.
- Environmental Concerns: Backup cameras are often exposed to harsh outdoor conditions, including moisture, extreme temperatures, and vibrations. Precautions involve using weather-resistant components, proper sealing of connections, and avoiding excessive cable strain to prevent damage and ensure longevity.
- Compatibility Issues: Mismatched components or incorrect wiring can result in compatibility issues, affecting system performance or causing damage. Consulting the wiring diagram and ensuring component compatibility before installation is crucial to avoid such hazards.
By understanding and implementing the safety precautions outlined in “Wiring Diagram Backup Camera Wiring Schematic,” individuals can mitigate potential hazards, ensure the safe and effective operation of the backup camera system, and enhance overall vehicle safety.
Customization
In the realm of “Wiring Diagram Backup Camera Wiring Schematic,” the concept of “Customization: Adapting to specific vehicle models” plays a pivotal role in ensuring the successful installation and operation of backup camera systems across a wide range of vehicle makes and models. This customization is driven by the inherent differences in electrical systems, mounting points, and overall vehicle architecture among different vehicles.
The wiring diagram for a backup camera system is not a one-size-fits-all solution. Each vehicle model may require specific adaptations to the wiring harness, connectors, and mounting hardware to ensure compatibility with its unique electrical system and physical characteristics. For instance, the wiring diagram may need to account for variations in the location of the reverse lights, the type of video input on the infotainment system, and the presence or absence of factory-installed parking assistance features.
Real-life examples of “Customization: Adapting to specific vehicle models” within “Wiring Diagram Backup Camera Wiring Schematic” can be found in aftermarket backup camera kits designed for specific vehicle makes and models. These kits typically include vehicle-specific wiring harnesses and mounting brackets, ensuring a seamless integration with the vehicle’s electrical system and providing a secure and aesthetically pleasing installation.
Understanding the connection between “Customization: Adapting to specific vehicle models” and “Wiring Diagram Backup Camera Wiring Schematic” is crucial for both professional installers and DIY enthusiasts. By carefully considering the specific requirements of the vehicle model, individuals can select the appropriate wiring diagram and make any necessary adaptations to ensure a successful installation. This understanding contributes to the reliable operation of the backup camera system, enhancing overall vehicle safety and convenience.
Integration
In the context of “Wiring Diagram Backup Camera Wiring Schematic,” the concept of “Integration: Compatibility with other systems” plays a crucial role in expanding the functionality and versatility of backup camera systems. By understanding the relationship between these two aspects, individuals can effectively integrate backup cameras with existing vehicle systems, enhancing the overall driving experience and safety.
The wiring diagram not only provides a roadmap for connecting the backup camera to the vehicle’s electrical system, but also serves as a guide for integrating the camera with other systems such as navigation, parking assistance, and blind-spot monitoring. By carefully considering the compatibility of the backup camera with these systems, individuals can unlock additional features and maximize the benefits of their backup camera installation.
Real-life examples of “Integration: Compatibility with other systems” within “Wiring Diagram Backup Camera Wiring Schematic” include the integration of backup cameras with factory-installed navigation systems, providing drivers with a seamless view of the rear surroundings while navigating. Additionally, the integration with parking assistance systems enables the backup camera to display dynamic guidelines that adapt to the steering angle, making parking maneuvers safer and more precise.
Understanding the connection between “Integration: Compatibility with other systems” and “Wiring Diagram Backup Camera Wiring Schematic” empowers individuals to make informed decisions when selecting and installing backup camera systems. By considering the compatibility with existing vehicle systems, individuals can ensure a seamless integration, enhancing the functionality, safety, and overall driving experience of their vehicles. This understanding contributes to the broader goal of improving vehicle safety and reducing the risk of accidents, providing drivers with increased confidence and peace of mind while reversing or navigating in challenging situations.


Related Posts


