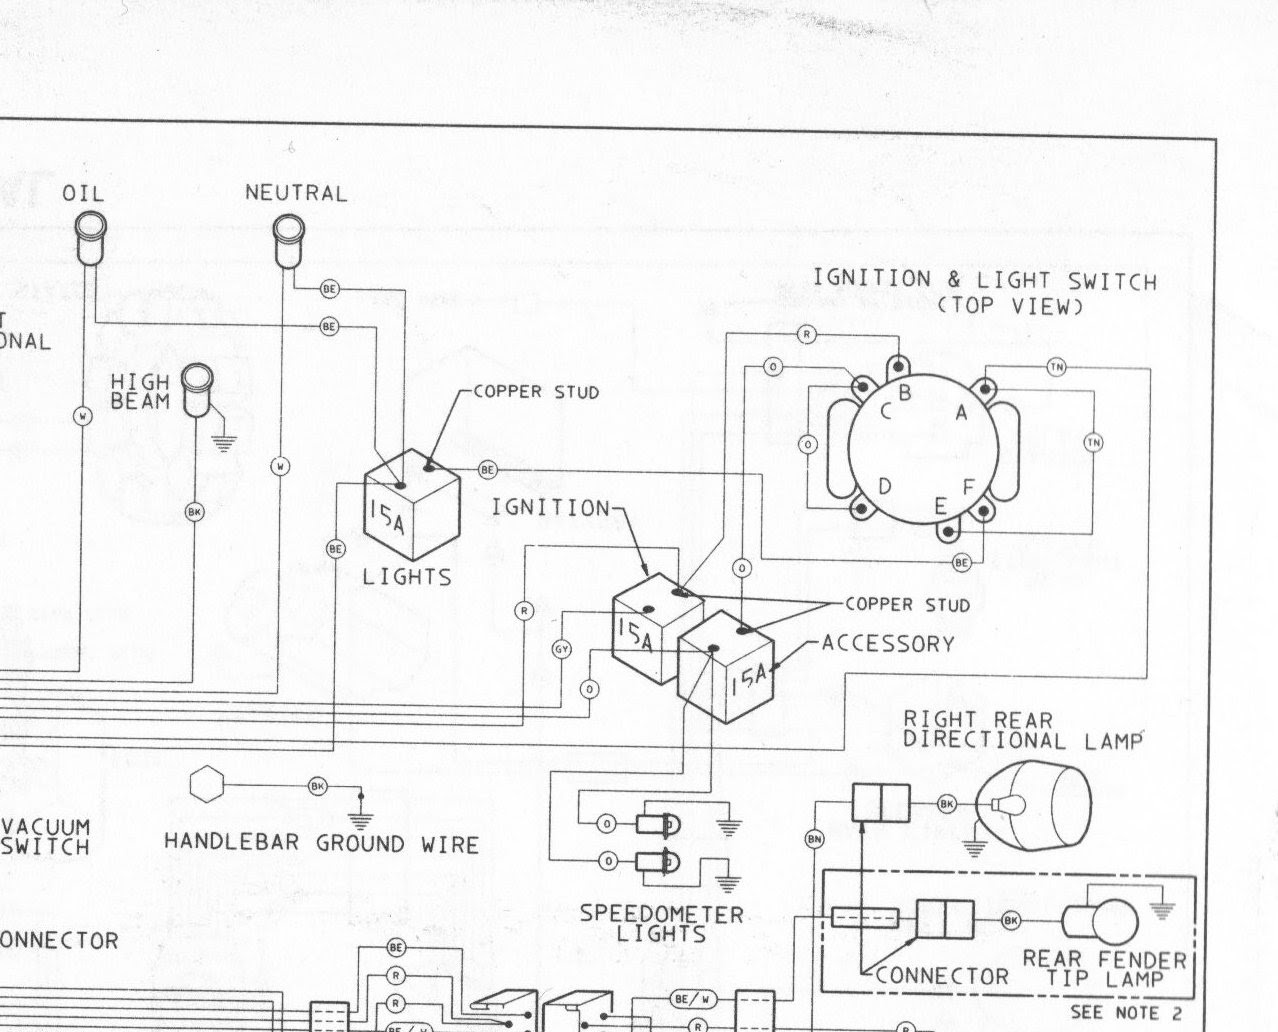
A Harley Davidson ignition switch wiring diagram is a schematic representation of the electrical connections within the ignition switch assembly of a Harley Davidson motorcycle. It provides a visual guide to the wiring, allowing technicians and DIY enthusiasts to troubleshoot and repair ignition system issues.
The ignition switch plays a crucial role in the operation of a Harley Davidson motorcycle. It controls the flow of electrical power to the ignition system, which in turn initiates the combustion process in the engine. A faulty ignition switch can lead to a variety of problems, including the motorcycle failing to start, stalling while riding, or even electrical fires.
Historically, Harley Davidson ignition switch wiring diagrams have evolved over time as the company has introduced new models and technologies. Understanding the wiring diagram for a specific model is essential for accurate troubleshooting and repair. Having access to a clear wiring diagram can save time and frustration, allowing for a more efficient and effective diagnostic process.
The Harley Davidson ignition switch wiring diagram is a crucial aspect of the motorcycle’s electrical system, serving as a comprehensive guide for troubleshooting and repair. Understanding its key aspects is essential for maintaining and servicing Harley Davidson motorcycles.
- Function: The wiring diagram provides a visual representation of the electrical connections within the ignition switch assembly, allowing technicians to identify and resolve issues related to the flow of electrical power to the ignition system.
- Accuracy: A precise wiring diagram is essential for accurate troubleshooting, ensuring that repairs are carried out correctly and efficiently.
- Model-specific: Harley Davidson ignition switch wiring diagrams vary depending on the motorcycle model and year, so it is crucial to use the correct diagram for the specific bike being serviced.
- Troubleshooting: The wiring diagram serves as a valuable tool for diagnosing electrical problems, enabling technicians to trace circuits and identify faulty components.
- Repair: With the help of a wiring diagram, technicians can effectively repair ignition switch issues, restoring the motorcycle’s electrical system to proper working order.
- Electrical safety: By providing a clear understanding of the electrical connections, the wiring diagram helps ensure that repairs are carried out safely, minimizing the risk of electrical hazards.
- DIY maintenance: For DIY enthusiasts, the wiring diagram empowers them to perform basic troubleshooting and repairs, saving time and money on professional maintenance costs.
- Customization: For those looking to customize their Harley Davidson, the wiring diagram provides insights into the electrical system, enabling modifications to be made safely and effectively.
- Historical evolution: Harley Davidson ignition switch wiring diagrams have evolved over time, reflecting changes in motorcycle design and technology, and understanding these changes is important for servicing older models.
- Availability: Wiring diagrams are readily available online and in service manuals, making them easily accessible for technicians and enthusiasts alike.
In conclusion, the Harley Davidson ignition switch wiring diagram serves as a comprehensive resource for understanding, troubleshooting, and repairing the motorcycle’s electrical system. Its importance lies in providing accurate information about the electrical connections, enabling efficient and safe maintenance and repair procedures.
Function
The Harley Davidson ignition switch wiring diagram fulfills this function by providing a clear and concise visual representation of the electrical connections within the ignition switch assembly. This enables technicians to easily identify and trace circuits, locate faulty components, and resolve issues related to the flow of electrical power to the ignition system. Without a wiring diagram, troubleshooting electrical problems would be significantly more challenging and time-consuming, as technicians would have to manually trace each wire and connection, increasing the risk of misdiagnosis and incorrect repairs.
Real-life examples of this function in action include:
- A technician uses a wiring diagram to diagnose a motorcycle that is experiencing intermittent starting problems. By tracing the electrical connections from the ignition switch to the ignition coil, the technician identifies a loose connection that is causing the problem.
- A custom bike builder uses a wiring diagram to modify the electrical system of a Harley Davidson motorcycle to accommodate aftermarket accessories. By understanding the flow of electrical power through the ignition switch assembly, the builder can safely and effectively integrate the new components into the electrical system.
The practical applications of this understanding are numerous. Wiring diagrams empower technicians to:
- Troubleshoot electrical problems quickly and accurately, saving time and money on repairs.
- Repair ignition switch issues effectively, restoring the motorcycle’s electrical system to proper working order.
- Safely modify the electrical system to accommodate aftermarket accessories or custom configurations.
In conclusion, the function of the Harley Davidson ignition switch wiring diagram in providing a visual representation of the electrical connections within the ignition switch assembly is critical for the efficient and effective troubleshooting and repair of the motorcycle’s electrical system. Understanding this function empowers technicians and enthusiasts alike to maintain and service Harley Davidson motorcycles with confidence.
Accuracy
In the context of “Harley Davidson Ignition Switch Wiring Diagram”, accuracy holds paramount importance. A precise wiring diagram is not merely a visual representation of electrical connections but a crucial tool that empowers technicians and enthusiasts to diagnose and repair electrical issues with confidence and efficiency. Without an accurate wiring diagram, troubleshooting becomes a haphazard process, increasing the likelihood of incorrect repairs and potential electrical hazards.
- Correct Component Identification: A precise wiring diagram provides a clear and unambiguous representation of each component within the ignition switch assembly. This enables technicians to accurately identify faulty components, such as a malfunctioning switch or a loose connection, and target repairs accordingly.
- Accurate Circuit Tracing: The wiring diagram serves as a roadmap for tracing electrical circuits within the ignition switch assembly. With a precise diagram, technicians can systematically follow the flow of electricity, identify potential breaks or shorts, and pinpoint the exact location of the issue.
- Safe and Effective Repairs: By providing an accurate understanding of the electrical connections, the wiring diagram guides technicians in carrying out repairs safely and effectively. It ensures that repairs are made to the correct components and that the electrical system is restored to its proper working order.
- Reduced Troubleshooting Time: A precise wiring diagram significantly reduces troubleshooting time by providing a clear and concise visual reference. This enables technicians to quickly identify potential issues, eliminating the need for extensive trial-and-error methods and minimizing downtime for the motorcycle.
In conclusion, the accuracy of a Harley Davidson ignition switch wiring diagram is paramount for accurate troubleshooting and efficient repairs. It empowers technicians and enthusiasts to correctly identify faulty components, accurately trace circuits, carry out repairs safely and effectively, and minimize troubleshooting time. Understanding and utilizing a precise wiring diagram are essential for maintaining and servicing Harley Davidson motorcycles to the highest standards.
Model-specific
The model-specific nature of Harley Davidson ignition switch wiring diagrams stems from the fact that different models and years of Harley Davidson motorcycles have unique electrical systems. These variations can be attributed to changes in the ignition system design, the addition or removal of electrical components, and even the overall architecture of the motorcycle’s electrical system. Using the correct wiring diagram is crucial because it ensures that technicians and enthusiasts have an accurate representation of the electrical connections specific to the bike being serviced. This accuracy is essential for effective troubleshooting, precise component identification, and safe and efficient repairs.
For instance, a 2015 Harley Davidson Touring model will have a different ignition switch wiring diagram compared to a 2023 Harley Davidson Softail model. The 2015 Touring model may have a traditional ignition switch with a mechanical key, while the 2023 Softail model may feature a keyless ignition system with RFID technology. These differences necessitate the use of model-specific wiring diagrams to ensure accurate troubleshooting and repairs.
Understanding and utilizing the correct wiring diagram for a specific Harley Davidson motorcycle offers several practical benefits. Firstly, it reduces troubleshooting time by providing a clear and concise visual guide to the electrical connections. Secondly, it enhances repair accuracy, ensuring that technicians can identify and replace faulty components correctly. Thirdly, it promotes electrical safety by guiding technicians in carrying out repairs according to the manufacturer’s specifications, minimizing the risk of electrical hazards.
In conclusion, the model-specific nature of Harley Davidson ignition switch wiring diagrams highlights the importance of using the correct diagram for the specific bike being serviced. This accuracy is critical for effective troubleshooting, precise component identification, safe and efficient repairs, and overall electrical system maintenance. Understanding and utilizing model-specific wiring diagrams empowers technicians and enthusiasts to maintain and service Harley Davidson motorcycles to the highest standards.
Troubleshooting
In the context of Harley Davidson ignition switch wiring diagrams, troubleshooting is a critical aspect of maintaining and repairing the electrical system of a Harley Davidson motorcycle. The wiring diagram serves as a valuable tool for diagnosing electrical problems, enabling technicians to trace circuits and identify faulty components. By understanding how to use the wiring diagram effectively, technicians can quickly and accurately resolve electrical issues, ensuring that the motorcycle operates safely and efficiently.
- Circuit Tracing: The wiring diagram provides a visual representation of the electrical circuits within the ignition switch assembly. By tracing the circuits, technicians can identify breaks, shorts, or other interruptions in the flow of electricity. This enables them to pinpoint the exact location of the problem, reducing troubleshooting time and minimizing the need for extensive testing.
- Component Identification: The wiring diagram also includes a legend or key that identifies each component within the ignition switch assembly. This allows technicians to quickly identify faulty components, such as a malfunctioning switch or a loose connection. By replacing the faulty component, technicians can restore the electrical system to proper working order.
- Real-Life Example: A technician is troubleshooting a Harley Davidson motorcycle that experiences intermittent starting problems. Using the wiring diagram, the technician traces the electrical circuits from the ignition switch to the ignition coil. By doing so, the technician identifies a loose connection at the ignition coil, which is causing the starting problems. By tightening the connection, the technician resolves the issue and restores the motorcycle to proper operation.
In conclusion, the troubleshooting aspect of Harley Davidson ignition switch wiring diagrams empowers technicians to diagnose electrical problems quickly and accurately. By tracing circuits and identifying faulty components, technicians can efficiently resolve electrical issues, ensuring the safe and reliable operation of Harley Davidson motorcycles.
Repair
Within the context of “Harley Davidson Ignition Switch Wiring Diagram”, the aspect of “Repair” holds significant importance. With the help of a wiring diagram, technicians are empowered to effectively troubleshoot and repair ignition switch issues, ultimately restoring the motorcycle’s electrical system to proper working order. Understanding the nuances of this repair process involves examining various facets and implications, each contributing to the overall effectiveness and efficiency of the repair.
- Component Identification: A wiring diagram provides a clear representation of the electrical components within the ignition switch assembly. This enables technicians to accurately identify faulty components, such as switches, relays, or wiring harnesses, allowing for targeted repairs and replacements.
- Circuit Analysis: The wiring diagram serves as a roadmap for tracing electrical circuits, allowing technicians to analyze the flow of electricity throughout the ignition switch assembly. This in-depth understanding helps identify breaks, shorts, or other interruptions in the circuit, leading to precise repairs that restore proper electrical function.
- Real-Life Example: A technician encounters a Harley Davidson motorcycle with a malfunctioning ignition switch, resulting in intermittent starting issues. Using the wiring diagram, the technician traces the electrical circuits and identifies a loose connection at the ignition switch. By tightening the connection, the technician effectively repairs the issue, restoring the motorcycle’s starting functionality.
- Implications: The ability to effectively repair ignition switch issues has a direct impact on the motorcycle’s overall performance, reliability, and safety. A properly functioning ignition switch ensures a smooth starting process, prevents electrical malfunctions, and minimizes the risk of accidents caused by electrical failures.
In conclusion, the “Repair” aspect of “Harley Davidson Ignition Switch Wiring Diagram” encompasses the identification of faulty components, analysis of electrical circuits, real-world applications, and broader implications for the motorcycle’s performance and safety. Understanding and utilizing a wiring diagram empower technicians to effectively repair ignition switch issues, ensuring the proper functioning of the electrical system and the overall reliability of the Harley Davidson motorcycle.
Electrical safety
Within the context of “Harley Davidson Ignition Switch Wiring Diagram,” electrical safety is of paramount importance. The wiring diagram plays a pivotal role in promoting electrical safety by providing a clear understanding of the electrical connections within the ignition switch assembly. This understanding empowers technicians and enthusiasts alike to carry out repairs safely and effectively, minimizing the risk of electrical hazards.
The cause-and-effect relationship between electrical safety and the wiring diagram is evident. A clear understanding of the electrical connections enables technicians to identify and address potential hazards, such as loose connections, faulty components, or incorrect wiring. By following the wiring diagram, technicians can ensure that repairs are carried out according to the manufacturer’s specifications, adhering to safety standards and minimizing the risk of electrical shocks, fires, or other accidents.
Real-life examples within “Harley Davidson Ignition Switch Wiring Diagram” further illustrate the importance of electrical safety. For instance, a technician troubleshooting an electrical issue may encounter a loose connection at the ignition switch. By referring to the wiring diagram, the technician can identify the correct connection point and tighten it securely, eliminating the potential for electrical arcing or overheating.
The practical applications of understanding electrical safety through the wiring diagram extend beyond troubleshooting and repairs. It empowers individuals to make informed decisions regarding electrical modifications or upgrades to their Harley Davidson motorcycles. By understanding the electrical connections and potential hazards, they can avoid unsafe practices and ensure that any modifications are carried out safely and in accordance with industry standards.
In conclusion, the connection between “Electrical safety: By providing a clear understanding of the electrical connections, the wiring diagram helps ensure that repairs are carried out safely, minimizing the risk of electrical hazards” and “Harley Davidson Ignition Switch Wiring Diagram” is critical. The wiring diagram serves as a valuable tool for promoting electrical safety, enabling technicians and enthusiasts to carry out repairs confidently and effectively, minimizing the risk of electrical hazards and ensuring the safe and reliable operation of Harley Davidson motorcycles.
DIY maintenance
Within the realm of Harley Davidson Ignition Switch Wiring Diagrams, DIY maintenance stands as a significant aspect, empowering enthusiasts to take matters into their own hands. The wiring diagram serves as a guiding light, enabling them to perform basic troubleshooting and repairs, ultimately saving both time and money on professional maintenance costs. This section delves into the intricacies of DIY maintenance, exploring its facets and implications, painting a comprehensive picture for the reader.
- Empowering Enthusiasts: The wiring diagram bestows upon DIY enthusiasts the ability to tackle electrical issues with confidence. By providing a clear understanding of the electrical connections, it allows them to diagnose problems, identify faulty components, and execute repairs without relying solely on professional assistance.
- Time-Saving: Time is a valuable commodity, and DIY maintenance offers significant savings in this regard. Instead of scheduling appointments and waiting for repairs to be completed, enthusiasts can utilize the wiring diagram to swiftly address minor electrical issues, minimizing downtime and maximizing riding time.
- Cost-Effective: Professional maintenance can incur significant costs, especially for minor repairs. By leveraging the wiring diagram, DIY enthusiasts can save money on labor costs and parts by performing repairs themselves, allocating those funds towards other upgrades or riding expenses.
- Real-Life Example: A Harley Davidson enthusiast encounters an intermittent starting issue. Armed with the wiring diagram, they trace the electrical circuit, pinpoint a loose connection at the ignition switch, and tighten it securely. This simple repair, facilitated by the wiring diagram, saves them a costly trip to the mechanic.
In conclusion, the aspect of DIY maintenance, empowered by the Harley Davidson Ignition Switch Wiring Diagram, offers a multitude of benefits to enthusiasts. It grants them the autonomy to tackle electrical issues, saving both time and money. By understanding the electrical connections outlined in the wiring diagram, enthusiasts gain the confidence and knowledge to maintain their Harley Davidson motorcycles with competence and satisfaction.
Customization
Within the realm of Harley Davidson Ignition Switch Wiring Diagrams, the aspect of customization holds great significance for enthusiasts seeking to personalize their motorcycles. The wiring diagram serves as a roadmap, providing insights into the electrical system and empowering individuals to make modifications safely and effectively. This section delves into the facets of customization, exploring its various components and implications, painting a comprehensive picture for the reader.
- Electrical Component Integration: The wiring diagram enables enthusiasts to integrate aftermarket electrical components, such as auxiliary lights, heated grips, or custom audio systems, into their Harley Davidson’s electrical system. By understanding the electrical connections and power requirements, they can ensure that these components are installed safely and function seamlessly with the motorcycle’s existing electrical system.
- Electrical System Optimization: For performance-oriented enthusiasts, the wiring diagram provides valuable insights into optimizing the electrical system. By understanding the flow of electricity and identifying potential bottlenecks, they can make modifications to improve the efficiency of the charging system, reduce electrical losses, and enhance overall electrical performance.
- Real-Life Example: A Harley Davidson enthusiast desires to install a custom lighting system on their motorcycle. By referring to the wiring diagram, they can identify the appropriate electrical circuits, determine the power requirements, and ensure that the new lighting system is integrated safely and effectively, enhancing the visibility and style of their bike.
- Safety and Reliability: Customization, when carried out without proper understanding of the electrical system, can introduce potential hazards. The wiring diagram empowers enthusiasts to make modifications safely by providing a clear understanding of the electrical connections. By adhering to the manufacturer’s specifications and industry standards, they can minimize the risk of electrical malfunctions, fires, or other safety concerns.
In conclusion, the aspect of “Customization: For those looking to customize their Harley Davidson, the wiring diagram provides insights into the electrical system, enabling modifications to be made safely and effectively” is integral to the realm of Harley Davidson Ignition Switch Wiring Diagrams. It empowers enthusiasts to integrate aftermarket components, optimize electrical performance, and make modifications with confidence, ensuring the safe, reliable, and personalized operation of their Harley Davidson motorcycles.
Historical evolution
The historical evolution of Harley Davidson ignition switch wiring diagrams is inextricably linked to the advancement of motorcycle design and technology. As Harley Davidson motorcycles have become more sophisticated over the years, so too have their electrical systems and ignition switch wiring diagrams. Understanding the evolution of these diagrams is critical for servicing older models, ensuring that repairs and modifications are carried out accurately and safely.
One of the most significant changes in Harley Davidson ignition switch wiring diagrams over time has been the introduction of electronic components. In older models, ignition switch wiring diagrams were relatively simple, with mechanical switches and relays controlling the flow of electricity. However, modern Harley Davidson motorcycles feature a variety of electronic components, such as electronic control modules (ECMs) and fuel injection systems. These components require more complex wiring diagrams that incorporate electronic schematics and pinpoint the location of sensors, actuators, and other electronic devices.
Another important change in Harley Davidson ignition switch wiring diagrams has been the adoption of computerized diagnostic systems. In the past, troubleshooting electrical problems on Harley Davidson motorcycles was a time-consuming and often difficult process. However, modern Harley Davidson motorcycles are equipped with computerized diagnostic systems that can quickly identify and isolate electrical faults. These systems rely on detailed wiring diagrams to accurately pinpoint the location of the problem, enabling technicians to repair the issue efficiently.
Understanding the historical evolution of Harley Davidson ignition switch wiring diagrams is not only important for servicing older models but also for appreciating the advancements in motorcycle technology. By studying the evolution of these diagrams, enthusiasts can gain a deeper understanding of how Harley Davidson motorcycles have evolved over time and how their electrical systems have become more sophisticated and reliable.
In conclusion, the historical evolution of Harley Davidson ignition switch wiring diagrams reflects the changing landscape of motorcycle design and technology. Understanding these changes is essential for servicing older models and appreciating the advancements that have been made in Harley Davidson motorcycles over the years.
Availability
Within the realm of “Harley Davidson Ignition Switch Wiring Diagram,” the aspect of “Availability” holds significant importance, as it ensures that wiring diagrams are within reach for both technicians and enthusiasts alike. This accessibility empowers individuals to troubleshoot, repair, customize, and maintain Harley Davidson motorcycles with greater ease and efficiency. By exploring the various facets of “Availability,” we gain a deeper understanding of its role and implications in the context of Harley Davidson Ignition Switch Wiring Diagrams.
- Online Accessibility: Wiring diagrams are readily available online through various platforms, including Harley Davidson’s official website, online forums, and dedicated websites that host motorcycle repair information. This online accessibility allows individuals to access wiring diagrams anytime, anywhere, with just an internet connection.
- Service Manual Inclusion: Harley Davidson service manuals, which provide comprehensive instructions and technical specifications for specific motorcycle models, invariably include detailed wiring diagrams. These service manuals serve as invaluable resources for both professional technicians and DIY enthusiasts, providing a structured and manufacturer-approved reference for electrical system troubleshooting and repairs.
- Real-Life Example: A Harley Davidson enthusiast needs to replace a faulty ignition switch on their motorcycle. By accessing the wiring diagram online or in the service manual, they can identify the correct part number, locate the switch’s electrical connections, and complete the repair efficiently, minimizing downtime and ensuring a proper fix.
- Implications: The easy accessibility of wiring diagrams empowers individuals to take a more active role in maintaining and repairing their Harley Davidson motorcycles. This accessibility promotes self-sufficiency, reduces reliance on professional mechanics for minor electrical issues, and fosters a deeper understanding of the motorcycle’s electrical system.
In conclusion, the “Availability: Wiring diagrams are readily available online and in service manuals, making them easily accessible for technicians and enthusiasts alike” aspect of “Harley Davidson Ignition Switch Wiring Diagram” plays a crucial role in empowering individuals to maintain, repair, and customize their Harley Davidson motorcycles with greater ease and efficiency. The online accessibility and inclusion in service manuals ensure that wiring diagrams are within reach, promoting self-sufficiency, knowledge acquisition, and a deeper connection with the motorcycle.


Related Posts


