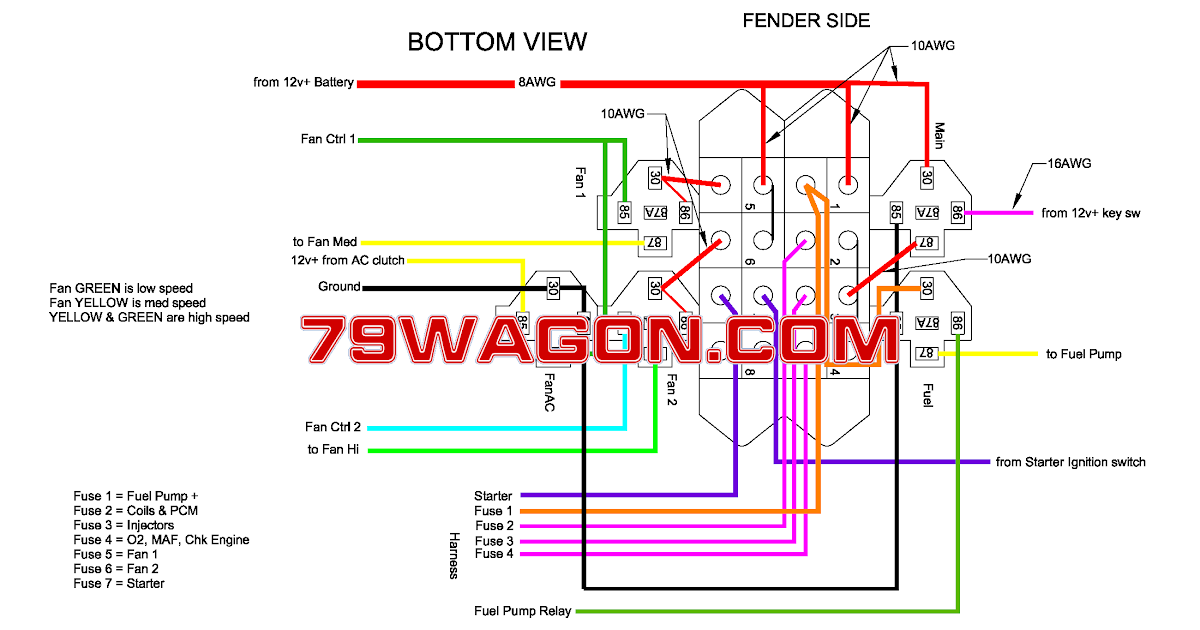
An LS swap wiring harness diagram is a detailed schematic that provides instructions on how to wire an LS engine into a non-GM vehicle. It shows the proper connections between the engine’s electrical components and the vehicle’s electrical system, ensuring that the engine runs smoothly and integrates seamlessly with the vehicle’s existing electronics.
LS swap wiring harness diagrams are essential for performing LS engine swaps, which involve replacing an existing engine with an LS engine from a General Motors vehicle. These swaps are popular among enthusiasts because LS engines offer improved performance, reliability, and aftermarket support. The wiring harness diagram guides the installer through the complex wiring process, ensuring that all electrical components are connected correctly.
The development of LS swap wiring harness diagrams has simplified the LS engine swap process, making it more accessible to DIY enthusiasts. Modern diagrams utilize color-coded wires and detailed instructions, allowing even novice installers to complete the swap successfully. This has led to a surge in LS engine swaps, transforming the automotive aftermarket and creating a thriving community of enthusiasts.
An LS swap wiring harness diagram is a crucial component in the LS engine swap process, ensuring the seamless integration of the new engine into the vehicle’s electrical system. Understanding its essential aspects is paramount for a successful and efficient engine swap.
- Compatibility: The diagram must be specific to the make and model of the vehicle and the LS engine being installed.
- Accuracy: The diagram should provide precise instructions and wire connections to prevent electrical issues or engine damage.
- Completeness: It should include all necessary wiring instructions, from the engine to the vehicle’s electrical system.
- Simplicity: Clear and concise instructions make it easy for installers to follow, even for those with limited electrical experience.
- Color-coding: Color-coded wires simplify the wiring process, reducing the risk of errors.
- Connector identification: The diagram should clearly identify all connectors and their corresponding locations on the engine and vehicle.
- Troubleshooting guide: A troubleshooting guide can help installers identify and resolve any electrical issues that may arise during the swap.
- Customization options: Some diagrams offer customization options to accommodate specific modifications or performance upgrades.
- Compatibility with aftermarket components: The diagram should indicate compatibility with aftermarket electrical components, such as engine management systems and gauges.
- Online availability: Many diagrams are available online, providing easy access for installers.
These aspects are crucial for ensuring a successful LS engine swap. By understanding and following the wiring harness diagram, installers can avoid electrical problems, optimize engine performance, and ensure a smooth integration between the new engine and the vehicle’s electrical system.
Compatibility
Compatibility is paramount when selecting an LS swap wiring harness diagram. The diagram must be tailored to the specific make and model of the vehicle undergoing the engine swap, as well as the LS engine being installed. Utilizing a compatible diagram ensures a seamless integration between the new engine and the vehicle’s electrical system, preventing potential issues and maximizing performance.
- Vehicle-Specific Considerations: Different vehicle makes and models have unique electrical systems, including varying wire colors, connector types, and computer modules. A compatible wiring harness diagram accounts for these variations, providing precise instructions for connecting the LS engine to the vehicle’s existing electrical infrastructure.
- Engine Variant Compatibility: LS engines come in various configurations, such as different displacement sizes, fuel injection systems, and accessory drive setups. The wiring harness diagram must be compatible with the specific LS engine being installed to ensure proper functionality of all engine components, sensors, and actuators.
- Aftermarket Component Integration: In many LS swaps, aftermarket components such as engine management systems, gauges, and turbochargers are incorporated. A compatible wiring harness diagram should provide instructions for integrating these components into the vehicle’s electrical system, ensuring proper communication and operation.
Using a compatible LS swap wiring harness diagram is essential for a successful engine swap. It eliminates guesswork, reduces the risk of electrical problems, and optimizes engine performance. By carefully selecting a diagram tailored to the specific vehicle and LS engine combination, installers can ensure a seamless integration and enjoy the benefits of an LS engine swap without compromising reliability or functionality.
Accuracy
In the context of LS swap wiring harness diagrams, accuracy is of paramount importance. Precise instructions and correct wire connections are essential to ensure a successful engine swap and prevent electrical issues or even engine damage. Here are four key facets of accuracy to consider:
- Connector Identification: The diagram must clearly identify all connectors and their corresponding locations on the LS engine and the vehicle’s electrical system. Mismatched or improperly connected connectors can lead to electrical shorts, component malfunctions, or even engine damage.
- Wire Color Coding: Many LS swap wiring harness diagrams utilize color-coded wires to simplify the wiring process. Accurate color coding ensures that wires are connected to the correct terminals, preventing cross-wiring and potential electrical issues.
- Grounding Points: Proper grounding is crucial for the proper functioning of electrical components. The wiring diagram should provide precise instructions on where and how to connect the engine and electrical system to the vehicle’s grounding points.
- ECU Pinouts: For LS swaps involving engine control units (ECUs), the wiring diagram must provide accurate pinout information. Incorrect ECU pin connections can disrupt communication between the ECU and the engine’s sensors and actuators, leading to performance issues or engine damage.
Ensuring accuracy in LS swap wiring harness diagrams is paramount for a successful engine swap. Precise instructions, proper wire connections, and meticulous attention to detail are essential to prevent electrical issues, optimize engine performance, and ensure the longevity of the swapped engine. By adhering to accurate wiring diagrams, installers can confidently tackle LS engine swaps and enjoy the benefits of upgraded power and performance.
Completeness
In the context of LS swap wiring harness diagrams, completeness is a critical component that ensures the successful integration of the new LS engine into the vehicle’s electrical system. A complete wiring diagram provides comprehensive instructions and covers all aspects of the wiring process, from the engine to the vehicle’s electrical system. This level of detail is essential for several reasons:
- Comprehensive Coverage: A complete wiring diagram eliminates the need for guesswork or searching for additional information, ensuring that all necessary wiring connections are accounted for. This reduces the risk of errors and ensures a smooth and efficient engine swap.
- Simplified Troubleshooting: In the event of any electrical issues or malfunctions after the engine swap, a complete wiring diagram serves as a valuable troubleshooting tool. It allows installers to trace wiring connections and identify potential problems quickly and accurately.
- Compatibility with Modifications: LS swaps often involve modifications to the engine or vehicle’s electrical system. A complete wiring diagram provides the necessary information to adapt the wiring harness to these modifications, ensuring proper functionality and preventing electrical conflicts.
Real-world examples of completeness in LS swap wiring harness diagrams include:
- Detailed instructions for connecting the engine’s sensors, actuators, and fuel injection system to the vehicle’s wiring harness.
- Clear identification of all ground points and their corresponding connections.
- Instructions for integrating aftermarket components, such as engine management systems or gauges, into the vehicle’s electrical system.
Understanding the importance of completeness in LS swap wiring harness diagrams is essential for a successful engine swap. By utilizing complete and accurate wiring diagrams, installers can ensure a seamless integration between the new LS engine and the vehicle’s electrical system, optimizing performance and reliability.
Simplicity
In the realm of LS swap wiring harness diagrams, simplicity plays a crucial role in ensuring the successful installation of an LS engine into a non-GM vehicle. Clear and concise instructions empower installers, regardless of their electrical expertise, to confidently tackle the wiring process and achieve optimal engine performance. This aspect of LS swap wiring harness diagrams encompasses several key facets:
- Step-by-Step Guidance: Effective wiring diagrams provide a step-by-step approach, breaking down the wiring process into manageable tasks. Each step is clearly outlined, with detailed instructions and visual aids to guide installers through the connections.
- Labeled Components: Simplicity extends to the labeling of components and connectors. Wiring diagrams should clearly identify each component and its corresponding connector, eliminating confusion and reducing the risk of incorrect connections.
- Color-Coded Wires: Many LS swap wiring harness diagrams utilize color-coded wires to simplify the identification and matching of connections. This visual cue makes it easier for installers to follow the diagram and ensure proper wiring.
- Troubleshooting Tips: Anticipating potential challenges, some wiring diagrams include troubleshooting tips and resources. These tips can guide installers in identifying and resolving common wiring issues, saving time and frustration.
The simplicity of LS swap wiring harness diagrams empowers installers of all skill levels to undertake engine swaps with confidence. By providing clear instructions, labeled components, color-coded wires, and troubleshooting tips, these diagrams enable a smooth and efficient wiring process, maximizing engine performance and enhancing the overall driving experience.
Color-coding
Within the context of LS swap wiring harness diagrams, color-coding plays a pivotal role in simplifying the wiring process and minimizing the risk of errors. By assigning distinct colors to different wires, these diagrams establish a visual cue that guides installers through the complex web of connections, ensuring accuracy and efficiency.
- Identification and Matching: Color-coding enables installers to easily identify and match corresponding wires, even in intricate harnesses with numerous wires. Each color represents a specific function or component, making it straightforward to trace and connect wires correctly.
- Reduced Guesswork: With color-coded wires, installers can eliminate guesswork and rely on visual cues to determine the proper connections. This reduces the likelihood of incorrect wiring, which can lead to electrical malfunctions or engine damage.
- Simplified Troubleshooting: In the event of electrical issues, color-coding aids in troubleshooting by providing a visual map of the wiring system. By following the colored wires, installers can quickly identify potential problems and isolate faulty connections.
- Consistency and Standardization: Color-coding promotes consistency and standardization in LS swap wiring harness diagrams. By adhering to established color conventions, different diagrams can be easily interpreted and followed, regardless of the manufacturer or vehicle application.
In summary, color-coding in LS swap wiring harness diagrams is a crucial aspect that significantly simplifies the wiring process and minimizes the risk of errors. Through visual cues and standardized color conventions, installers can confidently navigate the complexities of engine swaps, ensuring proper electrical connections and optimal engine performance.
Connector identification
In the realm of LS swap wiring harness diagrams, connector identification plays a crucial role in ensuring a successful and efficient engine swap. Accurate identification of connectors and their corresponding locations on the engine and vehicle is paramount for establishing proper electrical connections and maximizing engine performance. This aspect of LS swap wiring harness diagrams encompasses several key components:
- Comprehensive Labeling: Effective wiring diagrams clearly label each connector with a unique identifier, making it easy for installers to locate and match connectors during the wiring process.
- Visual Aids: Diagrams often include visual aids, such as color-coded connectors or detailed illustrations, to further simplify connector identification and prevent confusion.
- Cross-Referencing: Some diagrams provide cross-referencing tables that link connector identifiers to their corresponding functions and locations on the engine and vehicle.
- Compatibility Verification: Wiring diagrams should clearly indicate the compatibility of connectors with specific LS engine models and vehicle applications, ensuring that the correct connectors are used for a seamless integration.
Precise connector identification in LS swap wiring harness diagrams is essential for accurate wiring and trouble-free engine operation. By providing comprehensive labeling, visual aids, cross-referencing, and compatibility verification, these diagrams empower installers with the necessary information to confidently navigate the complexities of LS engine swaps and achieve optimal performance.
Troubleshooting guide
In the context of LS swap wiring harness diagrams, a troubleshooting guide serves as a valuable resource for installers facing electrical issues during the engine swap process. By providing a systematic approach to problem-solving, troubleshooting guides empower installers to identify and resolve potential electrical faults, ensuring a successful engine swap and optimal performance.
- Diagnostic Procedures: Troubleshooting guides outline step-by-step diagnostic procedures that guide installers through a series of tests to pinpoint the source of electrical problems. These procedures involve using multimeters, voltage testers, and other diagnostic tools to check for continuity, voltage levels, and proper grounding.
- Error Codes and Solutions: Some troubleshooting guides include a comprehensive list of error codes and their corresponding solutions. By referencing these codes, installers can quickly identify specific electrical issues and implement appropriate corrective measures.
- Real-World Scenarios: Effective troubleshooting guides provide real-world scenarios and case studies that showcase common electrical problems encountered during LS swaps. These examples illustrate the diagnostic process and demonstrate how to resolve issues in a practical setting.
- Compatibility Considerations: Troubleshooting guides often address compatibility issues that may arise when integrating LS engines into non-GM vehicles. By highlighting potential electrical conflicts and providing solutions, these guides help installers overcome compatibility challenges and ensure seamless engine operation.
In conclusion, a troubleshooting guide is an indispensable tool for installers undertaking LS engine swaps. By providing diagnostic procedures, error code solutions, real-world examples, and compatibility considerations, troubleshooting guides empower installers to identify and resolve electrical issues efficiently, ultimately leading to a successful engine swap and optimal performance.
Customization options
Within the realm of LS swap wiring harness diagrams, customization options play a crucial role in empowering installers to tailor the wiring harness to their specific modifications and performance upgrades. These options provide the flexibility to adapt the diagram to unique engine configurations, aftermarket components, and individual preferences, ensuring optimal performance and seamless integration.
Customization options in LS swap wiring harness diagrams typically involve modifying wire lengths, adding or removing circuits, and incorporating custom features. For instance, installers may need to extend or shorten wires to accommodate different engine bay configurations or to reach specific components. Additionally, they may need to add circuits to support aftermarket sensors, gauges, or engine management systems. Some diagrams also allow for the customization of wire colors and labeling, enabling installers to personalize the wiring harness for easier identification and maintenance.
The practical applications of customization options in LS swap wiring harness diagrams are vast. By tailoring the wiring harness to specific modifications and upgrades, installers can optimize engine performance, improve reliability, and enhance the overall driving experience. Customization options empower enthusiasts to fine-tune their engine swaps, unlocking the full potential of their LS engines.
In summary, customization options in LS swap wiring harness diagrams are a valuable asset for installers seeking to personalize and optimize their engine swaps. These options provide the flexibility to adapt the wiring harness to unique requirements, ensuring seamless integration, improved performance, and a tailored driving experience.
Compatibility with aftermarket components
In the context of LS swap wiring harness diagrams, compatibility with aftermarket components plays a pivotal role in enabling installers to seamlessly integrate their new LS engine with various performance enhancements and accessories.
Aftermarket engine management systems (EMS) offer advanced engine control capabilities, allowing for precise tuning and optimization of engine performance. Similarly, aftermarket gauges provide real-time monitoring of critical engine parameters, enhancing the driver’s ability to monitor and diagnose engine health. By indicating compatibility with these aftermarket components, LS swap wiring harness diagrams empower installers to harness the full potential of their engine swaps.
Real-life examples of aftermarket component integration include the installation of a Holley EFI system for enhanced fuel injection control or the addition of AutoMeter gauges for monitoring vital engine data. These upgrades not only improve engine performance and reliability but also provide valuable feedback for diagnostic purposes.
The practical significance of aftermarket component compatibility in LS swap wiring harness diagrams lies in the ability to customize and tailor the engine swap to specific performance goals and preferences. By carefully selecting and integrating compatible aftermarket components, installers can unlock the true potential of their LS engines, maximizing power output, efficiency, and driving enjoyment.
In summary, compatibility with aftermarket components is a critical consideration in LS swap wiring harness diagrams, enabling installers to enhance engine performance, improve monitoring capabilities, and personalize their engine swaps to suit their individual needs.
Online availability
In the realm of LS swap wiring harness diagrams, online availability has revolutionized the accessibility and convenience of these essential resources. With the advent of the internet, installers now have instant access to a vast repository of diagrams, empowering them to undertake LS engine swaps with greater ease and efficiency.
- Comprehensive Database: The internet hosts a comprehensive database of LS swap wiring harness diagrams, catering to a wide range of vehicle models and engine configurations. This extensive collection ensures that installers can find the exact diagram they need, regardless of the specifics of their project.
- Instant Access: Online availability eliminates the need for installers to physically visit dealerships or purchase expensive manuals. With just a few clicks, they can download the necessary diagram and begin working on their engine swap immediately, saving time and effort.
- Real-Time Updates: The online environment allows for real-time updates and revisions to LS swap wiring harness diagrams. As new models are released or modifications are made, updated diagrams are promptly made available online, ensuring that installers have access to the most current and accurate information.
- Community Support: Online forums and discussion groups dedicated to LS swaps provide a platform for installers to share their experiences, ask questions, and access additional resources. This community support enhances the overall accessibility and usability of online wiring harness diagrams.
The online availability of LS swap wiring harness diagrams has transformed the engine swap process, making it more accessible, convenient, and efficient. Installers now have instant access to a wealth of information, empowering them to complete their swaps with confidence and precision.


Related Posts


