Wiring a Ring Doorbell involves connecting the device through its existing doorbell wiring, allowing it to utilize the existing power source and chime for notifications. For instance, a homeowner can install a Ring Doorbell on their front door and wire it to the existing chime, enabling them to receive alerts and view live video footage on their smartphone or tablet.
Wiring a Ring Doorbell offers security and convenience benefits, such as remote monitoring, crime deterrence, and enhanced home control. Historically, the development of smart doorbells was driven by advancements in wireless technology, improvements in home security systems, and the growing popularity of remote home monitoring.
To provide comprehensive guidance on this topic, this article will delve into the various methods of wiring a Ring Doorbell, addressing common challenges, and offering tips for optimal performance. We will also discuss the use cases, benefits, and potential drawbacks of wired Ring Doorbells.
When considering “Wiring a Ring Doorbell,” several key aspects come into play, each influencing the successful installation and operation of the device. Understanding these aspects is crucial for a comprehensive approach to wiring a Ring Doorbell.
- Power Source: Existing doorbell wiring or transformer.
- Wiring Method: Direct wiring or using a bypass kit.
- Chime Compatibility: Mechanical or electronic chime.
- Tool Requirements: Screwdriver, drill, wire strippers.
- Safety Precautions: Power off the circuit breaker.
- Troubleshooting: Identifying and resolving common issues.
- Optimal Placement: Ideal height and visibility.
- Wi-Fi Connectivity: Strong and stable internet connection.
- Mobile App Setup: Configuring the Ring app for notifications and settings.
These aspects are interconnected and impact the overall functionality of the wired Ring Doorbell. By considering each aspect carefully, homeowners can ensure a secure and reliable installation that meets their specific needs. For example, selecting the appropriate wiring method depends on the existing doorbell system and chime type. Proper tool usage and safety precautions minimize the risk of electrical hazards. Optimal placement ensures clear visibility and effective motion detection. Understanding the significance of these aspects empowers individuals to approach the wiring process with confidence and achieve a successful installation.
Power Source
When wiring a Ring Doorbell, the existing doorbell wiring or transformer plays a crucial role in providing the necessary power. Several factors need to be considered to ensure a successful installation and optimal performance.
- Existing Doorbell Wiring: Most homes have existing doorbell wiring that can be utilized to power the Ring Doorbell. This wiring typically consists of two wires, one carrying power and the other acting as the ground. Before proceeding, verify the voltage of the existing wiring, as Ring Doorbells require a specific voltage range.
- Transformer: If the existing doorbell wiring does not provide sufficient power, a transformer may be necessary. A transformer converts the incoming AC voltage to a lower voltage suitable for the Ring Doorbell. It is important to select a transformer with the appropriate voltage output and power rating.
- Doorbell Chime: The doorbell chime is connected to the existing doorbell wiring and produces an audible sound when the doorbell button is pressed. Ring Doorbells are compatible with both mechanical and electronic chimes. Mechanical chimes use a physical hammer to strike a bell, while electronic chimes use electronic components to generate sound.
- Bypass Kit: In some cases, the existing doorbell chime may not be compatible with a Ring Doorbell. A bypass kit can be used to bypass the chime and connect the Ring Doorbell directly to the power source, eliminating the need for a chime.
Understanding the power source options and their implications is critical for successful wiring of a Ring Doorbell. Homeowners should carefully assess their existing doorbell system, including the wiring, transformer, and chime, to determine the most appropriate power source solution. By considering these factors and following the recommended guidelines, individuals can ensure a reliable and functional Ring Doorbell installation.
Wiring Method
When wiring a Ring Doorbell, the choice between direct wiring and utilizing a bypass kit is a critical decision that impacts the installation process and the overall functionality of the device. Understanding the implications of each wiring method is essential for homeowners seeking a reliable and efficient installation.
-
Direct Wiring:
Involves connecting the Ring Doorbell directly to the existing doorbell wiring, utilizing the existing power source and chime. This method is straightforward and does not require any additional components. However, it requires the existing doorbell wiring to be in good condition and compatible with the Ring Doorbell’s power requirements. -
Bypass Kit:
Employed when the existing doorbell wiring is not compatible or lacks sufficient power. A bypass kit provides an alternative power source by connecting the Ring Doorbell directly to a nearby power outlet. This method eliminates the need for the existing doorbell wiring and chime but requires additional wiring and a power outlet in close proximity. -
Doorbell Compatibility:
The compatibility of the existing doorbell chime with the Ring Doorbell plays a significant role in determining the wiring method. Mechanical chimes require a specific voltage range and may not be compatible with the Ring Doorbell. Electronic chimes, on the other hand, are generally compatible with Ring Doorbells and offer a wider range of voltage options. -
Installation Complexity:
Direct wiring is generally simpler to install compared to using a bypass kit. It involves connecting the Ring Doorbell to the existing doorbell wires, which may already be accessible. Installing a bypass kit requires additional wiring and connecting the Ring Doorbell to a power outlet, which may involve drilling holes and running wires.
Ultimately, the choice between direct wiring and using a bypass kit depends on the specific circumstances of the installation, including the condition and compatibility of the existing doorbell wiring and chime, as well as the desired level of installation complexity. Homeowners should carefully assess their existing doorbell system and consider the pros and cons of each wiring method to determine the most suitable solution for their needs.
Chime Compatibility
When wiring a Ring Doorbell, the compatibility between the existing doorbell chime and the Ring Doorbell is a crucial factor to consider. Understanding the differences between mechanical and electronic chimes and their implications is essential for a successful installation and optimal performance.
-
Mechanical Chimes:
These traditional chimes use a physical hammer to strike a bell, producing a distinct ringing sound. They require a specific voltage range, typically between 16-24 volts AC, to operate correctly. Mechanical chimes may not be compatible with Ring Doorbells, especially if the voltage supplied by the doorbell transformer is outside the required range. -
Electronic Chimes:
These modern chimes use electronic components to generate sound, offering a wider range of sounds and customization options. They are generally more compatible with Ring Doorbells and can operate on a broader voltage range. Electronic chimes often have adjustable volume levels and allow for the selection of different melodies. -
Voltage Requirements:
The voltage requirements of the doorbell chime play a significant role in compatibility. Ring Doorbells require a specific voltage range to function correctly. If the existing doorbell chime does not provide the required voltage, a transformer may be necessary to convert the incoming AC voltage to the appropriate level. -
Doorbell Compatibility:
The compatibility between the Ring Doorbell and the existing doorbell chime is crucial. Some Ring Doorbell models may be specifically designed to work with certain types of chimes. It is important to check the compatibility of the Ring Doorbell with the existing chime before proceeding with the installation.
Understanding the compatibility between mechanical or electronic chimes and Ring Doorbells ensures a seamless installation and optimal performance. By considering the voltage requirements, doorbell compatibility, and the features and limitations of each chime type, homeowners can make informed decisions and choose the appropriate solution for their needs.
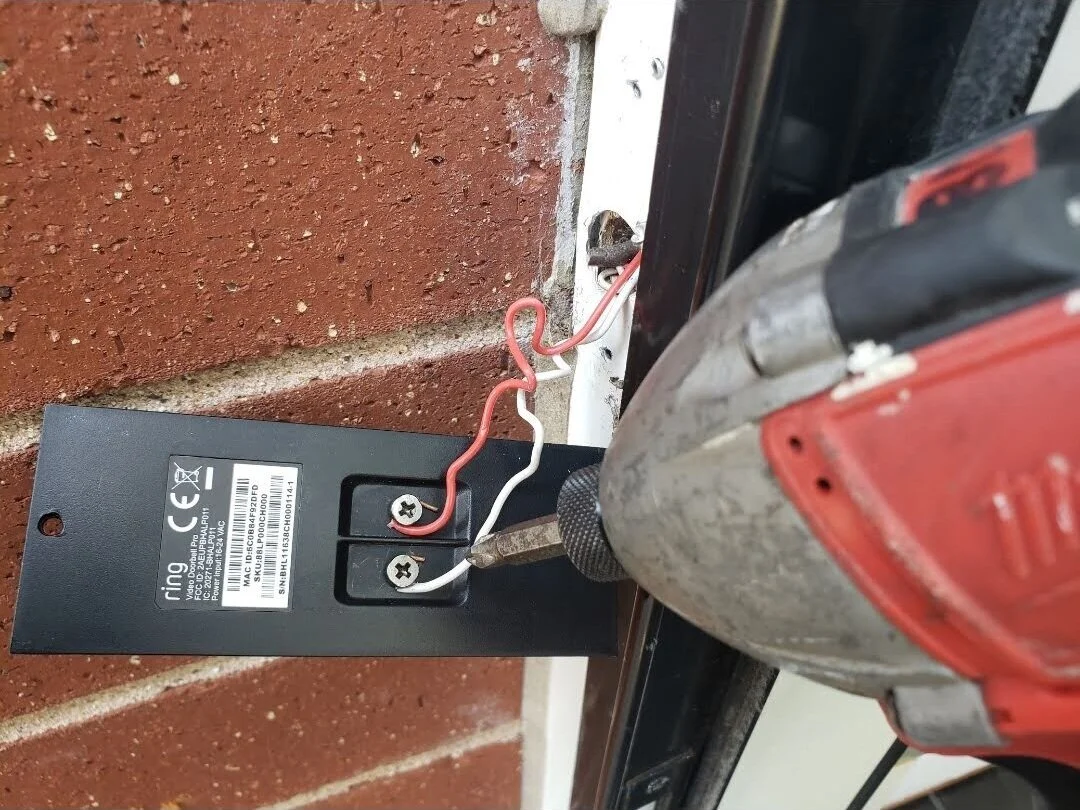
Tool Requirements
When embarking on the task of “Wiring A Ring Doorbell,” having the appropriate tools is paramount to ensure a successful and efficient installation. Three essential tools that every homeowner should have in their toolkit are a screwdriver, a drill, and wire strippers. Each of these tools serves a specific purpose and contributes to the overall success of the wiring process.
-
Screwdriver:
A screwdriver is used to tighten and loosen screws, which are commonly found in electrical components and doorbell assemblies. It is important to select a screwdriver with the correct size and type of tip to avoid damaging the screws or stripping the screw heads. -
Drill:
A drill is a power tool used to create holes in various materials, including wood, plastic, and metal. When wiring a Ring Doorbell, a drill is necessary for making holes for running wires, mounting the doorbell, and installing any additional components. -
Wire strippers:
Wire strippers are a specialized tool designed to remove the insulation from electrical wires without damaging the conductors. This is a crucial step in preparing the wires for connections and ensuring proper electrical contact. -
Additional Tools:
In addition to the essential tools mentioned above, other tools that may be useful include a voltage tester to verify the presence of electricity, a level to ensure the doorbell is mounted straight, and a wire cutter to trim excess wire.
Having the right tools for the job not only makes the wiring process easier and more efficient but also contributes to the safety and reliability of the installation. By understanding the specific roles of these tools and using them correctly, homeowners can ensure that their Ring Doorbell is wired properly and functions as intended.
Safety Precautions
When embarking on the task of “Wiring A Ring Doorbell,” safety should be the topmost priority. One crucial safety precaution is to power off the circuit breaker associated with the doorbell wiring. This seemingly simple step has profound implications for the safety and integrity of the installation process.
-
Electrical Hazard Mitigation:
Electricity poses inherent risks, and working with electrical components requires utmost caution. Powering off the circuit breaker eliminates the flow of electricity to the doorbell wiring, preventing the risk of electrical shocks or fires. -
Safe Handling of Wires:
When the circuit breaker is off, the wires are de-energized, making them safe to handle. This allows for secure connections and minimizes the chances of accidental short circuits or damage to the doorbell or other electrical components. -
Prevention of Damage:
Powering off the circuit breaker before wiring the Ring Doorbell protects the device and other electrical components from potential damage. Surges or incorrect wiring can lead to blown fuses or damaged circuitry, which can be costly and time-consuming to repair. -
Building Codes and Regulations:
Most building codes and electrical regulations require that the circuit breaker be turned off before working on electrical systems. Adhering to these regulations ensures compliance with safety standards and prevents potential legal liabilities.
In conclusion, powering off the circuit breaker is a non-negotiable safety precaution when “Wiring A Ring Doorbell.” It mitigates electrical hazards, enables safe handling of wires, prevents damage to components, and aligns with building codes. By following this essential safety measure, homeowners can ensure a secure and successful installation of their Ring Doorbell.
Troubleshooting
When tackling “Wiring A Ring Doorbell,” troubleshooting plays a pivotal role in ensuring a successful and functional installation. Troubleshooting involves identifying and resolving any issues that may arise during the wiring process, ranging from minor glitches to more complex problems. Understanding the connection between troubleshooting and wiring a Ring Doorbell is crucial for achieving a seamless and reliable setup.
Troubleshooting is an integral component of “Wiring A Ring Doorbell” as it enables homeowners to identify and rectify any discrepancies or errors that may hinder the doorbell’s proper operation. Common issues encountered during wiring include incorrect wire connections, loose terminals, power supply problems, and chime compatibility issues. By methodically troubleshooting these issues, homeowners can pinpoint the root cause of the problem and implement appropriate solutions.
For instance, if the Ring Doorbell fails to power on, troubleshooting steps may involve checking the power source, ensuring secure wire connections, and verifying the compatibility of the doorbell with the existing chime. By following a logical troubleshooting process, homeowners can effectively resolve these issues, ensuring optimal performance of their Ring Doorbell.
In summary, troubleshooting is a critical aspect of “Wiring A Ring Doorbell” as it empowers homeowners to identify and resolve common issues, ensuring a successful installation and reliable operation of their doorbell system. This understanding not only enhances the user experience but also promotes safety and prevents potential electrical hazards.
Optimal Placement
In the context of “Wiring A Ring Doorbell,” optimal placement is paramount to ensure effective functionality and maximize the benefits of the device. Ideal height and visibility play a crucial role in optimizing the performance of the Ring Doorbell, influencing factors such as motion detection accuracy, field of view, and overall user experience.
-
Height:
The height at which the Ring Doorbell is mounted significantly impacts its motion detection capabilities. A doorbell placed too low may not capture motion from individuals of all heights, while one placed too high may have a limited field of view. Ideal height placement ensures optimal motion detection for various individuals approaching the door.
-
Field of View:
The field of view of the Ring Doorbell determines the area it can monitor. Proper placement maximizes the field of view, allowing the doorbell to capture a clear and wide-angle view of the doorstep and surrounding areas. This wider field of view enhances security and reduces blind spots.
-
Visibility:
Ensuring clear visibility for the Ring Doorbell camera is crucial. Obstructions such as trees, shrubs, or overhanging eaves can hinder the camera’s ability to capture clear images or videos. Optimal placement involves choosing a location with minimal obstructions, allowing the camera to have an unobstructed view of the area.
-
Accessibility:
Consideration should be given to the accessibility of the Ring Doorbell for maintenance or troubleshooting purposes. Placing the doorbell at an appropriate height and location ensures easy access for battery replacement, cleaning, or any necessary adjustments.
Optimal placement of the Ring Doorbell, taking into account ideal height and visibility, enhances the overall effectiveness of the device. It optimizes motion detection accuracy, maximizes the field of view, ensures clear visibility, and maintains accessibility. By considering these factors during the wiring process, homeowners can ensure the Ring Doorbell operates at its full potential, providing enhanced security and peace of mind.
Wi-Fi Connectivity
In the context of “Wiring A Ring Doorbell,” Wi-Fi connectivity serves as a critical component, directly influencing the functionality and effectiveness of the device. A strong and stable internet connection is essential for the Ring Doorbell to perform its intended tasks, emphasizing the close relationship between the two.
The Ring Doorbell relies on Wi-Fi connectivity to transmit data, including live video footage, motion alerts, and two-way communication. Without a stable internet connection, the doorbell may experience interruptions or delays in these functions, compromising its ability to provide real-time security and monitoring. For instance, if the Wi-Fi signal is weak or unstable, the doorbell may fail to send notifications or stream live video reliably, hindering its effectiveness as a security device.
Ensuring a strong and stable Wi-Fi connection during the wiring process is crucial to optimize the Ring Doorbell’s performance. This involves considering factors such as the distance from the router, the presence of obstacles or interference, and the overall bandwidth available. By addressing these factors and ensuring a reliable Wi-Fi connection, homeowners can maximize the doorbell’s functionality and reap its full benefits.
In summary, “Wi-Fi Connectivity: Strong and stable internet connection” is inextricably linked to “Wiring A Ring Doorbell.” Without a stable internet connection, the Ring Doorbell’s ability to provide real-time security and monitoring is compromised. Understanding this connection empowers homeowners to prioritize a strong Wi-Fi signal during the wiring process, ensuring optimal performance and maximizing the benefits of their Ring Doorbell.
Mobile App Setup
In the context of “Wiring A Ring Doorbell,” the mobile app setup plays a critical role in completing the installation and unlocking the full functionality of the device. The Ring app serves as the central hub for configuring notifications, customizing settings, and accessing various features offered by the Ring Doorbell.
The mobile app setup is intricately connected to the wiring process as it allows homeowners to pair the Ring Doorbell with their home Wi-Fi network and establish a secure connection. Without proper configuration through the mobile app, the doorbell will not be able to transmit data, receive commands, or perform its intended functions. For instance, if the Wi-Fi credentials are not correctly entered during the app setup, the doorbell will fail to connect to the internet, rendering it unable to send notifications or stream live video.
Beyond the initial setup, the mobile app provides ongoing control and customization options for the Ring Doorbell. Through the app, users can adjust motion detection sensitivity, set up activity zones, and enable specific notifications based on their preferences. These settings are essential for tailoring the doorbell’s behavior to suit the unique needs of each homeowner. For example, by adjusting the motion detection sensitivity, users can minimize false alerts caused by minor movements, such as swaying trees or passing animals.
In summary, the mobile app setup is an indispensable component of “Wiring A Ring Doorbell” as it enables the configuration of critical settings, customization of notifications, and access to advanced features. Understanding this connection empowers homeowners to harness the full potential of their Ring Doorbell, ensuring optimal performance and personalized security monitoring.


Related Posts


