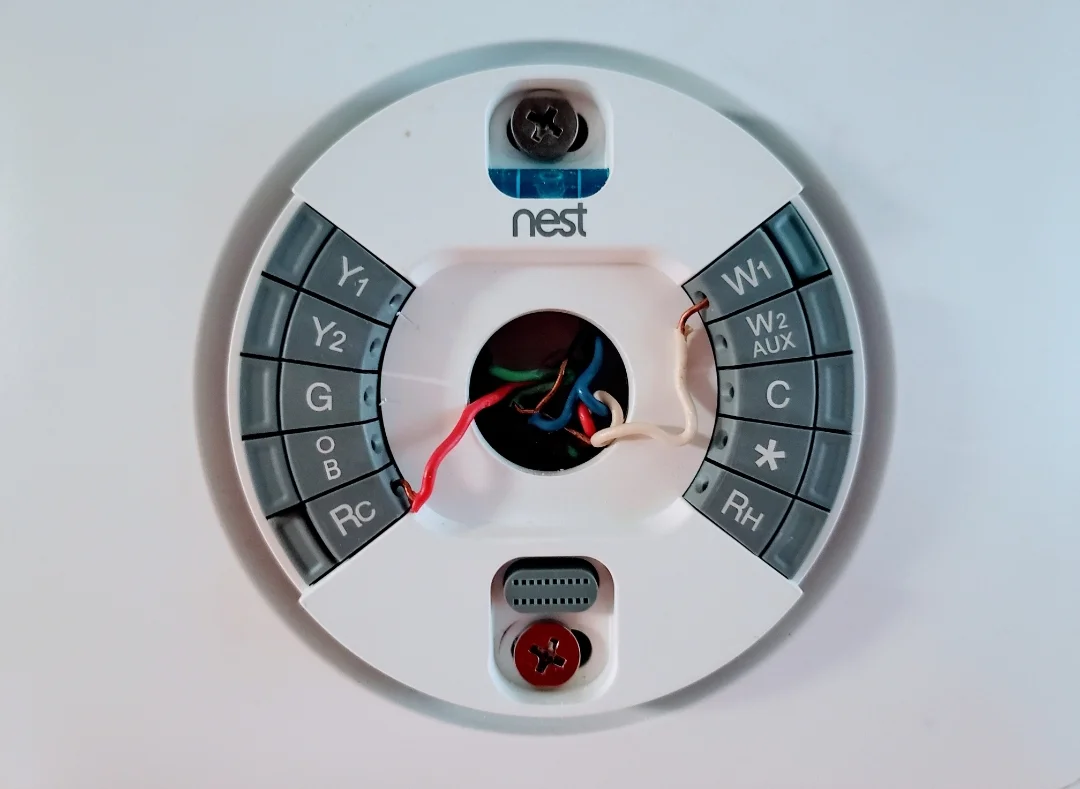
A Nest Thermostat Wiring Diagram is a detailed schematic representation of how a Nest thermostat is connected to an HVAC system. It shows which wires are connected to which terminals on the thermostat and the corresponding connections at the HVAC equipment. For instance, a typical Nest thermostat wiring diagram might indicate that the red wire should be connected to the “R” terminal on the thermostat and the corresponding red wire at the furnace.
Nest Thermostat Wiring Diagrams are essential for proper installation and troubleshooting of Nest thermostats. They provide a visual roadmap for ensuring that all wiring connections are correct, reducing the risk of electrical hazards or incorrect operation. Historically, these diagrams have evolved to include support for newer HVAC technologies, such as heat pumps and zoned systems.
This article will further delve into the nuances of Nest Thermostat Wiring Diagrams, exploring their components, variations, and best practices. By understanding the intricacies of these diagrams, homeowners and technicians can ensure the seamless installation and operation of their Nest thermostats, maximizing comfort and energy efficiency.
A Nest Thermostat Wiring Diagram is a detailed schematic that provides essential information for installing and troubleshooting Nest thermostats. Understanding the key aspects of these diagrams is crucial for ensuring proper connections, correct operation, and optimal performance of the thermostat.
- Components: Wires, terminals, labels
- Connections: Matching wires to correct terminals
- Compatibility: Ensuring compatibility with HVAC systems
- Troubleshooting: Identifying and resolving wiring issues
- Safety: Electrical safety guidelines
- Variations: Different diagrams for various models
- Best practices: Proper installation techniques
- Evolution: Historical context and advancements
These aspects are interconnected and play vital roles in the overall functionality and reliability of Nest Thermostat Wiring Diagrams. For example, accurate connections ensure proper communication between the thermostat and HVAC equipment, while safety guidelines minimize electrical hazards. Understanding these aspects enables homeowners and technicians to make informed decisions regarding thermostat installation and maintenance, ensuring comfort, energy efficiency, and the longevity of their HVAC systems.
Components
In the context of Nest Thermostat Wiring Diagrams, wires, terminals, and labels are essential components that establish the physical connections and provide visual cues for accurate wiring. Wires serve as the pathways for electrical signals, connecting the thermostat to the HVAC system. Terminals are the connection points on the thermostat and HVAC equipment where wires are secured. Labels identify each terminal, indicating its specific function (e.g., “R” for power, “Y” for cooling, etc.).
The precise arrangement and labeling of wires, terminals, and labels in Nest Thermostat Wiring Diagrams are critical for ensuring proper communication between the thermostat and HVAC system. Incorrect connections can lead to malfunctions, safety hazards, or reduced efficiency. For example, if the wire intended for the “R” terminal is mistakenly connected to the “Y” terminal, the thermostat may not be able to power up or control the cooling system properly.
Understanding the relationship between wires, terminals, and labels empowers homeowners and technicians to troubleshoot wiring issues and ensure the optimal performance of their Nest thermostats. By carefully following the wiring diagram and matching wires to the correct terminals, they can minimize the risk of electrical problems and ensure that the thermostat accurately controls the HVAC system. This understanding is particularly important in complex HVAC systems, such as those involving multiple zones or heat pumps, where proper wiring is essential for efficient and reliable operation.
In summary, wires, terminals, and labels are fundamental components of Nest Thermostat Wiring Diagrams, providing the physical connections and visual cues necessary for accurate wiring and optimal thermostat performance. Understanding their relationship empowers individuals to ensure proper installation, troubleshoot issues, and maximize the benefits of their Nest thermostats.
Connections
In the context of Nest Thermostat Wiring Diagrams, connections refer to the physical linking of wires to the appropriate terminals on the thermostat and HVAC equipment. Matching wires to the correct terminals is critical for establishing proper communication between the thermostat and the HVAC system, ensuring accurate temperature control, efficient operation, and safety.
Incorrect connections can lead to a range of issues, including:
- Thermostat malfunction or failure
- HVAC system not responding to thermostat commands
- Electrical hazards or shorts
- Reduced energy efficiency
Nest Thermostat Wiring Diagrams provide detailed instructions on which wires should be connected to which terminals. These diagrams are designed to be easy to follow, with clear labels and color-coded wires. By carefully matching wires to the correct terminals, homeowners and technicians can ensure that their Nest thermostats are installed correctly and operating optimally.
Real-life examples of the importance of matching wires to the correct terminals include:
- Connecting the red wire to the “R” terminal provides power to the thermostat.
- Connecting the green wire to the “G” terminal activates the fan.
- Connecting the yellow wire to the “Y” terminal turns on the cooling system.
Understanding the relationship between connections and Nest Thermostat Wiring Diagrams is essential for ensuring the proper installation, operation, and troubleshooting of Nest thermostats. By carefully following the wiring diagram and matching wires to the correct terminals, homeowners and technicians can maximize the benefits of their Nest thermostats, including energy savings, comfort, and peace of mind.
In summary, connections are a critical component of Nest Thermostat Wiring Diagrams, ensuring the accurate and safe operation of Nest thermostats. Matching wires to the correct terminals is essential for establishing proper communication between the thermostat and HVAC system, preventing malfunctions, and maximizing energy efficiency. Understanding this relationship empowers homeowners and technicians to confidently install, troubleshoot, and maintain their Nest thermostats, ensuring optimal performance and comfort.
Compatibility
In the context of Nest Thermostat Wiring Diagrams, compatibility refers to the ability of the Nest thermostat to work seamlessly with different types of HVAC systems. Ensuring compatibility is crucial for the proper installation, operation, and efficiency of the thermostat.
- System Type: Nest thermostats are compatible with various HVAC systems, including forced air, heat pumps, and radiant heating systems. The wiring diagram should indicate the specific system types that the thermostat is compatible with.
- Voltage: Nest thermostats operate on specific voltage ranges. The wiring diagram should specify the voltage requirements of the thermostat and ensure compatibility with the HVAC system’s voltage.
- Wiring Configuration: Different HVAC systems have different wiring configurations. The wiring diagram should provide detailed instructions on how to connect the Nest thermostat to the specific wiring configuration of the HVAC system.
- Smart Features: Nest thermostats offer smart features such as remote control, scheduling, and energy monitoring. The wiring diagram should indicate whether the HVAC system supports these smart features and how to wire them accordingly.
Ensuring compatibility between the Nest thermostat and the HVAC system is essential for optimal performance and user satisfaction. By carefully following the wiring diagram and verifying compatibility, homeowners and technicians can avoid potential issues such as incorrect operation, system damage, or reduced energy efficiency. Additionally, compatibility considerations extend beyond the initial installation, as future upgrades or changes to the HVAC system may require adjustments to the wiring configuration. Understanding the compatibility aspects of Nest Thermostat Wiring Diagrams empowers individuals to make informed decisions and ensure the long-term compatibility and efficiency of their HVAC systems.
Troubleshooting
Within the context of Nest Thermostat Wiring Diagrams, troubleshooting plays a critical role in identifying and resolving wiring issues that may arise during installation, maintenance, or operation. The wiring diagram serves as a comprehensive guide that empowers individuals to diagnose and address these issues, ensuring the proper functioning and efficiency of the thermostat.
The connection between troubleshooting and Nest Thermostat Wiring Diagrams is bidirectional. On one hand, the wiring diagram provides a visual representation of the system’s connections, allowing individuals to pinpoint potential trouble spots. On the other hand, troubleshooting techniques rely on the accuracy and clarity of the wiring diagram to guide the identification and resolution of wiring issues.
Real-life examples of troubleshooting using Nest Thermostat Wiring Diagrams include:
- Identifying a loose connection between the thermostat and the HVAC system by examining the wiring diagram and physically checking the connections.
- Resolving a communication error between the thermostat and the HVAC equipment by verifying the correct wiring configuration based on the diagram.
- Diagnosing a power issue by tracing the wiring connections from the power source to the thermostat using the diagram as a reference.
Understanding the connection between troubleshooting and Nest Thermostat Wiring Diagrams is essential for homeowners and technicians alike. It empowers them to proactively maintain their HVAC systems, identify and resolve issues promptly, and ensure the optimal performance of their Nest thermostats. By leveraging the wiring diagram as a troubleshooting tool, individuals can minimize downtime, prevent costly repairs, and enjoy a comfortable and energy-efficient home environment.
Safety
Nest Thermostat Wiring Diagrams are not merely technical blueprints but also incorporate crucial safety guidelines to prevent electrical hazards, fires, and personal injuries during installation and operation.
- Proper Wiring: Wiring mistakes can lead to short circuits, overheating, and even electrical fires. The diagram ensures proper wire connections to designated terminals, minimizing these risks.
- Grounding: Improper grounding can result in electrical shocks. The diagram specifies the grounding wire connection to protect users and prevent damage to the thermostat and HVAC system.
- Voltage Compatibility: Using a thermostat with incompatible voltage can cause malfunctions, fires, or damage to the HVAC system. The diagram indicates the voltage requirements to ensure safe operation.
- Circuit Protection: Overloading circuits can lead to overheating and fires. The diagram provides guidance on selecting the appropriate circuit breaker or fuse to protect the thermostat and HVAC system.
Adhering to these safety guidelines is paramount for a safe and reliable Nest thermostat installation. Ignoring them can compromise personal safety, property, and the optimal functioning of the HVAC system. By following the electrical safety guidelines outlined in the Nest Thermostat Wiring Diagram, homeowners and technicians can ensure the safe and efficient operation of their thermostats and HVAC systems.
Variations
Nest Thermostat Wiring Diagrams exhibit variations across different models to accommodate the unique electrical configurations and capabilities of each thermostat. These variations are not arbitrary but are meticulously designed to ensure compatibility, safety, and optimal performance.
The cause of these variations lies in the distinct features, functionalities, and hardware specifications of each Nest thermostat model. For instance, the Nest Learning Thermostat and Nest Thermostat E share a similar wiring configuration, but the Nest Thermostat E lacks the “C” wire terminal, which is essential for continuous power supply. Consequently, the wiring diagram for the Nest Thermostat E provides alternative wiring options to accommodate this difference.
Understanding the connection between variations in Nest Thermostat Wiring Diagrams and the specific models they pertain to is crucial for several reasons. First, it ensures that the correct wiring diagram is used during installation, preventing potential malfunctions or safety hazards. Second, it enables homeowners and technicians to identify the appropriate wiring configuration for their specific thermostat model, ensuring compatibility with their HVAC system.
In practice, these variations empower individuals to make informed decisions when installing or troubleshooting Nest thermostats. By referring to the correct wiring diagram for their specific model, they can confidently connect wires to the appropriate terminals, ensuring a safe and efficient installation. Moreover, the ability to navigate these variations allows technicians to provide tailored support and guidance to customers with different Nest thermostat models.
In summary, variations in Nest Thermostat Wiring Diagrams are a direct consequence of the varying features and specifications of different thermostat models. Understanding these variations is critical for proper installation, compatibility, and optimal performance. By leveraging this knowledge, homeowners and technicians can confidently navigate the nuances of Nest Thermostat Wiring Diagrams, ensuring a safe, efficient, and comfortable indoor environment.
Best practices
Within the context of Nest Thermostat Wiring Diagrams, best practices for proper installation techniques play a crucial role in ensuring the safe, efficient, and optimal performance of the thermostat. Adhering to these best practices minimizes the risk of electrical hazards, wiring errors, and system malfunctions.
- Planning and Preparation: Before initiating the installation process, carefully review the Nest Thermostat Wiring Diagram and consult the user manual to ensure compatibility with the HVAC system. Gather the necessary tools and materials, including a screwdriver, wire strippers, and a voltage tester.
- Wiring Connections: Follow the wiring diagram meticulously, matching wires to the correct terminals on the thermostat and HVAC equipment. Secure the wire connections using the appropriate screws or terminals and ensure they are tight and free of loose strands.
- Power and Grounding: Verify that the thermostat is properly grounded to prevent electrical shocks. Ensure that the power supply matches the voltage requirements specified in the wiring diagram and that the circuit breaker or fuse is appropriately sized.
- Testing and Troubleshooting: Once the installation is complete, test the thermostat by turning on the HVAC system and adjusting the temperature settings. Monitor the thermostat’s operation to ensure it is functioning correctly. If any issues arise, consult the wiring diagram to troubleshoot and resolve them.
By following these best practices, individuals can ensure that their Nest Thermostat is installed correctly, minimizing potential problems and maximizing its performance. These techniques empower homeowners and technicians to confidently handle the installation process, ensuring a safe, efficient, and comfortable indoor environment.
Evolution
Nest Thermostat Wiring Diagrams have undergone significant evolution, reflecting advancements in technology, industry standards, and consumer needs. This evolution has shaped the design, functionality, and user experience of these diagrams, making them more accessible, informative, and effective.
- Standardization: Early Nest Thermostat Wiring Diagrams varied in format and content, leading to confusion and installation errors. Standardization brought consistency, ensuring clear and uniform instructions across different models and HVAC systems.
- Simplified Language: Technical jargon has been replaced with clear and concise language, making diagrams more accessible to homeowners and technicians alike. This simplification reduces the risk of misinterpretation and incorrect wiring.
- Interactive Features: Modern Nest Thermostat Wiring Diagrams often incorporate interactive elements, such as clickable links to additional resources and troubleshooting guides. These features enhance the user experience and provide immediate assistance when needed.
- Compatibility Expansion: As Nest thermostats have evolved to support a wider range of HVAC systems, their wiring diagrams have expanded to include more detailed instructions for various configurations. This ensures compatibility with both legacy and cutting-edge HVAC technologies.
The evolution of Nest Thermostat Wiring Diagrams reflects the ongoing commitment to improving the installation, operation, and maintenance of Nest thermostats. By embracing advancements in technology and industry best practices, these diagrams continue to empower homeowners and technicians with the knowledge and guidance they need to ensure the optimal performance of their HVAC systems.


Related Posts


