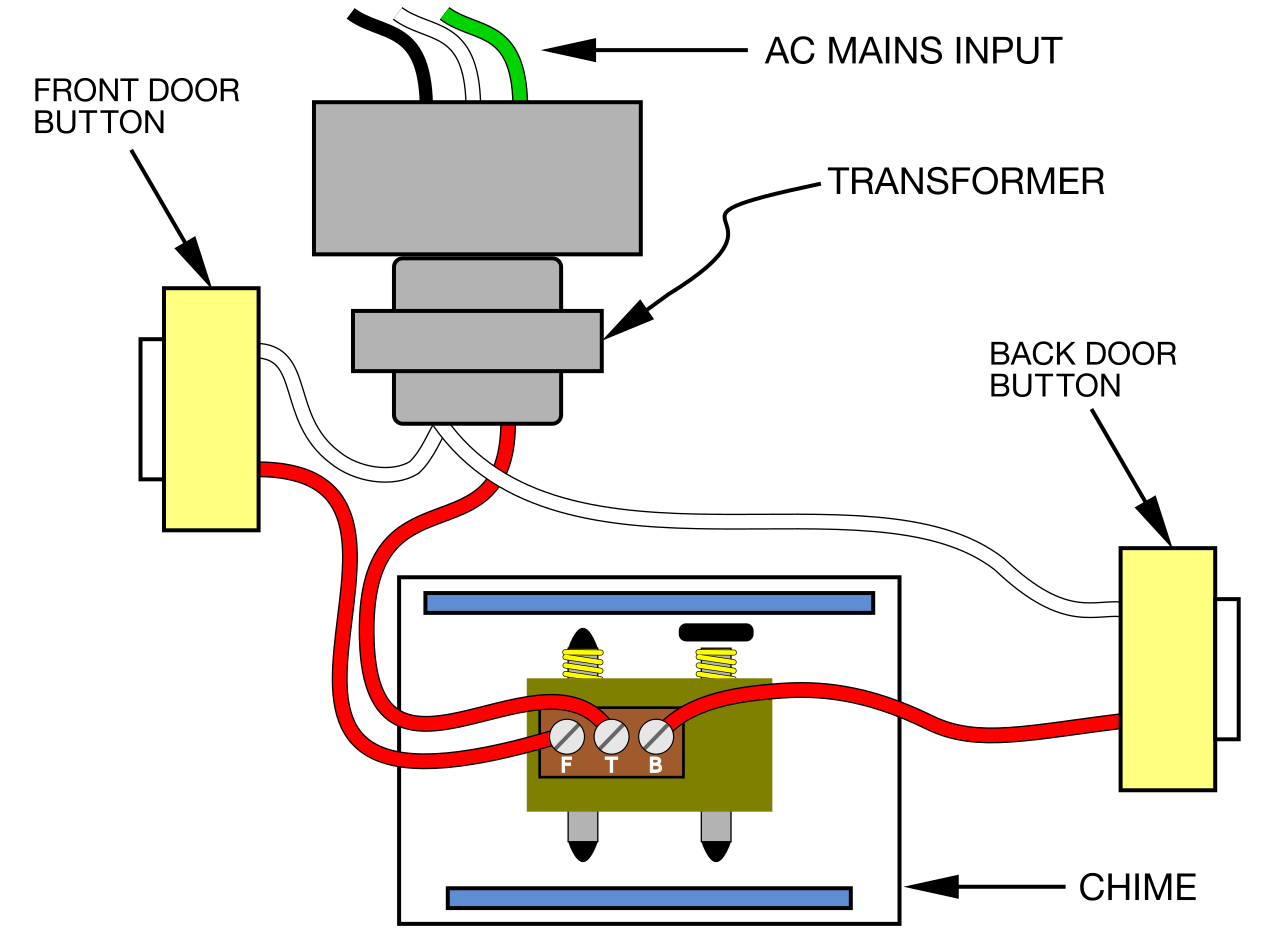
An “Old Doorbell Wiring Diagram” refers to a schematic diagram that illustrates the electrical connections for a doorbell system installed before modern wiring practices. An example is a diagram showing the wiring for a doorbell button, transformer, and chime installed in the early 20th century using cloth-covered wire.
Old Doorbell Wiring Diagrams are relevant today as they provide insights into the electrical systems of older buildings. Understanding these diagrams can aid in troubleshooting, repairs, and renovations. One key historical development is the introduction of low-voltage transformers in the 1930s, which improved safety and reliability.
This article will delve into the intricacies of Old Doorbell Wiring Diagrams, exploring their historical evolution, practical applications, and essential considerations for modern-day use.
Understanding the key aspects of Old Doorbell Wiring Diagrams is crucial for comprehending the electrical systems of older buildings and ensuring their safe and proper functioning.
- Components: Buttons, transformers, chimes, wires
- Connections: Parallel and series circuits
- Voltage: Typically 12-24 volts AC
- Wiring: Cloth-covered wire, modern Romex
- Safety: Electrical codes, proper grounding
- Troubleshooting: Common issues and solutions
- Renovations: Updating old wiring to meet modern standards
- Historical Significance: Evolution of doorbell technology
- Architectural Relevance: Compatibility with older buildings
- Hands-On Skills: Practical knowledge for electricians and homeowners
These aspects are interconnected and provide a comprehensive understanding of Old Doorbell Wiring Diagrams. They enable professionals and homeowners to maintain, repair, and upgrade these systems safely and effectively, preserving the historical integrity of older buildings while ensuring their electrical safety.
Components
In the context of Old Doorbell Wiring Diagrams, the componentsbuttons, transformers, chimes, and wiresplay a crucial role in understanding the system’s functionality and electrical connections. These components are interconnected and interdependent, forming a complete circuit that enables the doorbell to operate effectively.
The doorbell button initiates the circuit when pressed, sending a signal to the transformer. The transformer steps down the voltage from the main power supply to a safe level, typically 12-24 volts AC, which is suitable for the doorbell chime. The chime converts the electrical signal into audible sound, producing the familiar doorbell chime.
The wires serve as the pathways for electrical current to flow between these components. Proper wire selection and installation are essential to ensure a reliable and safe doorbell system. Understanding the connections and relationships between these components is vital for troubleshooting, repairs, and renovations involving old doorbell wiring.
In summary, the componentsbuttons, transformers, chimes, and wiresare indispensable elements of Old Doorbell Wiring Diagrams, forming a complete circuit that enables the doorbell to function. Comprehending their connections and interactions is key for maintaining, repairing, and upgrading these systems safely and effectively.
Connections
In the realm of Old Doorbell Wiring Diagrams, the proper arrangement of electrical connections is paramount for the system’s functionality and safety. Two fundamental types of connections are employed: parallel and series circuits.
A parallel circuit, as its name suggests, features multiple components connected side-by-side, allowing current to flow through each component independently. In the context of a doorbell system, this means that each doorbell button is connected in parallel with the others, allowing any button to activate the chime without affecting the others. This configuration ensures that pressing any button will produce the desired audible signal.
On the other hand, a series circuit involves components connected in a single loop, with current flowing through each component sequentially. Old Doorbell Wiring Diagrams may utilize series connections for the chime and transformer. In this arrangement, the current flows from the transformer, through the chime, and back to the transformer, completing the circuit. The chime’s placement in series with the transformer ensures that the correct voltage is applied to the chime, producing the appropriate sound.
Understanding the interplay between parallel and series circuits in Old Doorbell Wiring Diagrams is crucial for effective troubleshooting and repairs. By identifying the specific configuration, electricians and homeowners can pinpoint potential issues and implement appropriate solutions to restore the doorbell’s functionality. Furthermore, this understanding enables informed decision-making regarding system upgrades and renovations, ensuring compliance with modern electrical codes and safety standards.
Voltage
The voltage level of 12-24 volts AC is a defining characteristic of Old Doorbell Wiring Diagrams. This specific voltage range is crucial for the safe and effective operation of doorbell systems in older buildings.
The use of low voltage in doorbell wiring stems from safety considerations. Higher voltages, such as the 120 volts AC commonly used in household electrical outlets, pose a significant shock hazard. By utilizing a lower voltage, the risk of electrical accidents is greatly reduced, making it safer for individuals to install and maintain doorbell systems.
Additionally, the 12-24 volts AC range is well-suited for the components used in old doorbell systems. Doorbell buttons, chimes, and transformers are designed to operate efficiently within this voltage range, ensuring optimal performance and longevity.
Understanding the connection between voltage and Old Doorbell Wiring Diagrams is not only essential for safety but also for troubleshooting and repairs. By verifying that the voltage supplied to the doorbell system is within the specified range, electricians and homeowners can quickly identify potential issues and implement appropriate solutions. This understanding also guides the selection of replacement components, ensuring compatibility with the existing wiring and voltage.
Wiring
In the realm of “Old Doorbell Wiring Diagrams”, the wiring aspect holds significant importance, encompassing both traditional cloth-covered wire and contemporary Romex. Understanding the characteristics and implications of these wiring types is crucial for effective troubleshooting, repairs, and renovations of doorbell systems in older buildings.
-
Cloth-covered wire
Cloth-covered wire, commonly found in older buildings, is characterized by its distinctive fabric insulation wrapped around the conducting wires. This insulation provides electrical protection and adds a vintage aesthetic to the wiring. However, cloth-covered wire is more susceptible to damage and deterioration over time, requiring careful handling and inspection during maintenance or renovations.
-
Romex
Romex is a type of non-metallic sheathed cable commonly used in modern electrical wiring. It consists of insulated conductors enclosed within a protective plastic jacket. Romex is more durable and flame-resistant compared to cloth-covered wire, making it a safer and more reliable choice for doorbell wiring in both new and renovated buildings.
-
Compatibility
When dealing with “Old Doorbell Wiring Diagrams”, it is essential to consider the compatibility between cloth-covered wire and modern Romex. While these two types of wiring serve the same purpose, they have different physical characteristics and insulation properties. Mixing different wiring types within the same circuit can lead to safety hazards and unreliable performance. Therefore, it is advisable to maintain consistency in wiring materials throughout the doorbell system.
-
Safety considerations
The safety implications of wiring in “Old Doorbell Wiring Diagrams” cannot be overstated. Cloth-covered wire, due to its age and potential deterioration, may pose electrical hazards if not properly maintained or replaced. Loose connections, damaged insulation, and frayed wires can lead to short circuits, overheating, and even fires. Regular inspections and upgrades to modern wiring materials can mitigate these risks and ensure the continued safe operation of doorbell systems in older buildings.
In summary, understanding the different aspects of wiring, particularly cloth-covered wire and modern Romex, is essential for navigating “Old Doorbell Wiring Diagrams”. By considering the compatibility, safety implications, and durability of these wiring types, electricians, homeowners, and renovators can make informed decisions to maintain, repair, and upgrade doorbell systems in older buildings, ensuring their safe and reliable operation while preserving their historical charm.
Safety
Within the realm of “Old Doorbell Wiring Diagrams”, the paramount aspect of safety encompasses electrical codes and proper grounding. This facet plays a pivotal role in ensuring the reliable and hazard-free operation of doorbell systems in older buildings. Understanding and adhering to these guidelines is crucial for safeguarding both property and individuals from electrical mishaps.
-
Electrical codes
Electrical codes serve as a set of prescribed standards and regulations governing the installation, maintenance, and repair of electrical systems, including doorbell wiring. These codes are developed by expert organizations like the National Electrical Code (NEC) and aim to minimize the risks associated with electricity, such as electrical fires, shocks, and electrocution.
-
Proper grounding
Proper grounding provides a safe path for electrical current to flow in the event of a fault or surge. In the context of doorbell wiring, a grounding wire is connected to the metal components of the system, such as the doorbell button and chime, and routed back to the electrical panel. This grounding path ensures that any stray current is diverted away from individuals and sensitive electronic equipment.
-
Circuit protection
Circuit protection devices, such as fuses or circuit breakers, play a vital role in safeguarding doorbell wiring from overcurrent conditions. These devices are designed to interrupt the flow of electricity when the current exceeds a predetermined safe level, preventing damage to the wiring and connected components.
-
Regular inspections and maintenance
Regular inspections and maintenance are essential for ensuring the continued safety and reliability of doorbell wiring. Periodic visual inspections can help identify any signs of damage, corrosion, or loose connections. Additionally, testing the system with a multimeter can verify proper voltage levels and grounding.
By adhering to electrical codes, implementing proper grounding, incorporating circuit protection, and conducting regular inspections and maintenance, individuals can significantly reduce the risks associated with “Old Doorbell Wiring Diagrams” and ensure the safe operation of doorbell systems in older buildings.
Troubleshooting
Within the realm of “Old Doorbell Wiring Diagrams”, troubleshooting plays a critical role in maintaining the functionality and safety of doorbell systems in older buildings. Understanding common issues and their corresponding solutions is paramount for electricians, homeowners, and renovators alike.
One prevalent issue encountered in old doorbell wiring is the failure of the doorbell to ring when the button is pressed. This can be attributed to various causes, such as loose connections, faulty wiring, or a malfunctioning chime. By analyzing the “Old Doorbell Wiring Diagram” and systematically checking each component, electricians can pinpoint the source of the problem and implement the appropriate solution, such as tightening loose screws, replacing damaged wires, or repairing the chime.
Another common issue is a doorbell that rings continuously, even when the button is not pressed. This persistent ringing often indicates a short circuit within the wiring. By carefully examining the “Old Doorbell Wiring Diagram” and tracing the circuit, electricians can identify the location of the short and take corrective measures, such as replacing damaged wires or insulating exposed connections.
Understanding the connection between “Troubleshooting: Common issues and solutions” and “Old Doorbell Wiring Diagram” is essential for effective maintenance and repairs. By interpreting the diagram and applying knowledge of common issues, electricians and homeowners can diagnose and resolve problems efficiently, ensuring the continued functionality of doorbell systems in older buildings.
Renovations
In the context of “Old Doorbell Wiring Diagrams”, renovations play a vital role in ensuring the safety and functionality of doorbell systems in older buildings. Updating old wiring to meet modern standards involves various aspects, including component upgrades, safety enhancements, and code compliance.
-
Component upgrades
Replacing old doorbell buttons, chimes, and transformers with modern counterparts enhances the system’s performance and reliability. Modern components are designed with improved materials and construction techniques, providing longer lifespans and better resistance to wear and tear.
-
Safety enhancements
Incorporating safety features such as ground fault circuit interrupters (GFCIs) and arc fault circuit interrupters (AFCIs) into the doorbell wiring the overall safety of the electrical system. These devices protect against electrical shocks and fires, reducing the risk of accidents.
-
Code compliance
Bringing the doorbell wiring up to code ensures compliance with current electrical standards and regulations. This involves adhering to guidelines for wire size, insulation, and circuit protection, ensuring the system meets the minimum safety requirements.
-
Aesthetic improvements
Modernizing the doorbell wiring can also involve aesthetic upgrades, such as replacing old, faded wires with new, color-coordinated ones. This enhances the visual appeal of the doorbell system and complements the overall design of the building.
By understanding the implications of “Renovations: Updating old wiring to meet modern standards” in relation to “Old Doorbell Wiring Diagram”, electricians, homeowners, and renovators can make informed decisions about upgrading doorbell systems in older buildings. These renovations not only improve the functionality and safety of the system but also ensure compliance with current electrical codes and enhance the overall aesthetics of the building.
Historical Significance
Within the context of “Old Doorbell Wiring Diagrams”, the historical significance of doorbell technology cannot be overlooked. Understanding the evolution of doorbells provides valuable insights into the advancements that have shaped this seemingly simple yet essential home feature.
-
Mechanical Doorbells
The earliest doorbells were mechanical devices, operated by pulling a cord or lever. These doorbells produced a bell-like sound and were commonly found in the 19th century. Their simple design and limited functionality paved the way for more advanced electrical doorbells.
-
Electric Doorbells
The advent of electricity in the late 19th century revolutionized doorbell technology. Electric doorbells utilized an electromagnetic coil to activate a striker, producing a louder and more reliable sound. These doorbells were widely adopted and became the standard for homes and businesses.
-
Wireless Doorbells
In the mid-20th century, wireless doorbells emerged, eliminating the need for physical wires between the doorbell button and chime. These doorbells relied on radio frequency signals to transmit the signal, offering greater flexibility and ease of installation.
-
Smart Doorbells
The latest evolution in doorbell technology is the smart doorbell. Smart doorbells integrate video cameras, motion sensors, and Wi-Fi connectivity, allowing homeowners to remotely monitor theirand communicate with visitors. These advanced features enhance security and convenience, making smart doorbells increasingly popular in modern homes.
The historical significance of doorbell technology lies not only in the technological advancements but also in its reflection of societal changes. Doorbells have evolved from purely functional devices to sophisticated home security and communication systems, mirroring the increasing emphasis on home security and the growing adoption of smart home technology. Understanding the evolution of doorbells through “Old Doorbell Wiring Diagrams” provides a glimpse into the technological, social, and architectural history of our built environment.
Architectural Relevance
Within the context of “Old Doorbell Wiring Diagrams”, architectural relevance plays a crucial role in preserving the historical integrity and aesthetic charm of older buildings. Compatibility with the existing architectural style and materials is paramount for maintaining the building’s character and overall appeal.
Old doorbell wiring diagrams provide valuable insights into the electrical systems of older buildings, helping to ensure that any renovations or upgrades are carried out in a manner that respects the building’s architectural heritage. For example, in a Victorian-era home, the use of cloth-covered wire and vintage-style doorbell buttons can maintain the building’s historical ambiance while still meeting modern safety standards. Conversely, installing a modern wireless doorbell system in a historic building may detract from its architectural character.
Understanding the architectural relevance of old doorbell wiring diagrams enables architects, renovators, and homeowners to make informed decisions about doorbell system upgrades. By considering the building’s architectural style, materials, and historical significance, they can select doorbell components and wiring methods that complement the existing structure and preserve its unique character.
In summary, the connection between “Architectural Relevance: Compatibility with older buildings” and “Old Doorbell Wiring Diagrams” highlights the importance of preserving the historical integrity and aesthetic appeal of older buildings. By understanding this connection, professionals and homeowners can ensure that doorbell system upgrades are carried out in a manner that respects the building’s architectural heritage while meeting modern safety and functional requirements.
Hands-On Skills
Within the realm of “Old Doorbell Wiring Diagrams”, the aspect of “Hands-On Skills: Practical knowledge for electricians and homeowners” holds immense significance. Understanding and applying these skills are not only crucial for the successful installation, repair, and maintenance of doorbell systems in older buildings, but also for preserving the historical integrity and functionality of these structures.
-
Electrical Safety
Thorough knowledge of electrical safety principles is paramount when working with any electrical system, including doorbell wiring. Electricians and homeowners must be well-versed in electrical codes, proper grounding techniques, and the safe handling of electrical components.
-
Wire Identification and Connections
The ability to identify different types of wires and make proper connections is essential for effective doorbell wiring. Understanding wire gauges, insulation types, and the correct methods for splicing and terminating wires ensures reliable and safe operation.
-
Component Selection and Compatibility
Choosing the right components for a doorbell system requires an understanding of their compatibility and functionality. Electricians and homeowners must be able to select appropriate doorbell buttons, chimes, transformers, and other components based on voltage requirements, wiring configurations, and the specific needs of the building.
-
Troubleshooting and Repair
The ability to troubleshoot and repair doorbell systems is crucial for maintaining their functionality. Troubleshooting skills involve identifying potential problems using multimeters and other testing equipment, while repair skills encompass the safe and effective replacement or repair of faulty components.
Harnessing these hands-on skills allows electricians and homeowners to approach “Old Doorbell Wiring Diagrams” with confidence, ensuring the safe, reliable, and historically appropriate installation, maintenance, and repair of doorbell systems in older buildings. By combining theoretical knowledge with practical experience, these individuals can preserve the charm and functionality of these architectural treasures while adapting them to modern safety standards and technological advancements.


Related Posts


